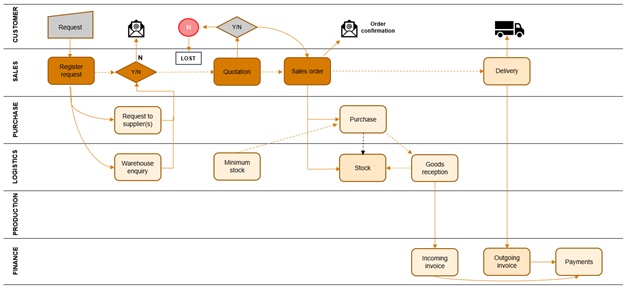
Sales can be defined as the process where a company sells one or several articles, where articles are defined as goods or services.
A one-time sale of a product.
A periodical contract sale of a product.
A sale requires that the goods to be sold are either in stock, can be purchased as needed, or produced as needed. This means that a sale process is a large logistical interaction that requires thorough planning.
Maintain the customers and monitor the communication
The buyers must be defined and handled as customers, with contact persons, terms & agreements and shipping addresses.
Receive and process customer requests
The requests from customers must be processed and followed up by giving quotes.
Complete orders
Customers will continuously place orders, which must be processed and completed.
Follow up orders
Follow up and protect sales backlog, receive and handle change requests, monitor and send customer backlog data.
Pricing of the goods
All goods must have a price, or prices, which needs to be defined and entered.
Reporting
The analysis phase needs information in the form of reports and statistics to successfully follow up customers and agreements.
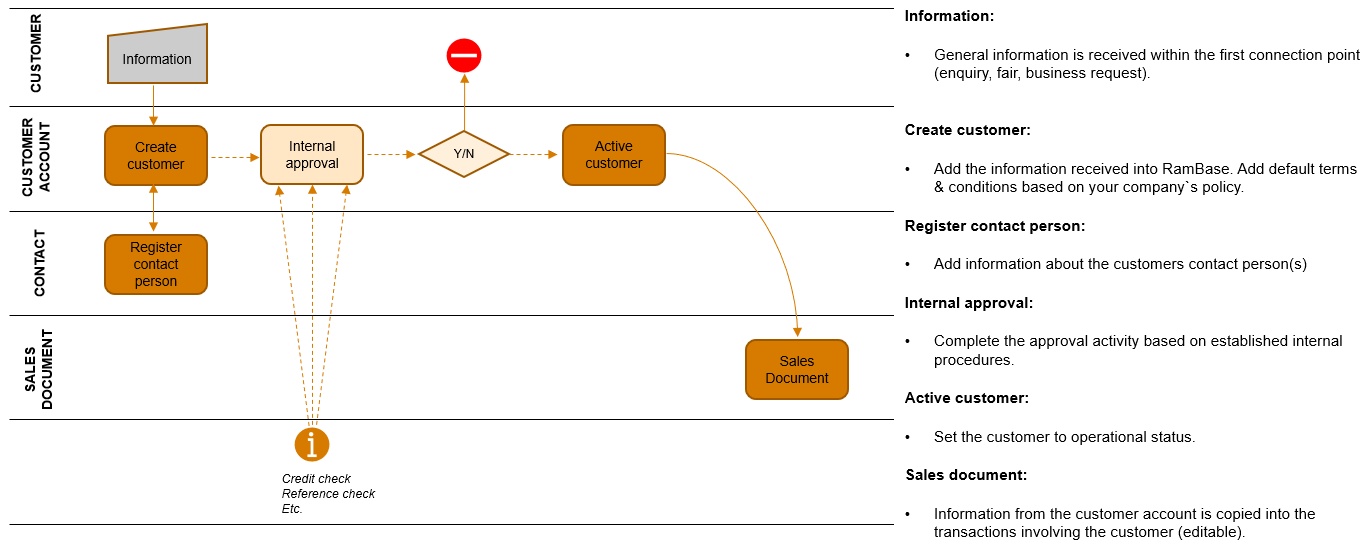
A customer can be a private person or a company. All customers have different terms and preferences, all of which must be maintained and updated.
A new customer is registered.
The customer’s terms are maintained.
The customer’s contact information is maintained.
Customer relations are closed.
All you need to register on a new customer is name, address, payment and delivery terms, and contact information.
If there is a business relationship with larger customers, you will normally have relations with several contact persons. Some may be purchasers, while others work with invoicing or project management. These people need to be defined with their contact- and work information, in addition to which situations they will be contacted.
Tasks involved in this process
Register a new customer
A request or an order is received, and the requester must be registered as a customer.
Maintain and update the customers
Either expand or reduce the terms for the customer, update information and similar.
Document handling
Setting rules for customers regarding where the different documents will end up.
Communication with the customer
Sending out reports and other correspondence.
The Customer (CUS) application is designed to create new customers efficiently, as well as viewing details on existing customers and the option of editing these details.
Note
In RamBase, a Customer (CUS) can be defined as a private person, or a company. This is decided when creating the customer by selecting either Business or Private in the Create customer popup.
Navigate to the application
Option 1: RamBase menu → Sales → Customer management → Customers
Option 2: Click the Program field and type "CUS" and press ENTER.
Click here to read more about the user interface.
The application is divided into three (3) main areas; the list of customers on the left, the header on the right with base customer and financial information, and the tabs area where detailed information is categorized.
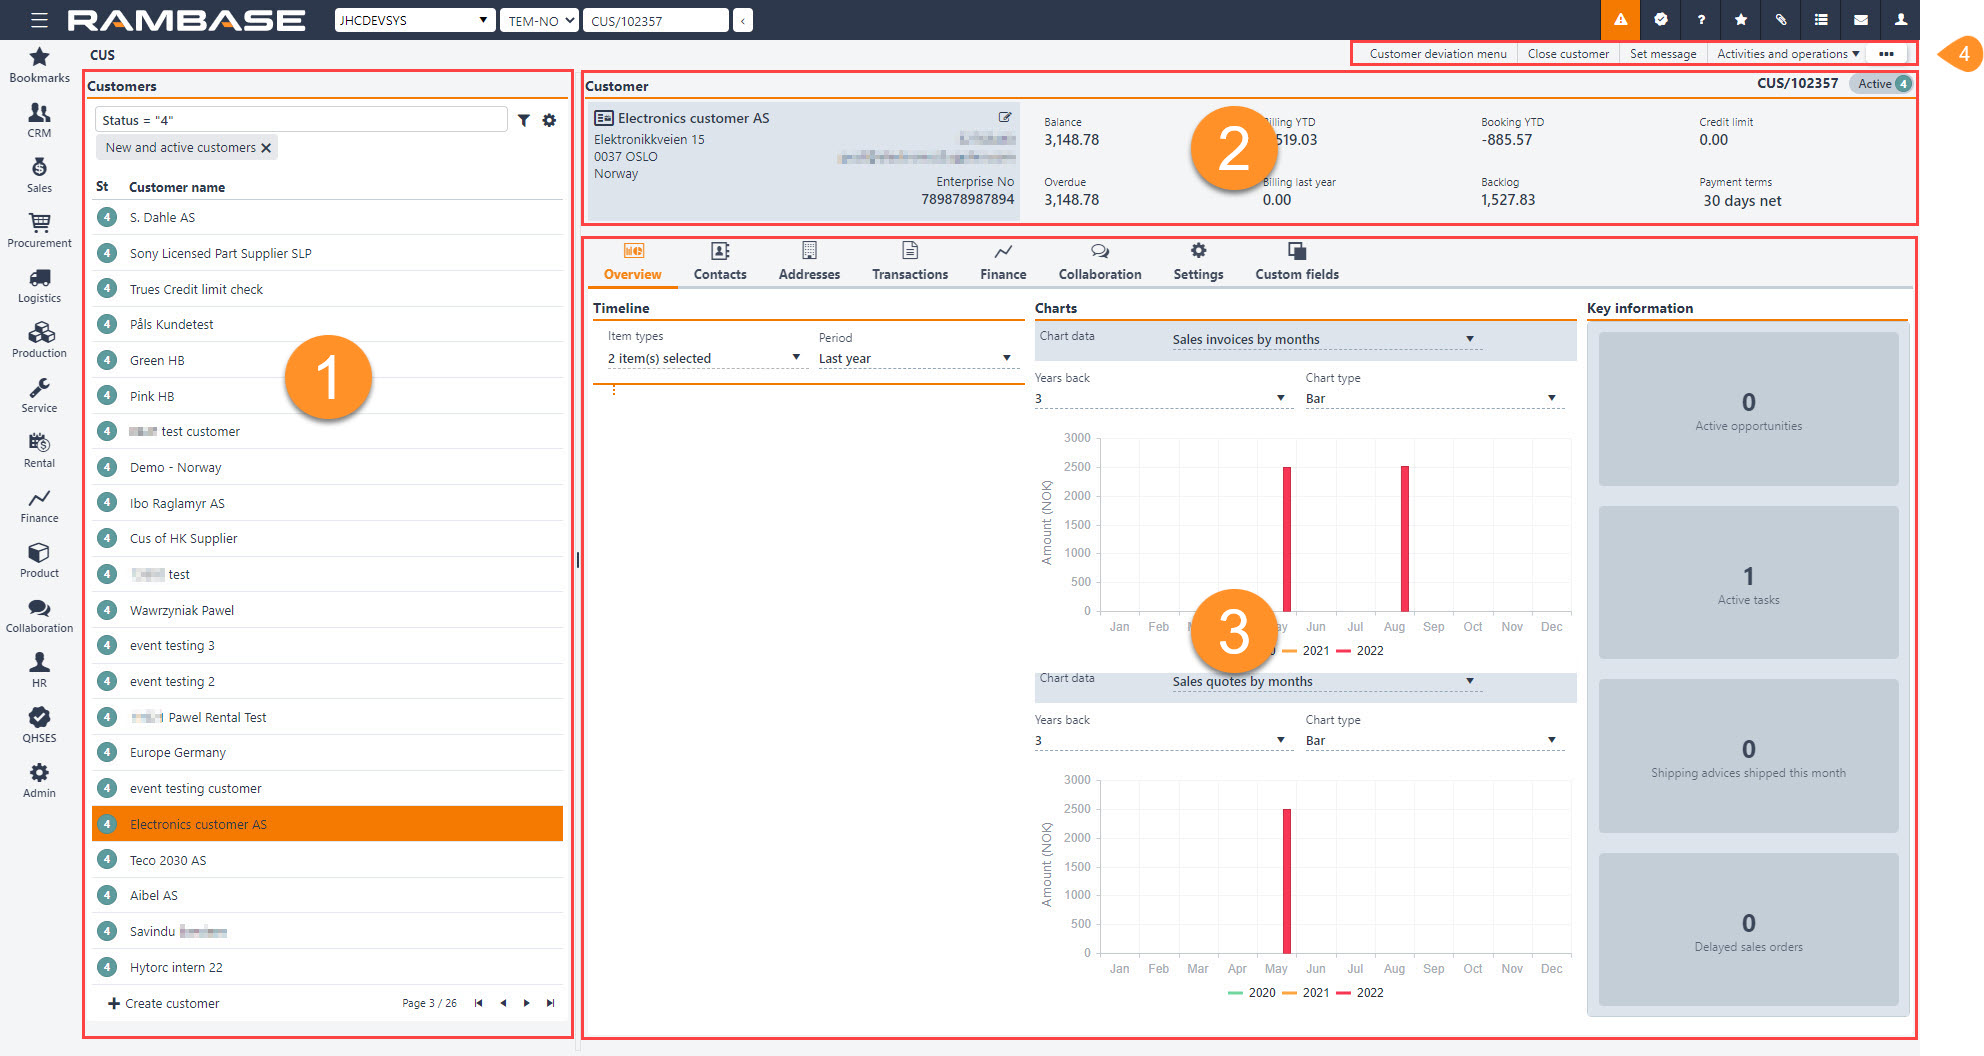
The list of Customers (CUS) can be filtered and customized. This is also the area where the creation of new customers is performed. The information in the list is detailed in the table below, describing each column and icon.
Search field, filter builder and column settings
The header contains multiple options to filter the list:
Standard filters:
Active customers - Filters on customers in Status 4 - Active.
Active and closed customers - Filters on customers in Status 4 - Active and Status 9 - Inactive.
Business customers - Filters on customers set as Business during creation.
Closed customers - Filters on customers in Status 9 - Inactive.
Invoiced this year - Filters on customers who have been invoiced in the current year. For details, click the Billing YTD in the Header area on the top-right.
My customers - Filters on customers where the current user is set as the Account manager.
New and active customers - Filters on customer in Status 1 - New and Status 4 - Active.
Pending activation - Filters on customers in Status 1- New.
Private customers - Filters on customers set as Private during creation.
With overdue payments - Filters on customer with Sales invoices (CIN) in Status 4 - Pending payment past the Due date.
Column | Icons | Description |
|---|---|---|
St |
| Displays an icon indicating the status of Customers (CUS). Potential statuses for Customers (CUS):
|
Id | Displays identifier of the Customer (CUS). Example: "CUS/123456" | |
Customer name |
| Displays the primary system name of the customer. The Information icon will be displayed if there is set a message on the Customer (CUS). Messages can be set via the Context menu option, Set message. |
First name | Secondary name of a company or first name of a person. | |
Last name | Name of customer (name of company or surname/family name/last name of a person). | |
Country | Displays the English name of the customer's country. | |
Classification | Classification of the customer. | |
Billing YTD | Total amount of invoices and credit notes that has been invoiced this year (to current date). |


| Create customer button |
To open the Customer (CUS) application, find Sales in the RamBase menu and then Customer management. Click Customers to enter the Customer (CUS) application.
Click the Create customer button in the lower left hand corner of the Customer (CUS) application
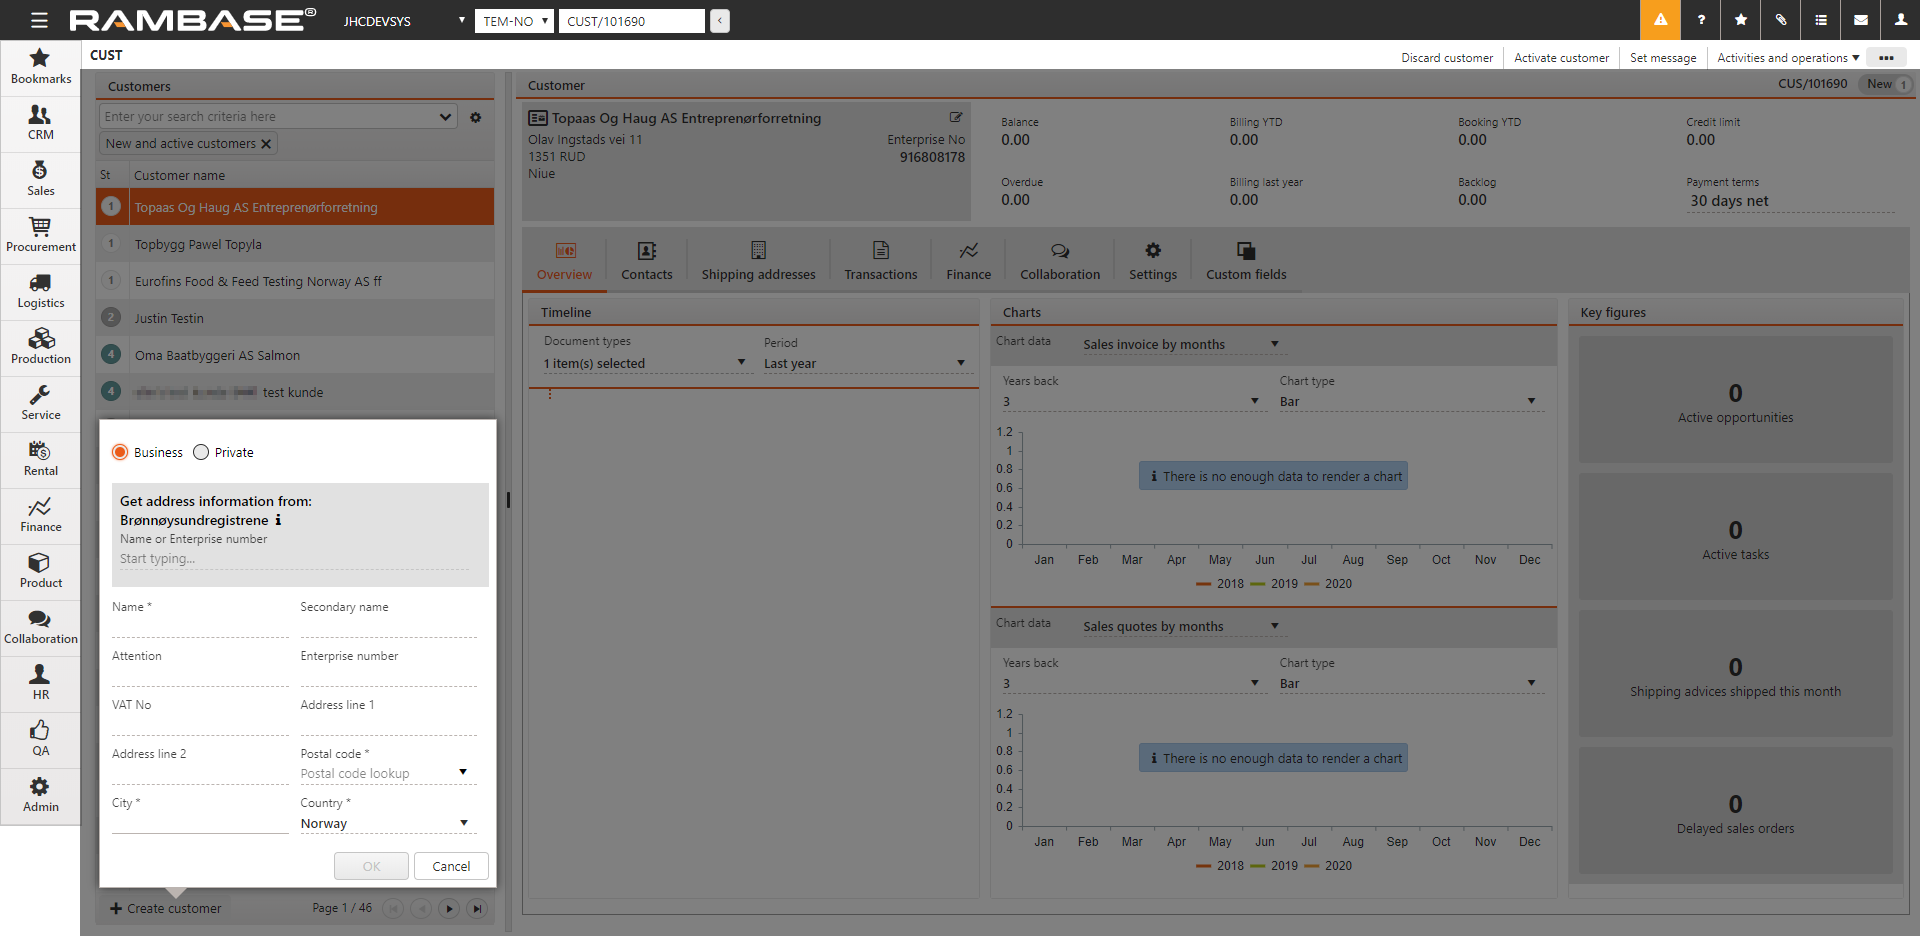
A new window appears where you can add customer main data. This can also be collected via the Brønnøysund integration. Search company name or enterprise number.
As soon as all mandatory data (fields marked with *) have been entered, click the OK button to create the Customer (CUS) in Status 1 - New.
In the Settings tab, enter relevant settings. Settings can be updated at all time. These settings will be used as default values and will be copied to documents, such as Sales Orders (COA).
You can add several Shipping and Invoice addresses in the Addresses tab. The Set as default column to the far right controls which of these addresses will be used as the default address for this user during document creation.
Note
It is possible to deactivate a shipping or invoice address if there are no active transaction documents, linked. And the addresses can be deleted if they have never been used.
In the Contacts tab, add data about employees that work for the Customer (CUS). Click the Select contact button to add a contact to the Customer (CUS). Click the Create contact button to create a new Contact (CNT) and add it to the customer.
To activate the customer, click the Activate customer option in the context menu. This action will activate the customer and set the Customer (CU) in Status 4 - Active.
Examples of potential banners in the Header


Financial information:
Balance - Displays the current Customer balance (CUSBAL) in the selected currency. To open the Customer balance (CUSBAL), click the field.
Billing YTD - Displays the Customer billing by YTD in the selected currency. To open the Customer Billing by Period/YTD report (NGREP/100120), click the field.
Booking YTD - Displays the Customer bookings withing the current fiscal year. To open the Customer Booking - By Customer report (NGREP/100324), click the field.
Credit limit - Displays the current credit limt. To edit the credit limit, click and type in the field.
Overdue -Displays the due amounts for the customer. To open the Customer DueAmounts (CUSDUE) application, click the field.
Billing last year - DIsplays the Customer billing for the previous year. To open the Customer Booking and Billing - By Year report (NGREP/100621), click the field.
Backlog - Displays the backlog amount in system currency, for the customer. To open the Customer Backlog (COA) - By Confirmed Date report (NGREP/100299), click the field.
Payment terms - Displays the current payment terms. To change payment terms, click the drop-down menu and select a new one.
Tip
The information on each tab is collapsed due to size.
Click the arrows to expand the information per tab.
The Overview tab includes various tools to compile and highlight information about the Customer (CUS).
The Timeline area allows the user to define a timeline by selecting Item types and Period.
Item types drop-down menu options:
CIN - Sales invoices
COA - Sales orders
CPO - Sales order requests
CQU - Sales quotes
CRQ - Sales quote requests
CSA - Shipping advices
NOTE - Notes
TASK - Tasks
OPPD - Opportunities
EMAIL - Email
Period drop-down menu options:
Last year
1 year ago
2 years ago
3 years ago
The Charts area can display up to two charts. Most chart data can be displayed historically by current year or years back, in addition to selecting a specific chart type; Bar, Bar stacked, Fluctuating line and Accumulated line.
Chart data drop-down menu options:
Sales invoices by periods
Sales quotes by months
Sales quote requests by months
Shipping advices by months
Billing 5 years
The Key information displays exactly that, key information in the form of:
Active opportunities - Click to open the Opportunities (OPPD) application.
Active tasks - Click to open the Task (TASK) application.
Shipping advices shipped this month - Click to open the Shipping advices (CSA) application.
Delayed sales orders - Click to open the Sales orders (COA) application.
In the Contacts tab, add data about employees that work for the Customer (CUS). Click the Select contact button to add a contact to the Customer (CUS). Click the Create contact button to create a new Contact (CNT) and add it to the customer.
Standard filters:
Active contacts - Filters the list on Contacts (CNT) in Status 4 - Active
Inactive contacts - Filters the list on Contacts (CNT) in Status 9 - Inactive
Search field, filter builder and column settings
The header contains multiple options to filter the list:
Column | Icon | Description |
|---|---|---|
St |
| Displays the status of Contact (CNT). Potential statuses:
|
First name | First name/Given name of the Contact (CNT). | |
Last name | Last name/Surname/Family name of the Contact (CNT). | |
Category | Displays the categorization of the Customer (CUS). Can be set up in the Domain values (DOV) application by selecting the Department field on contacts line in the Description column. | |
Job title |
| Professional title. To edit, click the Edit icon. |
Default phone |
| The default phone number of the Contact (CNT). To edit, click the Edit icon. |
Default email |
| The default email of the Contact (CNT). To edit, click the Edit icon. |
Set as default |
| If enabled, the Contact (CNT) is the default contact at the Customer (CUS). |
| To remove the Contact (CUS) from the Customer (CUS), click the Remove icon. | |
| To open the Contacts (CNT) application, to edit or inspect details, click the Right arrow icon. |


Creating a Contact (CNT), in the context of the Customer (CUS) application, will add the Contact (CNT) as a point of contact with the Customer (CUS). Contact (CNT) details can be viewed and edited in the Contact (CNT) application, which is easily available by clicking the Right arrow icon in the Contacts tab.
| Create contact button |
To create a new Contact (CNT) in Status 4 - Active, click the Create contact button.
In the following popup, fill in the contact's information:
Last name - Required
First name
Job title
Email
Phone
To set the potential contact as the default point of contact for the Customer (CUS), enable the Set as default checkbox.
To create another contact, without closing the popup, enable the Create another checkbox.
To finish creating the new Contact (CNT) and adding it to the Customer (CUS), click the Create button.
The Select contact button is used to select any previously created Contact (CNT) and add it as a point of contact with the Customer (CUS).
| Select contact button |

To add a any previously created Contact (CNT) to the Customer (CUS), click the Select contact button.
In the following popup, click the Contact drop-down menu and select a potential contact from the list.
Tip
Filter the selection by clicking the Filter icon.

Filter icon
Standard filters for Contacts (CNT):
Active contacts
Inactive contacts
Customer's contacts
Personnel contacts
Supplier's contacts
To set the selected contact as the default point of contact with the Customer (CUS), enable the Set as default checkbox.
To finish selecting a Contact (CNT) and adding it to the Customer (CUS), click the Create button.
The Sales order items (COAITEM) are listed to allow quick navigation to detailed information, as well as quick links to the Stock assignments (SAR) and Sales order item (COAITEM) applications.
Search field, filter builder and column settings
The header contains multiple options to filter the list:
Standard filters
Active items
Items with approval notification
Items confirmed this week
Confirmed later than requested
Delayed items
Items with information notifications
My items
My open items
Open items
Items with possible delivery problems
Column | Icon | Description |
|---|---|---|
St |
| Status of the Sales order item (COAITEM). Potential statuses are:
|
Id | Displays the Sales order item (COAITEM) identifier. | |
Created at | Date and time of creation in system settings format. | |
Remaining | Remaining number of units to be forwarded. | |
Product |
| Displays the Product (ART) name of the Sales order item (COAITEM). |
Manufacturer | Displays the shortname/code of the manufacturer. | |
Requested | Displays the Requested delivery date as requested by the customer, and set on the Sales order item (COAITEM). | |
Conf. date | Displays the confirmed date of delivery. Date of which the customer can expect the arriving goods. | |
Customers ref. no | Displays the customer's item reference number. Typically to the customer's internal system. | |
Customers product name | Displays the customer's product name which is defined in the Product (ART) application → Relations tab → Customers products sub-tab. | |
Gross margin (%) | Displays the gross margin of the Sales order item (COAITEM), based on the selected GmModel - as set up in the Company settings (COM). | |
Net price | Displays the final price per unit after deducting all discounts. | |
Net amount | Displays the net amount in company currency. | |
Assignments |
| To view Stock assignments (SARC) for the Product (ART), click the SAR icon. |
| To open the Sales order (COA) application in the context of the Sales order item (COAITEM), click the Right arrow icon. |


All Sales invoice items (CINITEM) and Sales credit note items (CCNITEM) for the Customer (CUS) are listed here, with quick navigation to relevant applications for further inspection and handling.
Search field, filter builder and column settings
The header contains multiple options to filter the list:
Define a specific period to further filter the list by adding YYYYmm values to the From and To fields in the tab header.

From and To fields
Standard filters
Sales credit note items
Sales invoice items
Column | Icon | Description |
|---|---|---|
St |
| Displays an icon indicating the status of the listed Sales order item (CINITEM) or Sales credit note item (CCNITEM). Potential statuses for Sales invoice items (CINITEM):
Potential statuses for Sales credit note items (CCNITEM):
|
Doc type | Displays the document type of the billing item. Potential document types:
| |
Type | Displays the details of the document type: Potential billing item types:
| |
Id | Displays the identifier of the billing item. The identifier can be applied to the document type for quick access via the Program field. Example "CINITEM/123456-1" | |
Quantity | Quantity of billing item | |
Product |
| Displays the name of the Product (ART) on the billing item. To open the Product (ART) application, to view and edit details, click the View icon. |
Manufacturer | Displays the shortname/code of the manufacturer. | |
Created at | Displays the date and time of creation in a format set up in the system settings. | |
Period | Displays the accounting period. | |
Customers ref. no | Displays the customers reference number. E.g. the internal sales order identifier the customer use in their own system. | |
Gross margin (%) | Displays the profit percentage of the sales amount. | |
Net price | Displays the sales transaction items net price in sales currency. | |
Net amount | Displays the total net amount in company currency. | |
Registration date | Displays the date of registration in the format defined in the system settings. | |
| To open the billing item in the relevant application, to inspect and edit details, click the Right arrow icon. Non exhaustive list of examples:
|

All Sales quote request items (CRQITEM) for the Customer (CUS) are listed here, with quick navigation to relevant applications for further inspection and handling.
Search field, filter builder and column settings
The header contains multiple options to filter the list:
Standard filters
Items with information notifications
My items
Pending purchase quote
Pending registration
Pending sales quote
Pending purchase quote request
Column | Icon | Description |
|---|---|---|
St |
| Displays the status of the Sales quote request item (CRQITEM). Potential statuses are:
|
Id | Displays the Sales quote request item (CRQITEM) identifier. | |
Quantity | Displays the number of units for the Sales quote request item (CRQ) | |
Remaining | Displays the remaining number of units to be forwarded. | |
Product | Displays the name of the Product (ART) of the Sales quote request item (CRQITEM). | |
Manufacturer | Displays the shortname/code of the manufacturer. | |
Created at | Displays the date and time of creation in a format set up in the system settings. | |
Customers ref. no | Displays the customers reference number. E.g. the internal sales order identifier the customer use in their own system. | |
Requested | Displays the Requested delivery date as requested by the customer, and set on the Sales quote request item (CRQITEM). | |
Valid to | Displays the due date of the customer's response. | |
Gross margin (%) | Displays the gross margin of the Sales quote request item (CRQITEM), based on the selected GmModel - as set up in the Company settings (COM). Read more about gross margin and the different calculation models. | |
Target price | Displays the net price as requested by the customer. | |
Net amount | Displays the total item amount. Calculated by multiplying target price with quantity. | |
| To open the Sales quote request item (CRQITEM) application, to view and edit details, click the Right arrow icon. |
All Sales quote items (CQU) for the Customer (CUS) are listed here, with quick navigation to relevant applications for further inspection and handling.
Search field, filter builder and column settings
The header contains multiple options to filter the list:
Standard filters
Active items
Agreements
Items close to expiration date
Items with information notifications
My items
Sales quote items without agreements
Column | Icon | Description |
|---|---|---|
St |
| Displays the status of the Sales quote item (CQUITEM). Potential statuses:
|
Id | Displays the Sales quote item (CQUITEM) identifier. | |
Quantity | Displays the number of sales quote items included in the quote. | |
Remaining | Displays the remaining number of units to be forwarded. | |
Product | Displays the Product (ART) name of the Sales quote item (CQUITEM). | |
Manufacturer | Displays the shortname/code of the manufacturer. | |
Created at | Date and time of creation in system settings format. | |
Customers ref. no | Displays the customer's item reference number. Typically to the customer's internal system. | |
Valid to | Displays the due date of the customer's response. | |
Gross margin (%) | Displays the gross margin of the Sales quote item (CQUITEM), based on the selected GmModel - as set up in the Company settings (COM). Read more about gross margin and the different calculation models. | |
Net price | Displays the final price per unit after deducting all discounts. | |
Net amount | Displays the net amount in company currency. | |
| To open the Sales quote item (CQUITEM) application, to view and edit details, click the Right arrow icon. |
All Shipping advice items (CSAITEM) for the Customer (CUS) are listed here, with quick navigation to relevant applications for further inspection and handling.
Standard filters:
Items with approval notifications
Items with information notifications
My Items
Columns | Icon | Description |
|---|---|---|
St |
| Displays the status of the Shipping advice item (CSA). Potential statuses:
|
Id | Displays the identifier of the Shipping advice item (CSAITEM). | |
Quantity | Displays the quantity of the Shipping advice item (CSAITEM). | |
Product |
| Displays the Product (ART) name of the Shipping advice item (CSA). |
Manufacturer | Displays the shortname/code of the manufacturer. | |
Created at | Date and time of creation in system settings format. | |
Customers ref. no | Displays the customer's item reference number. Typically to the customer's internal system. | |
Gross margin (%) | Displays the gross margin of the Shipping advice item (CSA), based on the selected GmModel - as set up in the Company settings (COM). | |
Net price | Displays the final price per unit after deducting all discounts. | |
Net amount | Displays the net amount in company currency. | |
| To open the Shipping advice item (CSAITEM) application, click the Right arrow icon. |
Note
Uses functionality from the rental 2013 release.
Quick links:
| View icon |
Recurring sales quotes - To open the Recurring sales quote menu (CQP) application, click the View icon.
Sales quotes - To open the Rental sales quotes (CQR) application, click the View icon.
Rental orders - To open the Rental orders menu (CRO) application, click the View icon.
Recurring invoice plans - To open Customer plan management (CPM) application, click the View icon.
Columns | Icon | Description |
|---|---|---|
| Displays the status of the Rental contract items (RCTITEM) in the list. Available statuses:
To select single or multiple contract items, click the Status icon(s). To select all, click the Checkbox in the Column header. Context menu optionsThe available options change depending on the selection of contract items. | |
Rental contract id |
| Displays the contract item identifier. To open the Rental contract (RCT) application in the context of the Rental contract item (RCTITEM), click the View icon. |
Line no. | Displays the line- or sequence number of the item. Items can be rearranged in the list by drag and drop, resulting in a new order line- and sequence number. | |
Version | Displays the rental contract item version. Note the Version log tab where new versions of the rental contract can be created. The version number represents in which version the item was added. | |
Revision | Displays the rental contract item revision. A new revision of the Rental contract item (RCTITEM) will be created when terms are updated. Examples are Effective date, Expiration date, Discount. | |
Internal note | ||
Stage |
| Displays the current stage of the Rental contract item (RCTITEM). To view all details in the Rental contract item (RCTITEM) application, click the Right arrow icon or click to highlight the item and press ENTER. |
Quote no. | Displays the rental contract quote identifier. | |
Quote name | Displays the name set when creating the Rental contract (RCT) quote. | |
Product |
| Displays the name and description of the Rental contract item (RCTITEM). To view and edit details on the Product (ART), click the View icon. |
Customers ref. no | Displays the Customers reference no. for the Rental contract item (RCTITEM). E.g. the internal sales order identifier the customer use in their own system. To edit, click the Right arrow icon to open the Rental contract item (RCTITEM) application and locate the Customers reference no field in header. | |
Type | Displays the product type of the Rental contract item (RCTITEM). Expected values can be Subscription or Rental. | |
Quantity | Displays the contract item quantity of the product. | |
Effective date | Start date of the Rental contract item (RCTITEM). Displayed in yyyy.MM.dd format. | |
Expiration date | End date of the Rental contract item (RCTITEM). Displayed in yyyy.MM.dd format. | |
Current rate step | Displays currency / piece or batch / interval. Details the current rate step in: Price/Piece or batch/Duration. Example: 700.00 USD/pcs/month. The example used will have an estimated monthly revenue of 700 USD per piece. | |
Discount | Displays the current discount in percent. | |
Number of rates |
| Details the number of Recurring rates (RRT) utilized by the Rental contract item (RCTITEM). To open the Rental contract item (RCTITEM) application and inspect and edit the details in the Rental rates sub-tab, click the View icon. |
Avg. rate per day | Displays the average rate per day. | |
Total amount | Displays the total amount excl. VAT of the Rental contract (RCT). | |
Discount amount | Displays the total discount amount excl. VAT. | |
Total net amount | Displays the total amount excl. VAT, after discount. | |
| To open the Rental contract item (RCTITEM) application, click the Right arrow icon. |


You can add several Shipping and Invoice addresses in the Addresses tab. The Set as default column to the far right controls which of these addresses will be used as the default address for this user during document creation.
Note
It is possible to deactivate a shipping or invoice address if there are no active transaction documents, linked. And the addresses can be deleted if they have never been used.
Use the Active on/off button to activate and deactivate addresses. Deactivated addresses can be reactivated.
Note that the Active on/off button can be used to activate and deactivate addresses. Deactivated addresses can be reactivated.
The Invoice sub-tab allows for creating and storing addresses for billing items, in example Sales invoice (CIN).
Search field, filter builder and column settings
The header contains multiple options to filter the list:
Standard filters:
Active addresses - Filters the list on addresses in Status 4 - Active
Column | Icon | Description |
|---|---|---|
St | Displays the status of the address. Potential statuses:
| |
Id | Displays the internal address identifier for the Customer (CUS). The creation sequence is common for both Invoice and Shipping addresses. | |
Name | Name of receiver (Name of company or last of a person). The default suggestion when creating the address is the customer's name. NoteThe default invoice address, set with the Set as default button, must have the same Name as the Customer (CUS). | |
First name | First-name, if the receiver is a person. NoteThe default invoice address, set with the Set as default button, must have the same Firstname as the Customer (CUS). | |
Attention | Displays the attention which will be set on potential invoices or shipments. The Attention field and column is used to a direct the invoice or shipment to particular individual or department | |
Address | Displays the address line, city and country of the recipient. | |
Displays the email address to be set on the shipment or invoice. | ||
Phone | Displays the phone number to be set on the shipment or invoice. | |
Set as default |
| If the Set as default button is enabled, the default address will be pre-selected for all Sales invoices (CIN). |
Active on/off | Added addresses can be activated and deactivated by using the Active on/off button. Activated addresses will be set in Status 4 - Active. Deactivated addresses will be set in Status 9 - Deactivated. NoteIf address is used on transaction documents it cannot be deactivated. | |
| To edit the address, click the Edit icon to open the Edit address popup. |

To create an address in Status 4 - Active, click the Create address button.
| Create address button |
To open the Customer (CUS) application, find Sales in the RamBase menu and then Customer management. Click Customers to enter the Customer (CUS) application.
Click the Create address button in the lower left corner of the Shipping sub-tab, found in the Addresses tab.
In the popup, add the customer shipping address data.
When all the mandatory data (fields marked with an asterisk *) have been provided, click the Create button to create the shipping address.
Search field, filter builder and column settings
The header contains multiple options to filter the list:
Standard filters:
Active addresses - Filters the list on addresses in Status 4 - Active
Column | Icon | Description |
|---|---|---|
St | Displays the status of the address. Potential statuses:
| |
Id | Displays the internal address identifier for the Customer (CUS). The creation sequence is common for both Invoice and Shipping addresses. | |
Name | Name of receiver (Name of company or last of a person). The default suggestion when creating the address is the customer's name. NoteThe default shipping address, set with the Set as default button, must have the same Name as the Customer (CUS). | |
First name | First-name, if the receiver is a person. NoteThe default shipping address, set with the Set as default button, must have the same Firstname as the Customer (CUS). | |
Attention | Displays the attention which will be set on potential invoices or shipments. The Attention field and column is used to a direct the invoice or shipment to particular individual or department | |
Address | Displays the address line, city and country of the recipient. | |
Displays the email address to be set on the shipment or invoice. | ||
Phone | Displays the phone number to be set on the shipment or invoice. | |
Set as default |
| If the Set as default button is enabled, the default address will be pre-selected for all shipments. |
Active on/off | Added addresses can be activated and deactivated by using the Active on/off button. Activated addresses will be set in Status 4 - Active. Deactivated addresses will be set in Status 9 - Deactivated. NoteIf address is used on transaction documents it cannot be deactivated. | |
| To edit the address, click the Edit icon to open the Edit address popup. |
To create an address in Status 4 - Active, click the Create address button.
| Create address button |
To open the Customer (CUS) application, find Sales in the RamBase menu and then Customer management. Click Customers to enter the Customer (CUS) application.
Click the Create address button in the lower left corner of the Shipping sub-tab, found in the Addresses tab.
In the popup, add the customer shipping address data.
When all the mandatory data (fields marked with an asterisk *) have been provided, click the Create button to create the shipping address.
The Finance tab includes key information along with helpful links to relevant applications.
The Transactions area includes the following links, which will forward the user to the relevant popup or application by clicking the View icon:
| View icon |
All transactions - To open the All transactions popup, where Sales invoices (CIN), Sales credit notes (CCN), and Payments (PAY) are listed, click the View icon.
Reminders - To open the Reminder menu (RMR) application, click the View icon.
Due amounts - To open the Due amounts popup, and inspect the customer's due amount, specified in dates and currencies, click the View icon.
Interests - To open the Interest menu (INT) application, to inspect current interests, click the View icon.
To open the Pay statistics popup, click the View icon.
Due 0-30 - Displays the amount due in Sales invoices (CIN) for the next 30 days.
Total due - Displays the total amount due.
Due 30-60 - Displays the amount due in the next 30-60 days span.
Not due - Displays the amount due with a future due date.
Due > 60 - Displays the amount due in Sales invoices (CIN) with due dates further out than 60 days.
Balance - Displays the total amount of receivables that the customer has not yet settled.
The Notes sub-tab is a useful tool which is used to create and follow up notes related to the Customer (CUS). The sub-tab supports the creation of multiple notes, and these can be searched and filtered efficiently.
This is in addition to the persistent Note functionality located in all RamBase applications.
Navigate to Notes (NOTE) application
When a note has been created, selecting it and clicking the View icon in the top right corner of the note, will open the Notes (NOTE) application where all notes can be viewed and handled.
Notable functionality in the Notes sub-tab
Search field - The search field can be used to search on a specific note subject. By clicking the field and pressing SPACEBAR all available parameters are listed.
Filter builder - To filter the notes on the standard filters listed below or to create a custom filter, click the Filter builder icon.
Standard filters
Last edited by me
My notes
My private notes
Notes I created
Add new button - To add a new note, click the Add new button. Provide a Title and optionally, a Description.
Title field - Required, add a title to the note.
Description - Optional, add a description.
The Tasks sub-tab is a useful tool which is used to add and follow up tasks related to the Customer (CUS). The sub-tab supports the creation of multiple tasks, and these can be searched and filtered efficiently. This is in addition to the persistent Tasks functionality located in all RamBase applications.
Navigate to Tasks (TASK) application
When a task has been created, selecting it and clicking the View icon in the top right corner of the task, will open the Task (TASK) application where all tasks can be viewed and handled.
Search field - To quickly search on the contents of a title, click the Search field and type, then press ENTER. To list all available search variables, click the Search field and press SPACEBAR.
Filter builder - To filter the tasks on the standard filters listed below, or to create a custom filter, click the Filter builder icon.
Standard filters
Standard filters
Active tasks
Archived tasks
Tasks assigned to me
Tasks created by me
Finished tasks
Tasks in progress
My active tasks
My tasks
My unfinished tasks
My private tasks
Tasks in my company
Unfinished tasks
Add new icon - To add a task, click the Add new button.
Button
Icon
Description
Add new task

Add a new task in the Customer (CUS) application
In the Customer (CUS) application select the Collaboration tab and then the Tasks sub-tab.
To add a new tasks, click the Add new button.
In the expanded box, categorize the task by clicking one of the buttons; New task, Phone-call, Meeting or Email.
Add a title by clicking the Title field and type.
Assign the task by clicking the Assigned to drop-down menu and selecting the assignee.
When the task is done, click the Mark as done checkbox.
To finish creating the task, click the Save button.
Assigned tasks in the Tasks (Task) application
Once a task is assigned, the person assigned the task can handle the task in the Tasks (Task) application.
Fields and buttons | Icon | Description |
|---|---|---|
New task |
| To categorize the task as standard, click the New task button. |
Phone-call |
| To categorize the task as a phone-call, click the Phone-call icon. |
Meeting |
| To categorize the task as a meeting, click the Meeting icon. |
| To categorize the task as an email, click the Email icon. | |
Title field | To add a title, click the Title field and type. | |
Description field | The Description field is optional, and is used to further describe the task. | |
Assigned to drop-down |
| To view details on the person assigned to the task, click the View icon to open the Personnel (PER) application. |
Create by field |
| To view details on the person who created the task, click the View icon to open the Personnel (PER) application. |
Mark as done checkbox | To mark the task as done, enable the Mark as done checkbox. | |
Save button |
| To create the task, or save edits, click the Save button. |
Cancel button |
| To cancel the creation of the task, or potential edits, click the Cancel button. |
Delete button |
| To delete a task, click the Delete button. |


The Opportunities tab is used to view business opportunities and follow them through the different stages, from lead to deal. These stages are created in the Opportunity Stages (OPPD) application.
Column | Icon | Description |
|---|---|---|
Stage | Displays the name of the stage. Potential stages are:
| |
Title | Displays the title of the Opportunity (OPPD). | |
Value | The unweighted value of the Opportunity (OPP). | |
Assigned to | The Employee identifier of person assigned to the Opportunity (OPP). | |
Probability (%) | The probability of winning this opportunity in percentage. | |
Expected closing date | The date when the deal is expected to be closed. | |
| To open the Opportunities (OPPD) application in list view, click the Right arrow icon. |
The Settings tab is used to maintain critical customer settings which are categorized in sub-tabs, which are detailed in the tables below.
Field/Drop-down menu | Icon | Required | Description |
|---|---|---|---|
Name | Name of customer (name of company or surname/familyname/lastname of a person). | ||
Secondary name | Secondary name of a company or firstname of a person. | ||
Enterprise number | Yes | The customers unique enterprise/organization number. | |
VAT number | Unique number assigned by the relevant tax authority to identify a party for use in relation to value added tax (VAT). | ||
EORI number | An EORI (Economic Operator Registration and Identification number) number is required of any party intending to import into the EU or export from the EU. | ||
Created by |
| The employee (might be RamBase-server) that created the customer. To open the Personnel (PER) application, to view and edit details, click the View icon. | |
Created date | Date and time of creation. | ||
Account manager |
| Reference to the employee who is responsible for the management of sales, and relationship with the customer. To open the Personnel (PER) application, to view and edit details, click the View icon. | |
Sales assistant |
| Reference to the employee who is sales assistant for the customer. To open the Personnel (PER) application, to view and edit details, click the View icon. | |
Website | Customers website/homepage/webpage. |
Field/Drop-down menu | Description |
|---|---|
Preferred language | Preferred language for the Customer (CUS). Is used in prints etc. |
Customer classification | Classification of the Customer (CUS) |
Sales district | A geographic district for which an individual sales person or sales team holds responsibility. |
Sector | The sector the customer belongs to. |
Market segment | Market segment of the Customer (CUS). |
Checkbox | Description |
|---|---|
Block sales order | True if Sales orders (COA) for this Customer (CUS) should be blocked/denied/rejected registration. A notification of type "Stop" will also be added to Sales orders (COA) for this Customer (CUS). |
Block sales quote | True if Sales quotes (CQU) for this Customer (CUS) should be blocked/denied/rejected registration. A notification of type "Stop" will also be added to Sales quotes (CQU) for this Customer (CUS). |
Block shipping | True if Shipping advices (CSA) for this Customer should be blocked/denied/rejected registration. A notification of type "Stop" will also be added to Shipping advices (CSA) for this Customer (CUS). |
Read more about the possibilities in the RamBase output.
Column | Icons | Description |
|---|---|---|
Document to send | Name of the output object. Available objects are listed in the Add document to send button - section, below. | |
Send by | Details the send by type. Expected options are EMAIL or PRINT. | |
Send to | Details of the recipient. An example can be the recipients email if the send by type is EMAIL. | |
Output design | Displays the name of the output design. | |
Mandatory | If yes, the output object must always be sent. | |
Number of prints | Number of copies to output. | |
| To edit, click the Edit icon. | |
| To remove the output for the object type, for the customer, click the Remove icon. |

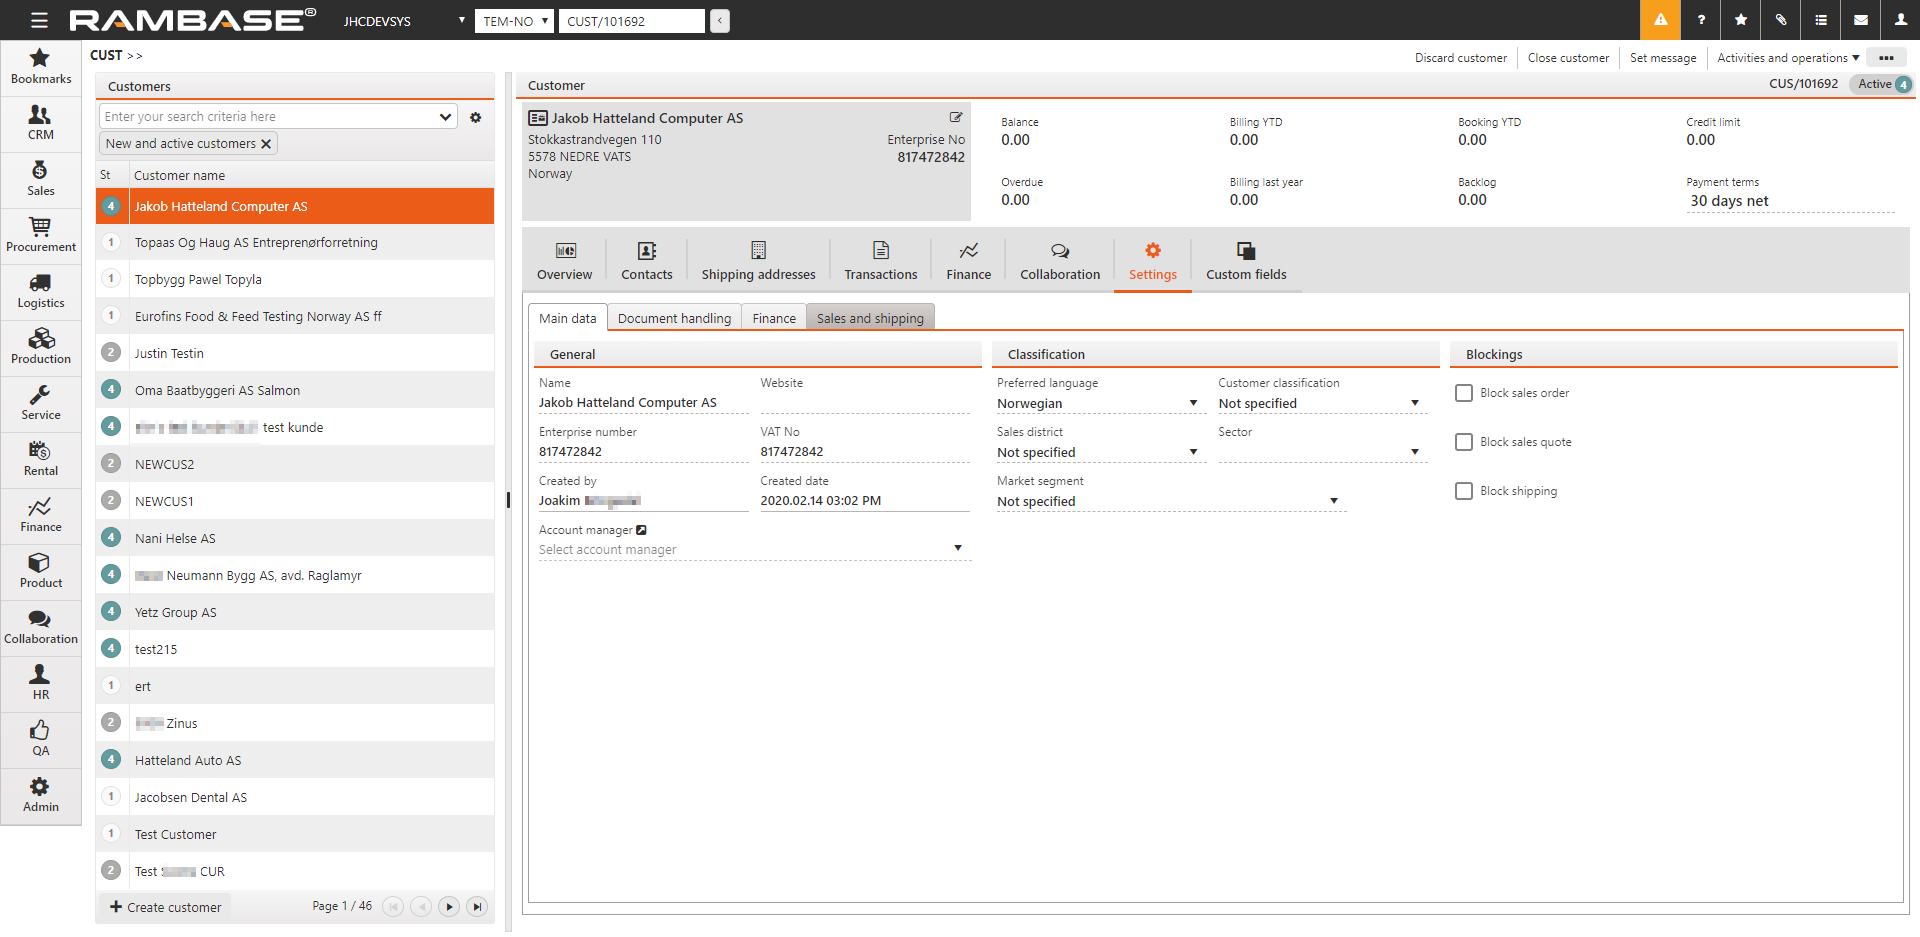
The Add document to send button is used to send a document on certain, user-defined, events.
| Add document to send button |

To add a document on a certain event, click the Add document to send button.
In the following popup, select how to send the document; Email, Print or File transfer protocol (FTP/SFTP).
Note
FTP applies to sending EHF invoices (EDI).
There is an integration with the ELMA registry that checks if the Enterprise number is registered in ELMA.
An error message will appear if the Enterprise number is missing from the Customer (CUS) or is not registered in ELMA.
In the Documents to send drop-down menu select which documents to send. Multi-select is supported.
The following options are available:
Certificate of Conformity from CSA upon registration (CoC)
Changed order confirmation by night (COA)
Corrective invoice upon registration
Deviation: goods received (CDV)
Deviation: ready for account action (CDV)
Deviation: registered (CDV)
Entry certificate upon registration (CSA)
Order overview (RCT)
Proforma invoice rental upon registration (CIN)
Proforma invoice service upon registration (CIN)
Proforma invoice upon registration (CIN)
Proforma invoice upon registration (COA)
QIS - Corrective action report
QIS - NCR concession request
QIS - NCR deviation request
QIS - Technical clarification
Recurring invoice plan triggered from a COA upon registration (COP)
Recurring sales quote triggered from a CQU upon registration (CQP)
Recurring sales quote upon registration (CQP)
Reminder (RMR)
Sales credit note rental upon registration (CCN)
Sales credit note subscription upon registration (CCN)
Sales credit note upon registration (CCN)
Sales invoice as CSV file upon registration (CIN)
Sales invoice rental upon registration (CIN)
Sales invoice service compact upon registration (CIN)
Sales invoice subscription upon registration (CIN)
Sales invoice upon registration (CIN)
Sales invoice upon registration with factoring bank text (CIN)
Sales invoice with serial numbers copy (CIN)
Sales invoice with serial numbers upon registration (CIN)
Sales order upon registration (COA)
Sales quote upon registration (CQU)
Serial number list upon registration (SNO)
Service order upon registration (CSO)
Shipment information (SPN)
Shipping advice rental upon registration (CSA)
Shipping advice upon registration (CSA)
Subscription quote (RCT)
Decide if the document is mandatory to send, by clicking the Mandatory to always send checkbox.
Note
If enabled, the recipient can not be deleted on a specific document.
Lastly, decide who to send the document to by choosing between; Recipient from a source document, Contact email address or New contact email address.
Note
The available Send to options are dependent selected Documents to send.
If New contact email address is selected, and the required details are provided; Last name and Email, a new Contact (CNT) will be created in Status 4 - Active.
If Contact email address is selected, choose the contact from the Contact email dropdown menu.
Finalize by clicking the Create button.
Tip on editing
If you want to change the output for any of the documents, choose the item line you want to change and click the Edit icon. This will open a popup similar to the one where you defined the rule, but this popup is specific for one document and contains a field where you choose the output for this specific document.
Before trading with a new Customer (CUS), some financial settings are required. These settings are critical to the accountancy. Other settings are recommended to add more details about each Customer (CUS). The financial settings can be found in the Settings tab → Finance sub-tab, in the Customer (CUS) application.
Tip
If an element is not described as Required in the following tables, only apply changes to settings which are to overrule the setup in the Company settings (CSV).
Field/Drop-down menu/Checkbox | Required | Recommended | Description |
|---|---|---|---|
Currencies | Yes | Select which Currencies (CUR) are to be used for the Customer (CUS). Multi-select is supported. NoteIf you have agreed to invoice your Customer (CUS) in local currency, this is the one you must choose. | |
Intercompany code | Use this field to identify internal customers/suppliers. | ||
VAT registration number | Yes | Unique number assigned by the relevant tax authority to identify a party for use in relation to Value added tax (VAT). | |
VAT handling | Specifies how value added tax (VAT) should be calculated. Either always include VAT, always exclude VAT or use standard/default VAT rules. NoteThe Company settings (CSV) and the Sales order(s) (COA) usually settle the VAT handling. Only use this field if you want to overrule the system's VAT calculation. Select the Set Always include VAT option if the Customer (CUS) always has to pay VAT on Sales orders (COA) and Sales invoices (CIN). Set Never include VAT if the Customer (CUS) never has to pay VAT on Sales orders (COA) and Sales invoices (CIN). Set Use default VAT if the Customer (CUS) should use the Company settings (CSV). | ||
Send to factoring checkbox | Identify which customer, invoices and credit notes, will be send to factoring | ||
Is related business entity checkbox | Identify if a Customer (CUS) is related business entity to the company. Businesses are obligated to tag business related entities. I.e if you own a company, and your spouse is owning a separate company, these companies are business related. For Polish users, read more the JPK_V7M and JPK_V7K file and related functionality. |
Field/Drop-down menu/Checkbox | Description |
|---|---|
Sales invoice consolidation | Specifies whether or how often shipping advices that origins from this sales order will be consolidated when creating sales invoices. Available options are:
|
Sales invoice consolidation field | Field name to group by when consolidating shipping advice items into sales invoices. Available options are:
|
Sales invoice item sort by | Field name to sort by when creating sales invoice items. Available options are:
|
Field/Drop-down menu/Checkbox | Required | Recommended | Description |
|---|---|---|---|
Payment method | Default payment method for the Customer (CUS). | ||
Payment terms | Yes | Default payment terms to use in new documents. The payment terms are usually agreed upon before trading with a new Customer (CUS). Due date on Sales invoices (CIN) are calculated based on Payment terms. | |
Interest rate | Set a special interest rate for this Customer (CUS). Otherwise, the Company settings (CSV) will be used. The interest rate is used for Sales invoices (CIN) past due date. | ||
Interest fee amount | Set a special fee for interest notes for this Customer (CUS). Otherwise, the Company settings (CSV) will be used. Fixed interest fee used for the customer. | ||
Send reminders | Set to true, to send automatic reminders on outstanding amounts to this Customer (CUS). Set to false if reminder is not be sent to this Customer (CUS). Default value is retireved from the Company setting (CSV): DefaultCreateValueCUSFieldREMINDER | ||
Require approval if overdue | Yes | True if shipments need approval if there are Sales invoices (CIN) with overdue amount. Default value is retireved from the Company setting (CSV): DefaultCreateValueCUSFieldDUEAPPROVE |
Fields | Required | Recommended | Description |
|---|---|---|---|
Credit insurance company | Insurance company used by the customer for credit insurance | ||
Credit insurance currency | Three character code following the ISO 4217 standard | ||
Credit insurance amount | Credit amount insured for the customer | ||
Credit limit | The maximum amount that the customer may charge on a credit card or borrow from a financial institution. Credit limitations for the customer. Approval is required if the invoice amount exceeds the credit limit. |
The Bank accounts list has all the Customer's (CUS) bank accounts.
Search field, filter builder and column settings
The header contains multiple options to filter the list:
Column | Description | |
|---|---|---|
Currency | Displays the Currency (CUR) used for the bank account | |
C code | Displays the two-character code (ISO 3166) identifying the country of the bank. | |
Account | Displays the account number used to identify the bank account. | |
Account type | Displays the type of the bank account, in example BBAN, Bankgiro, Plusgiro. | |
IBAN | Displays the International Bank Account Number (IBAN) which is an internationally agreed means of identifying bank accounts across national borders with a reduced risk of transcription errors. | |
Swift | Displays the SWIFT (Society for Worldwide Interbank Financial Telecommunication) Code, which is a standard format for Business Identifier Codes (BIC) and it is used to uniquely identify banks and financial institutions globally. These codes are used when transferring money between banks, in particular for international wire transfers or SEPA payments. | |
Bank name | Displays the name of the bank account. | |
Bank code | Displays the bank code. The code is assigned by a central bank, a bank supervisory body or a Bankers Association in a county, to all its licensed member banks or financial institutions. | |
Clearing code | Displays the clearing code of the bank account. | |
Clearing bank identifier | Displays the clearing bank identifier of the bank account. | |
| To edit the details of the bank account, click the Edit icon. | |
| To delete the bank account, click the Delete icon |
A Customer's (CUS) bank account(s) can be added via the Customer (CUS) application.
| Add bank account button |
To add a bank account to the Customer (CUS), click the Add bank account button.
At a minimum provide Currency, Account, Account type and Country.
Note
Only currencies added in the Finance data area can be selected.
To finalize adding the bank account, click the Create button.
Field / Drop-down menu | Icon | Description |
|---|---|---|
Delivery terms |
| To edit the delivery terms and delivery place, click the Edit icon. The delivery terms control how and where the product is delivered, in addition to who pays for the shipping and insurance. The delivery terms is based on the Incoterms rules from ICC (International Chamber of Commerce). |
Shipping services | Displays the name of the selected Shipping service (SHP). Click to select or replace the current Shipping service (SHP). | |
Fee amount | This is an amount, in the companies local currency, that by default will be added as fee when a Sales order (COA) is created for this Customer (CUS). | |
Minimum gross margin | The minimum gross margin in percent for the customer |
Auction only | Description |
|---|---|
Fee percent | The commission paid by the Customer (CUS) when purchasing LOTs. |
Field/Drop-down menu | Icon | Description |
|---|---|---|
Volume price agreement | Special price agreement related to the quantity being ordered. Example If this is set to for instance "100 agreement", it means the customer will get the price that is set for 100 pieces - if such an agreement exists - even if the Customer (CUS) has only ordered 1 piece. | |
Price list | To select a Price list (PLI) for the customer, click the Price list drop-down menu. | |
Exchange rate fluctuation agreement | When a Sales order (COA) is issued, RamBase stores the current exchange rate and the currency the product normally is purchased in. The exchange rate might have changed when the Sales invoice (CIN) is issued. The exchange rate fluctuation agreement specifies how to handle these differences. The agreement has the format AAA/BBB, where AAA is a percentage of the total invoice, and BBB is the exchange rate fluctuation percentage. E.g. 100/3.0 means that if the rate of exchange on the date a Sales order (COA) is forwarded to an invoice has changed more than +/- 3% from the rate of exchange, 100% of the invoice amount will be adjusted. | |
Fixed currency rates |
| To edit the Fixed currency rates, click the edit icon to open the Customer BRates popup. |

Drop-down menu | Icon | Description |
|---|---|---|
Shipping and handling codes |
| The special handling code used for this customer. To open the Shipping and handling codes (SHC) application, click the View icon. |
Service shipping and handling codes |
| The special handling code used for service. To open the Shipping and handling codes (SHC) application, click the View icon. |
Field/Drop-down menu/Checkbox | Description |
|---|---|
Shipping day | Specifies when the goods should be shipped. This is used to calculate the scheduled shipping date for each item. |
Only ship entire orders | True if all items of a Sales order (COA) should be shipped together. The items of a Sales order (COAITEM) should never be split into several shipments. If Sales order (COA) is forwarded to shipping advice by bulk handling, this will be controlled by RamBase. Manually forward requires that the users controls this themselves. |
Ship based on confirmed delivery date | If true, scheduled shipping date on each item will be calculated based on confirmed date rather than requested date. |
Only ship entire order items | True if the total quantity of a Sales order item (COAITEM) always should be shipped together. The quantity should never be split into several shipments. If Sales order (COA) is forwarded to Shipping advice (CSA) by bulk handling, this will be controlled by RamBase. Manually forward requires that the users controls this themselves. |
Ship items with equal scheduled shipping date together | True if all items of a Sales order (COAITEM) with the same scheduled delivery date should be shipped together. If Sales order (COA) is forwarded to Shipping advice (CSA) by bulk handling, this will be controlled by RamBase. Manually forward requires that the users controls this themselves. |
Freight for each shipment | If unchecked there will only be calculated freight on one shipping advice if the particular sales order has serveral shipments. |
Consolidate shipping advices | If true, Sales orders (COA) will be consolidated when creating Shipping advices (CSA) via the "Prepare for picking" process. If false, each Sales order (COA) will result in a separate Shipping advice (CSA). The field to use when consolidating is specified in the Consolidation field drop-down menu. |
Consolidation field | Field to use when consolidating Sales order items (COAITEM) into Shipping advices (CSA) in the "Prepare for picking" process. |
Ship sort by | Items in consolidated Shipping advices (CSA) will be sorted by this fields when they are created in the "Prepare for picking" process. |
The Rental tab contains options to specify Rental contract (RCT) settings for the Customer (CUS).
Field | Description |
|---|---|
Discount percentage | Provide the discount percentage that should be used when the Customer (CUS) creates a new rental or subscription item - Rental contract item (RCTITEM) - in a Rental contract (RCT). |
| Context menu options icon |

Context menu option | Description |
|---|---|
Customer deviation menu | To create new or view all Customer deviations (CDV) for the customer, select the Customer deviation menu option found in the Context menu options. |
Activate customer | If a customer is in Status 1 - New or Status 9 - Deactivated, it can be activated by selecting the Activate option from the Context menu options. |
Close customer | To set a Customer (CUS) in Status 4 - Active to Status 9 - Deactivated, select the Close customer option. NoteCustomers (CUS) with open transaction documents can not be closed/deactivated. |
Set message | It is possible to set a message on customers which are displayed in blue at top of the customer. The message will be visible on the customer's sales documents as a banner, such as a Sales order (COA). Select the Customer (CUS), then click the Set message option in the context menu. Type the desired message and click the Save button. |
Show related supplier | |
View subscriptions | To view the Customers (CUS) subscriptions, select the View subscriptions option. NoteUses functionality from the Subscription 2022 release. |
Discard customer | To discard a Customer (CUS) in Status 1 - New, select the Discard customer option in the Context menu. The Customer (CUS) will be deleted, along with all its information in the Customer (CUS) application. For customers in Status 4 - Active, use the Close customer option, which will set the customer in Status 9 - Inactive. |
Set bidder number | |
Send customer account statements | To open the Send customer account statements popup, select the Send customer account statements option found in the Context menu options. Click the Statement drop-down menu to select Open transactions or All transactions. Decide which customer should be included in the statement, and which currency. Clicking the Next button will allow the selection of PRINT or EMAIL. |
Import customer from file | To load customer data, select the Import customer from file option to open the Import/export Wizard popup. Read more about Load procedure - Input menu (INP) and Import/export Wizard (IOQWIZ). |
Create interest | |
Configure Peppol address | To configure the Peppol address, click the Configure Peppol address in the Context menu options. NoteConfiguring requires selecting a Party endpoint scheme identifier as well as providing a Party endpoint identifier. |
Update open sales orders with default invoice address | To update open Sales orders (COA) for the Customer (CUS) with the invoice address set as default in the Customer (CUS) application → Addresses tab → Invoices sub-tab, select the Update open sales orders with default invoice address option found in the Context menu options. |
Customer & supplier - All transactions | To view the report, Customer & supplier account movements (REPORT/100228), which lists all transactions, select the Customer and supplier - All transactions option found in the Context menu options. |
Print bidder number | |
Outgoing print / email | To view the progress on all outgoing prints or emails to the Customer (CUS), select the Outgoing print / email option found in the Context menu options. |
Print / send documents | Available documents can be sent to the Customer (CUS) by selecting the Print / send documents option found in the Context menu options. Potential documents can be edited and previewed before sending. |
View contracts | To view and potentially edit the contracts for the Customer (CUS), select the View contracts option found in the Context menu options. The option will open the Customer sales contracts (CSC) application. |
Show customer legal entities (CGR) | |
Show customer groups (CUG) | Customers can be grouped. A customer group is used in situations where several customers need to be processed similarly. Uses in RamBase: When a Purchase quote (SQU) is exclusive to a group of customers. This function is found in the Resale tab in the Purchase quote item (SQUITEM) application. An Item Price Agreement (IPA) can be restricted to be used by a single customer, all customers or customer groups. To view all members of the customer's group, select the Show customer groups (CUG) option. This will open the Customer group membership (CUSTOMERGROUPMEMBER) application. |
Show total balance | To open the Total Balance popup, to inspect customer's balance and due amounts for coming periods, select the Show total balance option. |
Delivery performance | To view delivery performance statistics for the customer, select the Delivery performance option. |
Quality assurance events | To view quality issues for the customer, select the Quality assurance events option which will open the Quality report achive menu (QAR) application. |
To open the Customer (CUS) application, find Sales in the RamBase menu and then Customer management. Click Customers to enter the Customer (CUS) application.
Click the Create customer button in the lower left hand corner of the Customer (CUS) application
A new window appears where you can add customer main data. This can also be collected via the Brønnøysund integration. Search company name or enterprise number.
Due to the validation process, the Postal code and City field can not remain empty. If there is no postal code or city, enter a placeholder character ("0" or ".") to continue.
As soon as all mandatory data (fields marked with *) have been entered, click the OK button to create the Customer (CUS) in Status 1 - New.
It is still possible to add additional data on the Customer (CUS).
In the Settings tab, enter relevant settings. Settings can be updated at all time. These settings will be used as default values and will be copied to documents, such as Sales Orders (COA).
In the Output control sub-tab, enter how documents are to be handled and where the they are to be sent by e-mail, print etc.
You can add several Shipping and Invoice addresses in the Addresses tab. The Set as default column to the far right controls which of these addresses will be used as the default address for this user during document creation.
Note
The Active on/off column can be used to activate and deactivate addresses. Only shipping addresses in Status 9 - Deactivated can be discarded by clicking the Thrash icon.
Note that the user will be notified when attempting to deactivate addresses currently in use.
In the Contacts tab, add data about employees that work for the Customer (CUS). Click the Select contact button to add a contact to the Customer (CUS). Click the Create contact button to create a new Contact (CNT) and add it to the customer.
To activate the customer, click the Activate customer option in the context menu. This action will activate the customer and set the Customer (CU) in Status 4 - Active.
The VAT Information Exchange System (VIES) validates single VAT numbers of any business entity registered in the EU when you enter the VAT number in the Customer (CUS) or Supplier (SUP) applications, or when the CUS or SUP applications are opened.
If you enter a valid VAT number for a business entity based in the EU, a message displays, stating that the VAT number is valid and registered in VIES.

Select Update name and address to retrieve the entity name and address from the VIES database.

A notification message is displayed in the application that the VAT is registered in VIES. The validation is performed every time you select a customer or supplier based in an EU member nation. If the service is unavailable for any reason and the VIES validation was not done, no notification is displayed. If the VAT number is not valid, the notification states that VAT not registered in VIES. If you hover over this notification, a popup notification states that VAT number is not valid or not registered in VIES.


If there is a mismatch between the address held in RamBase and the retrieved address, a notification is displayed in the General Settings. Select Update name and address to overwrite the currently entered address with the address retrieved from VIES.

Grouping of customers is registered in the Customer group (CUG) application.

From the RamBase menu, click on Sales followed by Customer management and then on Customer groups to enter the Customer group (CUG) application.
Click the Create new customer group button at the bottom of the screen.
Enter a descriptive name for the customer group and click Create.
Click the Add customer button to add customers to the group.
Click the Activate button at the top to set the Customer group (CUG) to Status 4. It is now active and ready for use.
Note: It is possible to import customers to the group using the Import Customers button from the context menu. This will open a popup where you choose which format you want to use and then you will be able to load the customer files.
Note
It is possible to import customers to the group using the Import Customers button from the context menu. This will open a popup where you choose which format you want to use and then you will be able to load the customer files.
A customer group is used in situations where several customers need to be processed similarly.
Uses in RamBase:
When a Purchase quote (SQU) is exclusive to a group of customers. This function is found in the Resale tab in the Purchase quote (SQU) item.
A Item Price Agreement (IPA) can be restricted to be used by a single customer, all customers or customer groups.
There are several settings in the Customer (CUS) application which need to be maintained so they are always up to date. Enter the Settings tab to see the settings.
General
Name
Name of customer (name of company or surname/familyname/lastname of a person).
Secondary name
Secondary name of a company or firstname of a person.
Website
Customers website/homepage/webpage.
Enterprise number
The customers unique enterprise/organization number.
VAT No
Unique number assigned by the relevant tax authority to identify a party for use in relation to value added tax (VAT).
EORI number
An EORI (Economic Operator Registration and identification number) number is required of any party intending to import into the EU or export from the EU.
Created by
The employee (might be RamBase-server) that created the customer.
Created date
Date and time of creation.
Account manager
Reference to the employee who is responsible for the management of sales, and relationship with the customer.
Sales assistant
Reference to the employee who is sales assistant for the customer.
Classification
If you want to group your customers, make sure to provide information to the relevant fields in this section.
Preferred language
This field controls which language the customer uses and which will be used in prints and emails sent to the customer.
Customer classification
Classification of customers. A, B, C, Internal, Trade are examples of commonly used values. Valid options must be defined in your company setup.
Sales district
A geographic district for which an individual sales person or a sales team hold responsibility. South, North, West, East and Overseas are commonly used values. Valid options must be defined in your company setup.
Sector
The sector the customer belongs to. Valid options must be defined in your company setup.
Market segment
The market segment the customer operates within. Valid options must be defined in your company setup.
Blockings
Block sales order
Sales orders for this customer will be blocked for registering.
Block sales quote
Sales quotes for this customer will be blocked for registering.
Block shipping
Shipping advices for this customer will be blocked for registering.
Finance data
Currencies
Choose currencies for the customer.
Intercompany data
Which intercompany database the customer belongs to.
VAT registration number
Set the unique number assigned by the relevant tax authority to identify a party for use in relation to value added tax (VAT).
VAT handling
Choose how value added tax (VAT) should be calculated. Either always include VAT, always exclude VAT or use standard/default VAT rules.
Send to factoring
Identify which customer, invoices and credit notes, will be sent to factoring.
Invoice
Sales invoice consolidation
Specifies whether or how often shipping advices that origins from this sales order will be consolidated when creating sales invoices.
Sales invoice consolidation field
Field name to group by when consolidating shipping advice items into sales invoices.
Sales invoice item sort by
Field name to sort by when creating sales invoice items.
Terms
Payment terms
Here you will set the payment terms the CUS has requested, or negotiated. These are codes based on your output language and include Payment in advance, Cash on Pickup, Cash on Delivery, X days net and Net X days EOM.
Payment terms
Default payment terms to use in new documents.
Interest rate
Interest rate used for sales invoices past duedate.
Interest fee amount
Fixed interest fee used for the customer.
Send reminders
Set to false if payment reminders should not be sent to this customer.
Require approval if overdue
True if shipments need approval if there are sales invoices with overdue amount.
Credit
Use the Credit limit and Credit insurance amount fields if you want to have a limit on the credit you will give to your customers. Credit limit and Credit insurance amount should be updated with the maximum credit you want to give to that specific customer. This may be adjusted if the customers credit situation changes. If Credit limit or Credit insurance amount is exceeded, an approval from will be necessary to ship goods to this customer.
Credit limit
By updating the Credit limit field on the customer, the system will check that the open balance on the customer do not exceed the value in the Credit limit field. This check will be done when goods is shipped to the customer on a Shipping Advice (CSA). If the Credit limit is exceeded, an approval is needed to be able to ship the goods.The setting CusCreditControl could be set to CUS or CGR, depending on if the Credit limit should be done to a customer or a customer group. If this setting has no value, CUS will be used as default.
Open balance on a customer that is used in Credit limit control is calculated this way:
Current balance on customer / customer group, included VAT
+ Total, included VAT, of this Shipping Advice (CSA)
+ Total, included VAT, of goods already shipped (CSA), without being invoiced (CIN)
- Prepayments waiting for bank confirmation (PAY status 3)
= Total
Credit Insurance amount
By updating the Credit insurance amount field on the customer, the system will check that the open balance on the customer does not exceed the value in the Credit insurance amount field. This check is done when goods are shipped to the customer on a Shipping Advice (CSA). If the Credit insurance is exceeded, approval is required to ship the goods.The setting CusCreditInsurance could be set to CUS or CGR, depending on if the Credit insurance should be done to a customer or a customer group. If this setting has no value, CUS is used as default.
Open balance and backlog on a customer that is used in Credit insurance control is calculated this way:
Current balance on customer / customer group, excluded VAT
+ Total, excluded VAT, of this Shipping Advice (CSA)
+ Total, excluded VAT, of goods already shipped (CSA), without being invoiced (CIN)
+ Total, excluded VAT, of registered Sales Orders (COA) that are not shipped
- Prepayments waiting for bank confirmation (PAY status 3)
= Total
Credit insurance company
Insurance company used by the customer for credit insurance.
Credit insurance currency
Three character code following the ISO 4217 standard.
Sales term
Delivery terms
The delivery terms control how and where the product is delivered, in addition to who pays for the shipping and Insurance.
Shipping service
Shipping services state how the product is to be shipped, e.g which forwarder and which Product from the forwarder.
Fee amount
This is an amount, in the companies local currency, that by default will be added as fee when a sales order is created for this customer.
Minimum gross margin
The minimum gross margin in percent for the customer.
Fee percent (auction only)
The commission paid by the customer when purchasing LOTs.
Sales agreements
Volume price agreement
This field indicates that there is a price agreement based on volume with this CUS.
Price group agreement
This field indicates that this CUS belongs to a group of customers with special pricing. These groups have to be predefined by JHC service group.
Price list
Choose price list for the customer. Price list can be created in the Price list (PLI) application.
Exchange rate fluctuation agreement
Exchange rate fluctuation agreements is a currency exchange agreement. An index agreement stated as 100/1.5 indicates that the CUS has to pay 100% of the deviation if it rises above 1,5% of the order amount.
Fixed currency rates
Set fixed currency rates in this table according to the exchange rate fluctuation agreement that has been agreed with the customer.
Warranty
Warranty period (months)
Agreement of default warranty period in months.
Warehouse
Shipping & handling codes
The special handling code used for this customer.
Service shipping & handling codes
The special handling code used for service.
Shipping claims
Shipping day
Specifies when the goods should be shipped. This is used to calculate the scheduled shipping date for each item.
Only ship entire orders
True if all items of a sales order should be shipped together. The items of a sales order should never be split into several shipments.
Ship based on confirmed delivery date
If true, will scheduled shipping date on each item be calculated based on confirmed date rather than requested date.
Only ship entire order items
True if the total quantity of a sales order item always should be shipped together. The quantity should never be split into several shipments.
Ship items with equal scheduled shipping date together
True if all items of a sales order with the same scheduled delivery date should be shipped together.
Freight for each shipment
If unchecked there will only be calculated freight on one shipping advice if the particular sales order has several shipments.
Consolidate shipping advices
If true, sales orders will be consolidated when creating shipping advices. If false, each sales order will result in separate shipping advice.
Consolidation field
Field to use when consolidating sales order items into shipping advices.
Ship sort by
Field to sort by when creating shipping advice items.
To align more closely with the International Commercial Terms (Incoterms), in which the place of delivery is explicitly named, RamBase has added a field called Delivery terms place to the Delivery terms. This makes the delivery terms legally valid. You can specify the default Delivery terms place for your customers. This is a mandatory field and you cannot validate some outgoing documents during a change of status if you do not specify the Delivery terms place. Any printouts such as PDF will also show the Delivery terms place.

To specify the Delivery terms place for a customer.
Enter CUS in the Program field and select the Enter key to open the Customer (CUS) application.
In CUS, select Settings > Sales and Shipping.
Select
 in Sales terms > Delivery terms.
Select the delivery terms from the Delivery terms list.
Enter the Delivery terms place below the Delivery terms list.
You can add a different default Delivery terms and Delivery terms place for every shipping address for your customer.

There are some settings for Delivery terms and Delivery terms place in the CSV.

You can specify the default values for the Delivery terms (DELTERM) field when creating new customers.
Enable Default create value for customers - Delivery Terms and select the default delivery terms for new customers in the field below.
You can specify the default values for the Delivery terms place (DELTERMPLACE) field when creating new customers.
Enable Default create value for customers - Delivery Terms Place and specify the default delivery terms place for new customers in the field below.
The Delivery terms place has also been added to applications such as the Auction (EVT) module. When orders are created from an auction, they inherit the delivery and return place from the specified Delivery terms place.
It is possible to control the document logistic in RamBase by predefining the recipients of specific documents for a given Customer (CUS). These settings can be controlled from the Document handling tab in the Settings tab in the CUS application.
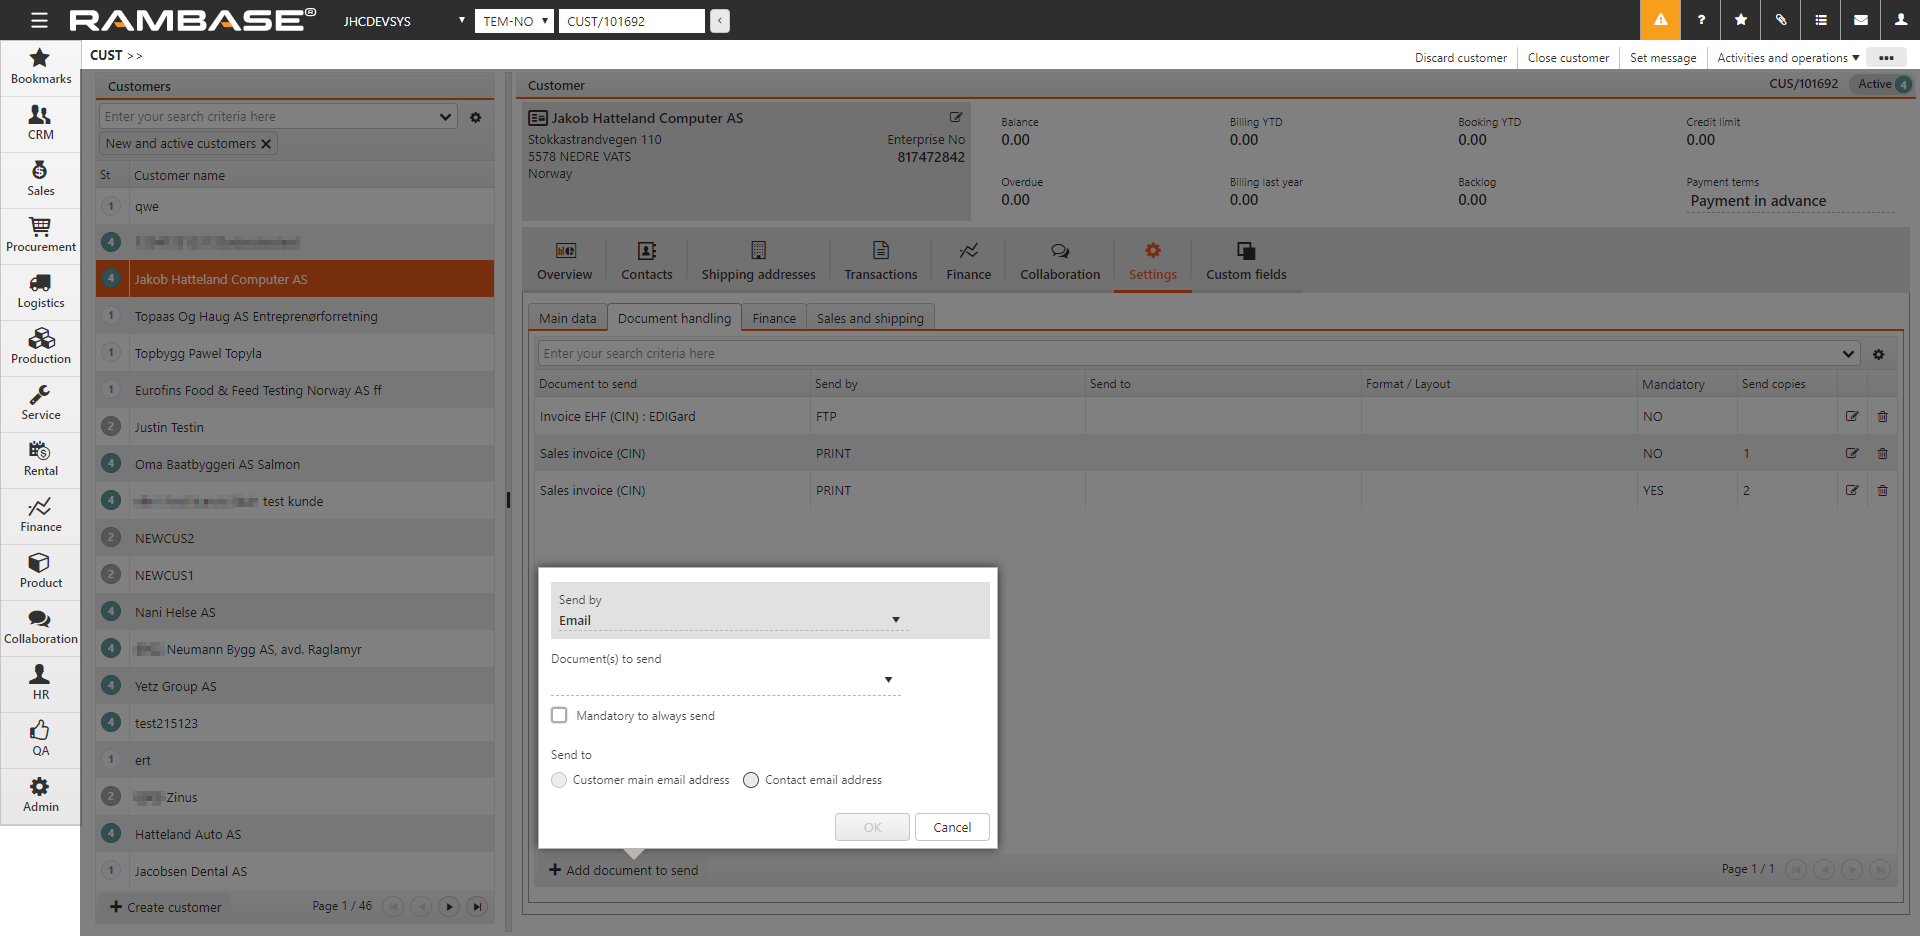
Enter the customer you want to set document handling rules for.
Click the Document handling tab in the Settings tab. Click the Add document to send button.
This button opens a new popup where you can add information
Send byChoose which method to send, which may be Email, Print or File Transfer Protocol (FTP/SFTP).
FTP applies to sending EHF invoices (EDI). There is an integration with the ELMA registry that checks if the enterprise number is registered in ELMA. An error message will appear if the enterprise number is missing from the customer or is not registered in ELMA.
Document to send
Choose which document you want to send.
Mandatory to always send
The recipient cannot be deleted on a specific document if this is selected.
Send to
Choose to send it to the customers main email address or which contact you want to send this to.
Note: If you want to change the output for any of the documents, choose the item line you want to change and click the edit icon. This will open a popup similar to the one where you defined the rule, but this popup is specific for one document and contains a field where you choose the output for this specific document.
To open the Article (ART) application, find Product in the RamBase menu and then Product management. Click Products to enter the ART application.
Highlight the specific ART and press ENTER.
Click the Create ARTSALESPRICE icon in the Sales Prices section in the Main Data folder.
In the new popup, select a price agreement for a customer group from the drop down menu in the PriceGroupAgr field, or set a quantity in the SalesQty field.Note: Either the field SalesQty or the field PriceGroupAgr must have a value, but only one of them can be filled.
Add details to apply to the price agreement for this specific ART.
Note: Either the field SalesPrice or the field SalesGM must have a value, but only one of them can be filled.
Use the date pickers to set the time interval for the agreement to be valid.
Note: A price group agreement can not occur several times within the same time interval.
Click the Submit button.
To open the Customer (CUS) application, find Sales or CRM in the RamBase menu and then Customer management. Click Customers to enter the CUS application.
Select the specific customer.
Enter the Sales and shipping tab in the Settings tab.
Select the price agreement(s) the CUS is to be linked to in the Sales agreements area.A customer can be linked to a price agreement based on volume, a common price agreement for a group of customers and a price list.
Whenever this customer places orders on articles linked to the price agreement(s), the sales prices will be set in accordance with the agreement.
As soon as all relevant information has been entered after creating the new Customer (CUS), it may be activated by using the Activate customer option in the context menu. After this the CUS will be active in the RamBase system and may be involved in a sales process. Click the Close customer option in the context menu to deactivate a customer.
As previously mentioned, all information entered on a CUS is set as default. This means that all documents created involving this CUS will contain this information. This does not however mean that the information is static. The field Payment terms, which defines the payment terms for the CUS in question, is a good example. If Payment terms is set to 15 days on the CUS, it will be set on all purchase orders from CUS as default. But if it is changed on the order itself, it will only apply for the order and not change in the default CUS settings.
If you want to change the payment terms, or any other settings permanently, you must perform this action in the CUS application.
In the CUS view you have access to all the customers information, and the ability to fill in or edit. General information, such as CUS name and address are shown permanently, as does the key figures shown in the top of the document. The key figures summarizes the periodical numbers for billing, booking, backlog, balance, overdue, payment terms and credit.
Use the Timeline area in the Overview tab to find documents connected to the customer. Select document types in the Document types field and period in the Period field. Click on the date to find all the selected document types from that specific date. In the Period field, Last year displays 12 months back from today's date.1 year ago displays documents from 12-24 months ago.
The Contacts tab displays contacts connected to the customer. It is possible to add/change Job title, Default phone and Default email directly in the CUS application.
The Shipping addresses tab displays all shipping addresses connected to the customer and the invoice address. It can only be one invoice address and it can not be deleted. Use the edit icon to change the addresses.
The Transactions tab enables you to find the customers transaction history, filtered by choice.
The Finance tab contains information regarding the customers transactions, reminders, due amounts, interests and pay statistics, with links to related documents.
The Collaboration tab is relevant when it comes to sales. It is possible to add notes and tasks by using the Add new icon in the Notes and Tasks tabs. Email communication is saved in the Emails tab. The Opportunities tab displays opportunities connected to the selected customer. Click the arrow button to right on the opportunity to open the Opportunity Details (OPPD) view of the selected opportunity connected to the customer.
In the Settings tab, it is possible to set and adjust the most common general settings, such as language, payment and delivery terms, in addition to which documents the CUS will receive. It also contains information regarding the CUS payment terms and other financial settings. The Sales and shipping folder can be said to contain logistics related information and settings. Here you may set the shipping details of the CUS if he wishes to have default settings. Click the Ship items with equal scheduled shipping date together check-box to make all items as unready until all items are ready for shipping.
When creating a Sales Order (COA) from a Sales Order Request (CPO), the COAITM will not inherit the price information from the CPOITM, but from the Article (ART) register. Expected Price from the CPOITM will be shown in the COAITM, and if there is a discrepancy between these, a warning will show.
It is possible to set a message on customers which are displayed in blue at top of the customer. The message will be visible on the customer's sales documents, such as a Sales order (COA).
Highlight the customer and click the Set message option in the context menu. Enter the desired message and click the Save button.
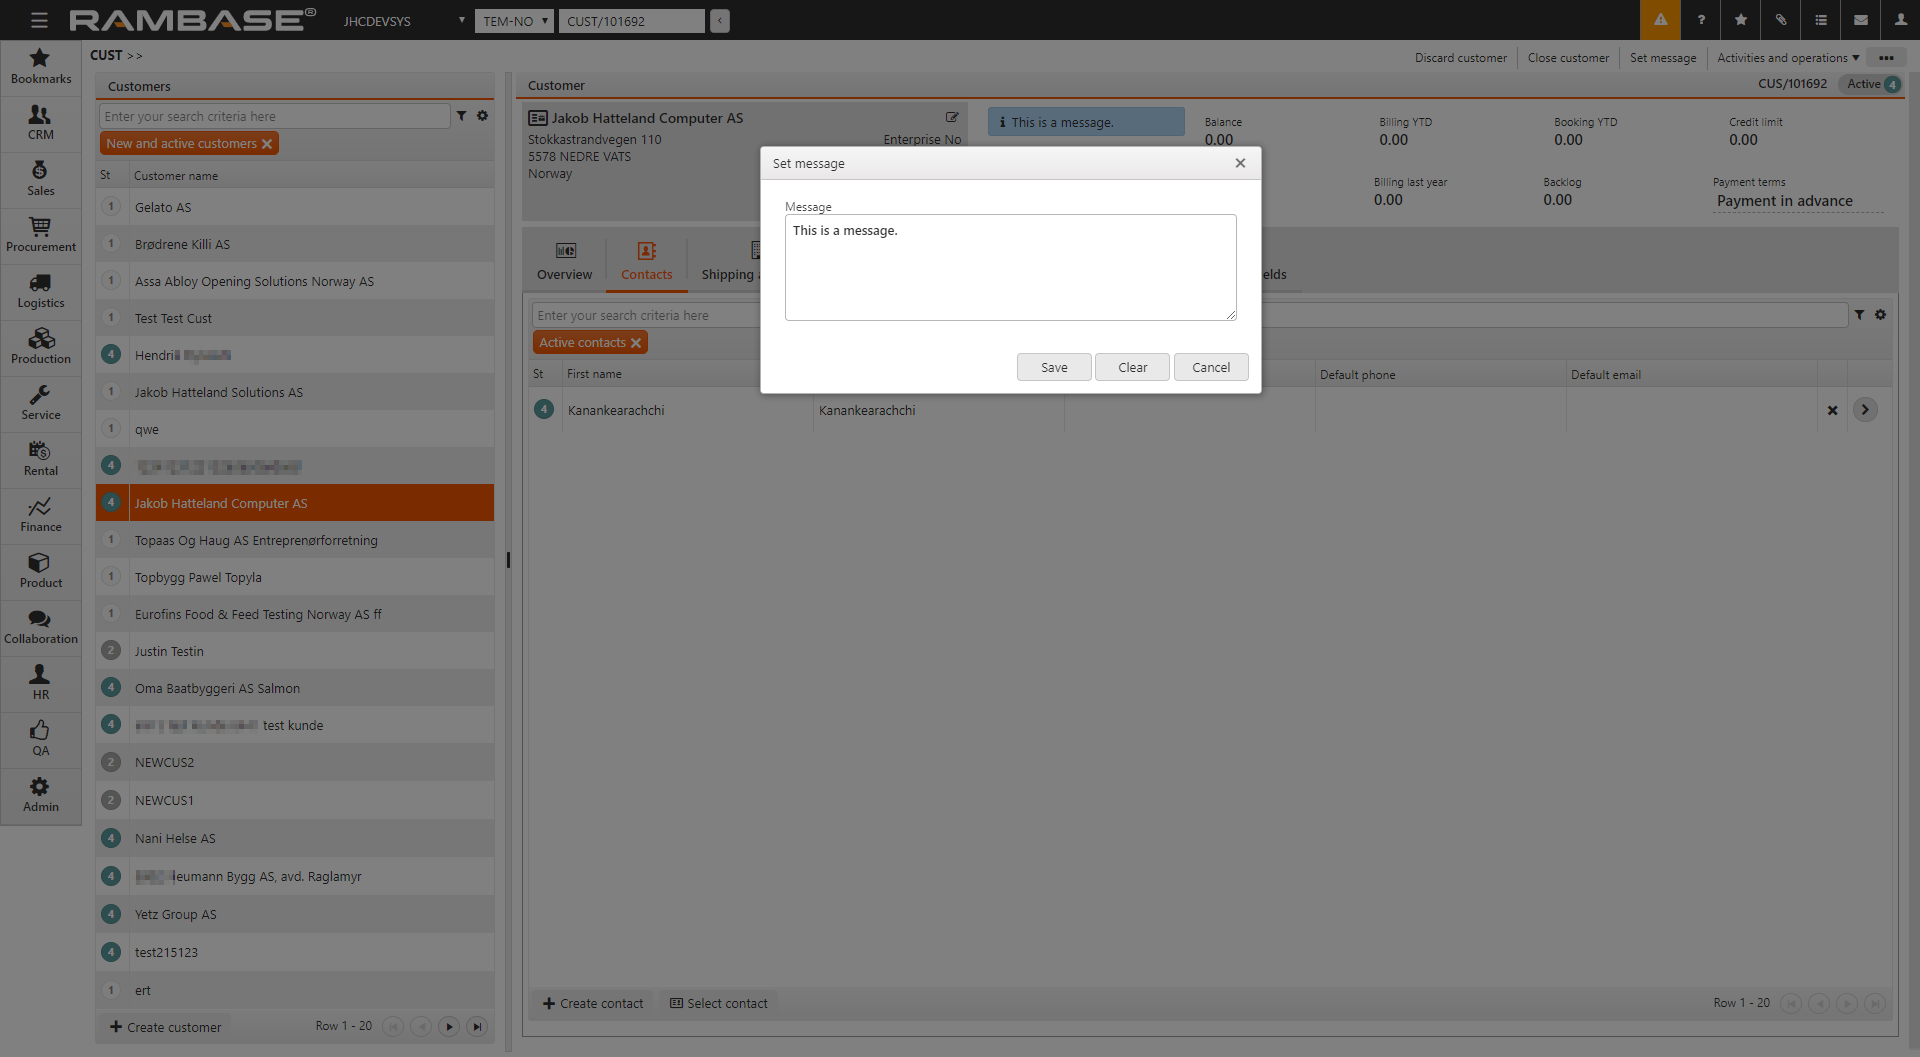
To remove or edit the message, click the Set message option in the context menu or click the Edit icon on the message. Click the Clear button and then click the Save button.
Before trading with a new Customer (CUS), some financial settings are required. These settings are critical to the accountancy. Other settings are recommended for more details about each CUS. The financial settings can be found in the Settings tab on the CUS.
Currencies
The currency(-ies) valid for this CUS. The field can contain more than one currency. You must at least register one currency. If you have agreed to invoice your CUS in local currency, this is the one you must choose.
Payment terms
You usually agree upon this when you start trading with a new CUS. Due date on invoices are calculated based on Payment terms.
VAT registration number
The Value Added Tax (VAT) registration number is a unique number assigned by the relevant tax authority. It is crucial to the VAT handling on the customer's transactions.
Enterprise number
This is the customer's legal entity, it is a unique enterprise number.
Require approval if overdue
Click this checkbox if approval of documents are required before shipping, if already invoiced orders are overdue.
Credit limit
Credit limitations for the customer. Approval is required if the invoice amount exceeds the credit limit.
Rules for handling interests, reminders, VAT, and payment methods can be specified for each CUS. If nothing is specified, the company's default financial setup will be used.
Only use these fields if you want to overrule the company settings.
Interest fee amount
Use this field if you want to set a special fee for interest notes for this CUS. Otherwise, the company settings will be used.
Interest rate
Use this field if you want to set a special interest rate for this CUS. Otherwise, the company settings will be used.
Send Reminders
Click this checkbox to send automatic reminders on outstanding amounts to this CUS. Otherwise, the company settings will be used.
VAT handling
The company settings and the CUS order usually settle the VAT handling. Only use this field if you want to overrule the system's VAT calculation. Set Always include VAT if the CUS always has to pay VAT on orders and invoices. Set Never include VAT if it never has to pay VAT on orders and invoices. Set Use default VAT if the CUS should use the company settings.
Intercompany code
Use this field to identify internal customers/suppliers.
It is possible to add additional shipping & handling specifications to a Customer (CUS) in situations where the customers shipments need additional care or special handling. These specifications are created and saved in the Shipping and handling codes (SHC) archive. The purpose of these codes is to display them to the people responsible for shipping & handling.
Enter the Shipping and handling codes (SHC) application by typing SHC in the program field and press ENTER.
Click the Create new SHC icon in the lower left hand corner.
Enter a unique number in the ShCode field. If the code is for a specific Customer (CUS) it may be beneficial to use the customer ID here to make it easier to find.
Choose a category for the Shipping and handling codes (SHC) in the Category dropdown menu. The choices are:
Customer: The description text will appear on picking list for shipments.
Service: If there is a ServiceSHC on Customer (CUS)/Products (ART) which match the Customer (CUS)/Products (ART) in a Customer deviation (CDV) document, this will show up in the Customer deviation (CDV).
Warehouse: The description text will appear on picking list for shipments.
Click the Create new SHC button when finished. This will open a new popup.
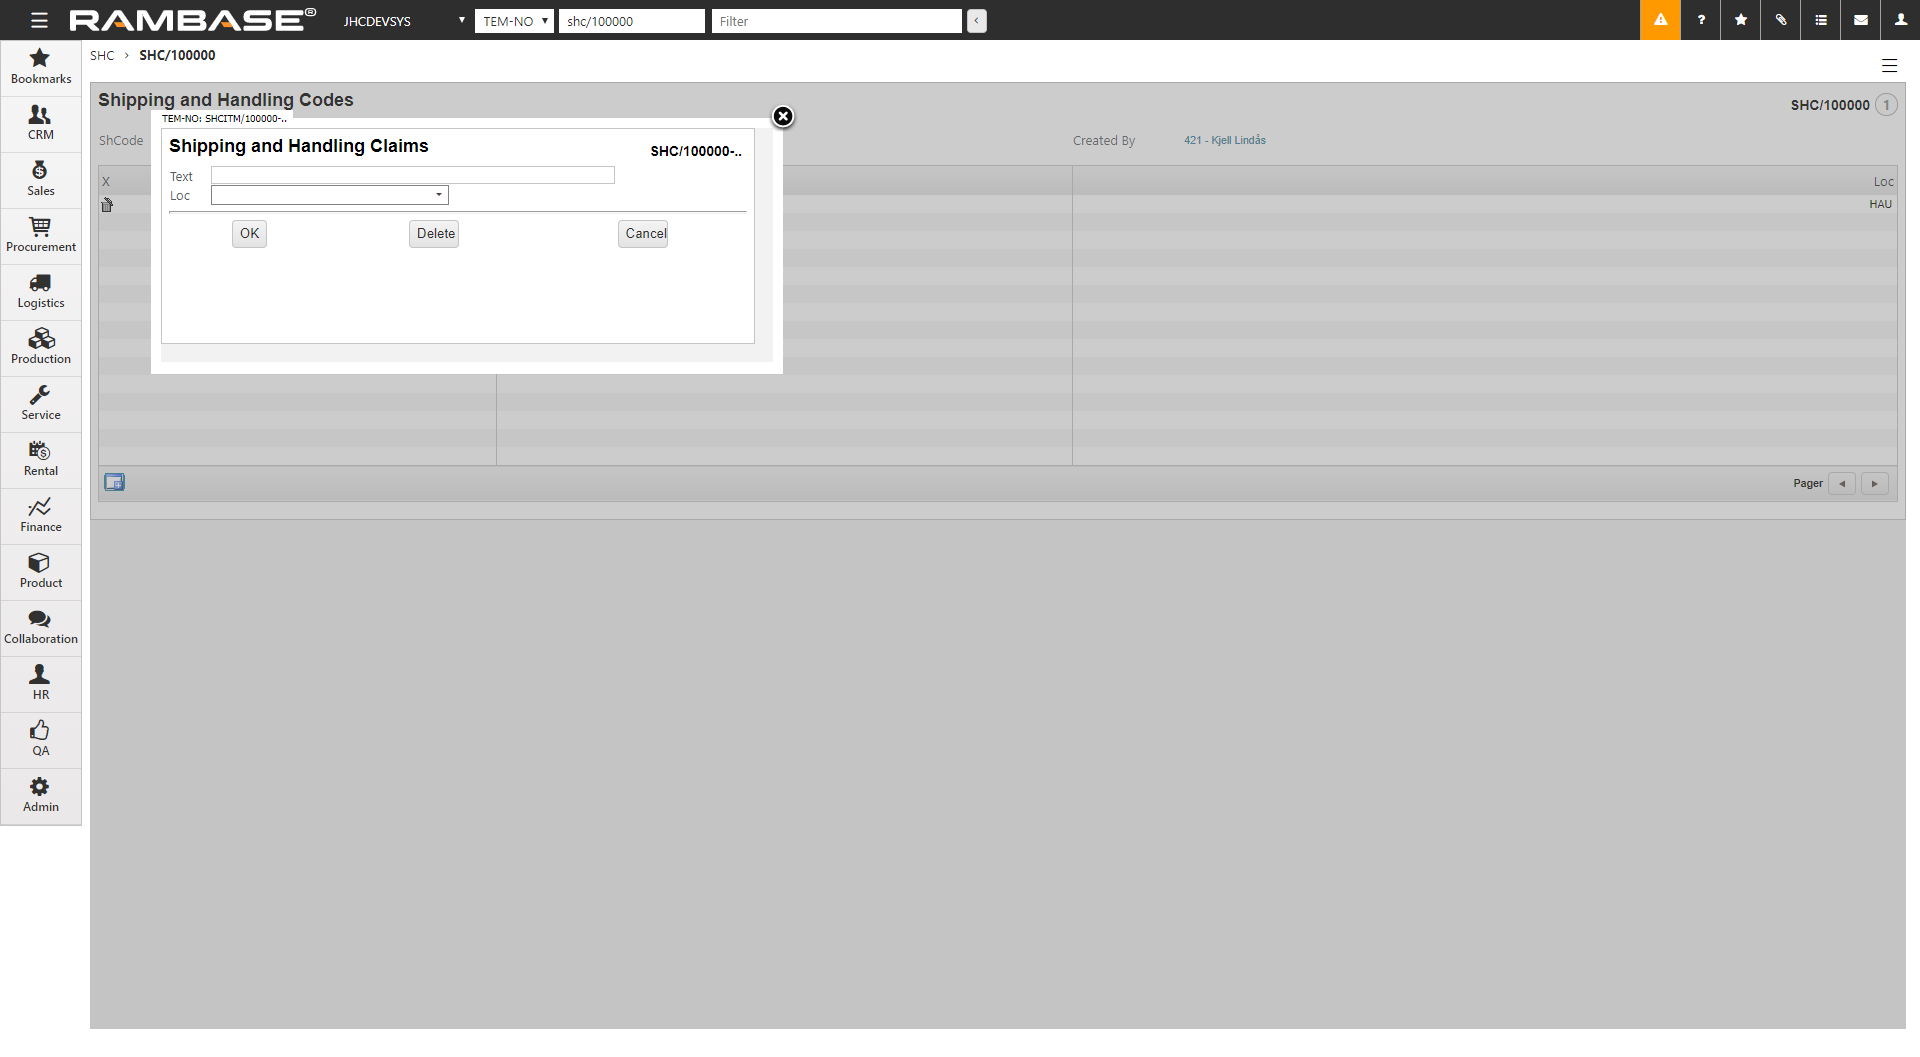
Enter a description of the Shipping and handling codes (SHC) in the Text field.
Choose a location from the Loc dropdown menu.
Click the OK button.
In the hamburger menu (three horizontal lines) in the top right of the window, select Forward to register. The status of the Shipping and handling codes (SHC) changes to Status 4.
You can now see the Shipping and handling codes (SHC) in the item field, and it is ready to be set to a Customer (CUS).
Enter the Customer (CUS) you want to add a Shipping and handling codes (SHC) to.
Click on the Sales and shipping tab in the Settings tab.
In the Warehouse area, click the Shipping & handling codes or the Service shipping & handling codes field to add the Shipping and handling codes (SHC) of your choice.
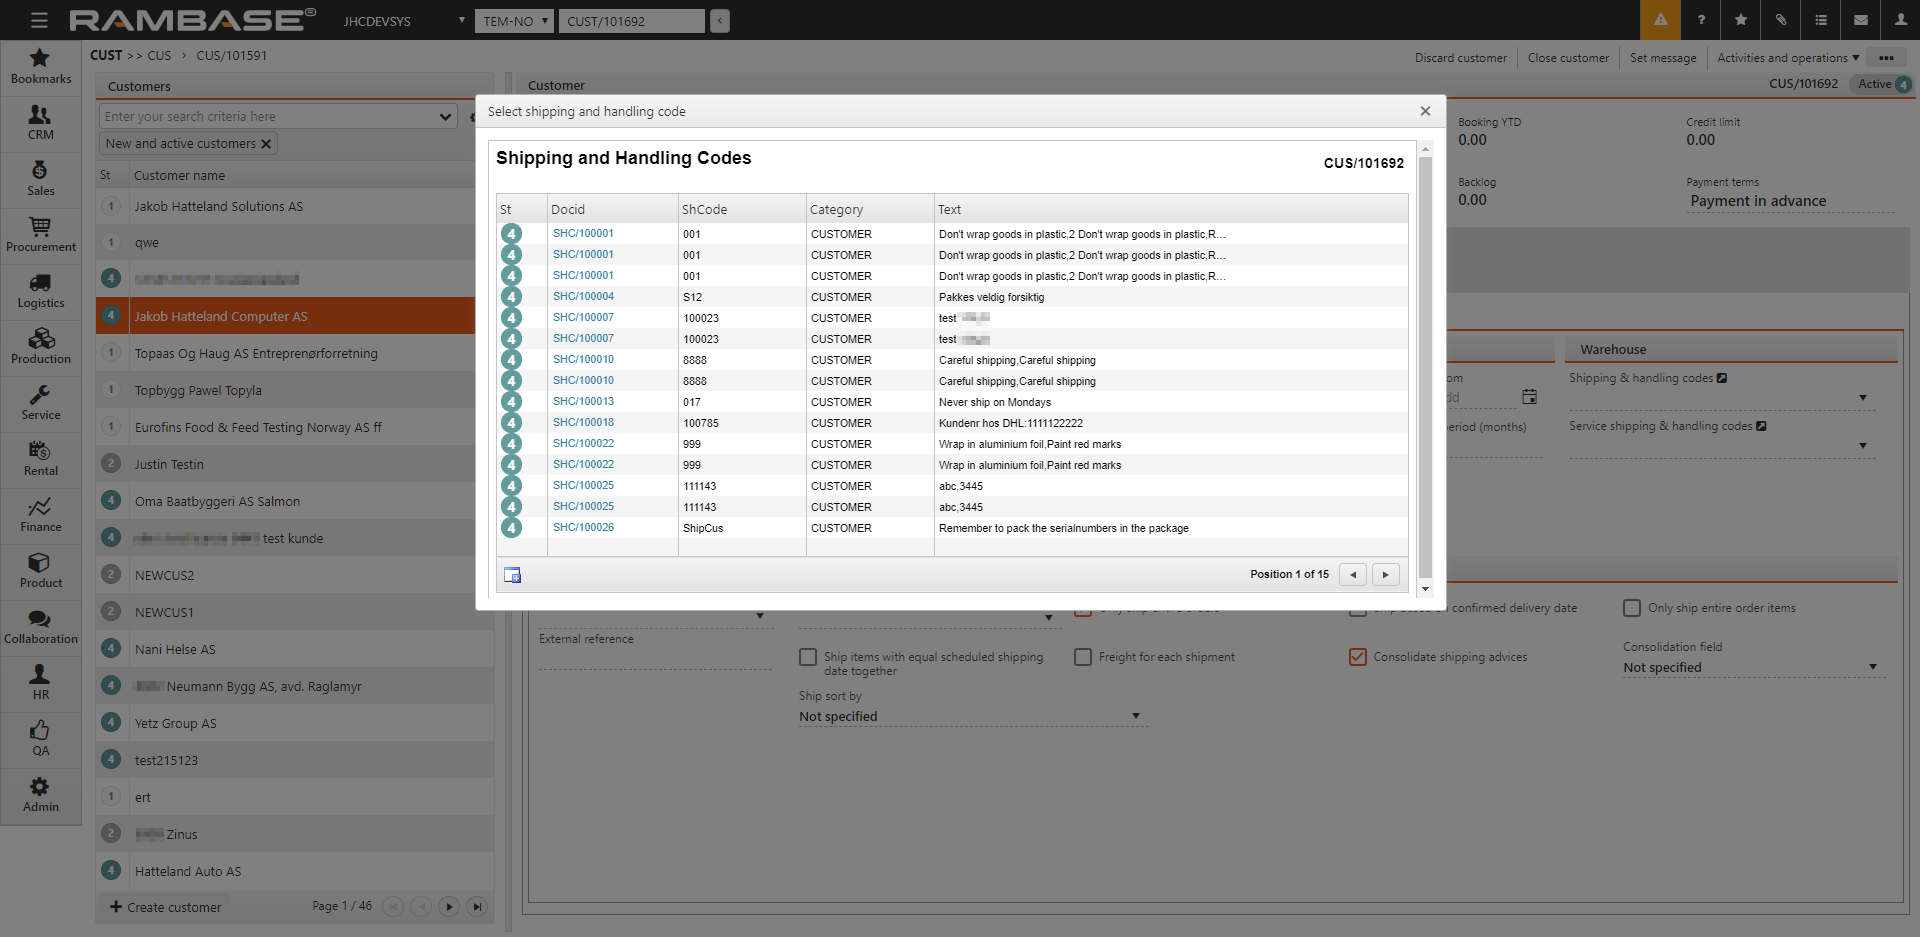
Highlight the desired Shipping and handling codes (SHC) and press ENTER.
The Shipping and handling codes (SHC) is now added to the Customer (CUS).
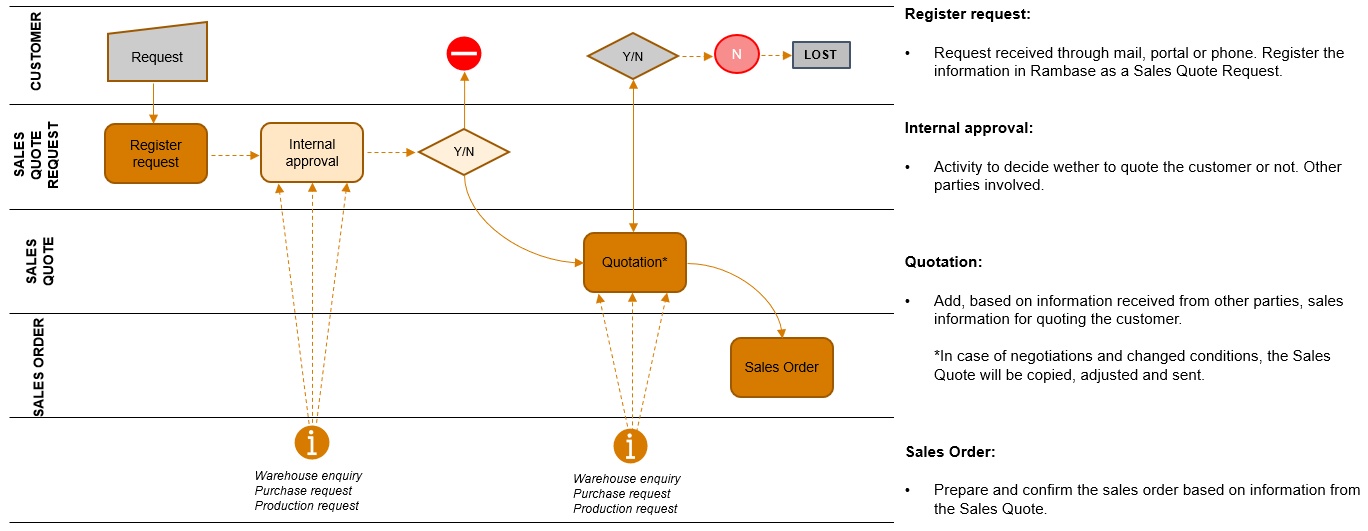
A quoting process is the process where one, if there are no set agreements or contractual obligations in place, agree with a customer regarding price, delivery time, payment terms and the product specification.
Single transaction with agreed terms.
Contract for agreed terms within a defined period.
Declined offer given to customer.
Some products have a fixed price independent of the customer, while other customers are given a set price for specific products. Offering different prices depending on product and customer is standard practice in certain industries. This is mainly due to some customers being larger and expecting contractual prices on a larger product range, while smaller customers prefer to request quote prices on a case-by-case basis, or they are buying on standard sales prices.
This process is usually started with a request for quote, where information regarding price and availability are gathered and forms the basis of the quote.
After a quote is given to the customer, there will be a period where the quote is open for acceptance or rejection. Any negotiations regarding price and/or terms in addition to acceptance or rejection, are logged in the ERP system.
Receiving a request for quote
A request for quote is received from customer.
Create a quote
Make a one-time-offer for a product to a certain quantity, price and delivery time.
Send the quote
Send the quote to one or several recipients by mail or print.
Create a contract quote
Make an offer on a product, to a certain quantity, price and delivery time – and for a certain period.
Follow up on the quote
Track status changes when validity date is approaching.
Change a quote
After negotiations with the customer, create a new version of the quote.
Mark lost quotes
Lost quotes are flagged. Register the reason for the loss and archive the quote.
Setting name | Description |
Approval for Agreement expiration date days on Sales Quote (CQU) | Value in this setting is the number of days you can add forwards in the Agreement expiration date field, -before you have to approve the Agreement expiration date when creating a new Sales Qoute Item (CQU-ITM). If CSV/CusQuoteSetExpireEqualValidTo is "ON" - the Agreement expiration date will automatically be created with X days (value from this setting) ahead from todays date. If his setting is 'OFF' - Agreement expiration date will be the same as Expiration date on CQU. Value in this setting must be a number of days. If CSV/CusQuoteSetExpireEqualValidTo is activated, - the Agreement Expiration Date will be X days ahead from today. In combination with the functionality in CSV/CusQuoteSetExpireEqualValidTo, - this set-up will give default date for approving Expiredate of CQU-ITM |
Approval for Expiration date days on Sales Quote (CQU) | Value in this setting is the number of days you can add forwards in the Expiration date field, - before you have to approve the Expiration date before registrating the Sales Quote (CQU). If the value is set to '$DATE+30', there will be an approval required if Expiration date is set to an later date than 30 days from today. Format to be used: $DATE+N (N for numbers) PS: This functionality is only working if the Agreement expiration date field on Sales Quote Item is empty. |
Attach files when sending Sales Quote (CQU) by email | Decide if emails sent from Sales Quote (CQU) documents should attach the attached files or not. If value is "ON" - Only selected attachment will be sent. If value is "OFF" - Send automatically all attached files. If settings is "OFF" (not activated) - Attachments will not be sent. |
Buffer quantity limit on Sales Quote (CQU) | Value in this setting is a limit in percent, checked against Buffer quantity field on Sales Qoute (CQU). If Buffer quantity is higher than this percentage out of total quantity of the item, -the item must be approved before the document can be registrated. |
Decimals in Amount field on documents | Sets the number of decimals for the Gross Amount field according to the archive Sales Order, Sales Invoice.. (COA/CIN/...) |
Decimals in Price field on documents | Sets the number of decimals for the Gross Price field according to the archive Sales Order, Sales Invoice.. (COA/CIN/...) |
Sales Quote Item (CQU-ITM) Agreement expiration date days | Value in this setting is a number of days after the Agreement expiration date on Sales Quote Item (CQU-ITM) has expire, - before Sales Quote item will change to status 9. Just for info: This setting for Agreement Expiration date will override the setting for Expiration date days |
Sales Quote Item (CQU-ITM) Agreement Expiration Date warning | Value in this setting is a number of days before the Agreement Expiration Date on Sales Quote Item (CQU-ITM) is reached, - that status will change to 6 (warning status). |
Sales Quote Item (CQU-ITM) Expiration date days | Value in this setting is a number of days after the Expiration date is passed, -that status on Sales Quote Item (CQU-ITM) will change to status 9. |
Sales Quote Item (CQU-ITM) Expiration Date warning | Value in this setting is a number of days before the Expiration Date on Sales Quote Item (CQU-ITM) is reached, - that status will change to 6 (warning status). |
Set Agreement Expiration Date equal to Expiration date on Sales Quote Item (CQU-ITM) | If this setting in "ON" - Agreement Expiration Date on Sales Quote Item (CQU-ITM) will be the same as Expiration date when creating a new item. NOTE: If the setting CSV/CusQuoteDefaultExpireApprovalDays has a value (numbers of days), Sales Quote Item will get Agreement Expiration Date X days ahead from todays date, and will need approval before Agreement Expiration Date exceed this number of days. If this setting is 'OFF' - Agreement Expiration Date will be empty, even if CSV/CusQuoteDefaultExpireApprovalDays has a value |
Show Docby Popup Before Registering Sales Quote (CQU) | If this setting is"ON" - Docby Popup will show before you can register a Sales Quote (CQU). In this popup you can select how the document should be sent to customer. |
A Sales Quote Request (CRQ) is a document that represents a request for a specific product. Requests can be for existing products (price and leadtime request), or non-existing. Drawings can be attached to the CRQ document.
To open the Sales Quote Request (CRQ) application, find Sales in the RamBase menu and then Quoting. Click Sales quote requests to enter the CRQ application.
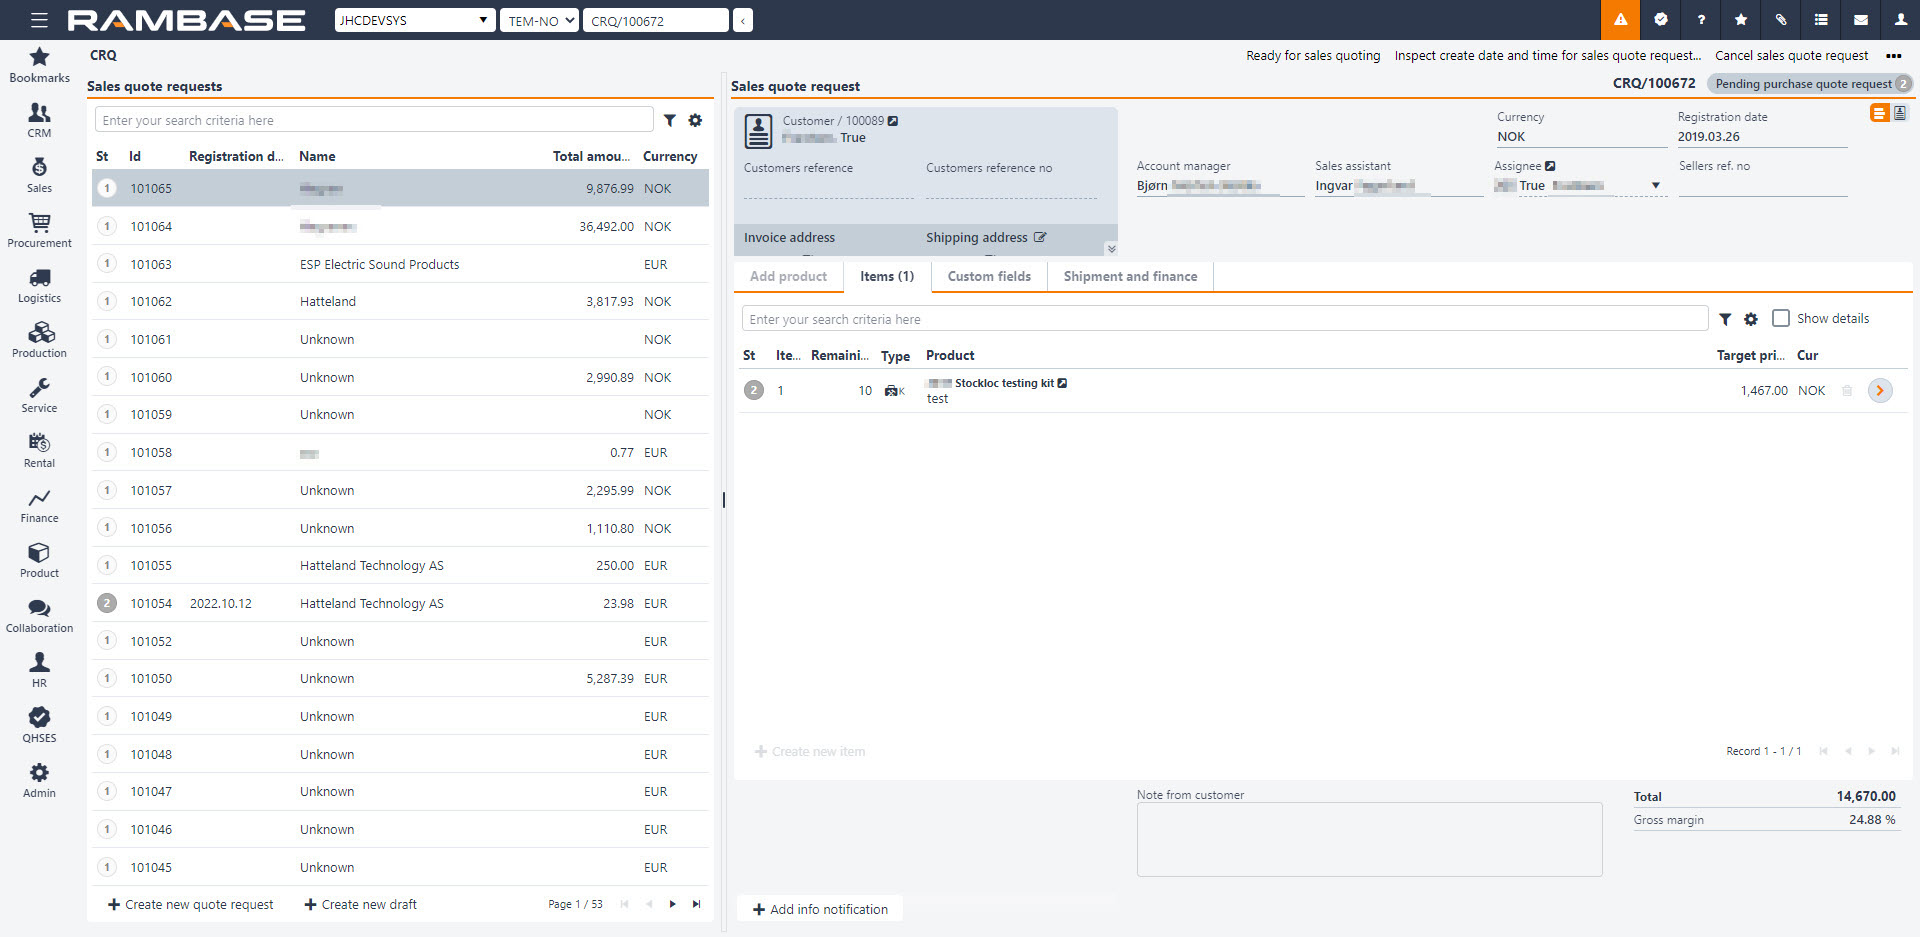
To open the Sales Quote Request (CRQ) application, find Sales in the RamBase menu and then Quoting. Click Sales quote requests to enter the CRQ application.
Click the Create new quote request button in the lower left hand corner of the application.
Enter parts of the Customer (CUS) name in the Customer lookup field, or click the downward arrow to open the search menu to find it. Choose the CUS and if the CUS has several addresses, choose the customer address in the Address lookup field.
Choose the currency in the Currency field and click the Create button.
Back in the CRQ you will see that the CRQ has received a sequence number (CRQ/xxxxxx) in the top right corner. This means that the CRQ is saved and available for further processing.
The reference number from the CUS may be set in the Customer ref no field. The reference person for the CUS may be set in the Customers ref field.
To add products, click the Create new item button.
This will open a popup where you must enter relevant information. Choose the quantity in the Qty field and enter the product name in the Product field to find it in the product list. Target price will be suggested according to value in the Company setting (CSV), Priority of suggested price. This may be adjusted.
If there is a requested delivery date, it can be set in the Requested delivery date field. Click the calendar icon next to the Requested delivery date field and choose the date. This may be adjusted.
If you need to add several items, check the Create Another box and repeat the item adding process.
Click the Create button.
If you need to add several items, click the Create new item button and repeat the item adding process.
A draft can automatically be created by clicking the Create new draft button in the menu. When a draft is created, the menu will automatically be collapsed to give more overview. Draft will create a document for a default customer, found in the Company settings (CSV) Default customer account for sales draft. If no Customer (CUS) is set up in this Company settings (CSV), RamBase will create one named as Unknown. This will have base data according to standard create values for this company. The base data can be changed for this Customer (CUS) afterwards if it is required, or the user can create a Customer (CUS) manually and add this to the Company setting (CSV). It will not be allowed to register documents for this Customer (CUS), users must change to a real Customer (CUS) before registering.
When creating a draft It is possible to add Products (ART) by searching them up in the Quick search field. Clicking on the Quick search filter icon will list a series of checkboxes. The user can decide which categories are to be included in the search. Hover over the Quick search filter icon to quickly see which categories are included in the search. New items can be added by clicking the Plus icon.
The Add product tab shows a Location available field and a Total available field. Location available inspect stock and available quantity for Location (LOC) of the document. Total available inspects stock and available quantity for all Location (LOC).
The Show details checkbox gives an overview over 4 useful tabs:
Tab names | Description |
|---|---|
Product details | Lists information from the related Product (ART) |
Product details | Accessories registered from Product (ART) |
Replacements | Replacements needed for a Product (ART) |
Transactions | Shows backlog items, Quote items and Invoice items |
When adding items from the Add products tab, they will appear in the Items tab.
The Show details checkbox gives an overview over 5 useful tabs:
Tab names | Description |
|---|---|
Item details | List information from the related Sales order item (COAITEM) |
Notifications | Notifications for this item |
Product details | Lists information from the related Product (ART) |
Landed costs | Shows the chosen purchase currency and the landed cost in purchase currency and sales currency |
Accessories | Accessories registered from Product (ART) |
It is possible to re-arrange items before registering a Sales quote (CQU) and sending it to the Customer (CUS), so that the items can be presented in logical order. Re-arrange item can be found by clicking the Context menu and then click on the Change items order.
The Item field is an id of an item and the field LineNo will take over as the sorting key. LineNo will decide the order of lines and will be used as sequence number for items. Item and LineNo will not necessarily be synchronized. When an item is deleted, it will simply not exist anymore. PDFs to Customers (CUS) will show a column for LineNo rather than Item. The field LineNo can be found as a column in the Sales quote item (CQUITM). When forwarding a Sales quote (CQU) to a Sales order (COA), item will be created in the LineNo order in the new documents.
If the Sales Quote Request (CRQ) is to be forwarded to a Sales Quote (CQU), the criteria will be that the request is in status 4.
There are two methods of forwarding a request to a quote, either the whole document or item by item.
To transport parts of a Sales Quote Request (CRQ) to a new Sales Quote (CQU), double-click on the desired item you want to transport to a new Sales Quote (CQU). In the context menu, click on the option Forward to sales quote. Then choose the destination Forward to new quote if the item is to be added to a new Sales Quote (CQU). If not, you may choose an existing Sales Quote (CQU) available in the lookup field beneath the option Forward to existing quote and then click the Forward button.
To transport a whole Sales Quote Request (CRQ) to a new Sales Quote (CQU), choose the option Forward all items to sales quote in the context menu. Then choose destination Forward to new quote if the item(s) is to be transported to a new Sales Quote (CQU). If not, you may choose an existing Sales Quote (CQU) available in the Lookup field beneath the option Forward to existing quote. Click the Forward button.
If the items that are transported to another document have a quantity higher than 1, you may also choose the quantity that should be transported. If you do not choose the full quantity to be transported to a new quote, the remaining quantity will remain on the original request for quote. If the CRQ item has received a target price, this will be visible in the CQU item.
If a Sales Quote Request (CRQ) are for products or components with no purchase price or delivery time available in the ERP system, you will need to get this information. This is done in RamBase by setting the request to a specific status which makes it available for the process of getting quotes from supplier.
To prepare for quote process against supplier for products that should be purchased, not manufactured inhouse, use the context menu option Ready for supplier quoting process. The Sales Quote Request and the related item lines will go to ST:2 and will be available for purchase department.
To prepare for quote request against supplier for products that are a part of a structure that should be manufactured inhouse, create a special structure, or copy the structure from the product using the context menu option Create new or copy product structure to item.
None of the components from the special structure will be visible for the purchasers before you have chosen which components to be sent for quoting. This is done in Sales Calculator, which you can find by using the context menu option Sales calculator.
Choose the components to add to the quote by selecting the checkbox in the Request Quote column for every line item.
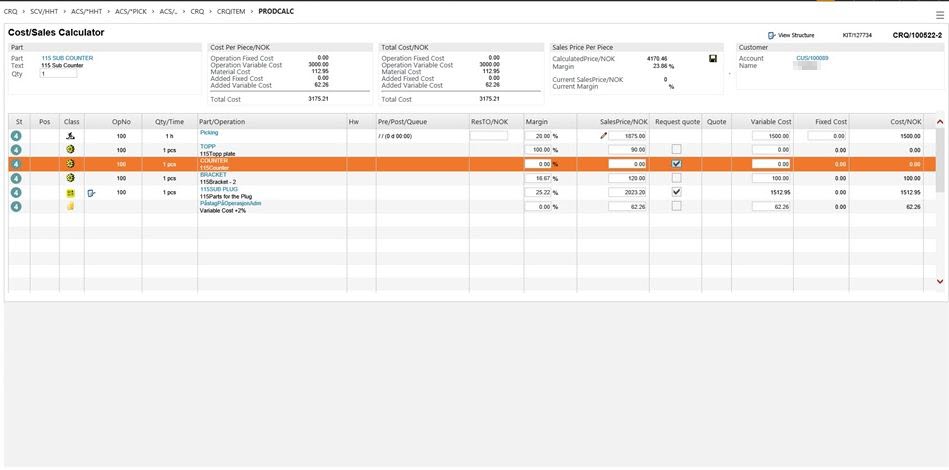
Choose the components you want quote on by checking the checkbox in the Request Quote column in each item line.
The purchaser gather one or several supplier quotes, and connect the best offer to the request. This means that purchase price and delivery time will be visible on the request and you may use this information further in the process.
A Sales quote (CQU), is an offer to a customer - normally based on a Sales quote request (CRQ). CQU are stored in the CQU-archive, and managed by the CQU-program. A CQU may also turn in to a sales agreement if a quote is accepted.
To open the Sales quote (CQU) application, find Sales in the RamBase menu and then Quoting. Click Sales quotes to enter the CQU application.
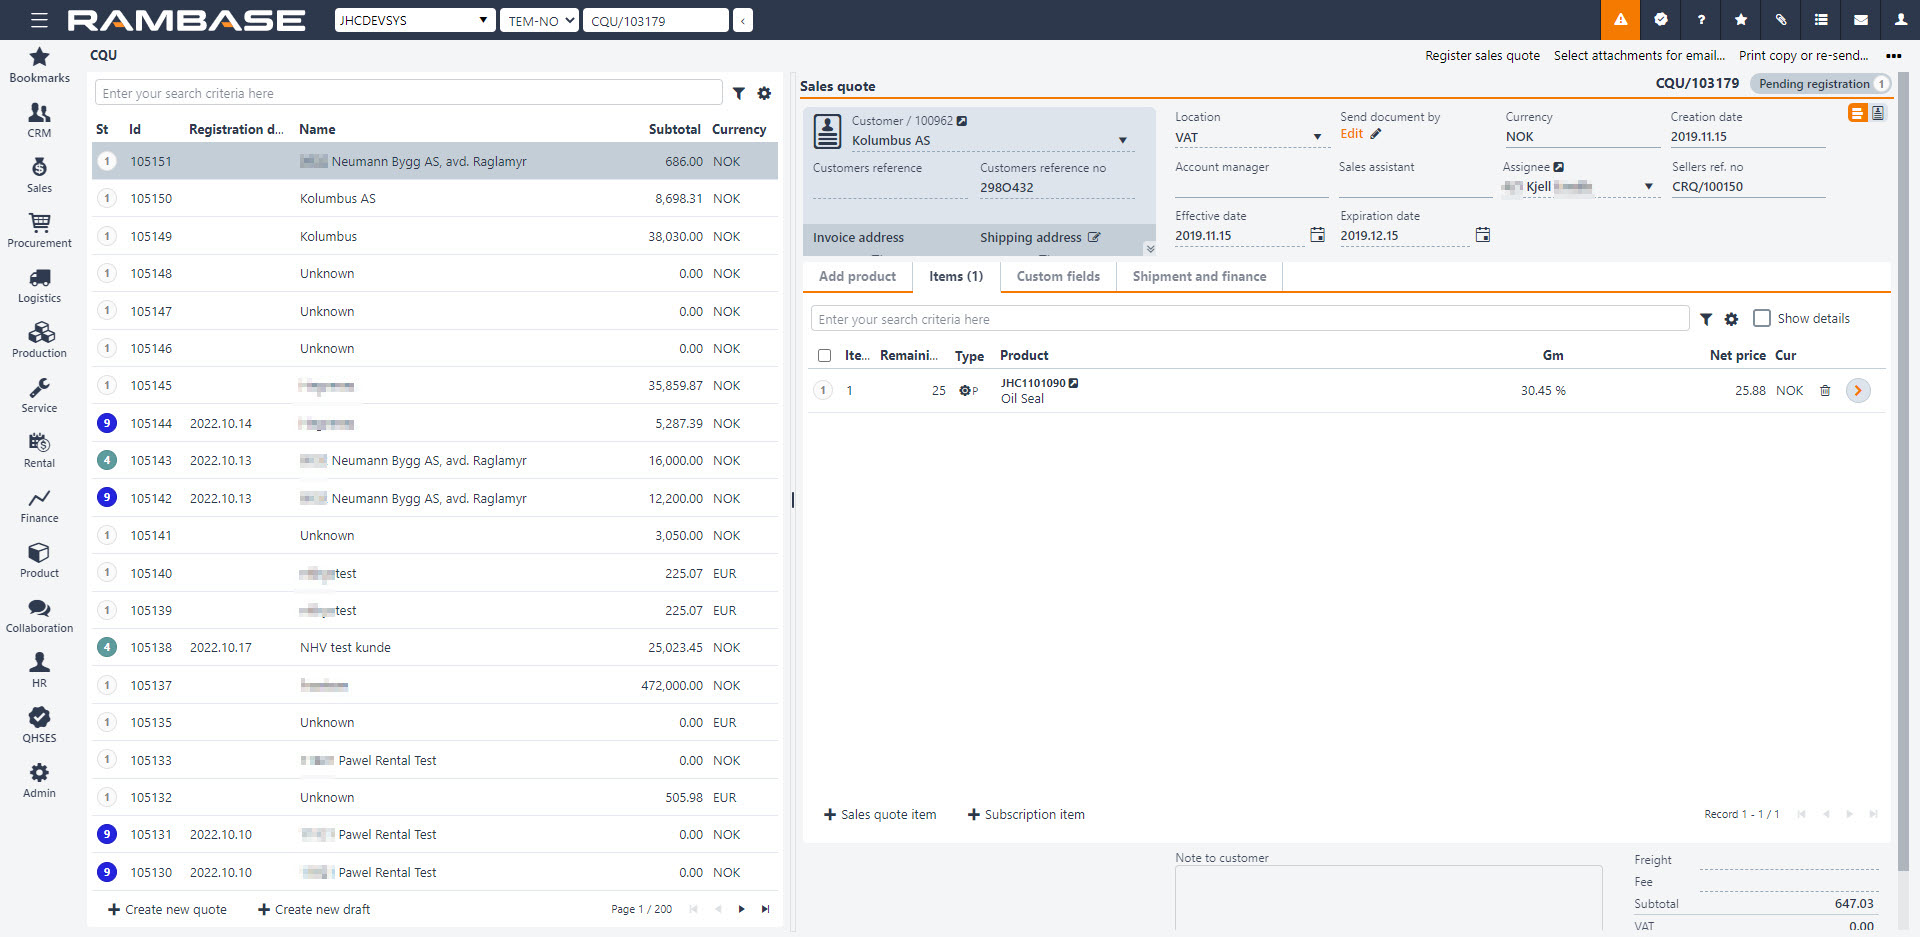
There are two methods of creating a Sales Quote (CQU), either from scratch or transferring a Sales Quote Request (CRQ) to a quote.
To open the Sales Quote (CQU) application, find Sales in the RamBase menu and then Quoting. Click Sales quotes to enter the CQU application.
Click the Create new quote icon in the lower left corner.
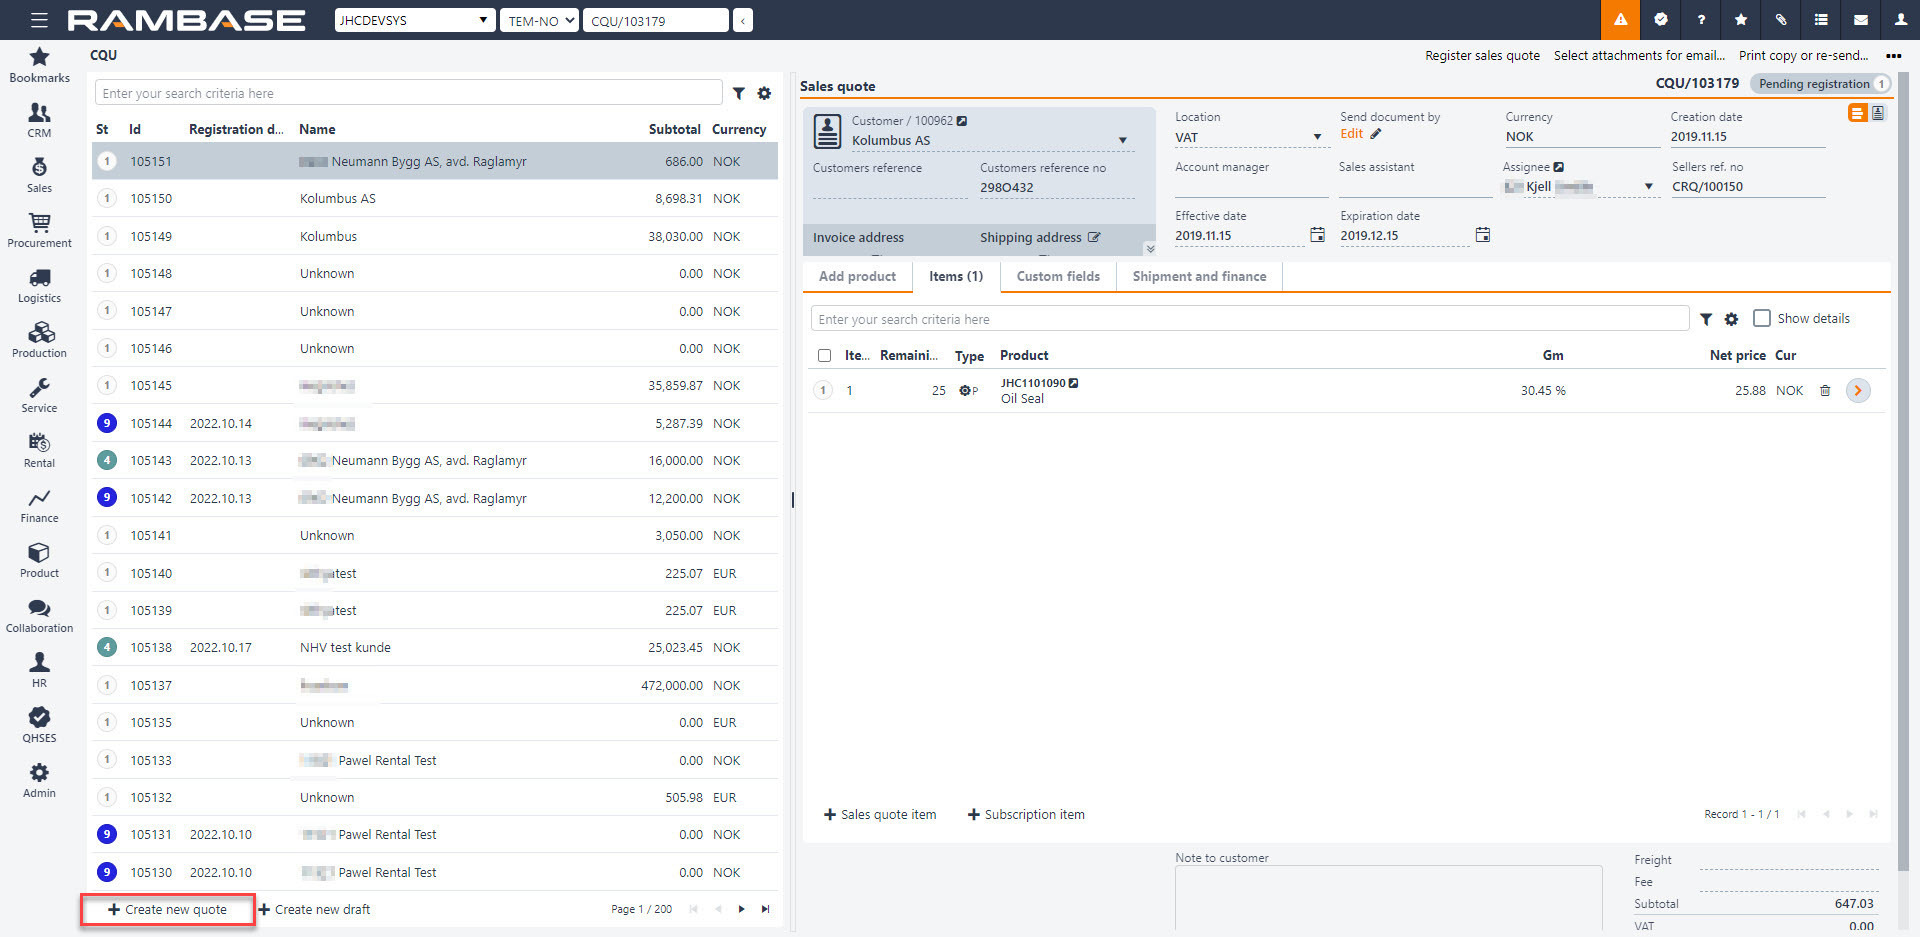
Enter parts of the customer name in the Customer lookup field, or click the downward arrow to open the search menu to find it. Choose the customer and if the customer has several addresses, choose the customer address in the Address lookup field. The address displayed is the address chosen as default in the Customer archive.
Back in the document you will see that the CQU has received a sequence number. This means that the document is saved and available for further processing. All information stored on the customer will also be available, such as price and delivery terms.
The RFQ number from the customer may be set in the Customer reference no field. The reference person for the customer may be set in the Customers reference field.
To add products, click the Sales quote item button.
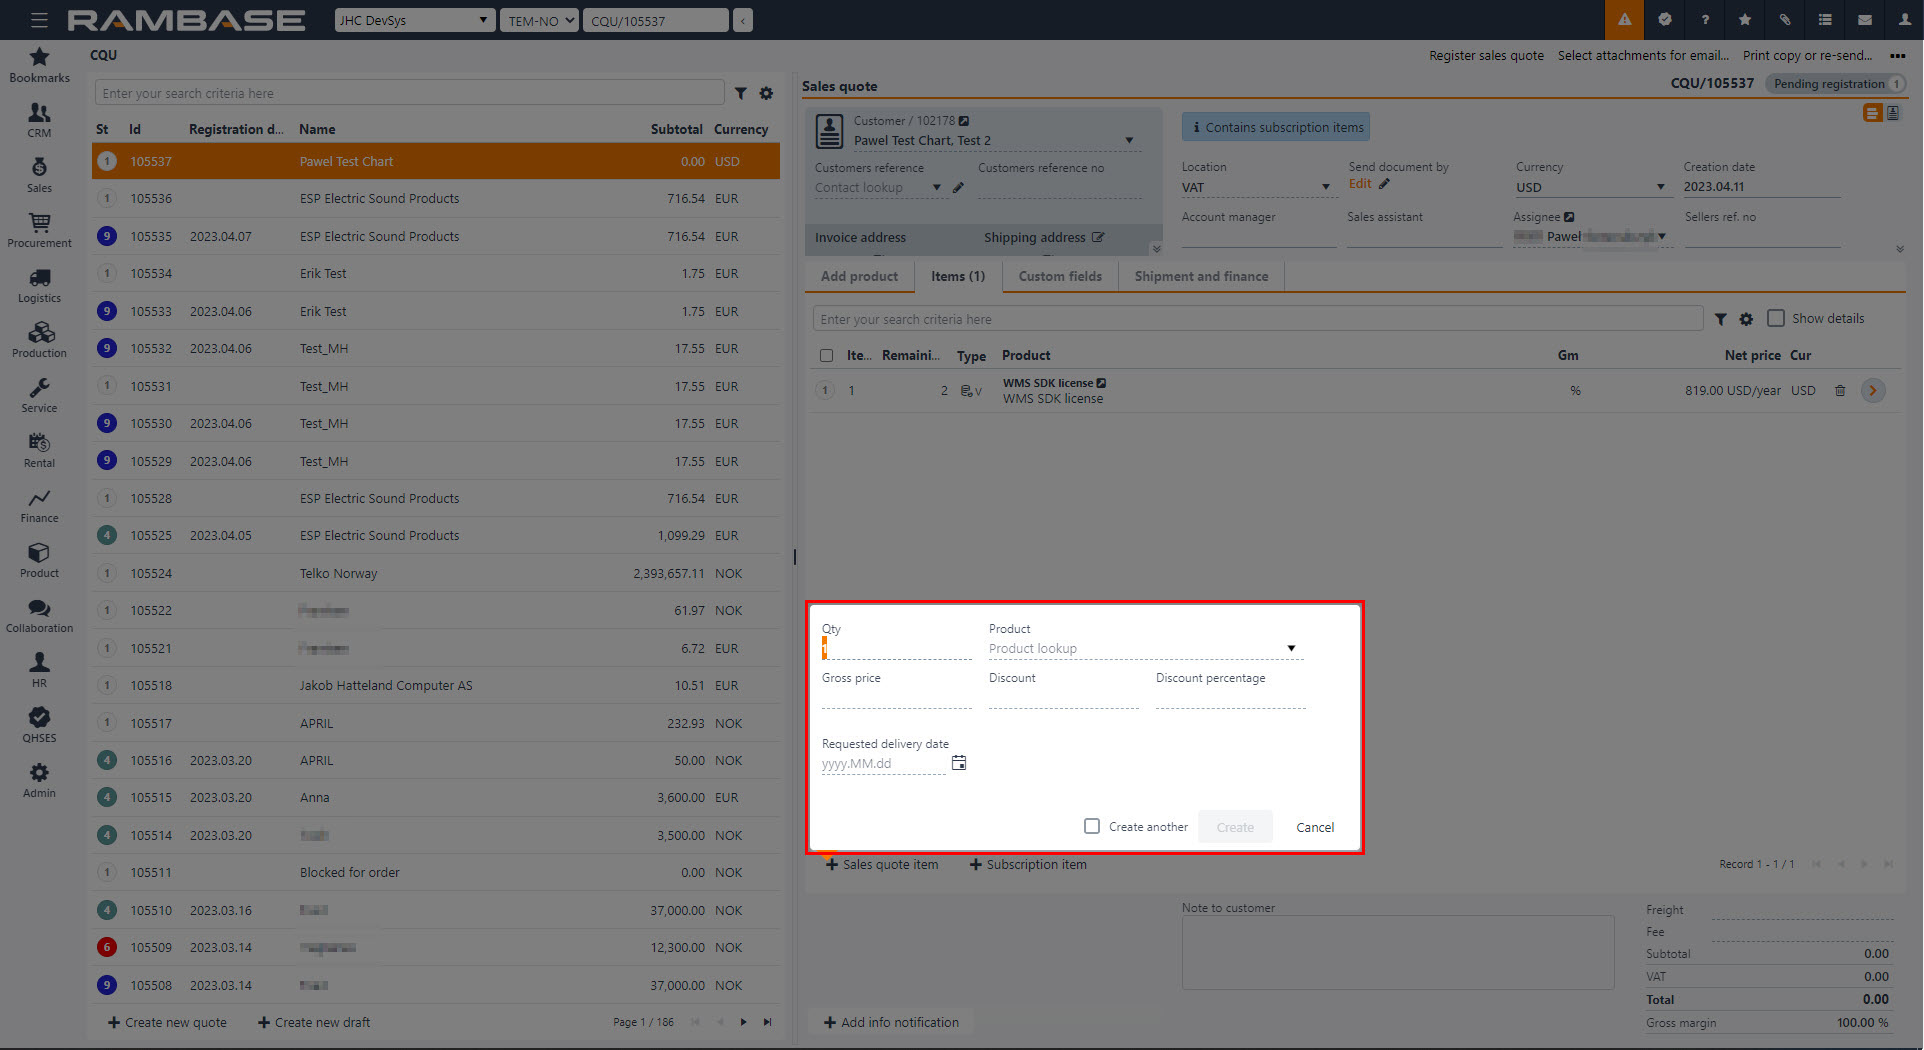
To add items, select the Create new items button. In the popup that appears, choose the quantity in the Qty field and enter the product name in the Products field to find it in the archive. RamBase will suggest prices according to the Company settings (CSV), Priority of suggested sales price for the item. All applicable prices will be presented in the Price based on field after the Product (ART) has been selected, and the user may select another price. The lowest applicable price is found the following way:
The lowest price of
Item price agreement (IPA)
Product (ART) price - Where the priority to find the applicable product is:
PLI (Price list)
VPA (Volume price agreement)
STD (Standard sales price)
If no applicable price can be found based on this, there will be attempt to calculate item price based on standard cost price of the product, in this priority.
GM from Company setting (CSV) Default Gross Margin on Sales documents
25% GM (Hardcoded)
You can set the information regarding when the customer needs the goods. To set the requested delivery date, click the calendar icon next to the Requested delivery date field and choose the date. This may be adjusted.
If you need to add several items, click on the Create Another checkbox and repeat the item adding process.
Click the Create button.
If you need to add several items, click the Sales quote item button and repeat the item adding process.
To set a duration period for the quote, use the fields Effective date and Expiration date.
A draft can automatically be created by clicking the Create new draft button in the menu. When a draft is created, the menu will automatically be collapsed to give more overview. Draft will create a document for a default customer, found in the Company settings (CSV) Default customer account for sales draft. If no Customer (CUS) is set up in this Company settings (CSV), RamBase will create one named as Unknown. This will have base data according to standard create values for this company. The base data can be changed for this Customer (CUS) afterwards if it is required, or the user can create a Customer (CUS) manually and add this to the Company setting (CSV). It will not be allowed to register documents for this Customer (CUS), users must change to a real Customer (CUS) before registering.
When creating a draft It is possible to add Products (ART) by searching them up in the Quick search field. Clicking on the Quick search filter icon will list a series of checkboxes. The user can decide which categories are to be included in the search. Hover over the Quick search filter icon to quickly see which categories are included in the search. New items can be added by clicking the Plus icon.
The Add product tab shows a Location available field and a Total available field. Location available inspect stock and available quantity for Location (LOC) of the document. Total available inspects stock and available quantity for all Location (LOC).
The Show details checkbox gives an overview over 4 useful tabs:
Tab names | Description |
|---|---|
Product details | Lists information from the related Product (ART) |
Accessories | Accessories registered from Product (ART) |
Replacements | Replacements needed for a Product (ART) |
Transactions | Shows backlog items, Quote items and Invoice items |
When adding items from the Add products tab, they will appear in the Items tab.
The Show details checkbox gives an overview over 5 useful tabs:
Tab names | Description |
|---|---|
Item details | List information from the related Sales order item (COAITEM) |
Notifications | Notifications for this item |
Product details | Lists information from the related Product (ART) |
Landed costs | Shows the chosen purchase currency and the landed cost in purchase currency and sales currency |
Accessories | Accessories registered from Product (ART) |
It is possible to re-arrange items before registering a Sales quote (CQU) and sending it to the Customer (CUS), so that the items can be presented in logical order. Re-arrange item can be found by clicking the Context menu and then click on the Change items order.
The Item field is an id of an item and the field LineNo will take over as the sorting key. LineNo will decide the order of lines and will be used as sequence number for items. Item and LineNo will not necessarily be synchronized. When an item is deleted, it will simply not exist anymore. PDFs to Customers (CUS) will show a column for LineNo rather than Item. The field LineNo can be found as a column in the Sales quote item (CQUITM). When forwarding a Sales quote (CQU) to a Sales order (COA), item will be created in the LineNo order in the new documents.
To create a CQU from a CRQ, you will need to forward the CRQ document to a CQU document. A CQU based on a CRQ will always contain the same information as the request, but with the option to add or change the information.
Instruction on how to forward a CRQ document to a CQU document can be found in the topic Follow up on Sales Quote Request.
You can copy an existing CQU to make a new CQU. In the CQU application. In the context menu, select Copy Sales quote to new sales quote.
To copy special structures to the new CQU, in CSV, enter COPY*SPECIAL*STRUCTURE and select the Enter key.
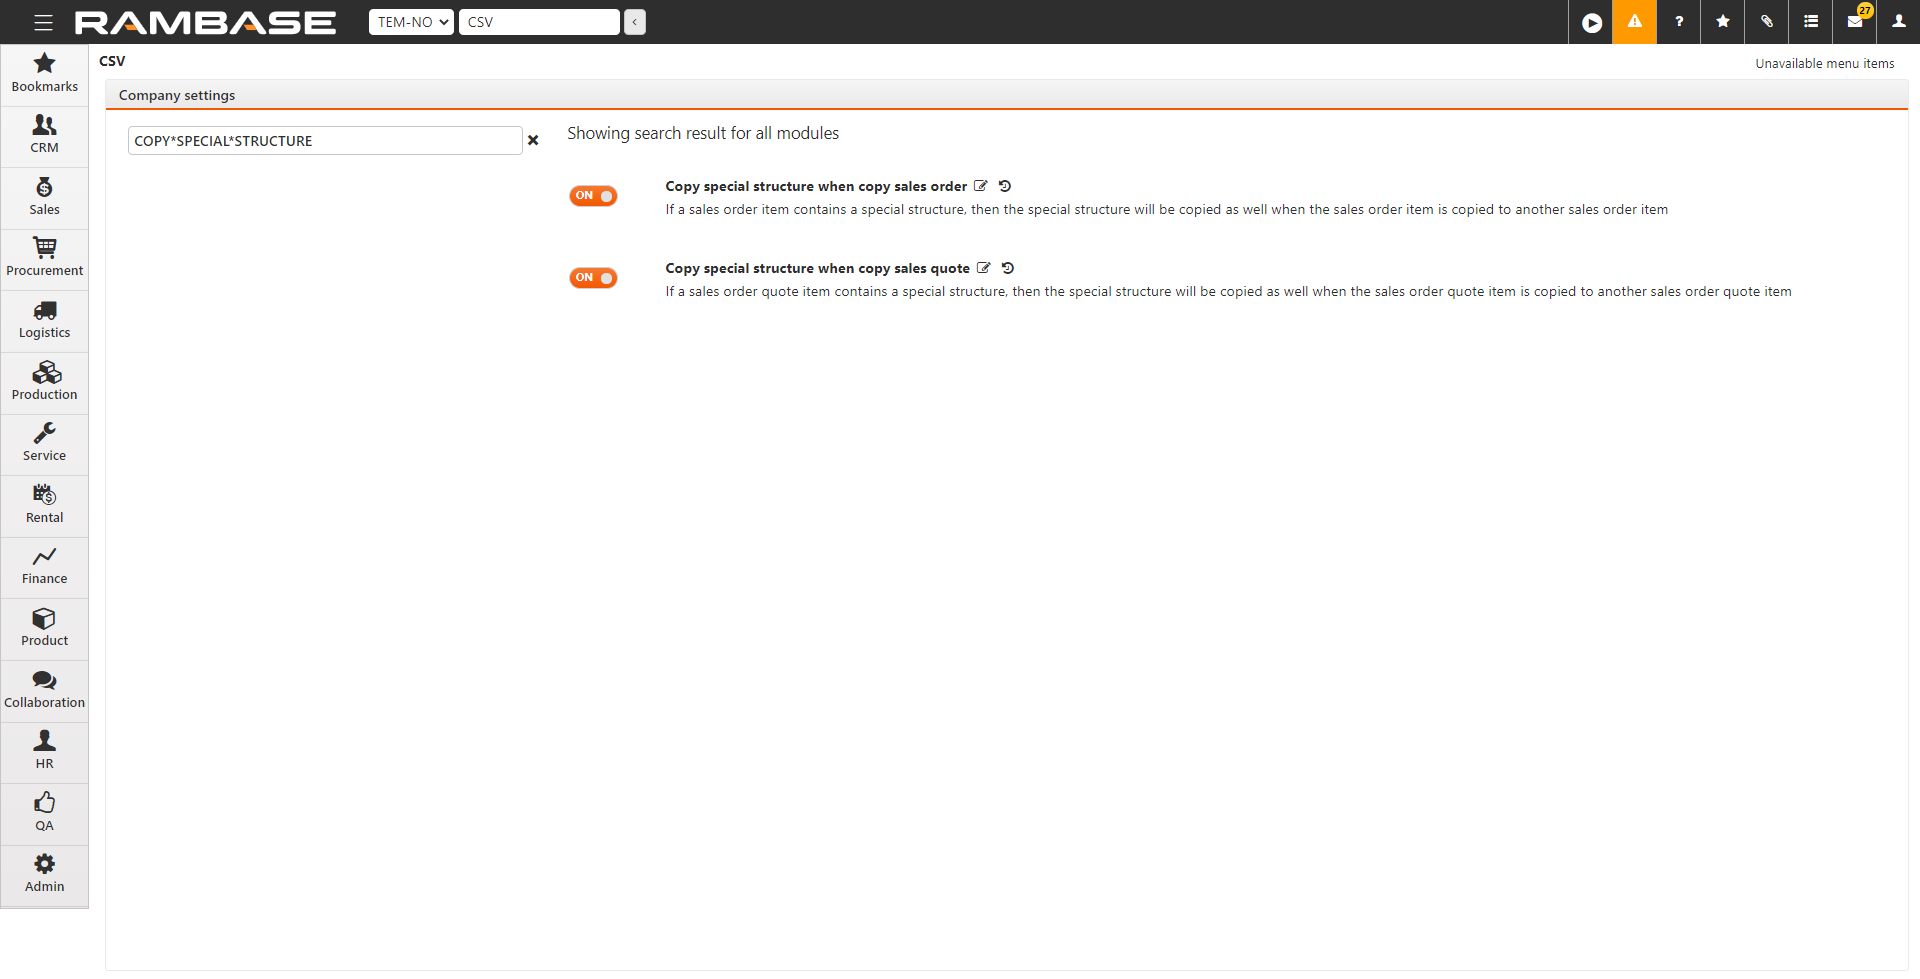
Select Copy special structure when copy sales quote to enable the setting.
Updating the price on Sales quote items (CQUITM) can be done on both main level and item level. Depending on where you are working, either from the Sales quote (CQU) application or the Sales quote item (CQUITM) application, different options in the context menu are available to achieve similar results:
Context menu option | Availability |
|---|---|
Update to suggested price for all items | Available in the Sales quote (CQU) application. |
Update to suggested price for selected items | Available in the Sales quote (CQU) application, if the Sales quote items (CQUITM) are selected. Also available in the Sales quote items (CQUITM) application. |
Update to applicable price | Available in the Sales quote items (CQUITM) application. If multiple prices are available, the user can choose the intended one. |
When to use these features
The user wants to mass update prices in a Sales quote (CQU) to suggested prices according to the Company settings (CSV), Priority of suggested sales price.
Reasons for changing might be correcting a draft, or terms have changed in the quoting process.
Conditions for Sales quotes (CQU)
The Sales quote (CQU) must be in Status 1 (Pending registration).
The Sales quote (CQU) must contain a minimum of one Sales quote item (CQUITM).
From the RamBase menu, select Sales and then Quoting. Finally click on Sales quotes to open the Sales quotes (CQU) application.
Update to suggested price for all items - Context menu option
From the Sales quote list, select the Sales quote (CQU) with Sales quote items (CQUITM) you want to update the price for.
From the Context menu, select the Update to suggested price for all items option.
Update to suggested price for selected items - Context menu option
From the Sales quote list, select the Sales quote (CQU) with Sales quote items (CQUITM) you want to update the price for.
From the Items tab, click on the on the Status icon or icons of the Sales quote items (CQUITM) to select the intended Sales quote items (CQUITM).
To select all Sales quote items (CQUITM), select the top checkbox in the Status icon column. Note that the selection only applies for for the Sales quote items (CQUITM) on the current page, and not all Sales quote items (CQUITM).
If successfully selected, a check mark will replace the Status icon.
From the Context menu, select the Update to suggested price for selected items option.
From the RamBase menu, select Sales and then Quoting. Finally click on Sales quotes to open the Sales quotes (CQU) application.
Update to suggested price for selected items
From the Sales quote list, select the Sales quote (CQU) with Sales quote items (CQUITM) you want to update the price for.
From the Items tab, click on the Arrow icon on one of the Sales quote items (CQUITM) to open the Sales quote items (CQUITM) application, entering item level.
In the Sales quote items (CQUITM) application, from the Sales quote item list area, click on the Status icons of the Sales quote items (CQUITM) you want to update the price for.
From the context menu, select the Update to suggested price for selected items.
Update to applicable price - Context menu option
From the Sales quote list, select the Sales quote (CQU) with Sales quote items (CQUITM) you want to update the price for.
From the Items tab, click on the Arrow icon on one of the Sales quote items (CQUITM) to open the Sales quote items (CQUITM) application, entering item level.
From the Sales quote item list area, click on the Sales quote item (CQUITM) you want to update the price for.
From the context menu, select the Update to applicable price option in the context menu.
If multiple prices are available, select the intended price in the Select price popup. If only one price is available, the price will be updated without having to choose.
It is possible to create a reservation of goods on Sales quotes (CQU) where a certain quantity of a product is allocated to avoid running out.
To open the Sales quote (CQU) application, find Sales in the RamBase menu and then Quoting. Click Sales quotes to enter the Sales quote (CQU) application.
Click on the specific Sales quote (CQU).
Highlight the Sales quote (CQU) item in the Items tab and press ENTER.
In the Sales quote (CQU) item you can find a field called Buffer quantity where you can set the desired buffer quantity.
The Sales Calculator is used to calculate sales price using operation and material cost together with added margin. It is a very helpful tool to control all aspects of pricing, both cost and sale, in a kit in the sales process.
There are several ways of accessing the Sales Calculator:
At CRQ / CQU / COA item with Class = K* and special structure
At CSO item 2 (Class = KM)
At PWO with special structure
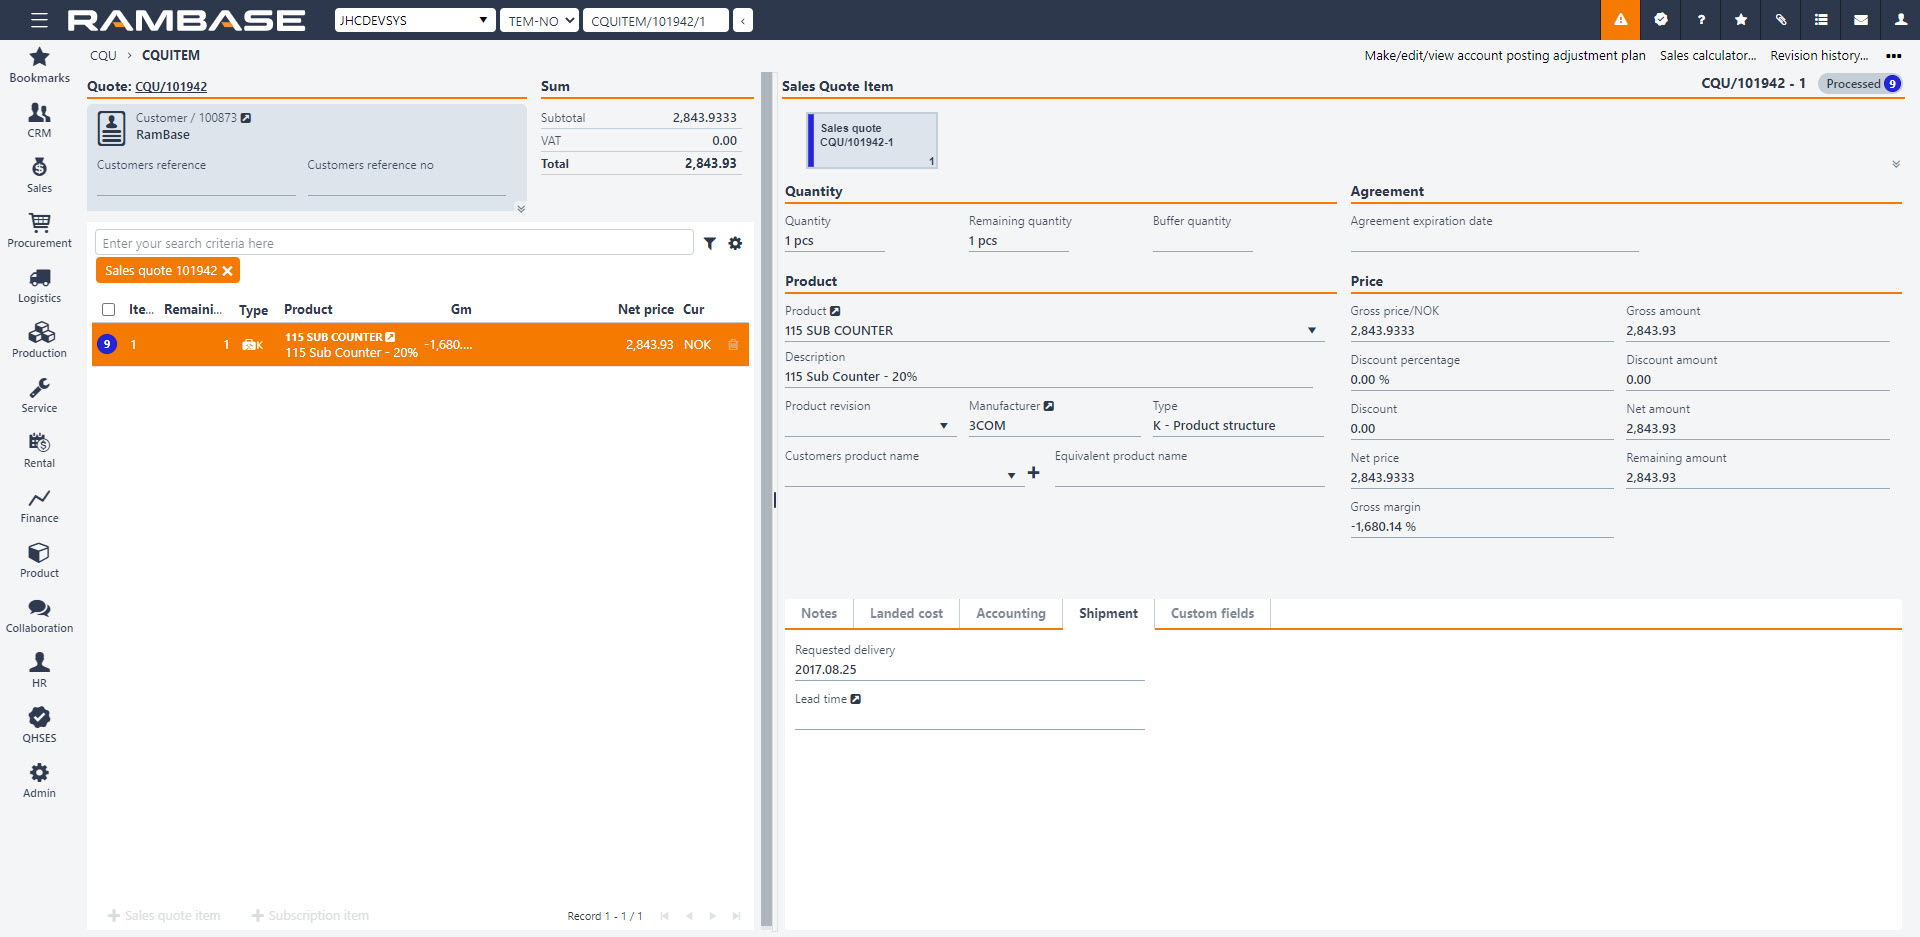
Enter the relevant document and click on the option Sales calculator in the Context menu to open the program.
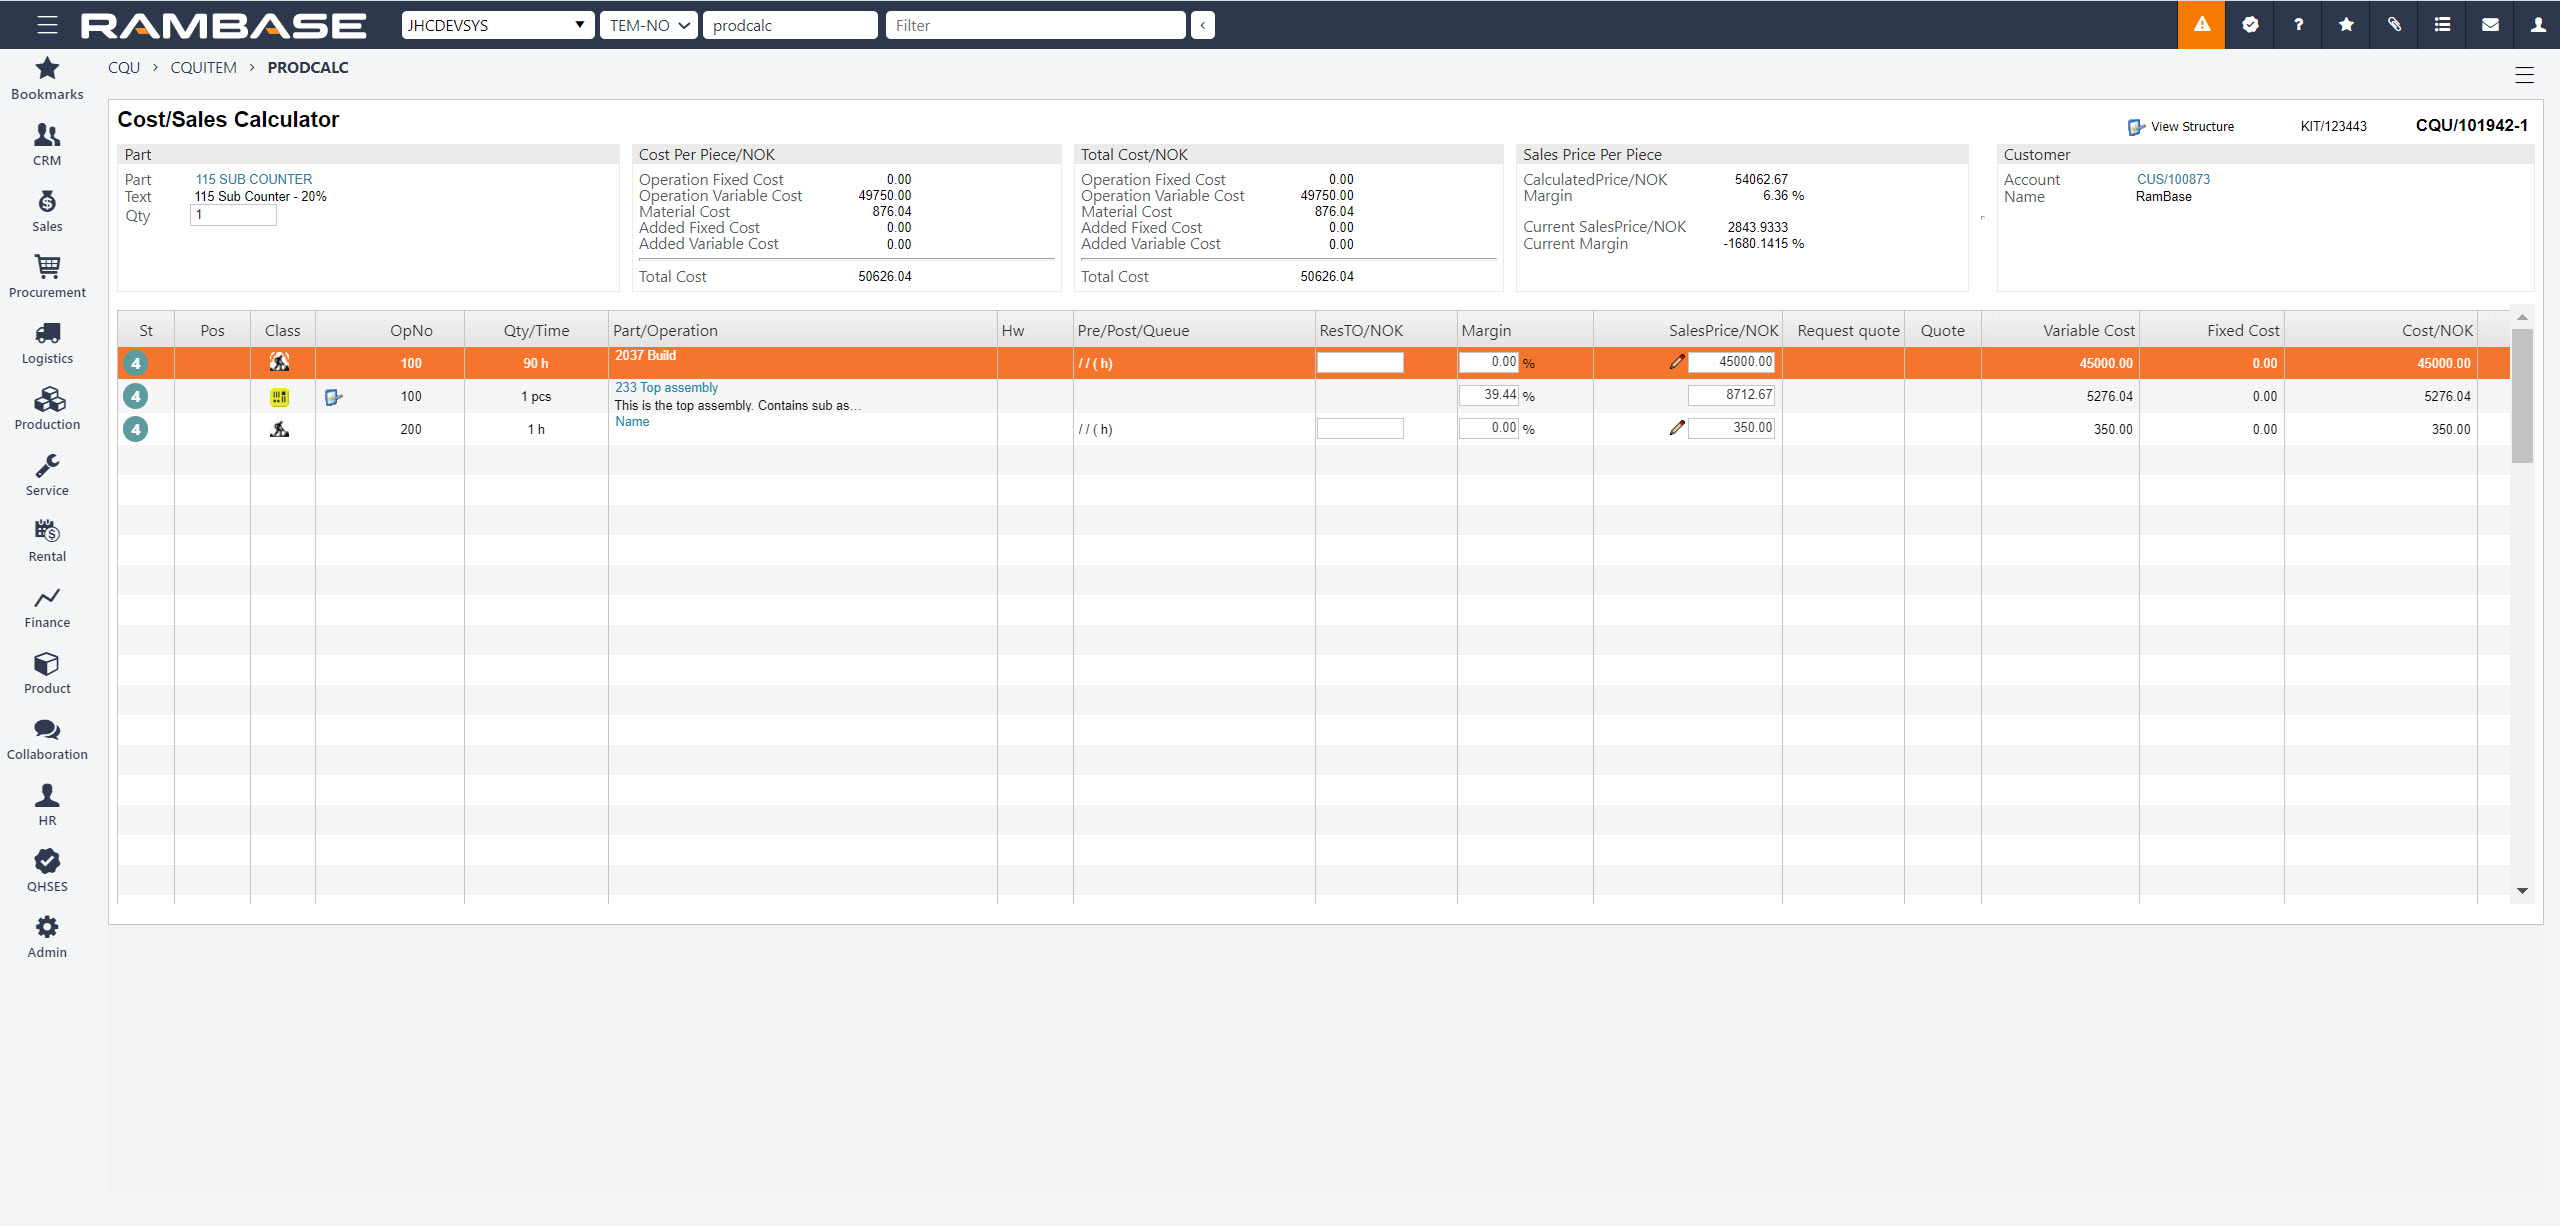
Part
This box shows the part number, text (part description) and Qty (sales quantity).
Cost Per Piece
Operations costs, material cost and added costs specified and summed per product.
Total Cost
Operations costs, material cost and added costs summed for the specified sales quantity.
Sales Price Per Piece
Calculated product sales price (per piece) based on sales prices for each line shown in the structure item lines.
Customer
When accessing the calculator from ART the customer can be selected. This will enable the action buttons to create CRQ / CQU / COA documents.
The item lines shows the valid structure of the ART (or the special structure for CRQ / CQU / COA / CSO / PWO) with costs, sales price and margin for each line.
The cost price for each line is showing the variable / fixed cost per piece to be produced. The values are read from the corresponding structure item and divided by the sales quantity when using the calculator for CRQ / CQU / COA / CSO / PWO. Each line shall always present the cost per operation/material based on producing one single product. Producing > 1 will lead to lower total fixed cost per quantity.
The cost price is comprised of material/article, operations and added costs, divided by the sales quantity.
The added cost may be linked to operations, materials, the complete structure or the sum of all the materials used. The form may be a fixed amount, variable amount or a variable percentage. The added cost must be defined in the Cost Archive (CST).
The sales price showing for each line may be calculated from several sources, based on the sales price and cost related to materials/articles, operations and the added costs.
The calculator is primarily used in situations where you need to calculate the specific price for a kit, based on quantity with a concrete sales price, cost price and the margin (in percentage) for the specific parts and operations. You may also see the margin for the total kit.
You may also create a CRQ, CQU and COA for the kit in question directly from the calculator by choosing a customer (CUS) in the upper right corner.
Making a special structure (copy from ART) in a COA will also give you the opportunity to tweak the prices for the specific COA. Use the save icon in the Sales Price Per Piece box to save the price for the COA.
The Sales Quote (CQU) is normally sent using e-mail, to either one or several recipients on the Customer (CUS) side. This may also be controlled with admittance if approval is needed. The recipients are retrieved from the CUS information stored in the DocBy field.
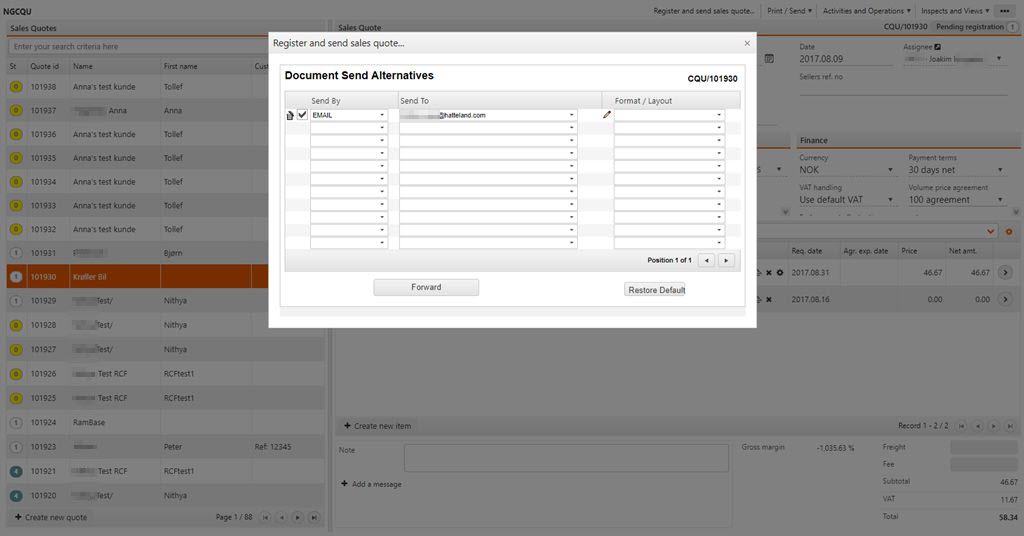
The CQU will normally be sent using the default settings at the time of registration, but may also be sent afterwards if desired. This is done by using the context menu in the top right corner and choose the option Print copy or re-send... Then you may choose if you want to send the original or a copy and what type of media you desire.
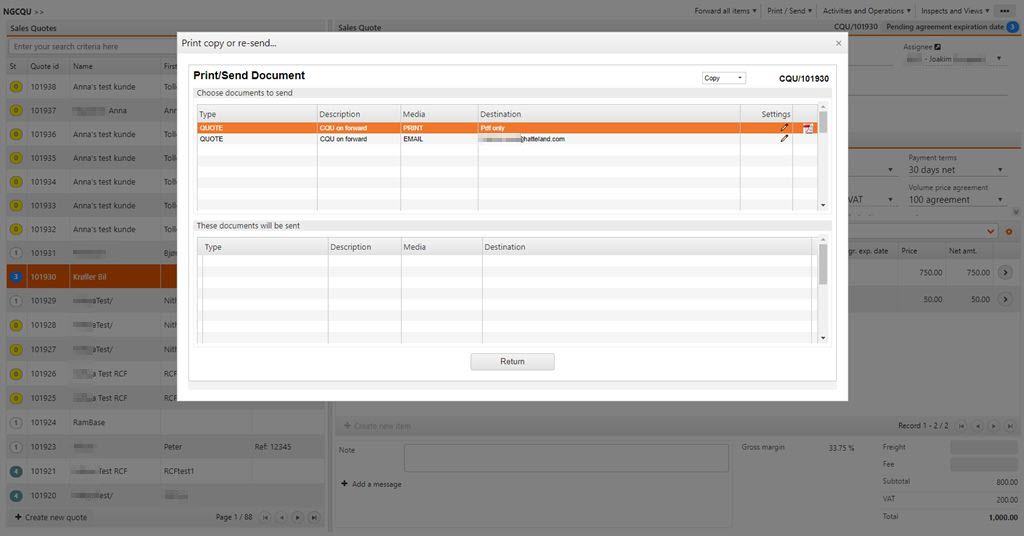
To register a CQU and send it to the desired recipients, use the context menu and choose the option Register and send sales quote. The CQU is now closed for editing. If the CUS wish to negotiate, the CQU must be transported to a new CQU. The CUS has now received the offer and depending on how this is followed up, you must wait for acceptance or decline.
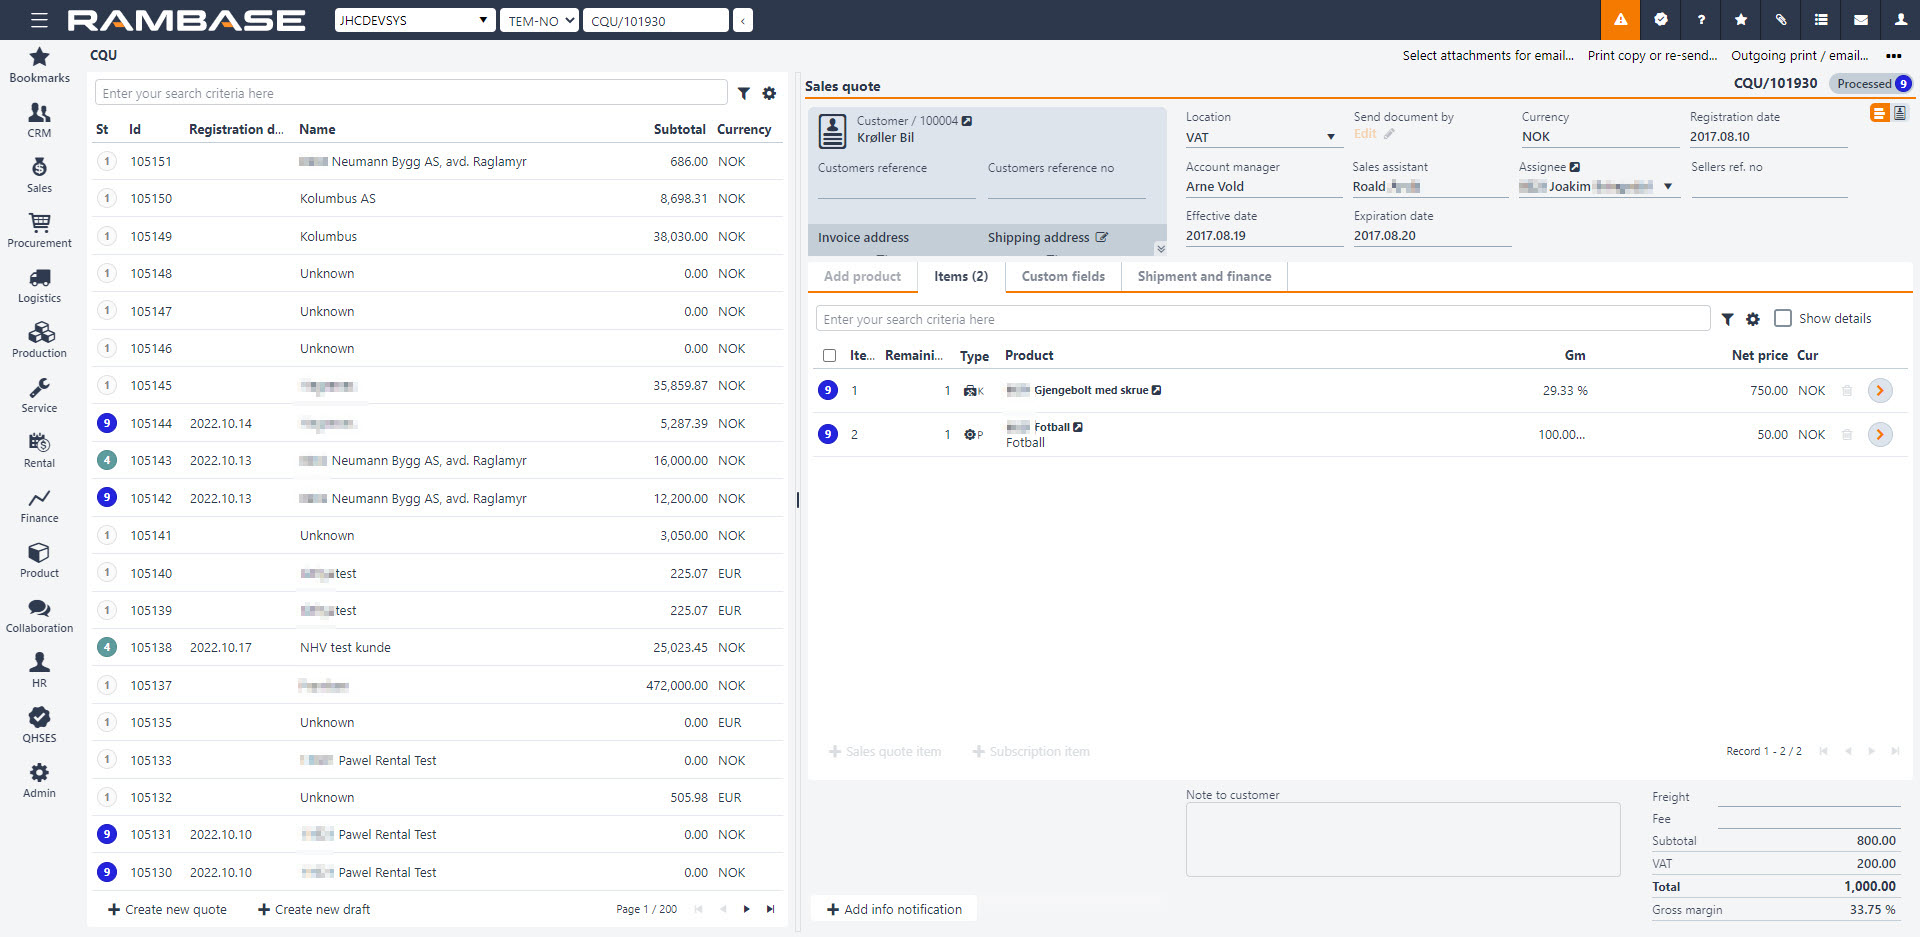
A quote is expired when the acceptance term which is set in the Expiration date field has expired. Depending on the company settings a quote may automatically change to ST:6 a specified number of days before the Expiration date, -as a warning to seller that is has to be followed up. A CQU may also be automatically closed after a certain period after expiration, where it will go to ST:9. These settings can be adjusted in the Settings application under Sales.
To cancel parts of a quote, double-click on the desired item and click on the Cancel item option in the Context menu. This may be used in cases where the customer only wants parts of the goods for the same terms.
To manually cancel the whole quote before the expiration date has been reached, click on the option Cancel sales quote in the Context menu. The quote will be archived as loss.
If the customer wish to discuss the terms following the quote, and the selling part agrees, a new quote must be made. There are two methods of doing this, either to change the whole quote or parts.
To transport parts of a quote to a new quote, double-click on the desired item. In the Context menu, click on the option Forward to sales quote. Then choose the destination Forward to new quote if the item is to be added to a new quote. If not, you may choose an existing quote available in the Lookup list beneath the option Forward to Existing Quote and then click on the Forward button. If the item lines to be transported has a quantity higher than 1, you may choose the quantity transported.
To transport a whole quote to a new quote, choose the option Forward all items to sales quote. Then choose destination Forward to new quote if the item is to be transported to a new quote. If not, you may choose an existing quote available in the Lookup list beneath the option Forward to existing order.
NOTE: It is also possible to use the multi-select option, where you click on the status icon of the item to select. The options you have available when performing multi-select are as follows:
Forward selected items to sales order
Update agreement expiration date on selected items
Open / discard
Cancel selected items
Delete selected items
If the customer accepts the quote within the expire date, which is set in the Expiration date field, you may turn this in to a long time agreement by extend the validity by updating Agreement Expire date in item.
If the customer accepts the quote and place an order, you can easily transport this to a Sales Order (COA). There are two methods of doing this, either if it is the whole quote or just parts to be ordered.
To transport parts of a quote to an order, double-click on the desired item. In the Context menu, click on the option Forward to sales order. Then choose the destination Forward to new order if the item is to be added to a new order. If not, you may choose an existing order available in the Lookup list beneath the option Forward to Existing Order and then click on the Forward button. If the item lines to be transported has a quantity higher than 1, you may choose the quantity transported.
To transport a whole order to a new order, choose the option Forward all items to sales order. Then choose destination Forward to new order if the item is to be transported to a new order. If not, you may choose an existing order available in the Lookup list beneath the option Forward to existing order.
NOTE: It is also possible to use the multi-select option, where you click on the status icon of the item to select.
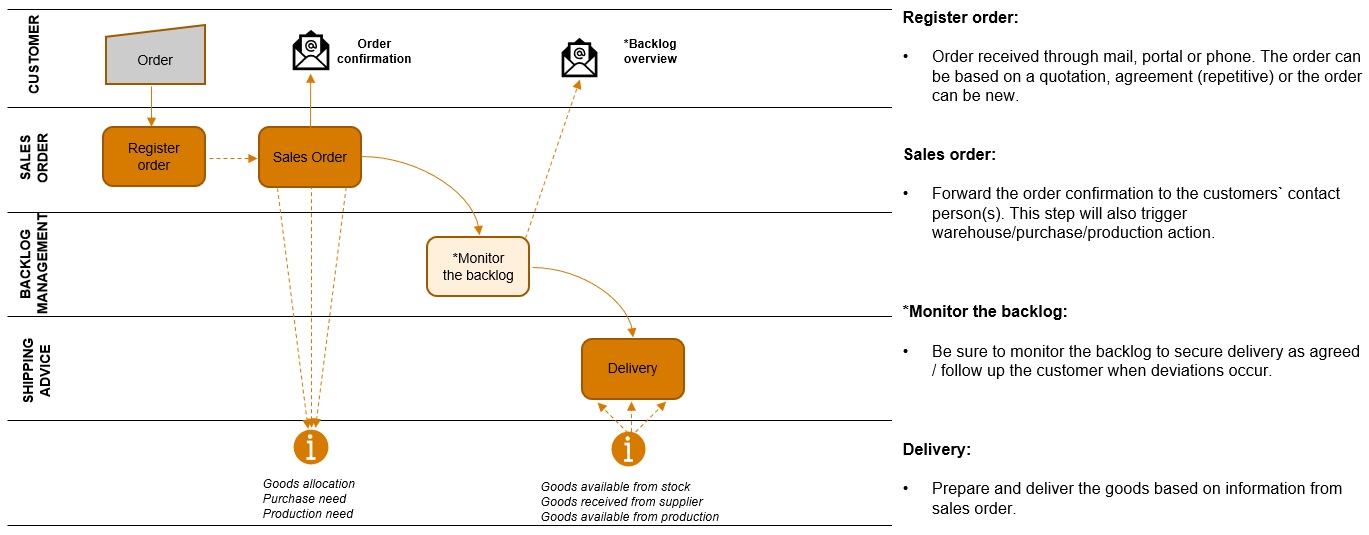
Use the order handling process to specify the price, delivery time, payment terms, articles and quantities required, for an order.
Single sale with mutually agreed, confirmed terms.
Contracted, recurring sales.
Cancelled sale with mutually agreed, confirmed terms.
Follow up on committed, undelivered orders, the customer backlog.
An order, which originates from a quotation, mainly contains the agreed terms that have been negotiated between you and your customer. An order, which requires confirmation from you to the customer, can be legally binding. Once you receive the order confirmation, you can add the order value in the company’s income projections.
An order can also be generated without being preceded by a quotation. This may be because the order is small, or the customer has a preexisting agreement of terms to be applied to all orders, such as purchases from a web shop. These agreements may be written or verbal, containing the agreed terms such as delivery time and price. This solution reduces the delivery time and the time overheads of administration.
In addition to the several other tasks in the ordering process, you should also follow up the committed, but as yet undelivered, orders. This is the customer backlog. Within this task you can follow up the customer backlog based on requests or your internal routines. For example, get committed dates from suppliers and/or production, making sure that the orders are delivered according to committed schedules or attempt to expedite purchase orders/production if the customer’s requested date is not met.
Follow up the customer backlog periodically to reduce delivery slippage. On-time deliveries can be increased by closely following up the backlog.
An order can be cancelled if necessary.
Receive an order. Creating an order where products, quantity, pricing and delivery terms are specified.
Allocate goods. Make sure the goods are in stock or in production.
Acknowledge the order. Send a sales order to one or several recipients.
Follow up on the customer backlog. An order that is already acknowledged can still be cancelled or partially delivered.
Amend an order. Upon request and agreement with the customer, create a new version of the sales order.
Setting name | Description |
Approval of change in Gross Margin | The value of this setting is the percentage of allowable variation in the Gross Margin without requiring a new Gross Margin approval. This setting is used in the Sales Order (COA), Shipping Advice (CSA)and Sales Invoice (CIN) applications. New approval is required only when the percentage difference between the previous and current Gross Margin is higher than the value of Approval of change in Gross Margin. The format for this value is: N (N for numerals). |
Attach files when sending Sales Order (COA) by email | Use this setting to specify if emails sent from the Sales Order (COA) application should have the applicable files attached. If the value is ON, you can select two options: 1) Only send selected attachments or 2) Autmatically send all attachments. |
Customer Order Cancel - Not Redirect To New | If this setting is set to ON, you are not redirected to the cancelled Sales Order (COA) when you cancel a Sales Order (COA) using the cancellation function (red X-icon). You will see the original Sales Order . |
Consolidate ‘Note to customer' in sales order to shipping advice | If this is switched ON, it will cause that if several sales orders (COA) are forwarded to the same shipping advice (CSA), “Note from customer” in all the orders will be forwarded and concatenated in “Note to customer” in the shipping advise. It wlll be distinguished in CSA which part of the content that origin from which sales order. |
Decimals in Amount field on documents | Specify the number of decimal places in the Gross Amount field in the archived Sales Order, Sales Invoice.. (COA/CIN/...) |
Decimals in Price field on documents | Specify the number of decimal places in the Gross Price field in the archived Sales Order, Sales Invoice.. (COA/CIN/...) |
Default Gross Margin on Sales documents | The value of this setting is the default Gross Margin percentage to be used for products without a Sales price. The Sales price is calculated from the Purchase price using the default Gross Margin you specify as a percentage. If you do not specify this value, the system uses 25% as the default Gross Margin. This setting is used in the Sales Order (COA), Sales Quote (CQU), Sales Order Request (CPO) and Shipping Advice (CSA). The format for this value is: N (N for numerals). More information is given at: https://help.rambase.net in Create a Sales Order |
Default price rounding rule-set for sales | The value of this setting is the the ID of the rule-set to use for rounding prices in the Sales Order Item (CIN-ITM) and Sales Quote Item (CQU-ITM) applications. If you do not want to specify the rule-set, leave this setting blank. |
Default View when select Product (ART) | If this paramater is set to ON,the default view is the Active products in the ITMCART (the Application where you choose the product when a customer document item is created). If this setting is deactivated, the default view is All products in ITMCART. Note: This setting is only available in legacy applications, not REX applications. |
Default View when select Product (ART) for Customer Orders | Specify the default filter when selecting Product (ART) for Customer orders in ITMCART (the Application where you choose the product when a customer document item is created). If this setting is deactivated, default view will be All products in ITMCART. Note: This setting is only available in legacy applications, not HTML5 applications. |
Department as mandatory on Sales Order (COA) | If this setting is set to ON, the Department field in the Accounting folder of the Sales Order (COA) must be filled before the Sales Order is forwarded to the customer |
Hide default currency on Document prints | If this setting is set to ON, the Default currency for the company is not displayed when documents are printed or emailed. The Currency is only displayed in the printed and emailed documents if the Currency is different from the Default currency of the company. |
Hide the currency rate when it is different from default currency | If this setting is set to ON, the Currency is hidden if it differs from the Default currency of the company. This setting applies to all customer and supplier documents. |
Import backlog value from Sales Orders (COA) to General Ledger (GL) | If this setting is set to ON, scheduled batch jobs are run that update Sales Orders (COA) to import the backlog value to the General Ledger. |
Inspect from Customer backlog (CUSBACKLOG) | If you specify this setting, when you select Inspect from a line in CUSBACKLOG , the Customer Backlog Management (CBM) application is displayed. If the setting is specified, the Customer Backlog (COA) - By ITM (NGREP/100090) is displayed. |
Link Warning on Sales Order (COA) | This value must be specified as an integer which indicates the number of days before the Scheduled shipping date that the Sales Order (COA) is issued a status 6 (warning), if the quantity is not totally linked to stock. |
Margin for SalesLeadTime Assignment Window | If this setting and the Use Assignment Window for Sales Order/Production Work Order setting are set to ON, Sales Orders/Production Work Orders are always assigned to PENDING if the LINKDELDATE in SAR is outside of the period given by SALESLEADTIME from ART, plus the margin from this setting. The SAR optimize process only re-assigns orders inside this window. If several companies have common ART and SAR registers (Group Structure), the Margin for SalesLeadTime Assignment Window'must only be specified for the company that is set up as OWNERDB. The Use Assignment Window for Sales Order/Production Work Order should be specified for each of the sales databases. The margin should be given in the number of days. The functions of the Assignment Window can not be used if the company is not also set up to run the nightly SAR optimize job. |
Partners info | The value of this setting is the partner setup for the company. The Partner field in Manufacture (MFR) can be updated with this information, e.g. PSWAREHOUSE, but it can also be a comma-separated list where values can be added. |
Project number as mandatory on Sales Order (COA) | If this setting is set to ON, the Finance project field in the Accounting folder of the Sales Order (COA) must be filled before the Sales Order can be forwarded to the customer |
Reconfirm production work order (PWO) when a sales order (COA) is reconfirmed | When confirmed date is updated in a sales order item (COA) with products of type "K" or "KA", the user will be asked to also update confirmed date in the assigned production work orders (PWO) |
ReConfirm Sales Order (COA) | If this setting is "ON" - Confirmed delivery date will automatically be updated in Sales Order Item (COA-ITM) for selected locations if confirmed delivery date is changed in any of the transactions that are assigned to COA-ITMs, -e.g in a (SOA-ITM), and this change causes that confirmed date in COA-ITM should be changed. This update will be logged in revision history on the Sales Order. NoteIn the Value field, add the three-letter abbreviation of the Locations (LOC), the enabled setting applies. In example VAT for Vats. Use "," as a separator: For example "VAT,HAU,RFK,AMS". If this setting in "OFF" - Confirmed delivery date will not automatically be updated in sales order item, but there will rather be set a notification in the item about that confirmed delivery date has been changed in transactions which do have assignments to this COA-ITM. In case CSV/"Don't reconfirm sales order if shipping day is a fixed week day" is "ON", confirmed delivery date will anyway not be updated if Shipping Day is a fixed day in the week of delivery or before delivery.. A notification will rather be added to the item. |
Don't reconfirm sales order if shipping day is a fixed week day | If this setting is "ON" - Change in confirmed delivery date from supplier or production backlog will not cause automatic update of confirmed delivery date in Sales Order Item (COA-ITM) if ShippingDay is a fixed week day. In this case a message will be set on Sales Order Item |
Request Date on Sales Order (COA) | The value of this setting must be an integer from 0 to 365, that is used to calculate the Requested delivery date for the Sales Order Item (COA-ITM). If you specify 0 as the value, the Sales Order Itemreceives the Requested delivery date on the current date. If you specify 2 as the value, the Sales Order item receives a Requested delivery date of the current date plus two days. |
Sales Order (COA) Assign To Stock | If this setting is set to ON, users are allowed the option to start a job that attempts to link all the items in the Sales Order (COA) to stock. If there is no Free Stock, the program attempts to swap links with other documents. The job is started by the option Assign To Stock under Activities And Operations in Sales Order. |
Seller on Sales Order Item (COA-ITM) | If this setting is CUS.PIDEXT, in the Seller field in the Sales Order (COA), Shipping Advice (CSA) and the Sales Invoice (CIN) are updated from the PidExternal field in Customer (CUS). If the value is CUS.PIDINT , the Seller field is updated from the PidInternal field in Customer. If the value is SYS.PID, the Seller field is populated with the name and personell id (PID) of the creator of the document. Information from these fields in Customer are aslo copied to other fields in the Sales Order (COA). PidExternal=Account manager, PidInternal=Sales Assistant and Person that creates the Sales Order SysPid=Assignee. If thissetting is set to OFF, the Seller field is populated with information from PidExternal |
Show Docby Popup Before Registering Sales Order (COA) | If this setting is set to ON, the Docby Popup is displayed before you can register a Sales Order (COA). In this popup you can select how the document should be sent to customer. |
Use Assignment Window for Sales Order (COA) | If this setting and the Margin for SalesLeadTime Assignment Window setting are both set to ON, the Sales Order is supplied the assignment from PENDING if LINKDELDATE in SAR is outside of the period given by SALESLEADTIME from ART, plus the value from the setting Margin for SalesLeadTime Assignment Window. The SAR optimize process only optimizes the Sales Order within this window. In case several companies have common ART and SAR registers (Group Structure), the Margin for SalesLeadTime Assignment Window should only be specified for the company that is configured as the OWNERDB, the Use Assignment Window for Sales Order should be specified for every sales database. |
Priority of suggested sales price | If the setting is switched off, then the lowest applicable price is suggested. If the setting is switched ON, then it is possible to choose the desired order from the available options in the drop-down menu. |
A Sales Order Request (CPO) is a document where orders from customers are registered. The difference between this document and a Sales Order (COA) is that the CPO is not assigned to goods in stock or supplier backlog. The CPO are saved in the CPO archive and may be inspected using the CPO application.
To open the Sales Order Request (CPO) application, find Sales in the RamBase menu and then Order handling. Click Sales order requests to enter the CPO application.
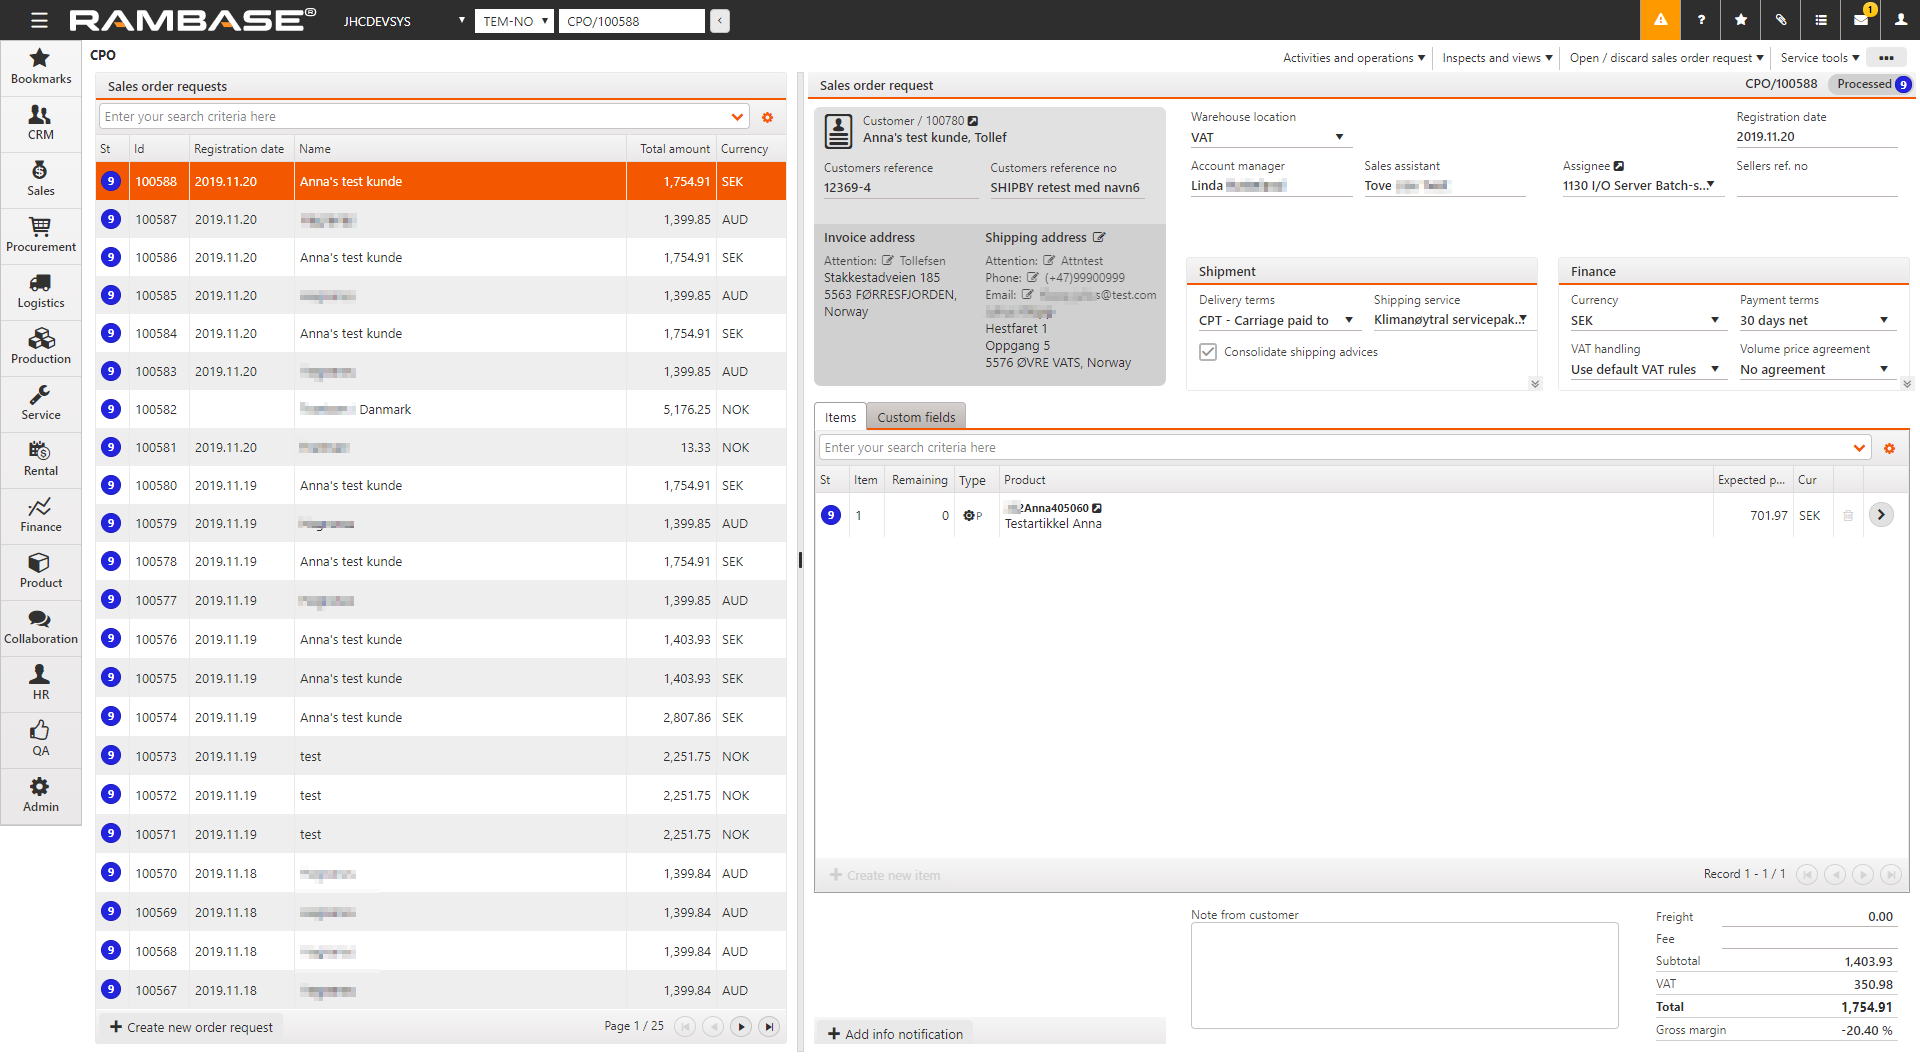
An example of a CPO may be orders registered from a webshop or received by any other electronically format. RamBase will automatically create a CPO, which will be processed and transported to a Sales Order (COA).
To open the Sales Order Request (CPO) application, find the Sales in the RamBase menu and then Quotinq. Click Sales quote requests to enter the CPO application.
Click the icon Create new order request. Enter the customer name (enter parts of the name in the Name field and press ENTER). This will open a popup where you choose the customer, address and which currency you want to use. The customers default address will be shown automatically.
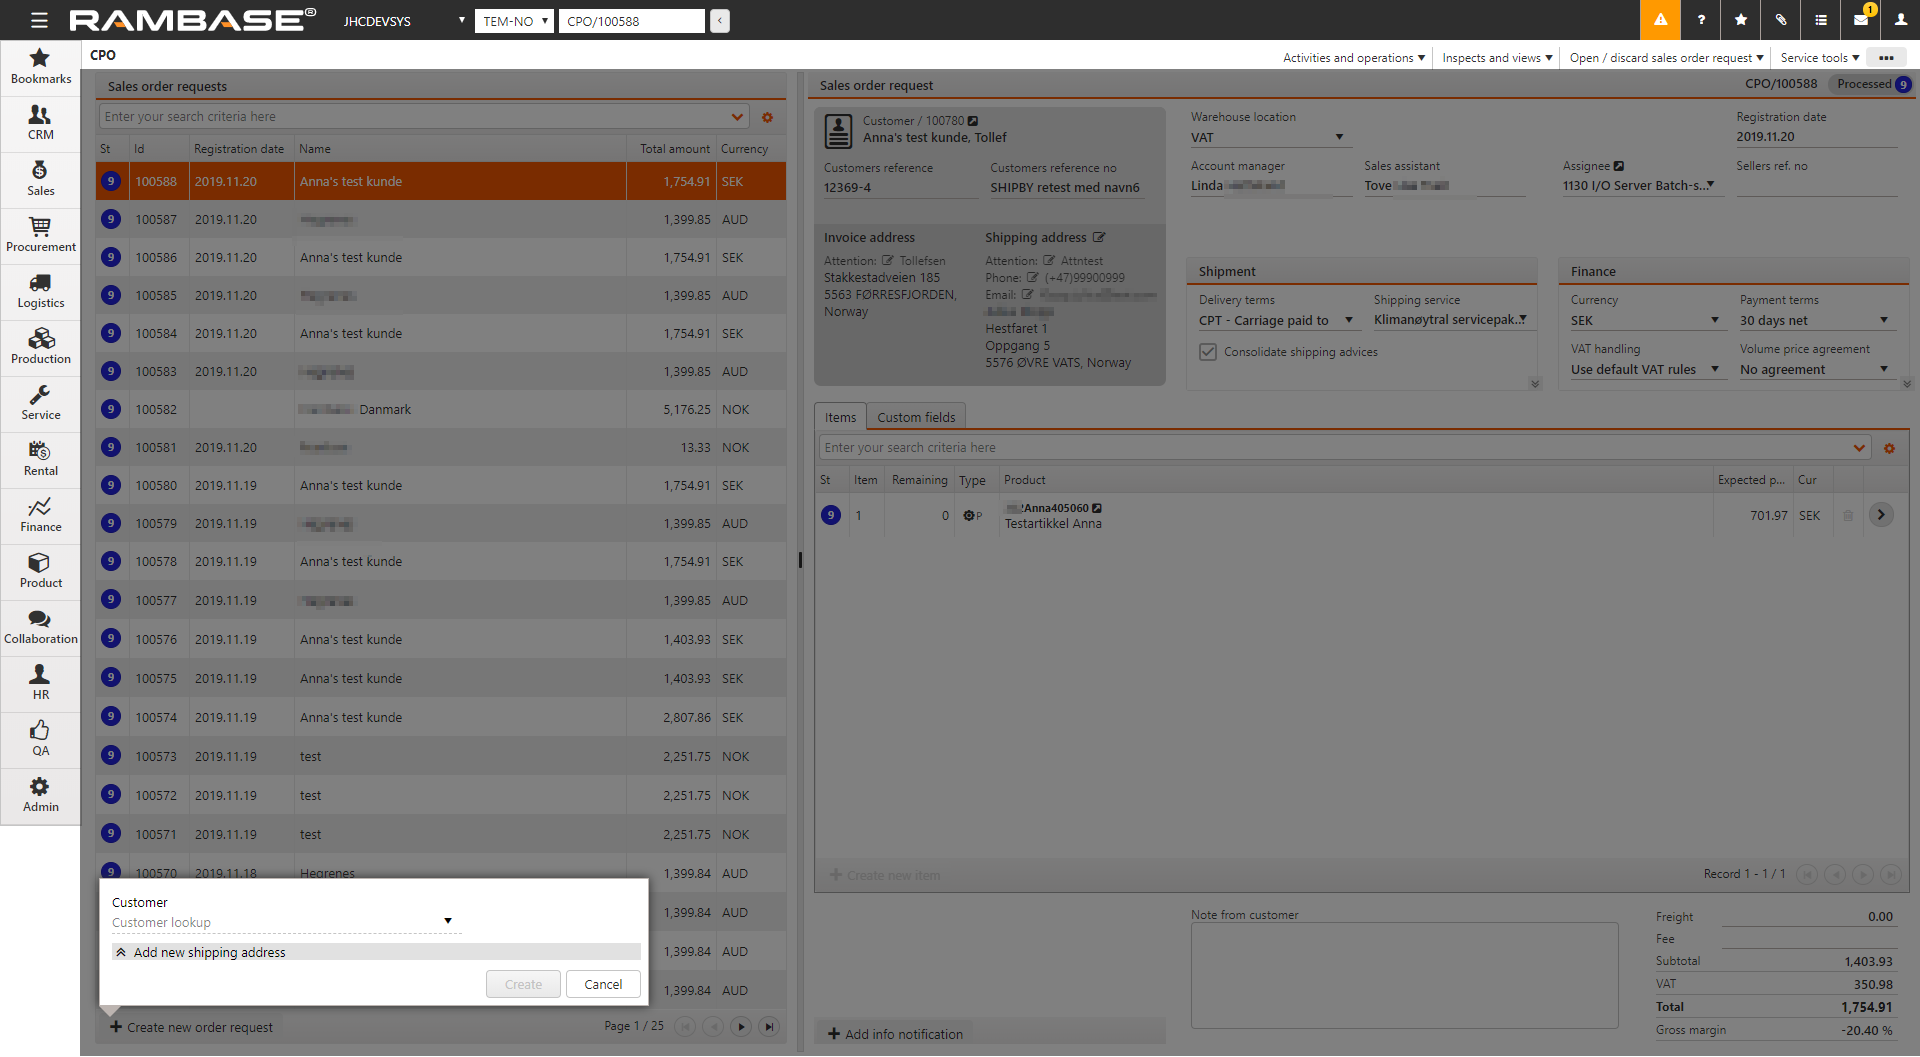
After this you will return to the Sales Order Request (CPO) document and it will have been assigned a sequence number. This means the document is saved and ready for further editing. You may also see that any default setting from the Customer document (CUS) related to the chose customer, has been entered automatically (such as delivery and payment terms).
The reference number from the customer may be set in the Customer reference no field. The reference person for the customer may be set in the field Customer reference.
To add products to the CPO document, press the Create New item. This will open a popup where you enter relevant information. Choose the quantity in the Qty field and press ENTER. In the Product field, enter parts of, or the full product name to find it in the archive. Expected price will be suggested according to value in the Company setting (CSV), Priority of suggested price. This may be adjusted.
The next step will be to set the information regarding when the customer need the goods. This is performed in the Requested Delivery Date field.
To add more articles easily, check the Create Another checkbox before clicking OK.
When finished, use the context menu option Register sales order request to set it to Status 4.
A Sales Order Request (CPO), being in the process of registration, may be edited and updated in several ways.
To register a CPO, use the context menu option Register sales order request. The order is now closed for editing.
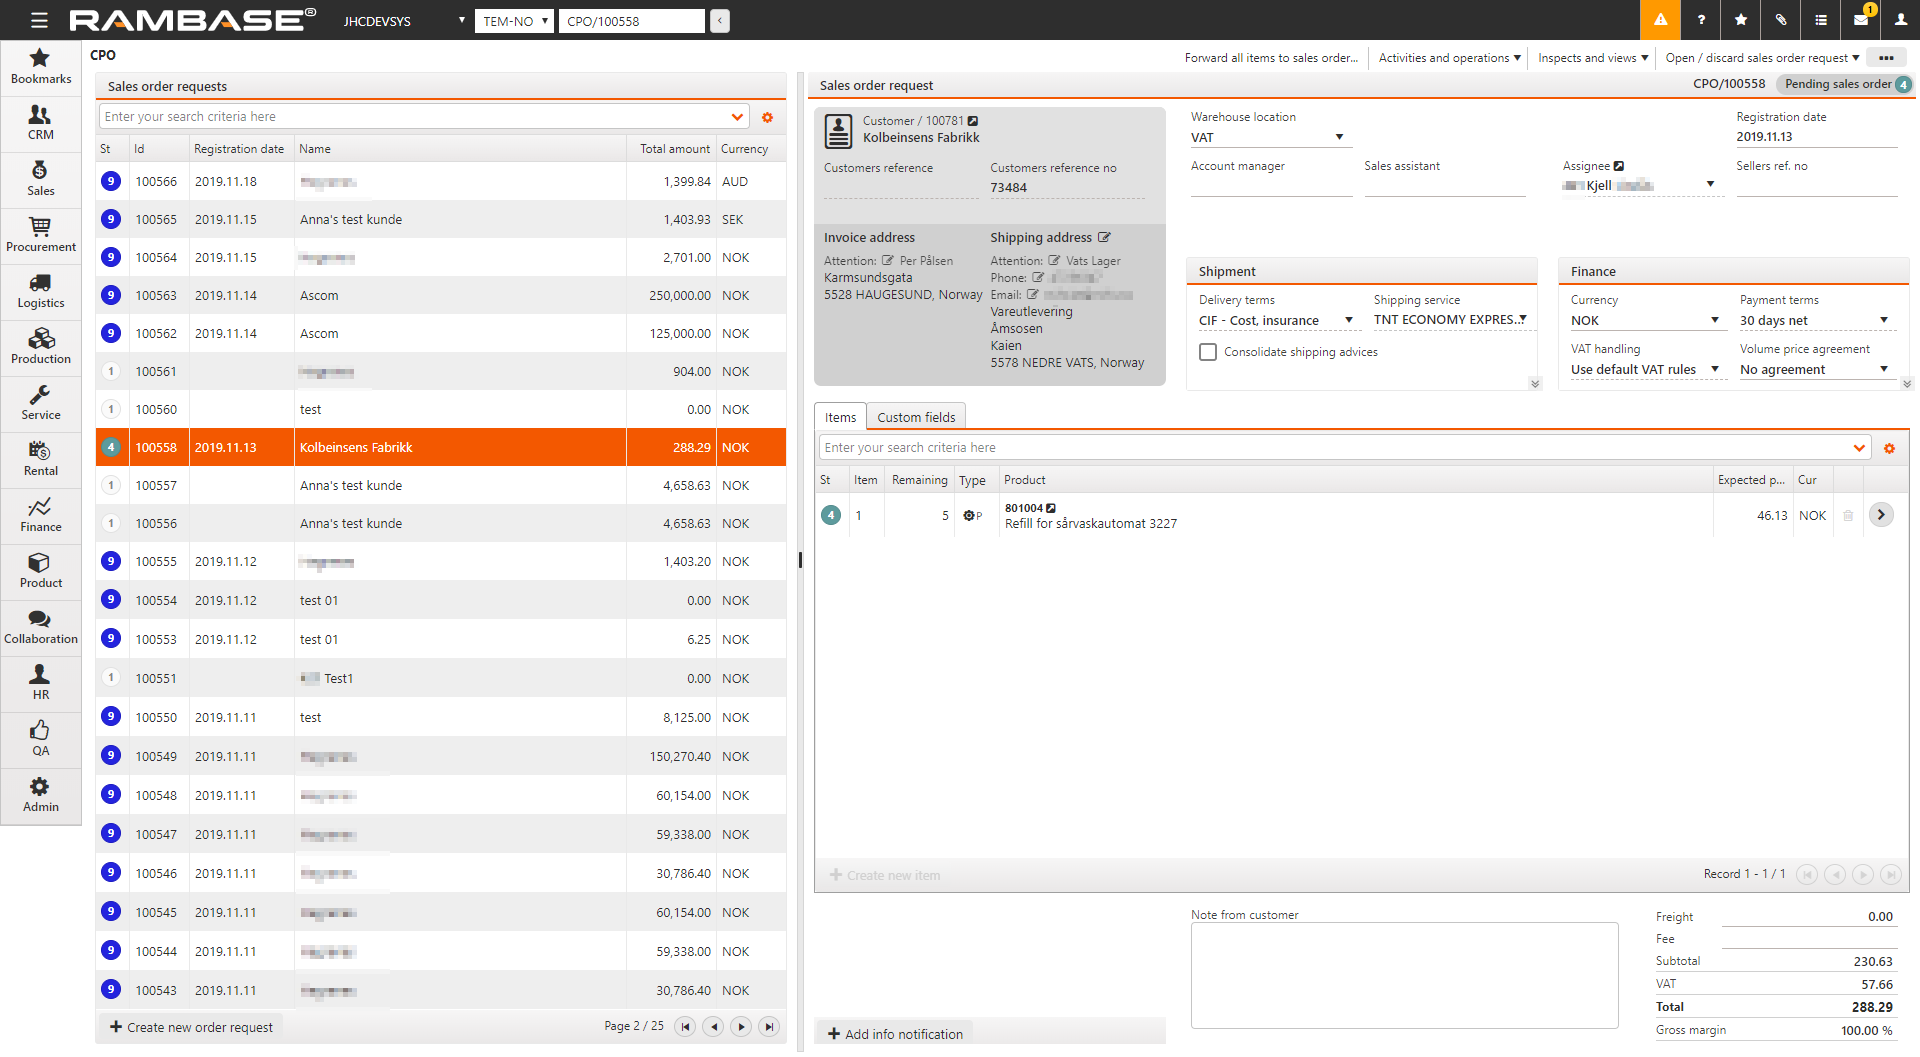
To cancel parts of an order you may highlight the desired item line and press ENTER to open the CPOITEM. Choose the Cancel item option in the context menu. This may be used in cases where the customer only wants parts of the goods for the same terms.
To confirm the order, you may easily transport this to a Sales Order (COA). There are two methods of doing this, either if it is the whole CPO or just parts to be ordered. The criteria for transporting items from a CPO to a COA is that the CPO is in ST:4 or higher. This status indicates that the CPO has been registered.
To transport parts of an order request to a sales order, highlight the item line and press ENTER to open the CPOITEM. Click the Forward to sales order... option in the context menu. Then choose Forward to new order if the item line is to be added to a new packing list. If not you may choose Forward to existing order and select an existing COA. If the item lines to be transported has a quantity higher than 1, you may choose the quantity transported.
To transport a whole CPO to a COA, Click the Forward all items to sales order.. option in the context menu. Choose the Forward to new order it the CPO is to be transported to a new COA. If not, you may choose Forward to existing order and select an existing COA.
A Sales Order (COA) is a document that acknowledge and confirms prices, leadtimes and terms after the reception of a Sales Order Request (CPO).
To open the Sales Order (COA) application, find Sales in the RamBase menu and then Order handling. Click Sales orders to enter the COA application.

There are several methods of creating a Sales order (COA).
Create a new Sales order (COA) by clicking the Create new order button
Forward a Sales quote (CQU) to a Sales order (COA)
Forward a Sales order request (CPO) to a Sales order (COA)
Forward a Sales order (COA) to a new Sales order (COA)
Copy a Sales Order (COA) to a new Sales Order (COA)
A Sales order may also be created from a Sales forecast (FCC) and via a Sales order change request (CRC).
When an original Sales order (COA) is created, it is automatically given the same identification number as itself in the field InitialOrderID. This value will be inherited by following Sales Orders (COA) in the flow. A Sales order item (COAITEM) may only be forwarded to an existing Sales order (COA) if the existing Sales order (COA) has the same initial identification number as the Sales order item (COAITEM). This makes it possible to trace Sales orders (COA) back to the original order. To see the identification number of the Sales Order (COA), click the Column settings icon, then select Column and finally select the InitialID checkbox.
To open the Sales order (COA) application, start in the Rambase menu and select Sales, then Order handling and finally Sales orders.
Click the Create new order button in the bottom left corner, enter the customer name in the Customer field and select the customer. The Shipping address that is displayed is the one that is set up as default for the customer. If the customer has several shipping addresses, select the relevant address in the Shipping address field. To add a new address, select Add new shipping address. Sales order (COA) is created with invoice address equal to its default invoice address, but both invoice and shipping address can be changed after sales order is created as long as it has not yet been registered and sent to customer.
If the customer is registered with several currencies, select the one relevant for this Sales order (COA) in the Currency dropdown menu.
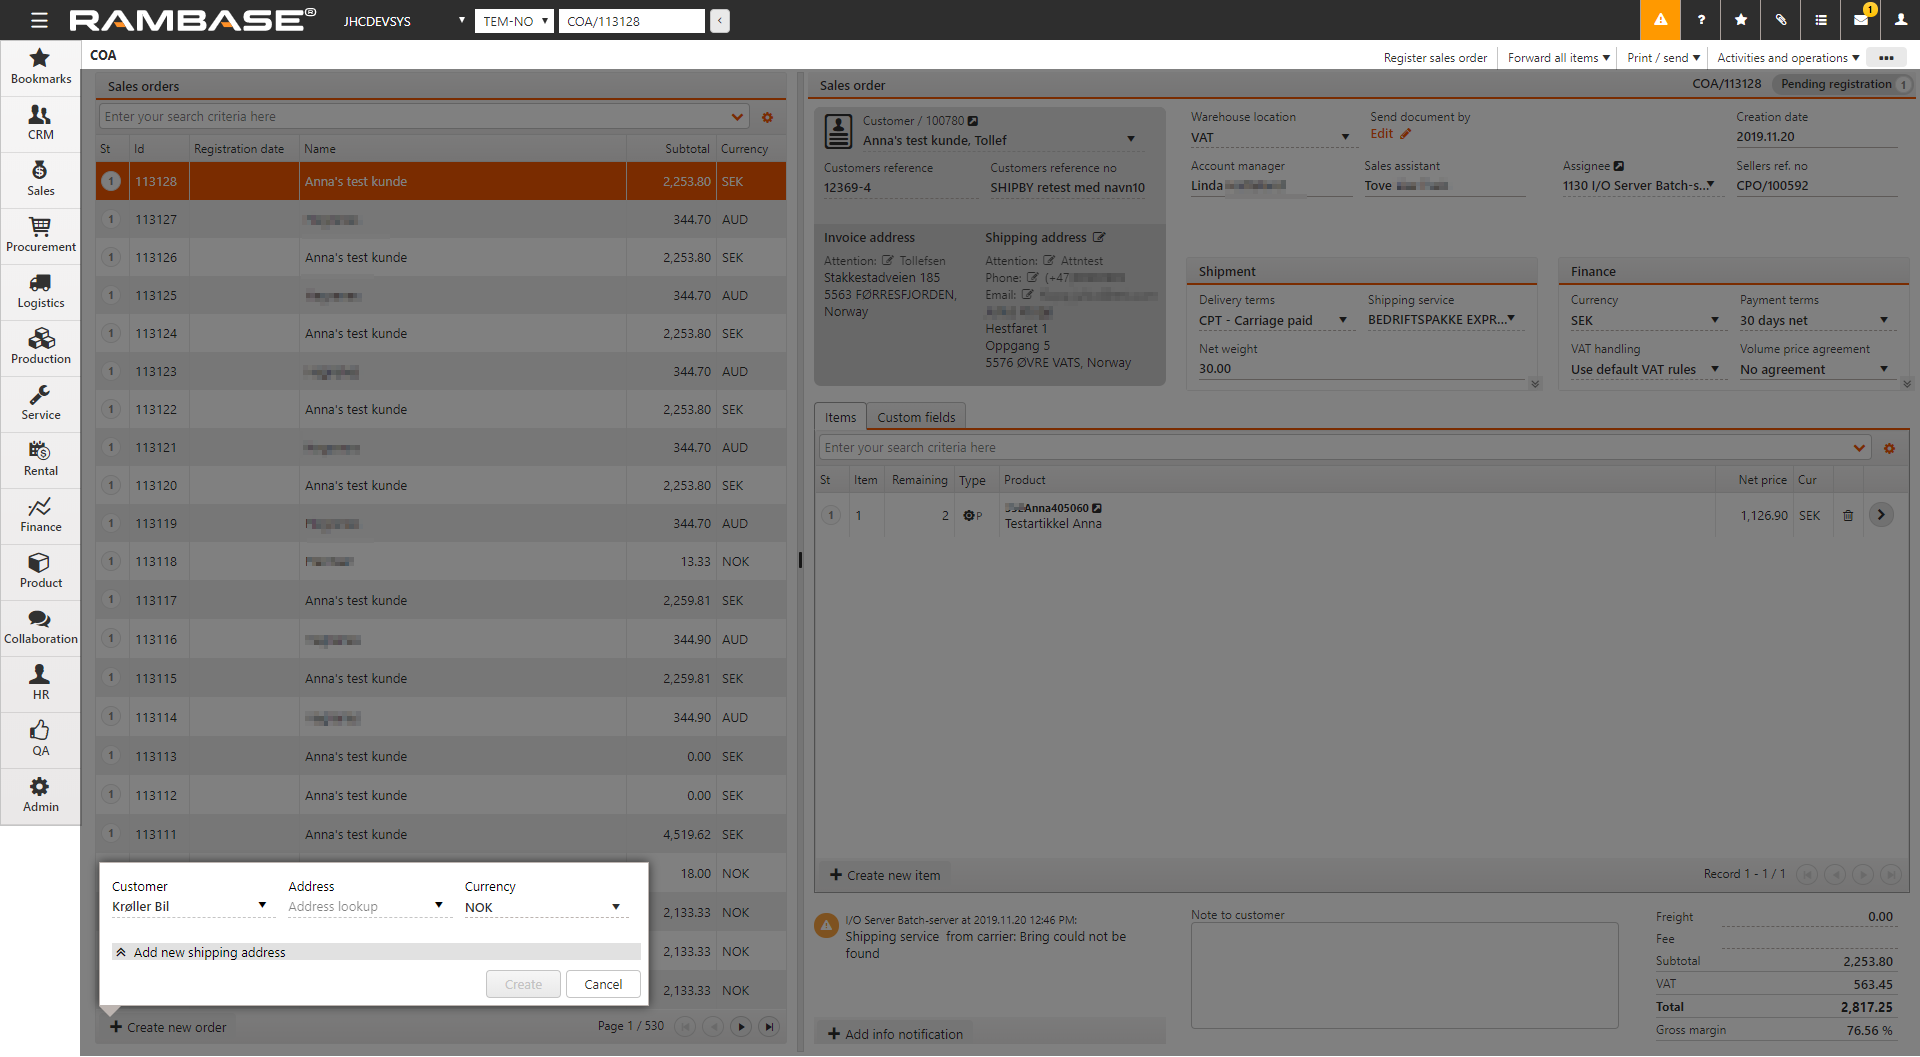
Click the Create button. The Sales order (COA) has now been assigned a Sales order (COA) number. The number is given below the content menu and in the Program field. This indicates that the document is saved and available for further processing. All stored information about the customer is also available.
The Shipment and finance tab shows all shipment and finance related information. You can specify the following:
Shipment fields
Description
Delivery terms
Select delivery terms
Shipping service
Select shipping service
Net weight
The net weight of object (excluding packing material) in kilograms
Consolidate shipping advices
Select the field that connects the consolidated orders. This field is only visible when Consolidated shipping advice is selected. Available options are:
Items customers reference number: Consolidate the shipping advice by matching items customer reference number
Customers reference number: Consolidate the shipping advice by matching customer reference number
Customers reference: Consolidate the shipping advice by matching customer reference
Ship sorted by
Items in consolidated shipping advices will be sorted by this field when they are created in the Prepare for picking process
Shipping day
Specifies when the goods should be shipped. This is used to calculate the scheduled shipping date for each item
Ship based on confirmed delivery date
If enabled, the scheduled shipping date for each item is calculated based on confirmed date rather than the requested date
Only ship entire orders
Select this checkbox if the total quantity of a Sales order (COA) should always be shipped together. The items of a Sales order (COA) should never be split into several shipments.
If the Prepare for picking (PFP) application is used for creating the Shipping advice (CSA), this will be controlled there.
If the Shipping advice (CSA) is created manually from the Sales order (COA), the user has to control this manually.
Only ship entire order items
Select this checkbox if the total quantity of a Sales order item (COAITEM) always should be shipped together. The quantity should never be split into several shipments
If the Prepare for picking (PFP) application is used for creating the Shipping advice (CSA), this will be controlled there.
If the Shipping advice (CSA) is created manually from the Sales order (COA), the user has to control this manually.
Ship items with equal scheduled shipping date together
True if all items of a Sales order (COA) with the same scheduled delivery date should be shipped together.
If the Prepare for picking (PFP) application is used for creating the Shipping advice (CSA), this will be controlled there.
If the Shipping advice (CSA) is created manually from the Sales order (COA), the user has to control this manually.
Freight for each shipment
If this checkbox is not selected, freight is only calculated from one shipping advice if the Sales order (COA) has several shipments
RamBase calculates Confirmed date in Sales order item (COAITEM), based on Confirmed delivery of its assignments. If there are assignments from the stock, supplier or production backlog, the Confirmed delivery date from these are used to calculate Confirmed delivery date in the Sales order item (COAITEM).
The Shipping day tab in the Sales order (COA) application specifies when the goods should be shipped. This is used to calculate the Scheduled shipping date and Confirmed delivery date for each item.
Example 1: A Sales order (COA) is set up with shipping day "3 days before delivery date" and the Sales order item (COAITEM) has requested delivery date 2022.11.02. If it has assignments from a Purchase order response (SOA) which is also confirmed 2022.11.02, confirmed delivery date of the sales order item (COAITEM) will be calculated as 2022.11.07.
RamBase automatically takes into account the 2 working days lost over the weekend and adds it to the 3 days shipping time from the warehouse to the customer.
If the Company setting (CSV) Reconfirm sales order is switched ON, Sales order item (COAITEM) will be updated automatically with the calculated confirmed delivery date. If it is switched OFF, the following notification will appear in Sales order item (COAITEM): "Confirmed delivery date from supplier/production: 2022.11.02 + 5 days delivery = 2022.11.07."
Example 2: A Sales order (COA) is set up with a fixed shipping day Wednesday week before delivery date and the Sales order item (COAITEM) has Requested delivery date 2022.11.02. If it has assignments from a Purchase order response (SOA) which is also confirmed 2022.11.02, Confirmed delivery date of the Sales order item (COAITEM) will be calculated to the same date.
If the Company setting (CSV) Reconfirm sales order is switched ON, the Sales order item (COA) will be updated automatically with the calculated confirmed delivery date. If it is switched OFF, the user will be notified to verify the Confirmed delivery date in the Sales order item (COAITEM)
It is possible to manually control the Confirmed delivery date of a Sales order (COA) which is set up with a fixed weekly shipping day, even if the Company setting (CSV) Reconfirm sales order is switched ON. The precondition is that the Company setting (CSV) Don't reconfirm sales order if shipping day is a fixed weekday is switched ON too.
The purchase order number from the customer can be specified in the Customer reference no. The reference person for the customer can be specified in Customers reference.
To add items, click Create new item. In the popup that appears, choose the quantity in Qty and enter the product name in Product to find it in the archive. RamBase will suggest prices according to the Company settings (CSV), Priority of suggested sales price. All applicable prices will be presented in the Price based on field after the Product (ART) has been selected, and the user may select another price. The lowest applicable price is found the following way:
The lowest price of
IPA (Item price agreement)
Sales quote (CQU)
Product (ART) price - where the priority to find the applicable product price is:
PLI (Price list)
VPA (Volume price agreement)
STD (Standard sales price)
If no applicable price can be found based on this basis, RamBase will attempt to calculate item price based on standard cost price of the product, in this priority:
GM from Company setting (CSV) Default Gross Margin on Sales documents
25% GM (Hardcoded)
Specify the Requested delivery date by choosing the date or enter it manually in the fomat yyyy.MM.dd.
If this is a high priority sales order, and the parts needed are linked to other orders, select Activities and operations and Assign to Stock, which re-links the necessary parts to this order. This is not possible if the parts have been locked or if the target order is in Status 1 (Pending registration). Also note that this function is only available if it is activated in the settings.
If you need to add several items, click on the Create new item button and add all the necessary items.
If the Sales order (COA) is a free sample for a customer, select Mark sales order as sample order. This removes the cost of the items and adds a Free sample text box.
A draft can be created by clicking the Create new draft button in the menu. When a draft is created, the menu will automatically collapse to give more overview. Draft will create a document for a default customer, found in the Company settings (CSV) Default customer account for sales draft. If no Customer (CUS) is set up in this Company settings (CSV), RamBase will create one named as Unknown. This will have base data according to standard create values for this company. The base data can be changed for this Customer (CUS) afterwards if it is required, or the user can create a Customer (CUS) manually and add this to the Company setting (CSV). It will not be allowed to register documents for this Customer (CUS), users must change to a real Customer (CUS) before registering.
When creating a draft, it is possible to add Products (ART) by searching them up in the Quick search field. Clicking on the Quick search filter icon will list a series of checkboxes. The user can decide which categories to included in the search by selecting the relevant checkboxes. Hover over the Quick search filter icon to quickly see which categories are included in the search. New items can be added by clicking the Plus icon.
The Add product tab shows a Location available field and a Total available field. Location available inspect stock and available quantity for Location (LOC) of the document. Total available inspects stock and available quantity for all Location (LOC). The Show details checkbox gives an overview of 4 useful tabs:
Tab name | Description |
|---|---|
Product details | Lists information from the related Product (ART) |
Accessories | Accessories registered from Product (ART) |
Replacements | Replacements needed for a Product (ART) |
Transactions | Shows Backlog items, Quote items and Invoice items |
When adding items from the Add products tab, they will appear in the Items tab.
The Show details checkbox gives an overview of 5 useful tabs:
Tab name | Description |
|---|---|
Item details | List information from the related Sales order item (COAITEM) |
Notifications | Notifications for this item |
Product details | Lists information from the related Product (ART) |
Landed costs | Shows the chosen purchase currency and the landed cost in purchase currency and sales currency |
Accessories | Accessories registered from Product (ART) |
It is possible to re-arrange items before registering a Sales quote (CQU) and sending it to the Customer (CUS), so that the items can be presented in logical order. The function to re-arrange item can be found by clicking the Context menu and then selecting Change items order.
The Item field is an id of an item and the field LineNo will take over as the sorting key. LineNo will decide the order of lines and will be used as sequence number for items. Item and LineNo will not necessarily be synchronized. When an item is deleted, it will simply not exist anymore. PDFs to Customers (CUS) will show a column for LineNo rather than Item. The field LineNo can be found as a column in the Sales quote item (CQUITM). When forwarding a Sales quote (CQU) to a Sales order (COA), item will be created in the LineNo order in the new documents.
A Sales order (COA) based on a Sales quote (CQU) will always contain the same information as the quote, but with the option to add or change information.
To forward a Sales quote (CQU), click the Context menu icon and select Forward all items to sales order.
A Sales order (COA) based on a Sales order request (CPO) will always contain the same information as the order, but you can add or change information. When creating a Sales order (COA) from a Sales order request (CPO), the Sales order item (COAITEM) does not inherit the price information from the Sales order request item (CPOITEM), but from the Product (ART) register. Expected Price from the Sales order request item (CPOITEM) is shown in the Sales order item (COAITEM). If there is a discrepancy between the two, a warning will appear.
To forward a Sales order request (CPO), click the Context menu icon and select Forward all items to sales order.
In situations where there are changes to an existing Sales Order (COA), the existing Sales order (COA) should be forwarded to a new Sales order (COA). Examples of changes that would trigger the need to forward a Sales order (COA) to a new one, are a change in quantity, price or delivery terms. The new Sales order (COA) will have the same information as the previous one and be in Status 1, ready for the changes. Forwarding a Sales order (COA) entails keeping the history of previous Sales orders (COA) in the flow. This makes it possible to easily navigate in the flow, all the way back to the original Sales order (COA) to see the details of previous Sales orders (COA).
To forward a Sales order (COA), click the Context menu icon and select Forward all items to sales order.
This may be useful in several instances, for example when the same order is to be sent to the customer, but with different request/confirmed dates or prices/quantities. It can save time to copy an existing Sales Order (COA) and modify the new Sales order (COA) while it is in Status 1. The order may be modified by deleting or adding items or choosing another customer account. Item values, such as quantity, price, discount and article number may also be changed. It is not possible to change the Currency (CUR).
Note
The history of the existing Sales order (COA) is not copied.
It is possible to copy from an existing Sales order (COA) in Status 9.
If the item has a special structure on the original Sales order (COA), the new item will get the standard structure of the KIT.
To copy a Sales order (COA) click the Context menu icon and select Copy sales order to a new sales order. A Sales order (COA) copied from an existing Sales order (COA) is always set to Status 1 and contains the same information as the original order.
You can also select Copy to new sales order item at the item level to copy the item to either a new or an existing Sales order (COA). If the item is copied to a new Sales order (COA), the values in the account, location and currency fields in the existing Sales order (COA) must be identical to the corresponding fields in the original Sales order (COA).
To copy special structures from the original Sales order (COA) to the new one, go to Company settings (CSV) and search COPY*SPECIAL*STRUCTURE.
Turn on Copy special structure when copy sales order.
Updating the price on Sales order items (COAITEM) can be done on both the main level and item level. Depending on the where you are working, either from the Sales order (COA) application or the Sales order item (COAITEM) application, different options in the context menu are available to achieve similar results:
Context menu option | Availability |
|---|---|
Update to suggested price for all items | Available in the Sales order (COA) application, on main level. |
Update to suggested price for selected items | Available in the Sales order (COA) application, if the Sales order items (COAITEM) are selected, on main level. Also available in the Sales order items (COAITEM) application, on item level. |
Update to applicable price | Available in the Sales order items (COAITEM) application, on item level. If multiple prices are available, the user can choose the intended one. |
When to use these features
The user wants to mass update prices in a Sales order (COA) to suggested prices according to the Company settings (CSV), Priority of suggested sales price.
Reasons for changing might be correcting a draft, or terms have changed in the ordering process.
Conditions for Sales orders (COA)
The Sales order (COA) must be in Status 1 (Pending registration).
The Sales order (COA) must contain a minimum of one Sales order item (COAITEM).
Logic - If the suggested price is from a Sales quote (CQU)
In the sales quoting process, a Sales order (COA) can be the result of several Sales quotes (CQU). Therefore the seller can decide which of the Sales quotes (CQU) prices to use. Using the Update to suggested price for selected items or Update to suggested price for all items options will link prices from the Sales quotes (CQU) with the suggested prices.
Update to suggested price for all items - Context menu option
From the RamBase menu, select Sales and then Order handling. Finally click on Sales orders to open the Sales order (COA) application.
From the Sales order list, select the Sales order (COA) with Sales order items (COAITEM) you want to update the price for.
From the Context menu, select the Update to suggested price for all items option.
Update to suggested price for selected items - Context menu option
From the RamBase menu, select Sales and then Order handling. Finally click on Sales orders to open the Sales order (COA) application.
From the Sales order list, select the Sales order (COA) with Sales order items (COAITEM) you want to update the price for.
From the Items tab, click on the on the Status icon or icons of the Sales order items (COAITEM) to select the intended Sales order items (COAITEM).
To select all Sales order items (COAITEM), select the top checkbox in the Status icon column. Note that the selection only applies for for the Sales order items (COAITEM) on the current page, and not all Sales order items (COAITEM).
If successfully selected, a check mark will replace the Status icon.
From the Context menu, select the Update to suggested price for selected items option.
Update to applicable price - Context menu option
From the RamBase menu, select Sales and then Order handling. Finally click on Sales orders to open the Sales order (COA) application.
From the Sales order list, select the Sales order (COA) with Sales order items (COAITEM) you want to update the price for.
From the Items tab, click on the Arrow icon on one of the Sales order items (COAITEM) to open the Sales order items (COAITEM) application.
From the Sales order item list area, click on the Sales order item (COAITEM) you want to update the price for.
From the context menu, select the Update to applicable price option in the context menu.
If multiple prices are available, select the intended price in the Select price popup. If only one price is available, the price will be updated without having to choose.
Update to suggested price for selected items - Context menu option
From the RamBase menu, select Sales and then Order handling. Finally click on Sales orders to open the Sales order (COA) application.
From the Sales order list, select the Sales order (COA) with Sales order items (COAITEM) you want to update the price for.
From the Items tab, click on the Arrow icon on one of the Sales order items (COAITEM) to open the Sales order items (COAITEM) application.
From the Sales order item list area, to select multiple Sales order items (COAITEM), click on the Status icons of the Sales order items (COAITE
M) you want to update the price for.
From the context menu, select the Update to suggested price for selected items.
When a new Sales order (COA) registration is attempted, there will be performed a check against the credit limit that is set on the Customer (CUS). This check can be switched ON and OFF with the Deactivate Approval message - Sales Order Credit limit Exceeded setting in the Company settings (CSV) application.
It is also possible to set a margin for the check against the customer credit limit, with the Credit Limit Margin on Sales Order setting available in the Company settings (CSV) application. If an approval for credit limit on a Sales order (COA) is activated and the setting has a value, the approval will appear in advance of the credit limit being reached.
An approval is required if the value of (customer balance + Payments (PAY) from customer's which are in Status 3 + Shipping advice (CSA) in Status 4) is higher than (customer credit limit - margin).
It is possible to delay the shipment of items until some of the other items on the sales order are ready. This is performed in the Shipment area with the option Ship Items With Equal Shipping Date Together.
This function is available on the following documents: Sales Order (COA), Customer Quote (CQU), Purchase Order (CPO) and Customer (CUS).
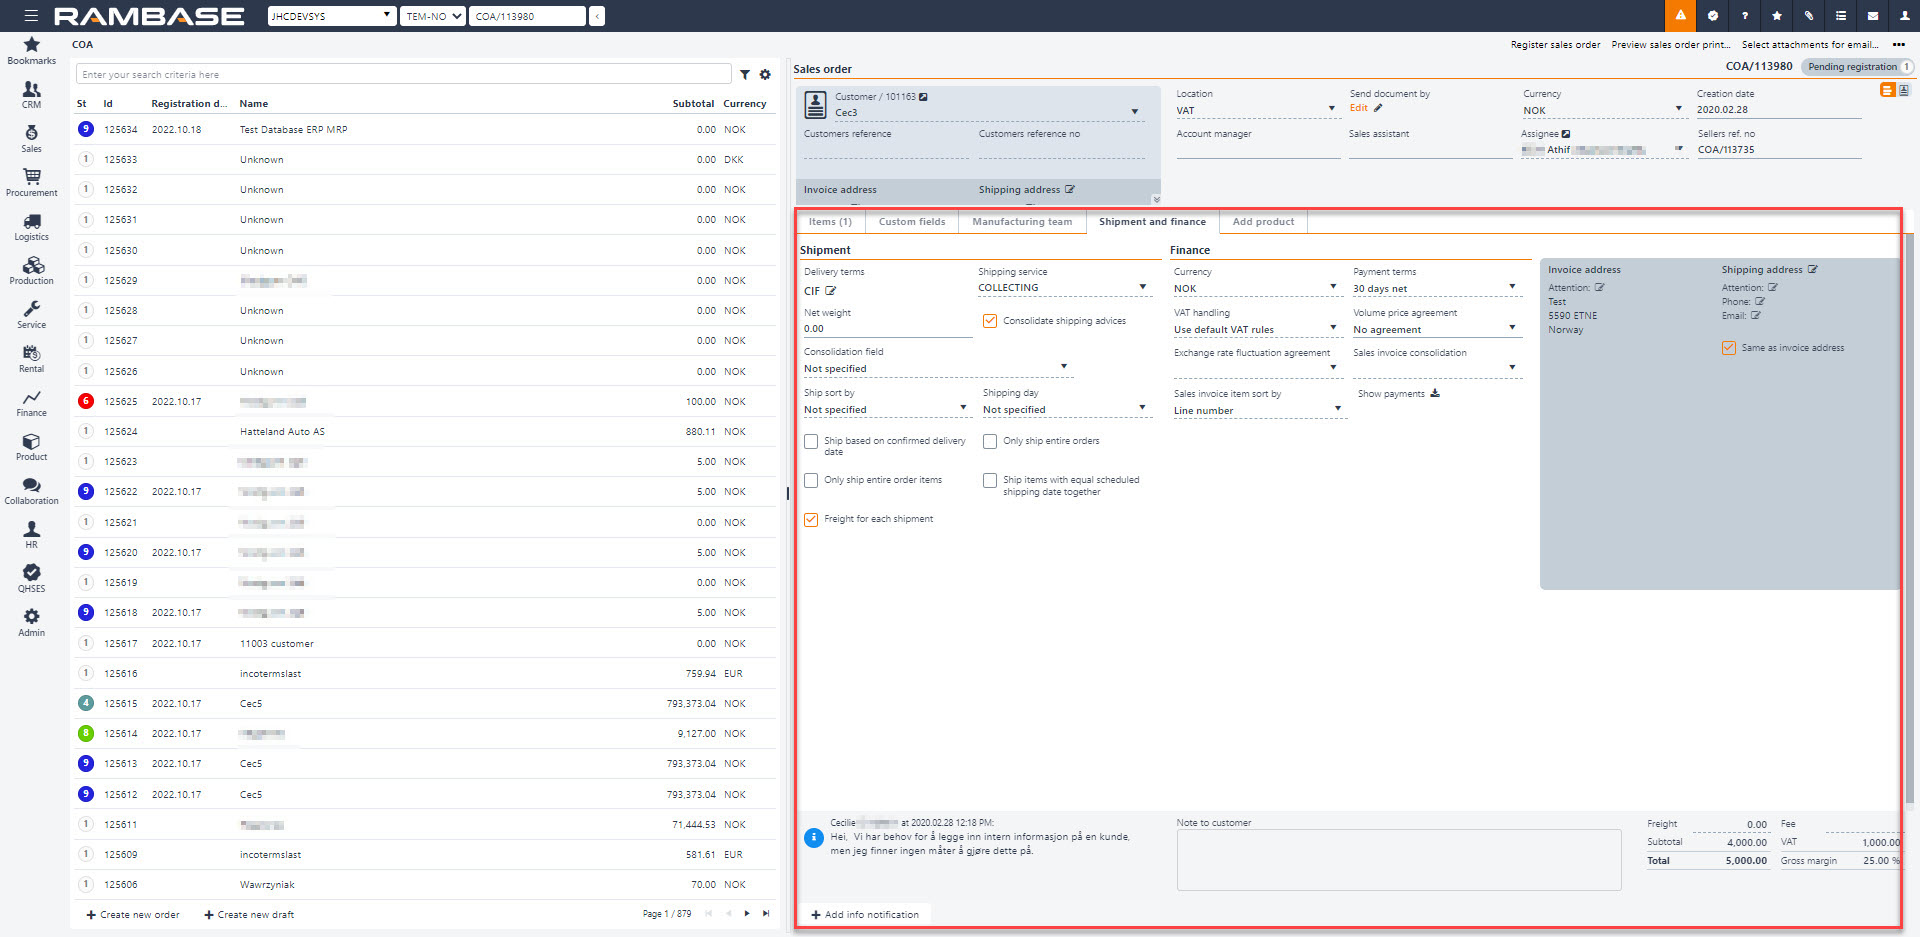
Enabling this option will ensure that shipments with the same shipping date will go out together by not displaying items as ready for shipping before all items with the same shipping date is set to ready.
Several applications are connected to an order document to give the seller information about possible delivery date. Stock assignments gives an stock overview for necessary parts and raw materials for the requested product. Resource load in production gives an overview of workload for necessary resources (machines/peoples) to manufacture the requested product. ProdPlan gives an overview of running productions for the requested product.
The most important date stamps on an order acknowledgment are Requested date, confirmed delivery date and deldate, which is calculated based on these two and Delivery day.
Requested date is the delivery date requested from the customer. Requested date is the basis of accurate delivery statistics and is a key value for managing deliveries. Confirmed date is first set by the seller (or automatically by the system), but can be changed due to delays in procurement or production. The RamBase system gives information about changes in confirmed delivery date, and reconfirmed order acknowledgments can be sent to customers.
Requested date (REQ) and confirmed date (CONF) can be set on each order item, or on all order items as a whole.
When a Sales Order (COA) is created it will be assigned to inbound goods in the Assignment Register (SAR) by the FIFO principle. The assignment may be inspected by clicking the Stock Assignments option in the action menu under the menu folder Inspects and views or by using the icon in the item line.
If special purchase prices quoted from suppliers (SQU) exist, such a quote can be suggested as basis for the Purchase Order (SPO) for this specific COA-ITM and will then also be used as basis for GM calculation.
To choose a quoted purchase price as basis for purchase order, choose a valid purchase quote in the Based On-field under the Landed Cost folder in the COA item. A valid purchase quote is understood as it’s expiry date is higher than todays date. The chosen SQU will then show up in the purchase program as information to the purchaser.
Gross margin is calculated using the formula: (((Sales Price - Cost Price) * 100) / Sales Price).
The approval system can be configured so that COA-ITM with gross margin below a certain threshold value must be approved by a supervisor.
If the items on the COA are not in stock and are to be manufactured internally, uncheck (if checked) the Block for production-checkbox in the Product area in COA item view. The COA will then be available in the production planning tool.
NOTE: It is also possible to use the multi-select option, where you click on the status icon of the item to select. The options you have available when performing multi-select are as follows:
Forward selected items to sales order
Forward selected items to shipping advice
Delete selected items
Clear selected items
Cancel selected items
It is possible to filter out specific Sales Order Items using the RamBase filter field. There are many different pre-defined filters you can use to filter out the exact items you need based on several criteria. If you would, for example, want to find all items with messages attached, you could use the following procedure:
To find a specific Sales Order Item, open the COAITEM (COAITEM) application, find Sales in the RamBase menu and then Order handling. Click Sales order items to enter the COAITEM application.
Click the cogwheel icon above the item lines.
Find Columns and check the option Highlighted Notifications.
Use the filter field an choose the option ContainginNotificationTypeID (if you do not know the type of message).
Then choose ContainingNotificationTypeID, which will open a popup where you can choose the filtered categories of Sales Order Items, based on your access level.
Choose the category you suspect the Item will be in and click the Select button. You will now be able to see the relevant Items in the menu to the left.
Customers can trade in many currencies. The currencies are defined for each Customer (CUS) in the CUS application.
If a CUS trades in more than one currency, you will get a popup asking you to choose currency when entering a new document.
The gross margin (GM) of every order item is calculated directly and presented for the seller as soon as sold goods are connected to a purchase through a stock assignment.
The Gross margin (GM) is calculated from the formula (((SalesPrice - CostPrice)*100) / SalesPrice).
A sales price can be set both as fixed price-calculated margin, or as fixed margin-calculated price.
Approvals can be configured so that order-items with Gross margin (GM) below a certain threshold value has to be approved by a supervising employee.
Gross margin (GM) on the document level is calculated when the Sales order (COA) is created. Gross margin (GM) on the item level is recalculated based on what the item is linked to.
If the goods get a cost price higher than the sales price, it will get a negative Gross margin. But the document will still have the original Gross margin (GM).
The model explains how various data points affect the calculation of landed cost (total cost of a product when it’s received on your doorstep) and gross margin (profit as a percentage of sales) in sales transactions. Key factors include:
BLC (Landed Cost): Total landed cost per unit, calculated from shipping and purchase costs. It differs based on GM models—historical, current, or invoice rates.
GM (Gross Margin): Percentage of profit derived from subtracting the landed cost from the sales price. It's influenced by rates (exchange and purchase rates) and sales transaction types.
Abbreviations that are used:
Abbreviations | Description |
|---|---|
ART | Product |
SAR | Stock assignment register |
CRQ | Sales quote request |
CQU | Sales quote |
CPO | Sales order request |
COA | Sales order |
CSA | Shipping advice |
CIN | Sales invoice |
CCN | Sales credit note |
PWO | Production work order |
SPO | Purchase order |
SOA | Purchase order response |
SSA | Goods reception |
SIN | Supplier invoice |
CDV | Customer deviation |
LCFREIGHT | Landed cost freight This is the freight part of landed cost. BLC is including LCFREIGHT. This is calculated when fright is added to a SPO, SOA, SSA item which sales transaction item has assignments from. |
BCUR | Purchase currency This is by default set equal to currency from ARTs preferred purchase price when a sales transaction item is created. It will then normally be the currency of the PWO, SPO, SOA, SSA the item has assignments from. BCUR can anyway be overruled by user for each item. |
BRATE | Purchase rate BRATE is used as purchase rate for CRQ, CQU, CPO, COA, CSA items. This is the rate between BCUR and sales currency. |
INVRATE | Purchase rate INVRATE is used as purchase rate for CSA, CIN and CCN items. This is the rate between BCUR and sales currency at the date the CSA was shipped. |
RATE | Sales transaction rate This is the rate between sales currency and local currency at the sales transactions date (DATE). |
NETPRICE | Net price This is a sales transaction items net price in sales currency |
CNETPRICE | Converted net price Thus is a sales transaction items net price converted to local currency (NETPRICE * RATE) |
NETLCLAMT | Net Landed Cost This is the total landed cost amount for a sales transaction item in sales currency (QTY * BLC * Purchase rate) In this formula is Purchase rate either BRATE or INVRATE, depending on type of sales transaction type. |
CNETLCAMT | Converted net Landed Cost This is the total landed cost amount for a sales transaction item in local currency (QTY * BLC * Purchase rate * RATE) In this formula is Purchase rate either BRATE or INVRATE, depending on type of sales transaction type. |
BLC | Landed Cost This is the total cost for a product arriving at the warehouse. It is the key for calculation of GM. |
GM | Gross Margin This is a percentage that tells how much of a sales amount that is profit. |
BLC for a sales transaction item is calculated based on real cost from its SAR assignments from PWO, SPO, SOA and SSA. Or it is based on expected cost price in ART if the sales transaction item has no assignments.
BLC is the landed cost for one unit. It’s a value that is calculated in an items BCUR.
If BCUR in sales transaction item is different from the company's local currency, BLC is calculated by first calculating the cost from the ART/SAR assignments back to local currency. A company’s GM model decides which rate that is used for this:
GM model = “H” - Historic rate (RATE from SSA)
GM model = “C” - Current rate (rate at today's date)
GM model = “I” - Invoice rate (rate from SIN)
After the cost from SAR/ART is calculated back to local currency, it is converted to BCUR using exchange rate from the date of the document.
There are anyhow some sales transaction items which don’t have landed cost calculated based on assignments from SAR :
CQU, COA, CSO, CSA and CIN items for non-stock products (ART not using assignments). Landed cost for these are stored directly in the item. It is copied from ART as default, but may be manually overruled by user.
CIN items of type “Advance invoice settlement” or which have been created by forward from another CIN/CCN. These items do not have any landed cost.
CIN items created from a CDV. Landed cost for these are calculated based on the content in “LCCalc” in the CDV.
For all other CIN items Landed cost is copied from the shipping advice (CSA) or service order (CSO) item is has been forwarded from.
Gross Margin is the difference between sales transactions items net price and landed cost, in percentage of net price. It is calculated like this: (NetPrice – (( BLC * Purchase rate ) * 100)) / NetPrice.)
Purchase rate is either BRATE or INVRATE, depending on sales transaction type.
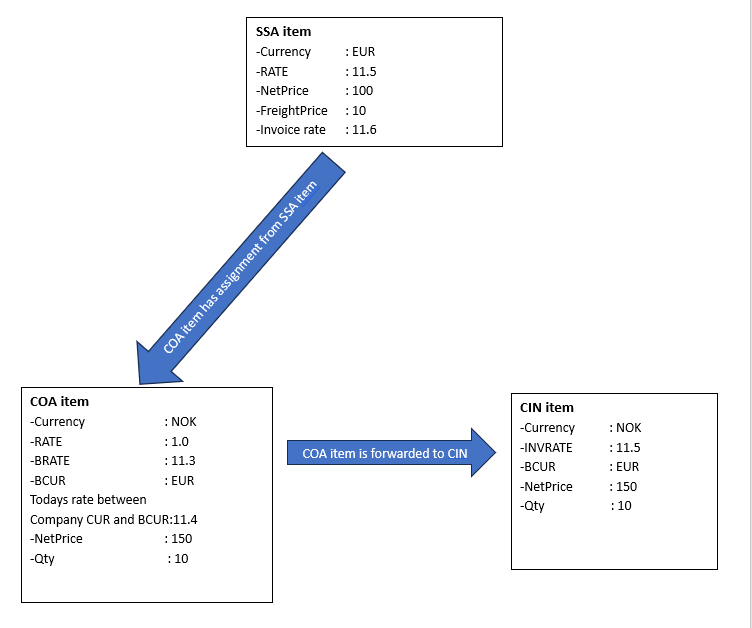
Calculation of BLC:
BLC = ((( SSA.NetPrice + SSA.FreightPrice ) * SSA.Rate ) / Rate between local CUR and BCUR ) / COA.Qty
BLC = ((( 100 + 10 ) * 11.5 ) / 11.4 ) / 10
BLC = ((( 110 ) * 11.5 ) / 11.4 ) / 10
BLC = (( 1265 ) / 11.4 ) / 10
BLC = ( 110.965 ) / 10
BLC = 11.0965 EUR
Calculation of GM in COA item:
GM = ((COA.NetPrice - ( BLC * COA.Purchase rate )) * 100 ) / COA.NetPrice
GM = (( 150 - ( 11.0965 * 11.3 ) * 100 ) / 150
GM = ( 150 - ( 125.39045 ) * 100) / 150
GM = (( 24.61 ) * 100 ) / 150
GM = ( 2461 ) / 150
GM = 16.41 %
Calculation of GM in CIN item:
GM = ((CIN.NetPrice - ( BLC * CIN.Purchase rate )) * 100 ) / CIN.NetPrice
GM = (( 150 - ( 11.0965 * 11.5 ) * 100 ) / 150
GM = (( 150 - ( 127.61 ) * 100) / 150
GM = (( 22.39 ) * 100 ) / 150
GM = ( 2239 ) / 150
GM = 14.93 %
Calculation of BLC:
BLC = ((( SSA.NetPrice + SSA.FreightPrice ) * SIN.Rate ) / Rate between local CUR and BCUR ) / COA.Qty
BLC = ((( 100 + 10 ) * 11.6 ) / 11.4 ) / 10
BLC = ((( 110 ) * 11.6 ) / 11.4 ) / 10
BLC = (( 1276 ) / 11.4 ) / 10
BLC = ( 111.93 ) / 10
BLC = 11.193
Calculation of GM in COA item:
GM = ((COA.NetPrice - ( BLC * COA.Purchase rate )) * 100 ) / COA.NetPrice
GM = (( 150 - ( 11.193 * 11.3 )) * 100 ) / 150
GM = (( 150 - ( 126,4809 )) * 100 ) / 150
GM = (( 23.5191 ) * 100 ) / 150
GM = ( 2351.91 ) / 150
GM = 15.68 %
Calculation of GM in CIN item:
GM = ((CIN.NetPrice - ( BLC * CIN.Purchase rate )) * 100 ) / CIN.NetPrice
GM = (( 150 - ( 11.193 * 11.5 ) * 100 ) / 150
GM = ( 150 - ( 128.7195 ) * 100) / 150
GM = (( 21.2805 ) * 100) / 150
GM = ( 2125.05 ) / 150
GM = 14.19 %
Calculation of BLC:
BLC = ((( SSA.NetPrice + SSA.FreightPrice ) * Todays rate ) / Rate between local CUR and BCUR) / COA.Qty
BLC = ((( 100 + 10 ) * 11.7 ) / 11.4 ) / 10
BLC = ((( 110 ) * 11.7 ) / 11.4 ) / 10
BLC = (( 1287 ) / 11.4 ) / 10
BLC = ( 112.895 ) / 10
BLC = 11.2895
Calculation of GM in COA item:
GM = ((COA.NetPrice - ( BLC * Todays rate )) * 100 ) / COA.NetPrice
GM = (( 150 - ( 11.2895 * 11.7 )) * 100 ) / 150
GM = (( 150 - ( 132.0872 )) * 100 ) / 150
GM = (( 17.9128 ) * 100 ) / 150
GM = ( 1791.28 ) / 150
GM = 11.94 %
Calculation of GM in CIN item:
GM = ((CIN.NetPrice - ( BLC * CIN.Purchase rate )) * 100 ) / CIN.NetPrice
GM = (( 150 - ( 11.2895 * 11.5 ) * 100 ) / 150
GM = ( 150 - ( 129.8293 ) * 100) / 150
GM = (( 20.1707 ) * 100) / 150
GM = ( 2017.07 ) / 150
GM = 13.45%
The calculation method is designed to provide users with an estimated delivery date to the customer, taking into account the availability of goods. Users have the option to manually set a start date, which serves as the initial point for the calculation. The system will then estimate the earliest possible delivery date.
The header provides details about the Sales order (COA) and the Product (ART) in question. The first section includes information on the product, description, revision, and available quantity.
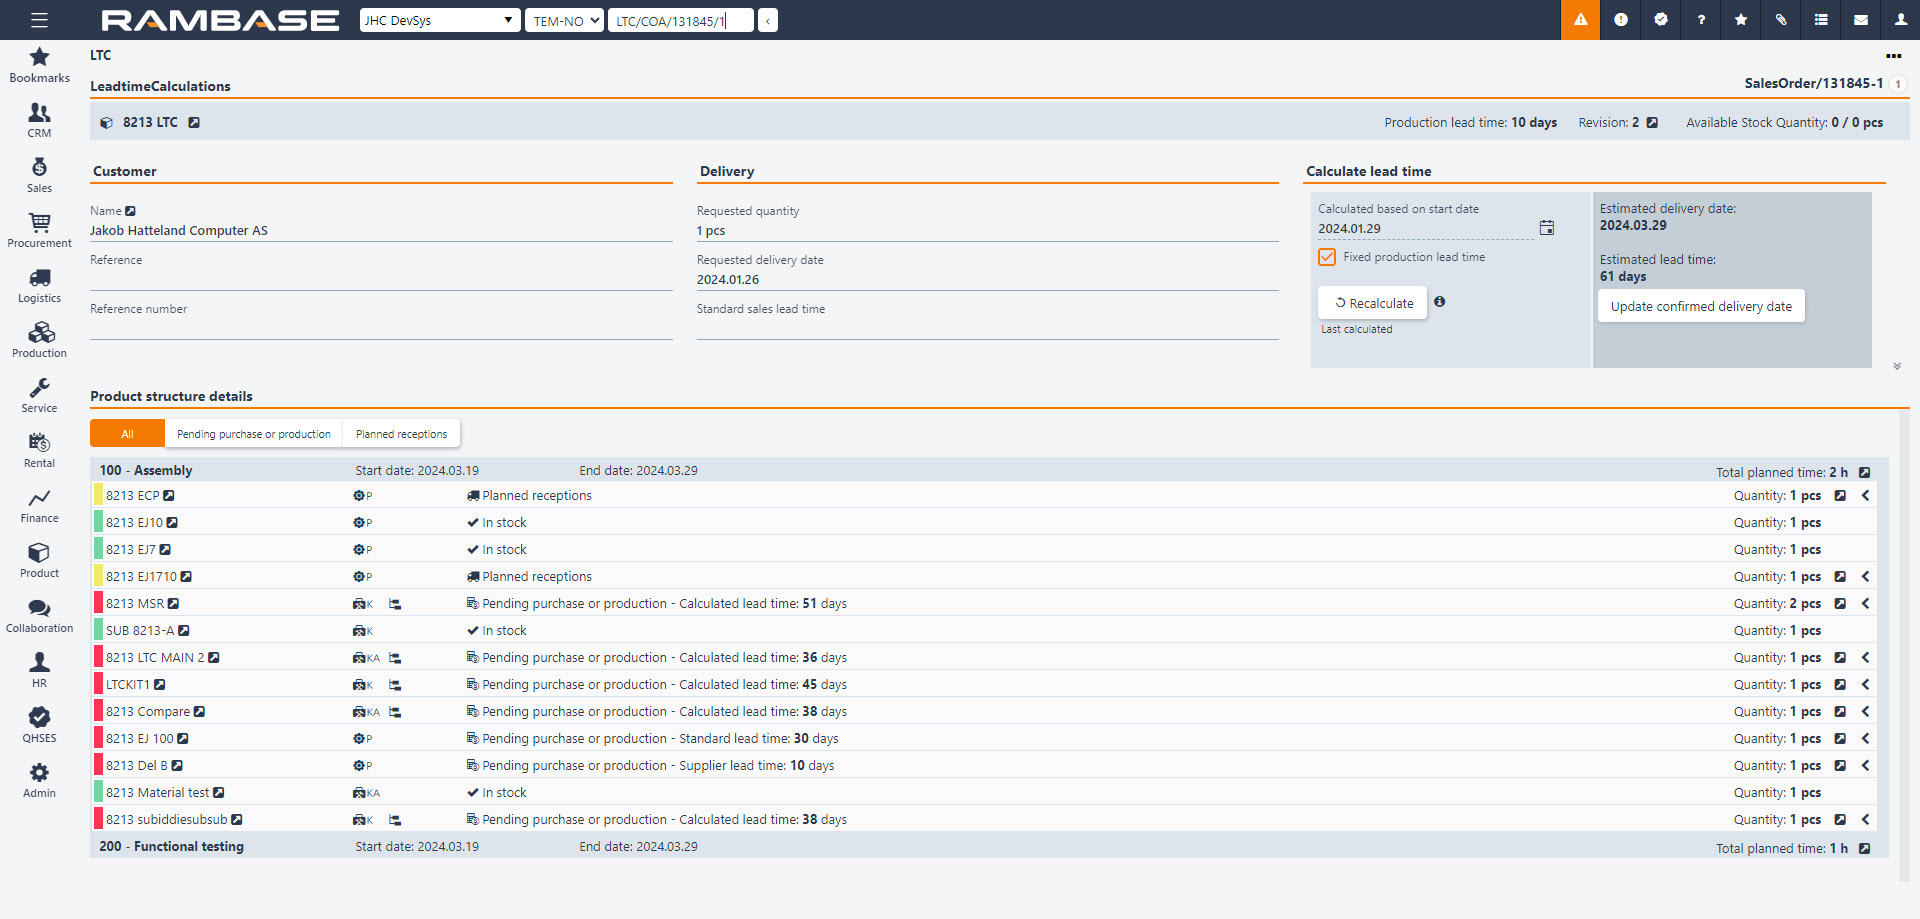
The section below contains sales order details, including customer information, references, and reference numbers. It also includes delivery specifics such as Requested quantity, Requested delivery date (derived from the sales order), and, if applicable, the Standard sales lead time for the sold product.
Columns | Description |
|---|---|
Name | Customer name |
Reference | Customers reference |
Reference number | Customers reference number |
Requested quantity | Number of units ordered |
Requested delivery date | The delivery date as requested by the customer |
Standard sales lead time | The standard lead time, expressed in number of days, from when the customer places an order to delivery |
The calculation method is designed to provide users with an estimated delivery date to the customer, taking into account the availability of goods. You have the option to manually set a start date, which serves as the initial point for the calculation. The system will then estimate earliest possible delivery date.
Columns/Fields/Buttons | Description |
|---|---|
Calculated based on start date field | The initial starting point for the calculation |
Fixed production lead time checkbox | The predetermined number of days required to produce a given product |
Recalculate button | Recalculate the process |
Estimated delivery date | The estimated delivery date to the customer |
Estimated lead time | Total lead time presented in number of days |
Update confirmed delivery date button | Update the confirmed delivery date on a Sales order (COA) |
Fixed production lead time refers to the predetermined number of days required to produce a given product. When all components are available in stock, the fixed production lead time serves as a direct indicator of how quickly users can deliver the product. However, if users have dependent components that are currently out of stock and come with their own specified purchase lead times, one should add the number of days from the components purchase lead time to the fixed production lead time of the final manufactured product.
For example, if the fixed production lead time is 5 days and one component is not in stock with a purchase lead time of 7 days, the earliest possible delivery date would be 12 days from todays date.
Note
Note: Fixed production lead time should only be presented when the Company setting (CSV) Production planning based on production lead time is activated. Otherwise, this option should be hidden.
Note
The information in LeadTimeCalculations is a snapshot of the situation last time it was calculated for this object. If there have been changes in for example product structure, leadtimes, stock situation etc, use the Recalculate icon to update the information
Note
Calculation of leadtime will be based on related product structure in Status 4.
The KIT details section presents the product structure from the Product (ART) on the Sales order (COA), displaying all operations, components, and sub-assemblies.
Each operation is presented with its start and end date, along with the total planned time in hours. On mouseover, users also get presented the specific planned time to the corresponding processing times: Setup, Run time and Cleanup time. When inspecting one of the operations, it should direct you to the Production resource capacity and load overview (RCL) application with the filter set to the resource assigned to the operation.
There are three distinct statuses that a component or sub-assembly can have: In stock, Pending purchase or production, or Planned reception. These are also represented as filter options at the top on the KIT details section.
When the status is In stock, it signifies that the total required quantity is already available in the inventory, and no further action is necessary.
When the status is Pending purchase or production, it indicates that the required quantity is not currently in stock, necessitating an action such as procuring the component or initiating sub-assembly production.
When the status is Planned reception, it suggests that the required quantity is not in stock, but there is an active purchase order or ongoing production that will provide the necessary quantity to fulfill the requirement.
Sub-assemblies, which are products classified as KITs or KIT assemblies, can also be accessed and explored. When you navigate to one of these specified product types, you will be presented with the same overview for KIT details.
Certain products are immaterial, and therefore don’t need to be a part of Goods assignment (SAR). These products can for example be freight, consultant hours or various types of fees etc. They may be added to orders but such order items don’t need any assignment as there is nothing to pick, pack and ship. Such products must be specified as Is non stock in Product archive (ART).
Product type Z - Non stock product will always be a non-stock product. For product of type X - Expenses and V - Value added service it’s optional to configure them as non-stock products. This has to be set-up in advance of starting using the products in transaction documents.
When non-stock product is added to a Sales order (COA), the Sales order item (COAITEM) may be forwarded directly to a Sales invoice (CIN). It’s also possible forward it to a Shipping advice (CSA) first. This is typically relevant if the order do have a mix of non-stock products and products that required goods assignment and you want all the Sales order item (COAITEM) to end up at the same invoice at the end. Such a Shipping advice item (CSAITEM) will anyway not be a part of the picking list.
When non-stock product is added to Purchase order (SPO), the purchase order cannot be forwarded to a Goods receptions (SSA) as there is no goods involved. Supplier invoice (SIN) will therefor be created directly from the purchase order
To change the Customer (CUS) of a Sales Order (COA) in edit mode, click the downward arrow below the Customer Id field. This will open a popup where you may filter out and change the CUS for the selected COA.
It is also possible to change between shipping addresses by clicking the edit-icon in the Shipping Address. This will open a popup where you may filter out and change the shipping address for the existing order. You can also add a new address using the Create New Address-button in the lower left corner.
File attachments such as drawings, terms, contracts, certificates and deviation forms are in many situations desired by the customer. This means that these documents need to be available and able to be included in a Sales Order (COA). The document can be attached to the COA or just on the email sent to the recipients, or both.
There are several methods of connecting attachments to a COA. The criteria is that the files need to be included directly on the COA, or they need to be included on a connected article.
To attach files to a COA, you can easily drag and drop the desired file in the window while in the COA, article or other documents. An alternative is to click the Context menu option (under the menu folder Inspects and views) Notes and Attachments, and upload the file(s) in question using the Attach file-button. The latter alternative limits the uploads to one at a time, while in the first you have support for several files at a time.
Assuming all documents are uploaded, either on the COA or on connected articles or other transaction documents, you have the option of controlling which documents to follow the output of the COA. Choose the option Select attachments for email in the context menu, which opens a popup where you may select the desired documents. Click Update after you have made the selection.
It is possible to lock a Sales Order (COA) item to a specific Purchase Quote (SQU) agreement using the Base Reference field (Bref).
The criteria for this action is that you have a Purchase Quote (SQU) in ST:4 and it is not created toward another Customer (CUS).
Create a Sales Order (COA) and add the same item you have in the Purchase Quote (SQU).
After the item has been added, double click on the item line to open the item details.
In the Cost folder, click the edit icon next to the Based On field to open the Select Bref popup.
The Purchase Quote (SQU) will be available in the item lines. Double click this item line to add the Purchase Quote (SQU) as source.
Press Esc to go back to the COA view.
In the Context menu, choose the Register and send sales order... and forward the COA to the customer.
Open the Purchase (PUR) application, find Procurement in the RamBase menu and then Purchasing. Click Purchase handling to enter the PUR application.
Enter the Pending Items folder where the COA will be available. Highlight the desired item line and press ENTER.
Click the SQU Supplier radio button to filter out the correct order. Highlight the result and press ENTER.
You have now created a Purchase Order (SPO) based on the Purchase Quote (SQU) agreement. You can see the link to the original SQU in the SPO document.
Messages can also be added to a Sales Order (COA), whether information meant for internal or external use. Internal information will only show in RamBase while external information will be available for print and/or mail.
To add internal information on the COA you can click the Add a message-button on the bottom left, which opens a free text field when clicked
To add external information on the COA, click in the Note text field and add your information.
To add internal information on a COA item line, use the Add a message-button to the right in item view.
To add external information on a COA item line, use the Note text field and add your information in item view.
The Sales Order (COA) is most often sent by e-mail, either to one or several recipients. The recipient(s) are retrieved from the Send document by-field on the COA. Here you will find a list of all contacts related to the customer who are set up as recipients for this type of documents, in addition to yourself.
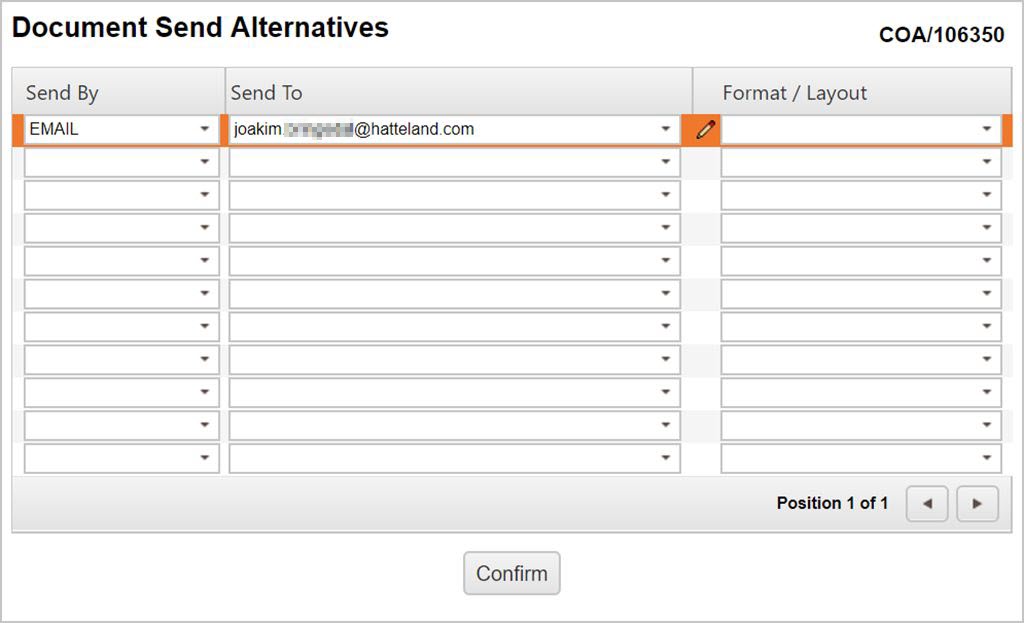
The COA will normally be sent using the default settings, but these may be changed if desired. This can be done by using the option Review Sales Order in the context menu. Then you can choose if you want to send the original or a copy, and the method of sending.
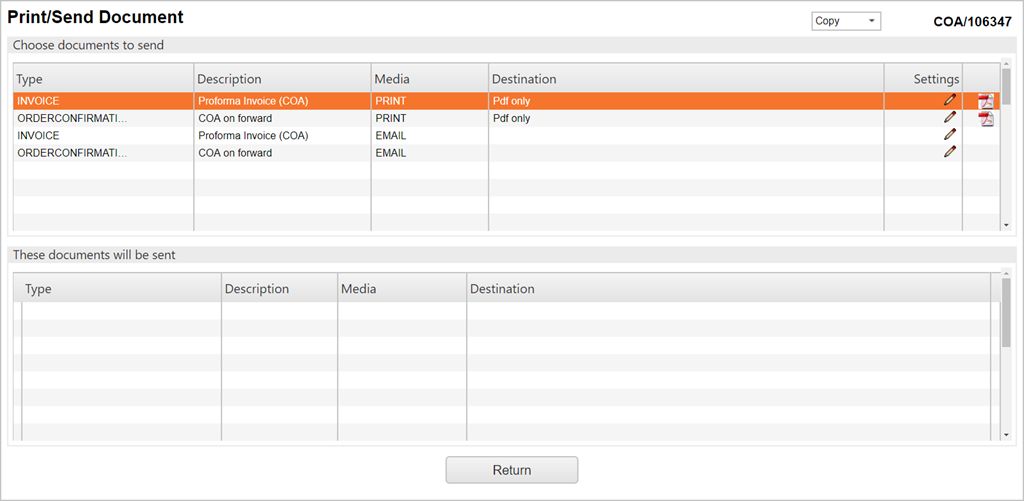
To register a COA and subsequently send it to the desired recipients, you need to use one of the action menu options regarding forwarding the document. This will close the COA for editing and if the customer request any changes, the COA must be transported to a new COA.
To cancel parts of a Sales Order (COA), you may enter the desired item(s) and use the context menu option Cancel Item. This is normally performed in situations where the customer only want parts of the delivery, or where the seller can not deliver all items on a COA anyway.
To cancel parts of a COA item, you may enter the desired item and use the context menu option Forward to sales order. In the Forward to sales order popup, write the amount you want to cancel in the Forward quantity field. Click on the Forward button to create a new COA. In the COAITEM view for the new COA, change the Quantity field to 0 and register the COA.
To cancel the whole COA, use the context menu option Cancel sales order. This will cancel the total order.
If the customer wants to discuss the terms, change required delivery date etc they have got confirmed in the COA and the seller agrees to this, the COA must be transported to a new COA. There are two ways of doing this, depending on if it is the whole order, or just parts of it the customer wants to change.
To transport all, or parts of a COA to a new COA, click the action menu option Forward Item. Then choose destination Forward to sales order if the lines is to be added to a new COA. If not you may choose one of the existing COAs available when choosing the Forward to existing order in the popup. You may also add the cause of the change if desired in the Caused By field, and/or add a note in the Note field.
If the item(s) to be transported to a new COA has quantity higher than 1, you may also choose the quantity to be transported using the Forward Quantity field. If you do not want the full quantity transported the remaining quantity will remain in the original COA.
If there are any changes to confirmed delivery date in a Sales order (COA) that has already been sent to customer, this must be confirmed again and the customer must be informed. There are several ways to change the confirmed delivery date in a Sales order item (COAITEM):
Automatically based on confirmed delivery date from supplier/production. If the ReConfirm Sales Order (COA) setting is ON and Location (LOC) is added to the Values field of the setting, confirmed delivery date will be automatically updated if there is a change in the confirmed delivery date in the Purchase order response item (SOAITEM) or the Production work order (PWO) this COA has assignments from.
Forward the item or all items to a new COA, and update the confirmed delivery date in the item(s) before the new COA is registered. The advantage of this process is that the new COA is sent to the customer.
Change confirmed delivery date in already registered sales orders. This can be done by simply selecting a date in the Confirmed delivery field in the Sales order item (COAITEM), or the same delivery date can be set for all active items using the context menu Update confirmed delivery date on all items... option.
When a Sales order item (COAITEM) or all items are forwarded to a new COA, the user can choose whether the change is caused by Us or the Customer. Same if the context menu Update confirmed delivery date on all items... option is used. If the confirmed delivery date is set automatically, or by updating directly in the field, RamBase will understand the change as it is caused by Us.
Us or Customer can be found in the Change caused by field in Sales order item (COAITEM)
It is possible to lock confirmed delivery date, to prevent both manual and automatic updates.
To lock the confirmed delivery date, click on the open Padlock icon in the Confirmed delivery field.
To unlock the field, click on the locked Padlock icon.
The date can be locked or unlocked for updates both directly in an existing Sales order item (COAITEM), and in the forward popup when forwarding a Sales order (COA) to a Sales order (COA). The state of the Padlock icon during the forward process determines whether the confirmed delivery date in the new Sales order item (COAITEM) should be locked or unlocked.
In the Sales orders (COA) application, it is possible to lock and unlock all items belonging to a specific Sales order (COA). This is done by clicking on the Context menu icon and selecting the relevant option:
Lock confirmed delivery date on all items
Unlock confirmed delivery date on all items
If there is a change in the confirmed delivery date of a Sales order item (COAITEM), this topic will provide the steps to automate the re-sending of Sales order (COA) confirmation.
Tip
A batch job will run every night to check for possible changes in confirmed delivery date of Sales order items (COAITEM), and if changes are identified, initiate the re-sending of order confirmation.
Note that manual edit of a confirmed date will also create a revision which will be picked up by the batch job.
Company setting (CSV) requirement
The Company setting (CSV) - ReConfirm Sales Order (COA) will dictate the automation of this setup.
Customer (CUS) requirement
There will be no automatic output, unless it is set up in the Customer (CUS) application.
It is necessary to set up the Output settings (OOS). The required setting is listed in the Output settings (OOS) table below.
Setting | Description |
|---|---|
Changed order confirmation by night | This email is triggered automatically every night if turned on. |
Output settings (OOS) - Set up Changed order confirmation by night
From the RamBase menu open the Output settings (OOS) application by selecting Admin, followed by Print/email administration and finally Output settings.
In the application, click the Output tab.
Either a. Select the setting or b. Search for it:
Customize the following options:
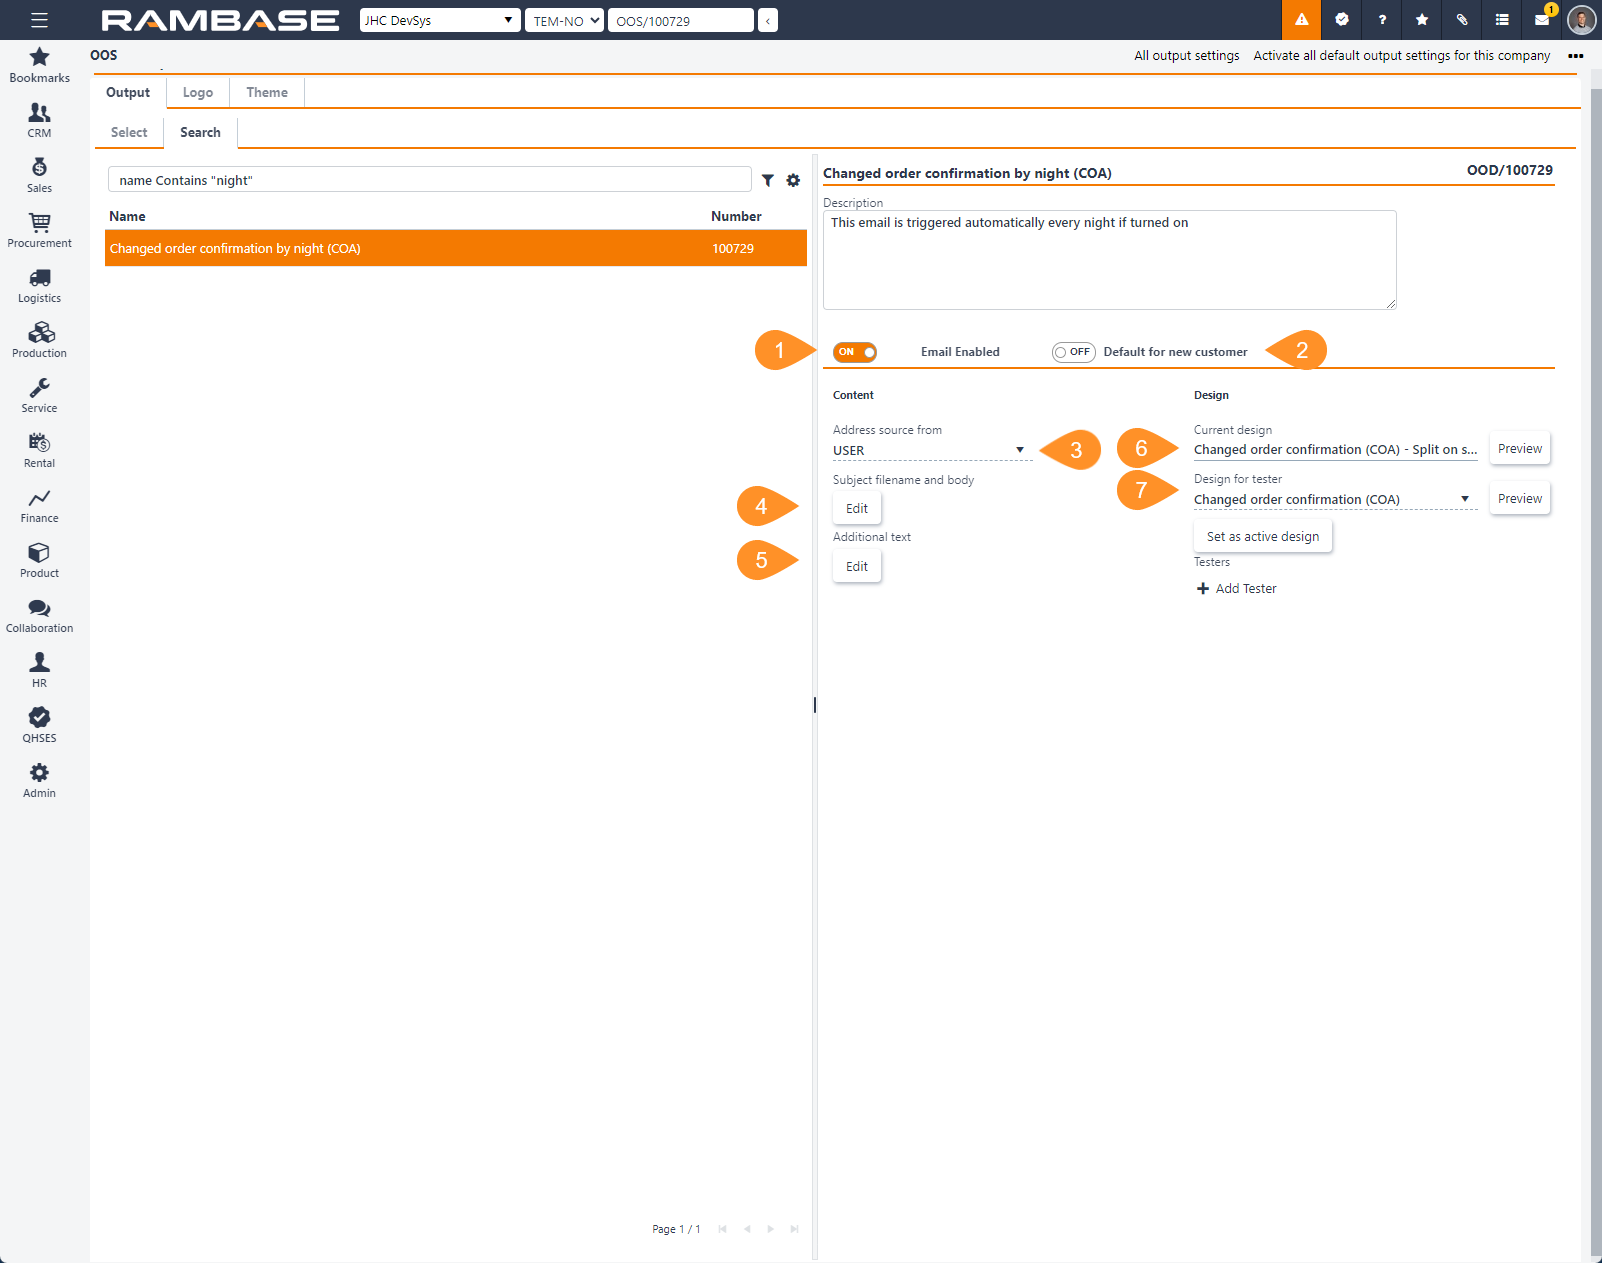
Numbers refer to the numbered list below.
Email enabled - ON
Default for new customer - Decide if the automatic order confirmation is default when creating a new customer.
Address source from - Decide if the re-sending of order confirmation is to be sent to an email from; USER, COMPANY, ACCOUNT MANAGER or CUSTOM.
If the CUSTOM option is selected, add a Name and Email to the corresponding fields below the Address source from dropdown menu.
Subject filename and body - Customize the details for the email which will contain the changed order confirmation Extensively edit the subject, filename, body and add and remove languages. The text body can be edited with standard tools, including embedding of links.
Additional Text - Additional text can be added, it also supports the option of add various languages.
Current design - View the design which is used to detail the potential changed order confirmation. Use the Preview button to make an informed choice of design.
Design for testers - Select or test a new potential design for the changed order confirmation. Use the Preview button to make an informed choice of design. The selected design can be set as active by clicking the Set as active design button (8).
Changed order confirmation (COA) - Will display all the Sales order items (COAITEM) with relevant information.
Changed order confirmation (COA) - Split on status 9 - Will display all the Sales order items (COAITEM) and seperate the Sales order items (COAITEM) in Status 9.
Set as active design - If the selection in the Design for testers dropdown menu is to replace the current design, click the Set as active design button.
The setting should now be set up according to the users preferences.
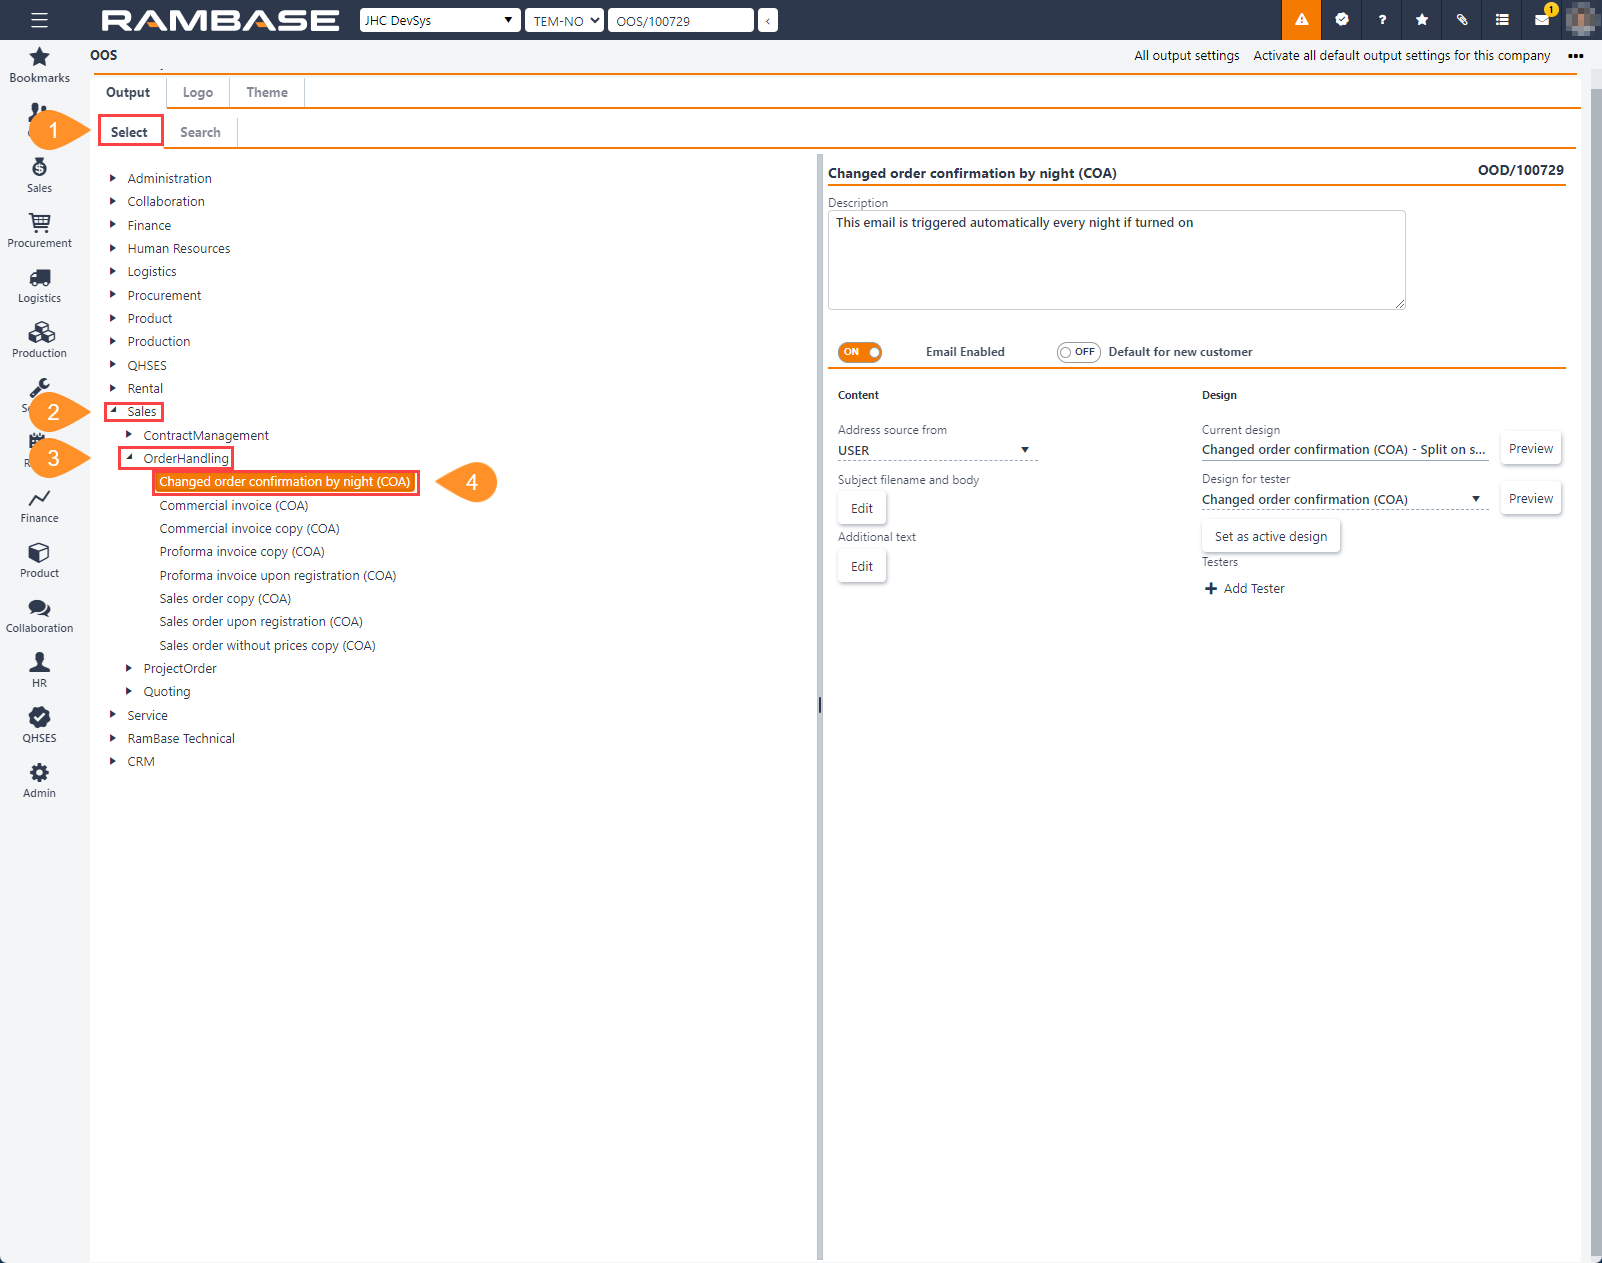
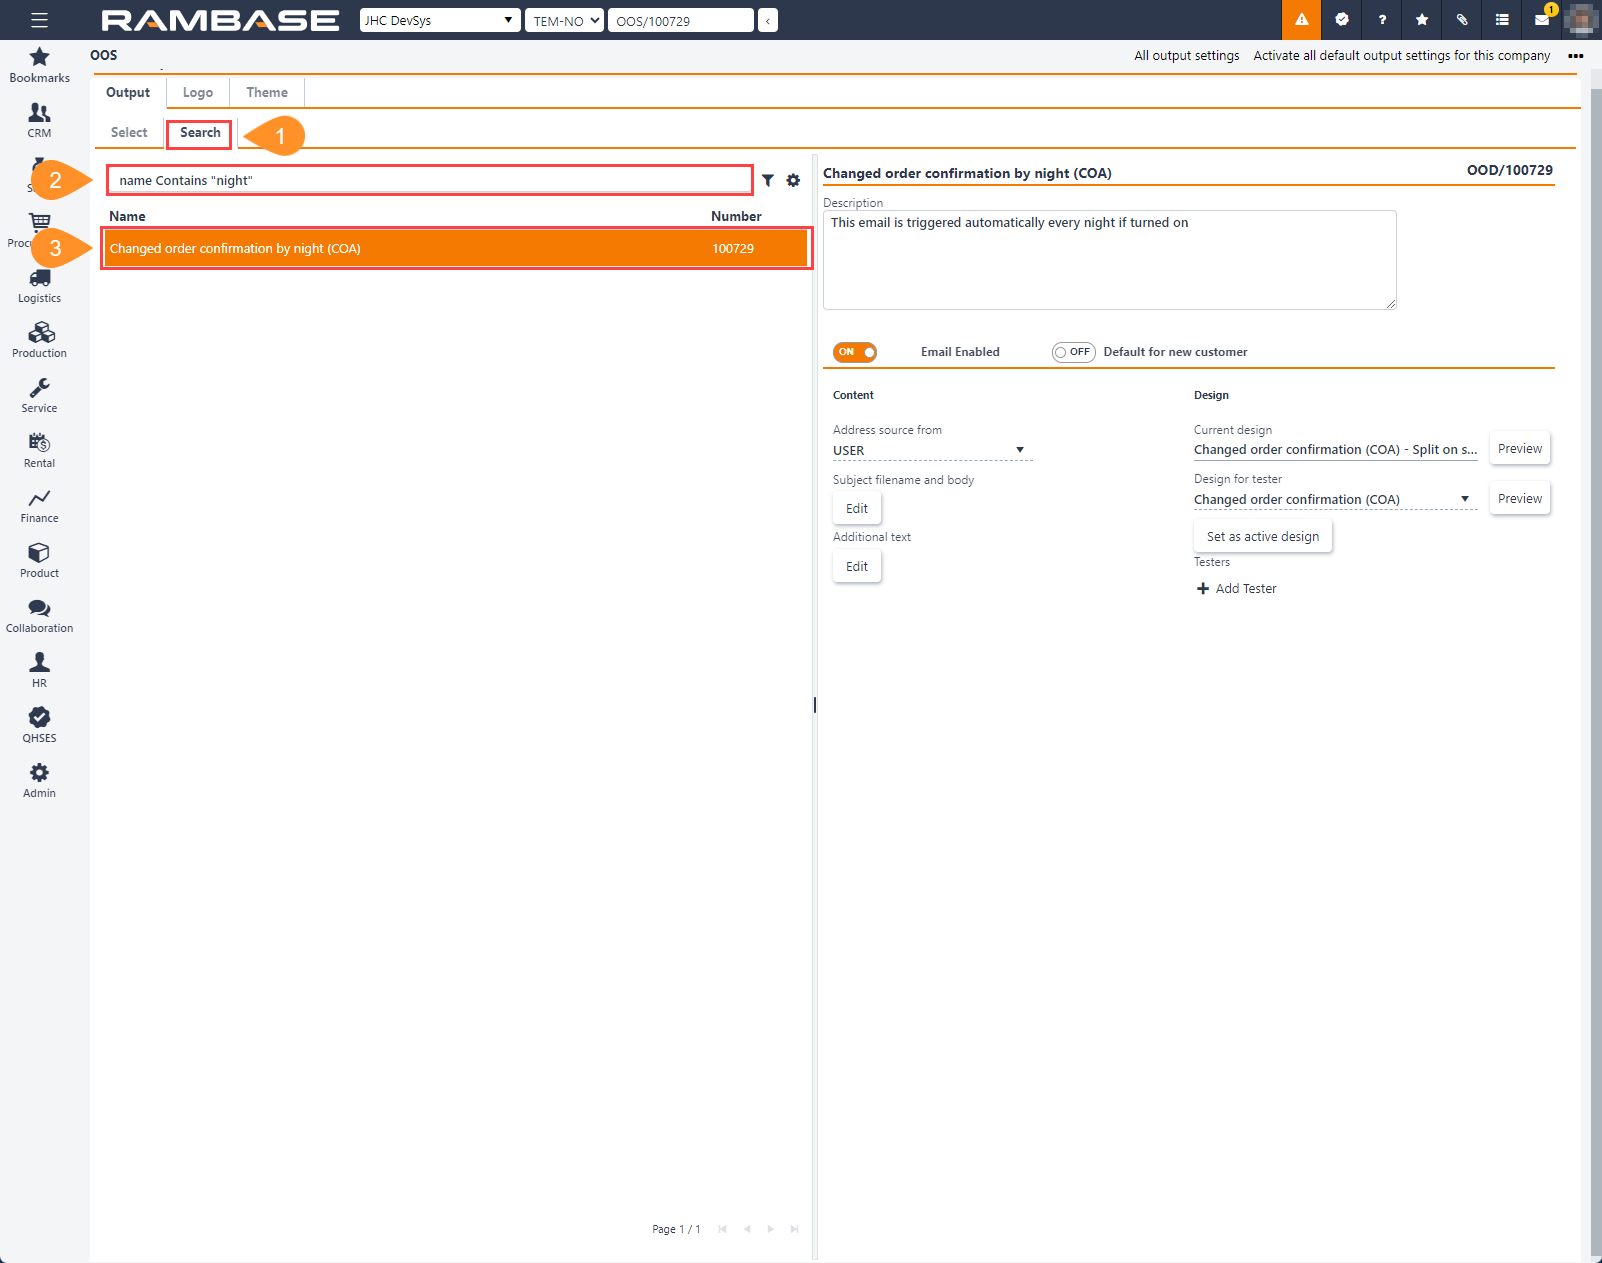
The output also needs to be set up in the Customer (CUS) application.
Customer (CUS) - Set up output for automatic order confirmation
Open the Customer (CUS) application from the RamBase menu by clicking CRM, followed by Customer management and finally Customers.
Select or search for the customer from the Customers list.
When the customer is selected, click the Settings tab and then the Output control sub-tab.
To activate automatic order confirmation, click the +Add document to send button found in the Footer in the Output control sub-tab.
In the following popup, choose how to send the document in the Send by dropdown menu.
Select the Changed order confirmation by night (COA) option in the Documents to send dropdown menu.
Optionally, check the Mandatory to always send checkbox.
Choose who to send the document to in the Send to dropdown menu;
Recipient from a source document - If selected, the recipient will be same as the inital order confirmation.
New contact email address - If selected, provide a First name, Last name and Email in the related fields.
To finalize the sending of additional documents, click the Create button.
The customer is now set up to receive outputs.
There is a Company setting (CSV) that optionally can be used to tailor the trigger and consequence. The setting is listed in the Company setting (CSV) table below.
Warning
Changes to these settings will have an effect on all Sales order items (COAITEM) in your system. Should be tested before activation.
Setting | Sub setting | Description (from the Company settings (CSV) application) |
|---|---|---|
ReConfirm Sales Order (COA) | If this setting is "ON" - Confirmed delivery date will automatically be updated in Sales Order Item (COA-ITM) for selected locations (locations can be added in a comma list like e.g VAT,HAU,OSL,LON) if confirmed delivery date is changed in any of the transactions that are assigned to COA-ITMs, -e.g in a (SOA-ITM), and this change causes that confirmed date in COA-ITM should be changed. This update will be logged in revision history on the Sales Order. If this setting in "OFF" - Confirmed delivery date will not automatically be updated in sales order item, but there will rather be set a notification in the item about that confirmed delivery date has been changed in transactions which do have assignments to this COA-ITM. In case CSV/"Don't reconfirm sales order if shipping day is a fixed week day" is "ON", confirmed delivery date will anyway not be updated if Shipping Day is a fixed day in the week of delivery or before delivery. A notification will rather be added to the item. | |
Don't reconfirm sales order if shipping day is a fixed week day | If this setting is "ON" - Change in confirmed delivery date from supplier or production backlog will not cause automatically update of confirmed delivery date in Sales Order Item (COA-ITM) if ShippingDay is a fixed week day. In this case a message will be set on Sales Order Item. |
Sales order change request (CRC) is used in instances where a customer requests a change to a registered Sales order (COA).
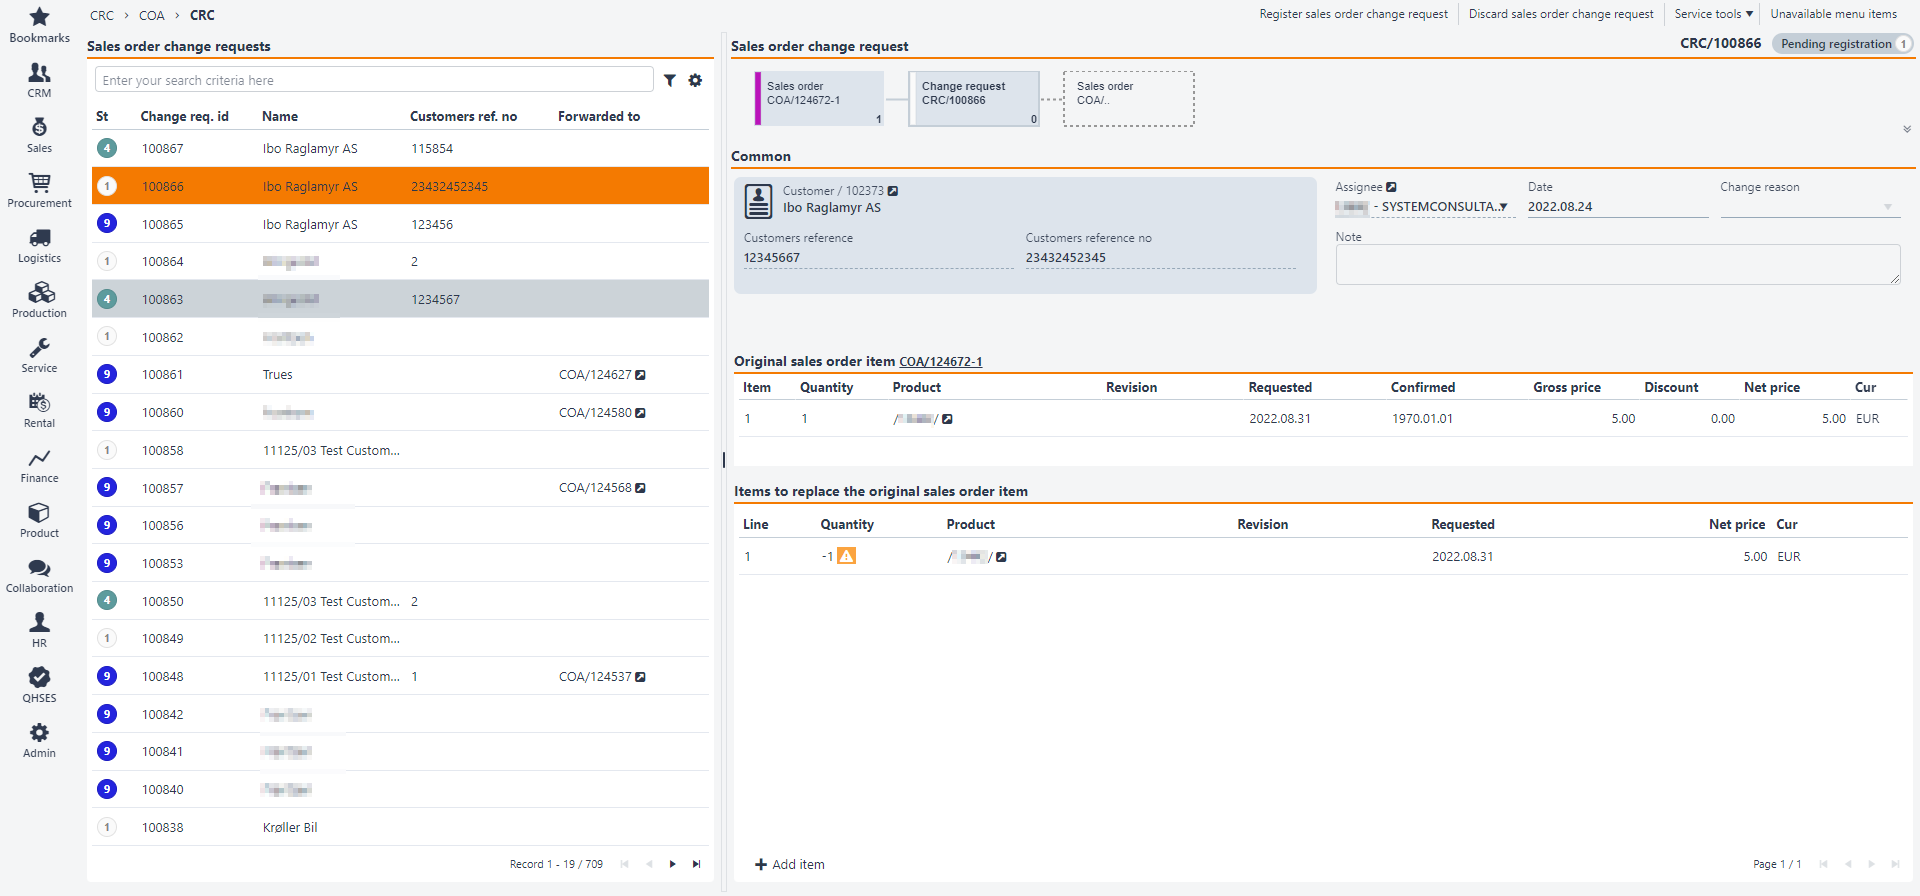
Find the Sales order (COA) the customer wants to perform a change on and enter the item that requires a change.
Click on the Change requests tab.
Click the Create new change request button.
Enter the Customers reference, Customers reference no and/or Change reason in the popup. The field Change reason can provide a reason for change on a Sales order (COA).
Click the Create button. A Change request (CRC) is now created and the Sales order (COA) item is set to Status 5 (Pending change request).
You will now enter the Sales order change request (CRC) document in Status 1 (Pending registration). You can add item, change or add information, such as Customers reference/Customers reference no and add a note.
The lower areas will display Original sales order item COA/xxxxxx-x and Items to replace the original sales order item. The default is that the quantity will be cancelled, as you can see from the orange warning. The Inspect-icons at the top links directly to the original Sales order (COA) in the top one, and the bottom one links to the specific product(s).
Click the Add item button. You will now see a popup where the total item quantity is listed in the Quantity field. This is the quantity you can change.
Depending of which changes the customer requests, Product, Requested delivery date or Quantity can be entered for each item.
Then click on the Create button to save the changes that where made.
Click on the Register sales order change request option or Discard sales order change request option in the context menu when finished.
If you choose to register the Sales order change request (CRC), it will be set to Status 4 (Active).
The user can choose either to Accept and forward to sales order or Decline sales order change request by clicking the corresponding button in the context menu.
After clicking Accept and forward to sales order you will get the option Forward to new order or Forward to existing order. You will also have the opportunity to provide a reason in the Change reason field. The Forward to new order creates a new Sales order (COA) and the Forward to existing order will add this to the Sales order (COA) you find in the search menu.
If you choose the option, Decline sales order change request, the Sales order change request (CRC) will go to Status 9, and the Sales order (COA) will return to the status it had before the Sales order change request (CRC) was created.
Note
Remember that the total quantity will be cancelled by default. Any inaction towards the remaining quantity will remove these from the sales order.
A subscription process may be defined as the process where something is sold on a subscription basis. Subscribers will order the goods automatically, unless cancelled by the subscriber in advance.
Contract sale to agreed terms within a defined period.
Declined sale presented to customer.
Examples of subscription sales are books sold in a book club, stamps in a stamp club or magazines from a publisher.
The subscription is often limited to a period, where the subscriber is rewarded for committing over a certain period.
Creating a subscription
Set terms for the subscription, such as period, membership and frequency.
Creating offers concerning the subscription
Offers can be sent out concerning the subscription to all subscribers.
Creating subscription orders
Orders will be automatically created if they are not cancelled in advance by the subscriber.
Maintain subscribers
Subscribers sign up and off. This overview must be maintained.
Setting name | Description |
Default Customer on Sales Quote (CQU) for Subscription | Value in this setting is the CustomerId for Default Customer that should be used on Subscription Sales Quote (CQU). These quotes have TYPE=SUBSCRIPTIONS. Format to be used: CUS/NNNNNN (N for numbers) |
Email address to notify changes in Subscription | Value in this setting is a email address to the company using Subscription functions in Rambase. When the company customers signs up for a Subscription or Unsubscribes, mail will be sent to this addres. Format to be used: Hatteland@Hatteland.com (e.g) |
The Subscription (SUB) application manages subscriptions, such as subscriptions for magazines, catalogues etc. The system has functionality for handling creation of subscriptions, cancellation of next shipment of subscription and unsubscribing customers.
To open the Subscription (SUB) application, find Sales in the RamBase menu and then Subscriptions. Click Subscription management to enter the SUB application.
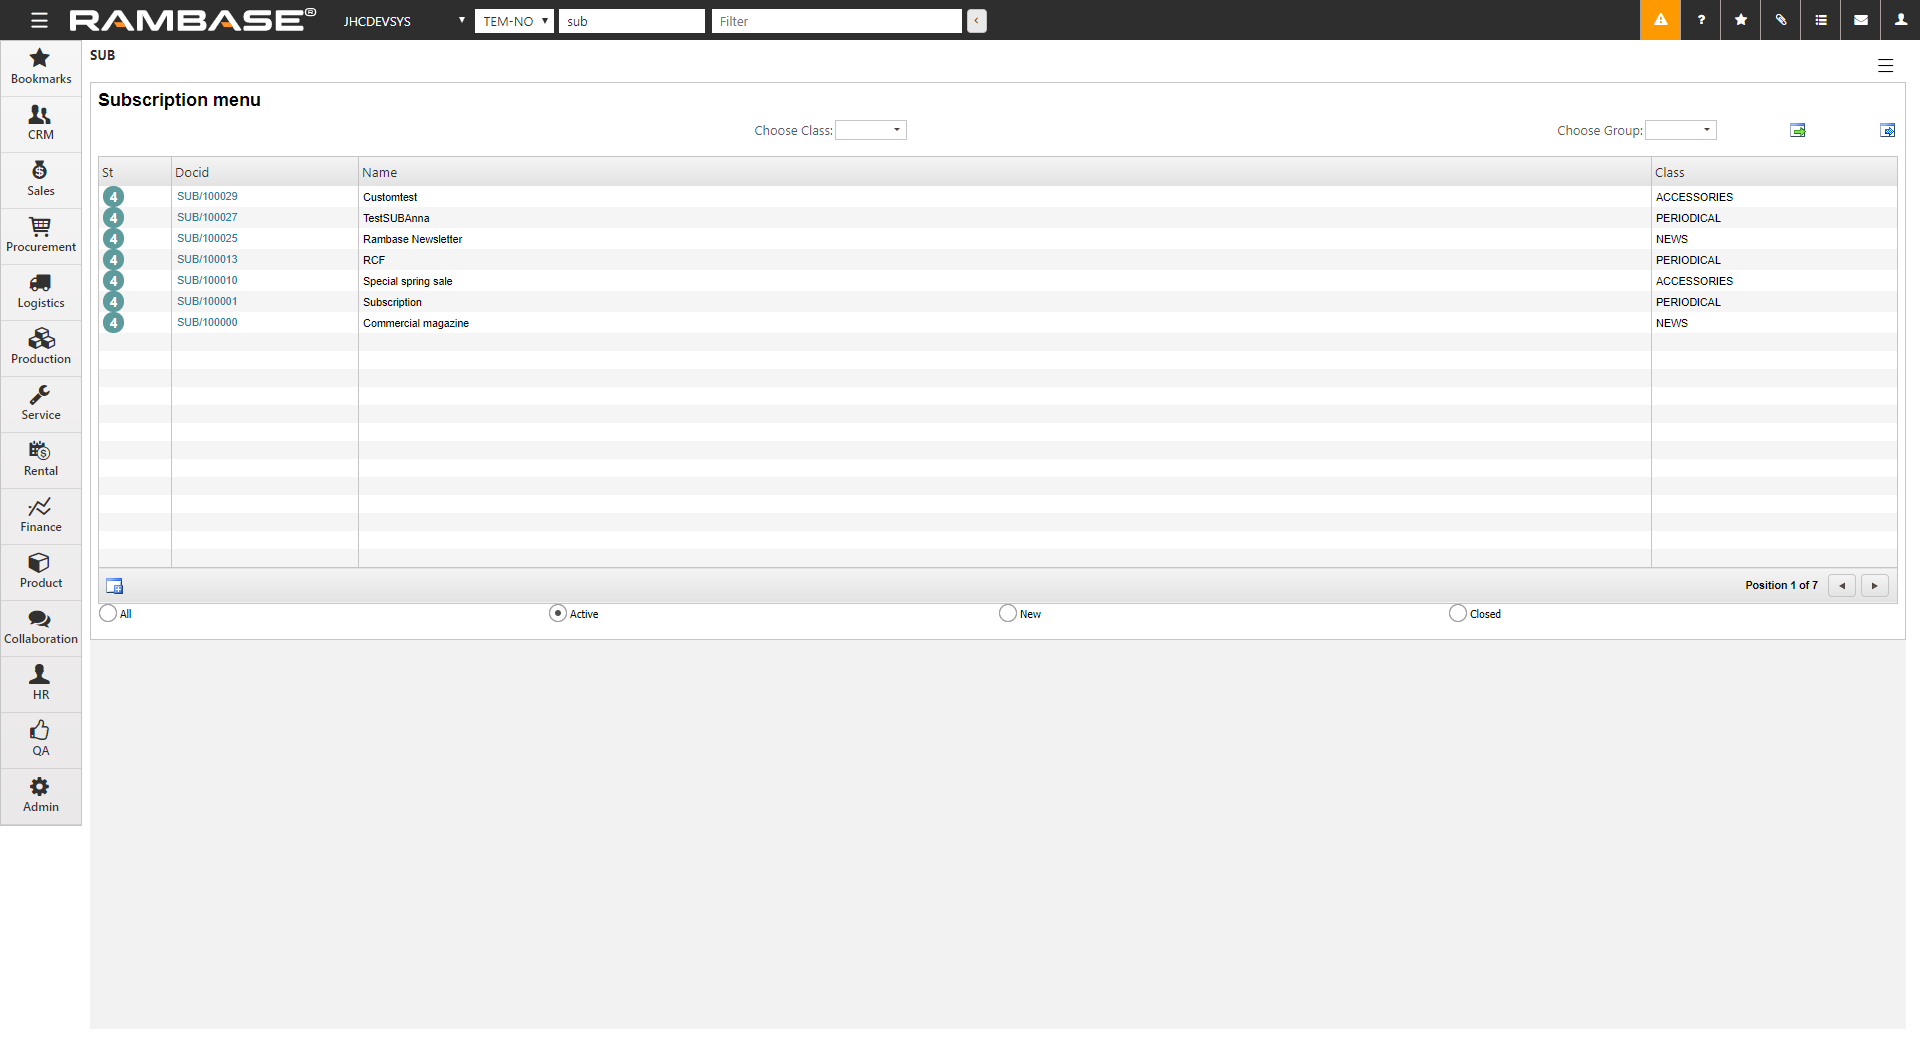
The SUB application shows you all existing subscriptions, with a drop down menu and radio buttons to further filtering for relevant subscriptions.
To open the Subscription (SUB) application, find Sales in the RamBase menu and then Subscriptions. Click Subscription management to enter the SUB application.
To open the Create Subscription popup, click the Create new icon in the lower left hand corner.
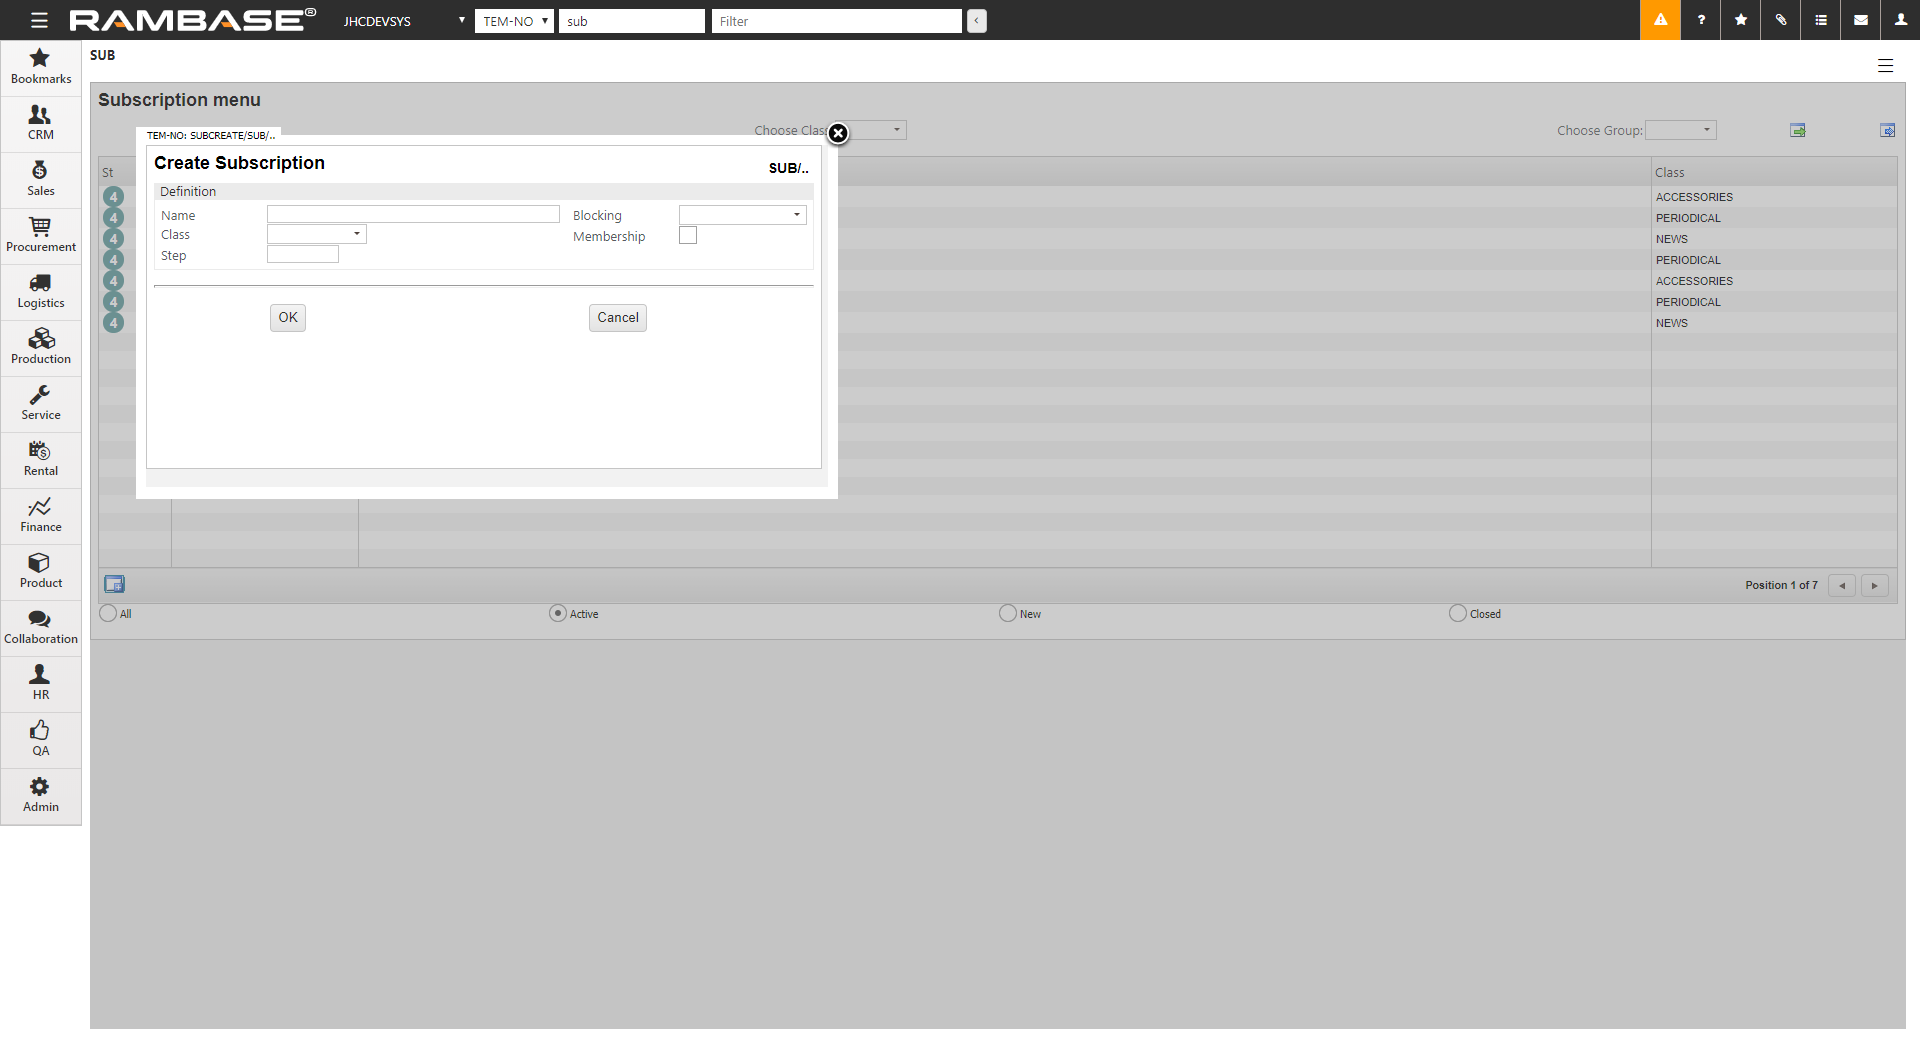
Enter a name for the subscription in the Name field.
Select the type of subscription you need in the Class field. The alternatives are:
Periodical
This is a type of subscription that involves periodic shipments to the customer with products that may change from period to period. To manage the shipments, each period is represented by a separate Sales Quote (CQU) document, where the ValidFrom and ValidTo dates determine the period, and the item lines on the CQU represent the products of that period.
Serial
This is a type of subscription that involves a series of shipments, such as pages from a cookbook, where you periodically will receive different pages of the book until you have got the complete book. To prepare which products that are going to be shipped when, you create a single CQU for the complete serial. Use the Step field to indicate how many CQU items you will ship each time.
Accessories
This is a type of subscription where the system automatically sets up a subscription for accessories when the customer buys the product.
News
This is a type of subscription that involves the shipments of products as they become available. Typically you will wait to setup the CQU until the products are available, and then enter a reasonable period by means of the VaildFrom and ValidTo dates, from which you manage it more or less as any other subscription.
If you have chosen the Serial alternative in the Class field, use the Step field to indicate how many CQU items you will ship each time.
The Blocking field lets you choose between two alternatives:
Block for CancellationThis option will block the subscription from being cancelled by customer.
Block for UnsubscriptionThis option will block the subscription from being unsubscribed. Typically used in instances where the Serial class has been chosen, to disable the possibility to unsubscribe before the complete serial has been received.
The Membership field is used in instances where the subscription is to trigger a certain membership.
Click OK to complete the registration and move on to the creation of subscription content.
Once a new Subscription (SUB) is registered, the Subscription window is displayed. From here you may create a Sales Quote (CQU) document to hold information about the products and prices that the subscription consists of.
Here you may also add the subscription to a group. The groups are defined by JHC.
To open the Subscription (SUB) application, find Sales in the RamBase menu and then Subscriptions. Click Subscription management to enter the SUB application.
Highlight a SUB and press ENTER.
Enter the Quotes folder.
Click the Create CQU icon in the lower left-hand corner.
This opens the Create Sales Quote popup, where you need to enter:
ValidFrom: Enter the date the subscription starts.
ValidTo: Enter the date the subscription ends.
Click the OK button. This opens a Sales Quote (CQU) flagged as Subscription.
Follow standard RamBase procedures to add products.
When you are finished, press F12 to open the action menu and choose the option Forward to Customer.
Repeat the process if more than one CQU is required. This is normally done for subscriptions of type PERIODICAL where you need to change the products for each period.
After the registration is finished you will be in the Subscription window. This is where you will build the subscription content, add customers and handle the customers subscriptions status.
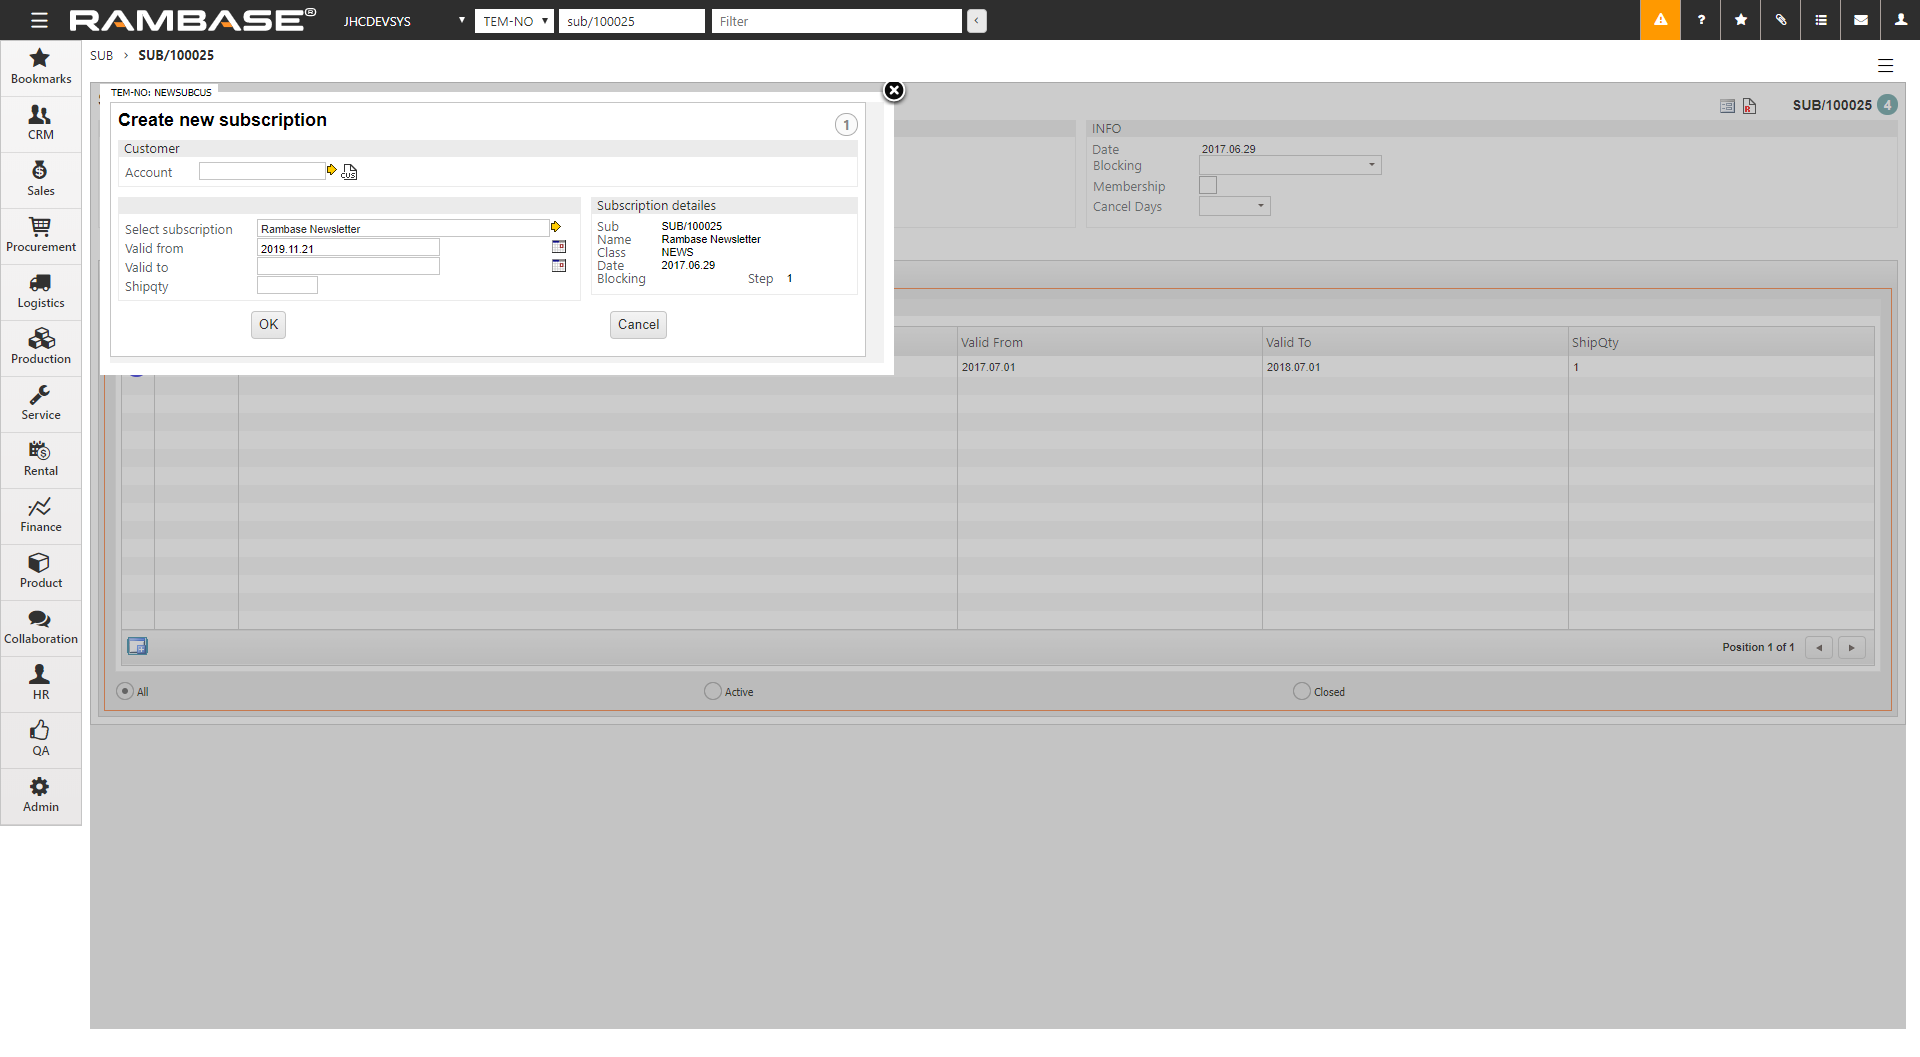
The first step in building subscription content is to create a Sales Quote (CQU), which will list the subscription items. This CQU will be created for a default customer set up in companies configuration settings.
Click the Create CQU icon. This will open a window where the initial information regarding the CQU must be entered.
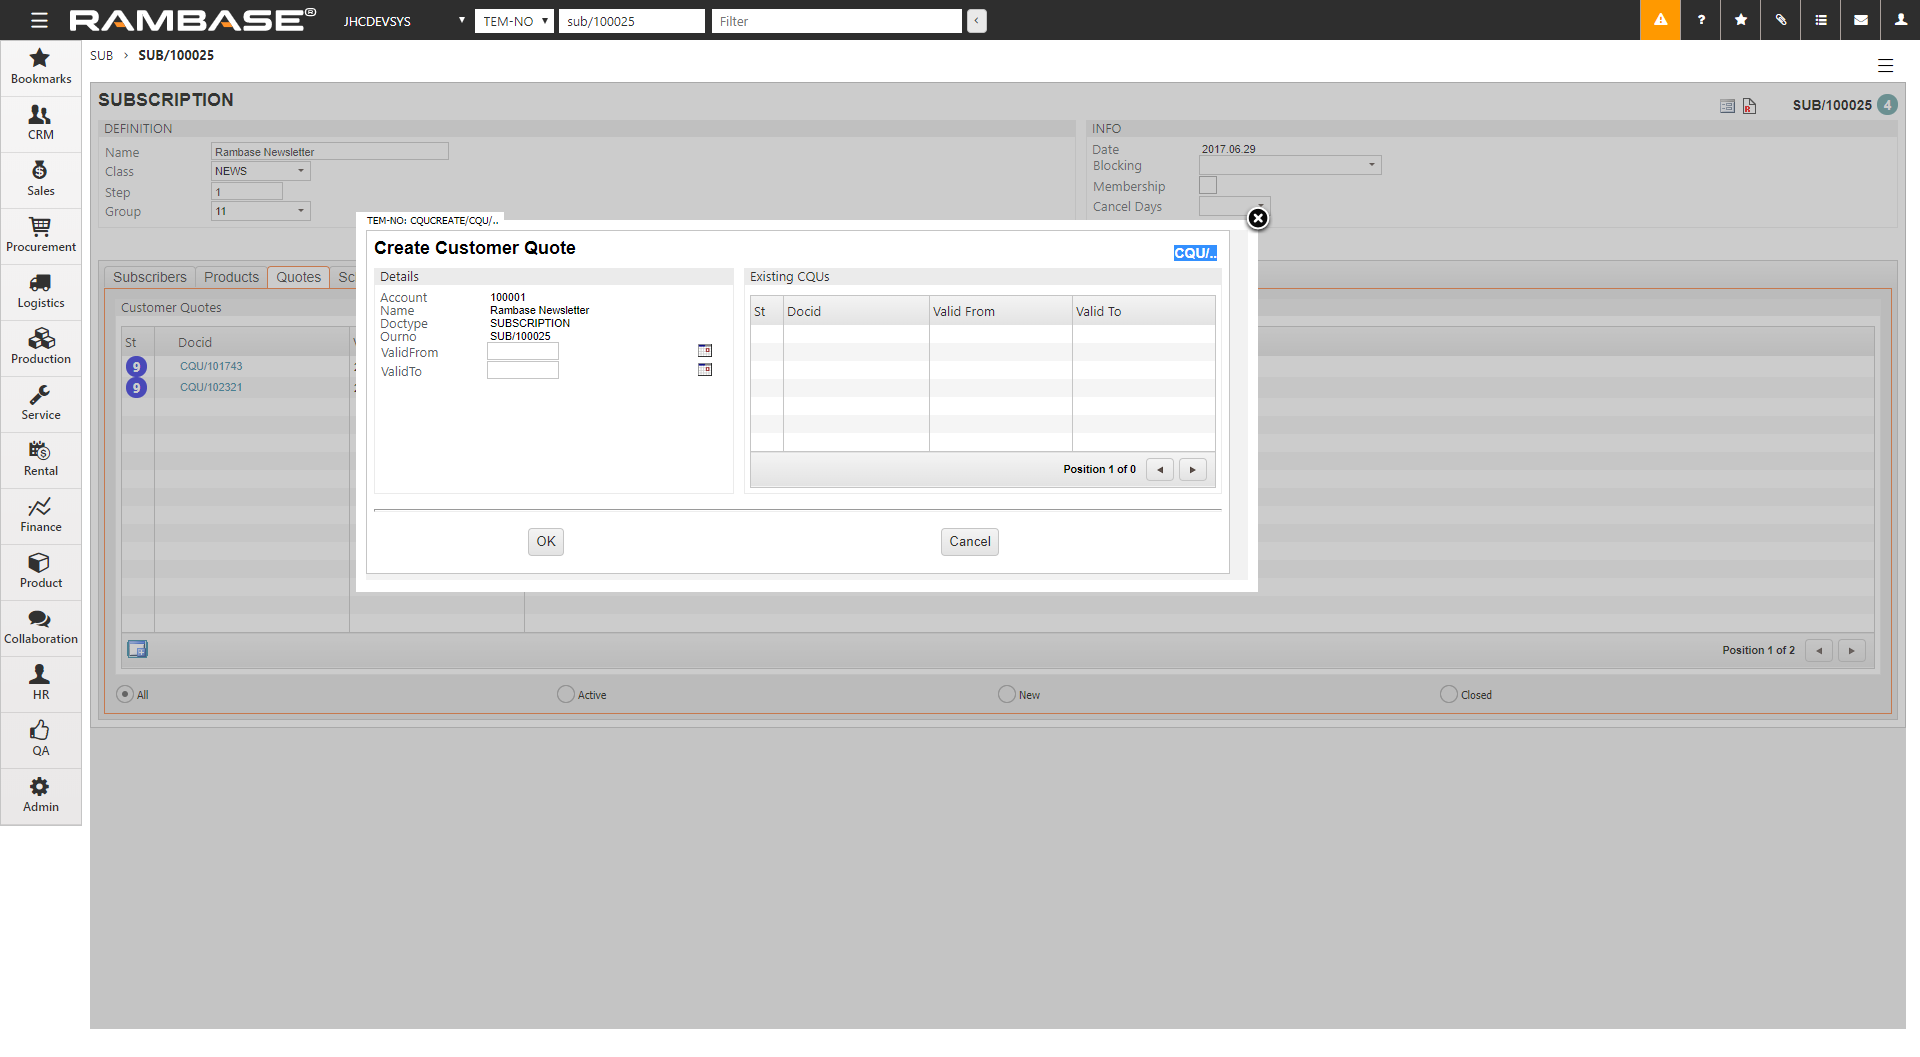
On the right side of the window you can see all CQUs related to this subscription. On the left side you have two fields where you must state the duration of the subscription. ValidFrom defines the start of the subscription period while ValidTo defines the end.
Click OK when you are finished to open the CQU item window.
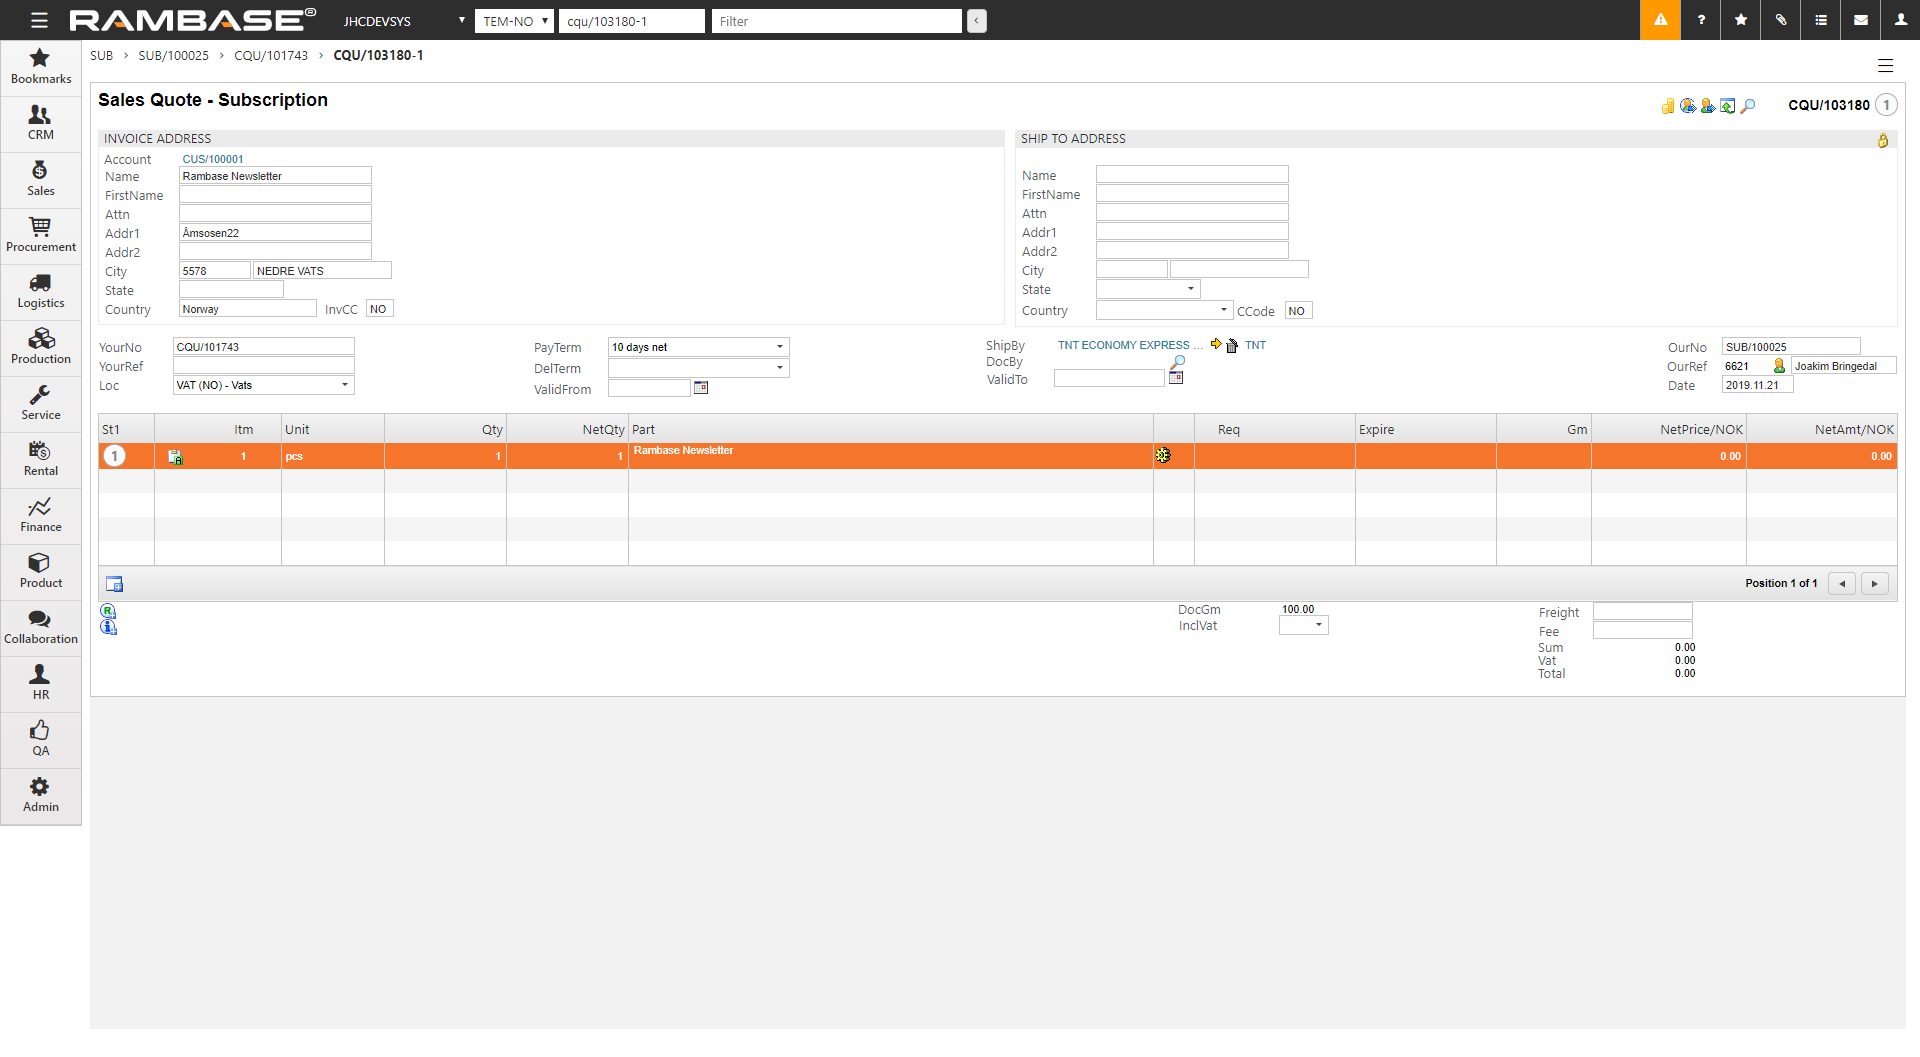
Click the Create new Item icon and add the desired subscription item.
Repeat the process if more than one CQU is required. This is normally done for subscriptions of type Periodical, where you need to change the products for each period.
Press F12 to open the action menu and choose the option Forward to Customer to register the CQU.
Close the CQU document to return to the subscription document.
To create the scheduled orders that are supposed to be sent in the next shipment, we start a process called pre-order.
To open the Subscription (SUB) application, find Sales in the RamBase menu and then Subscriptions. Click Subscription management to enter the SUB application.
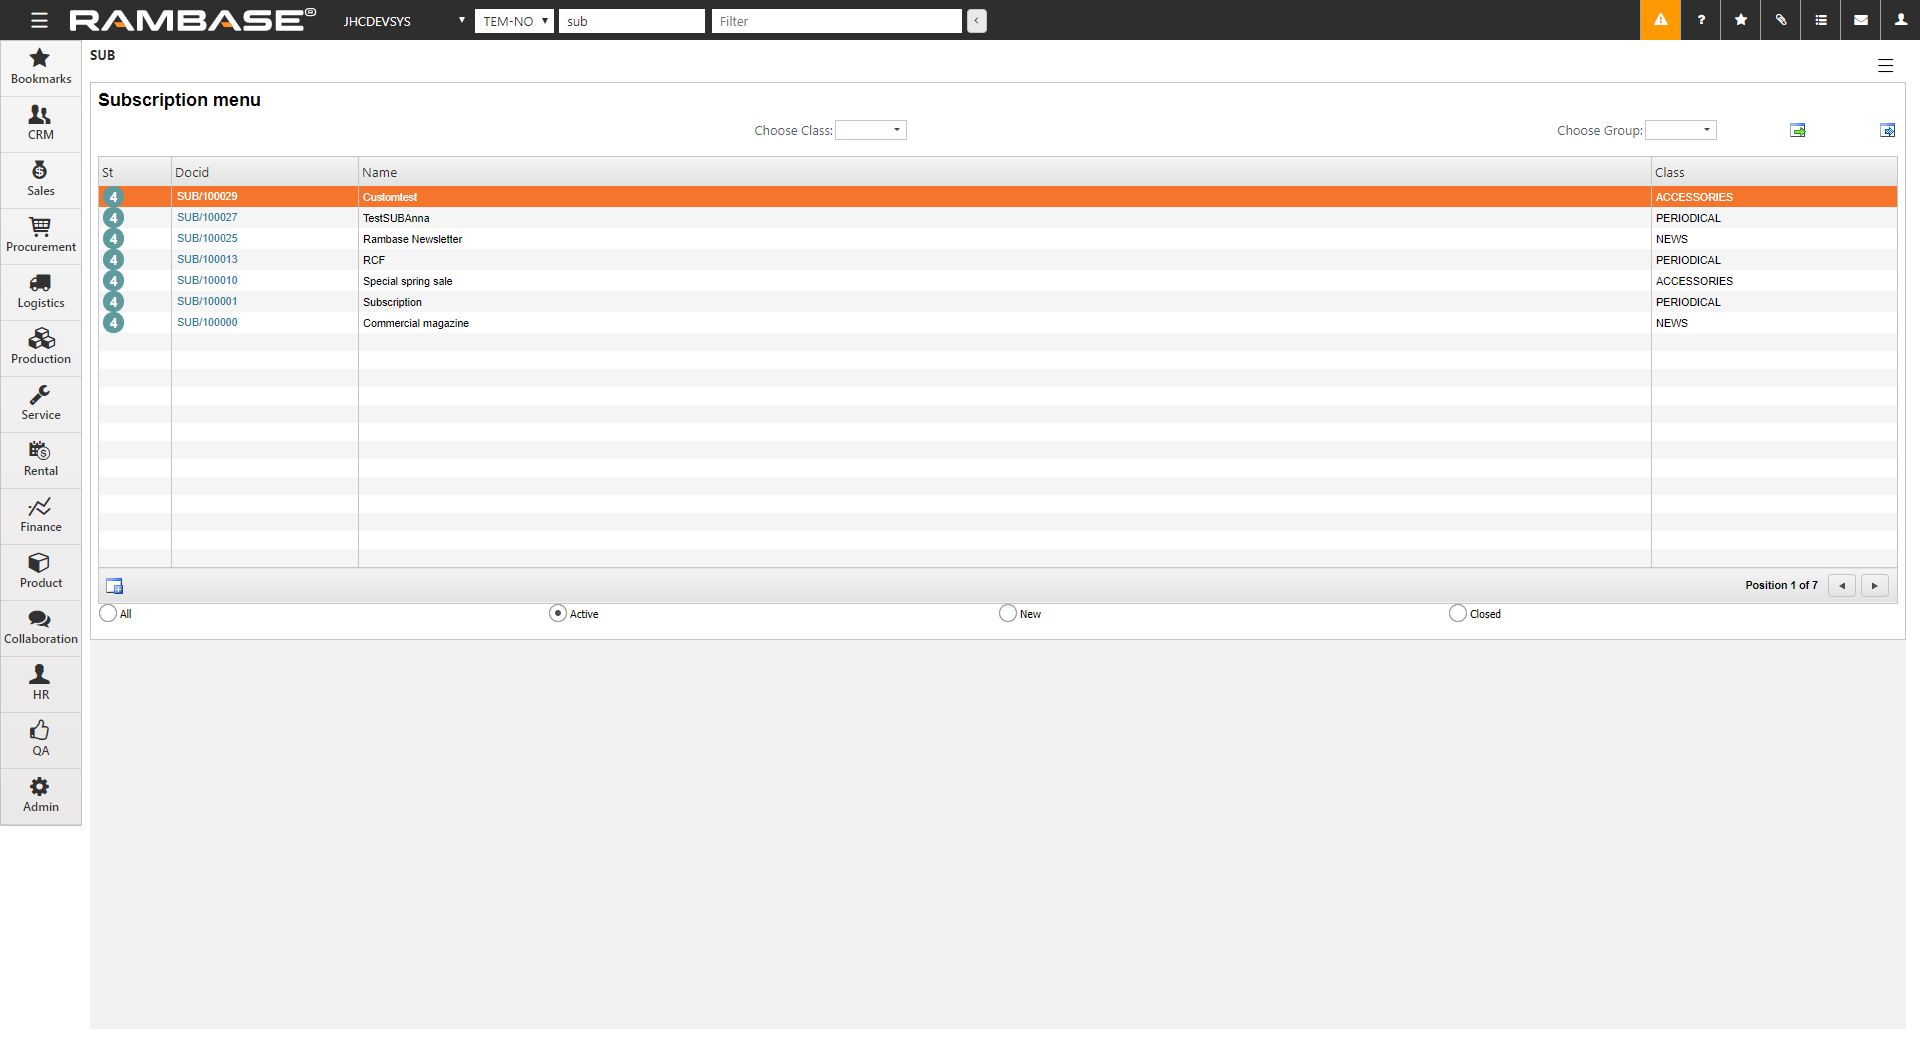
Locate the desired SUB, highlight the item line and press ENTER.
Enter the Quotes folder.
Click the Start preorder process icon on the item line for the chosen Quote.
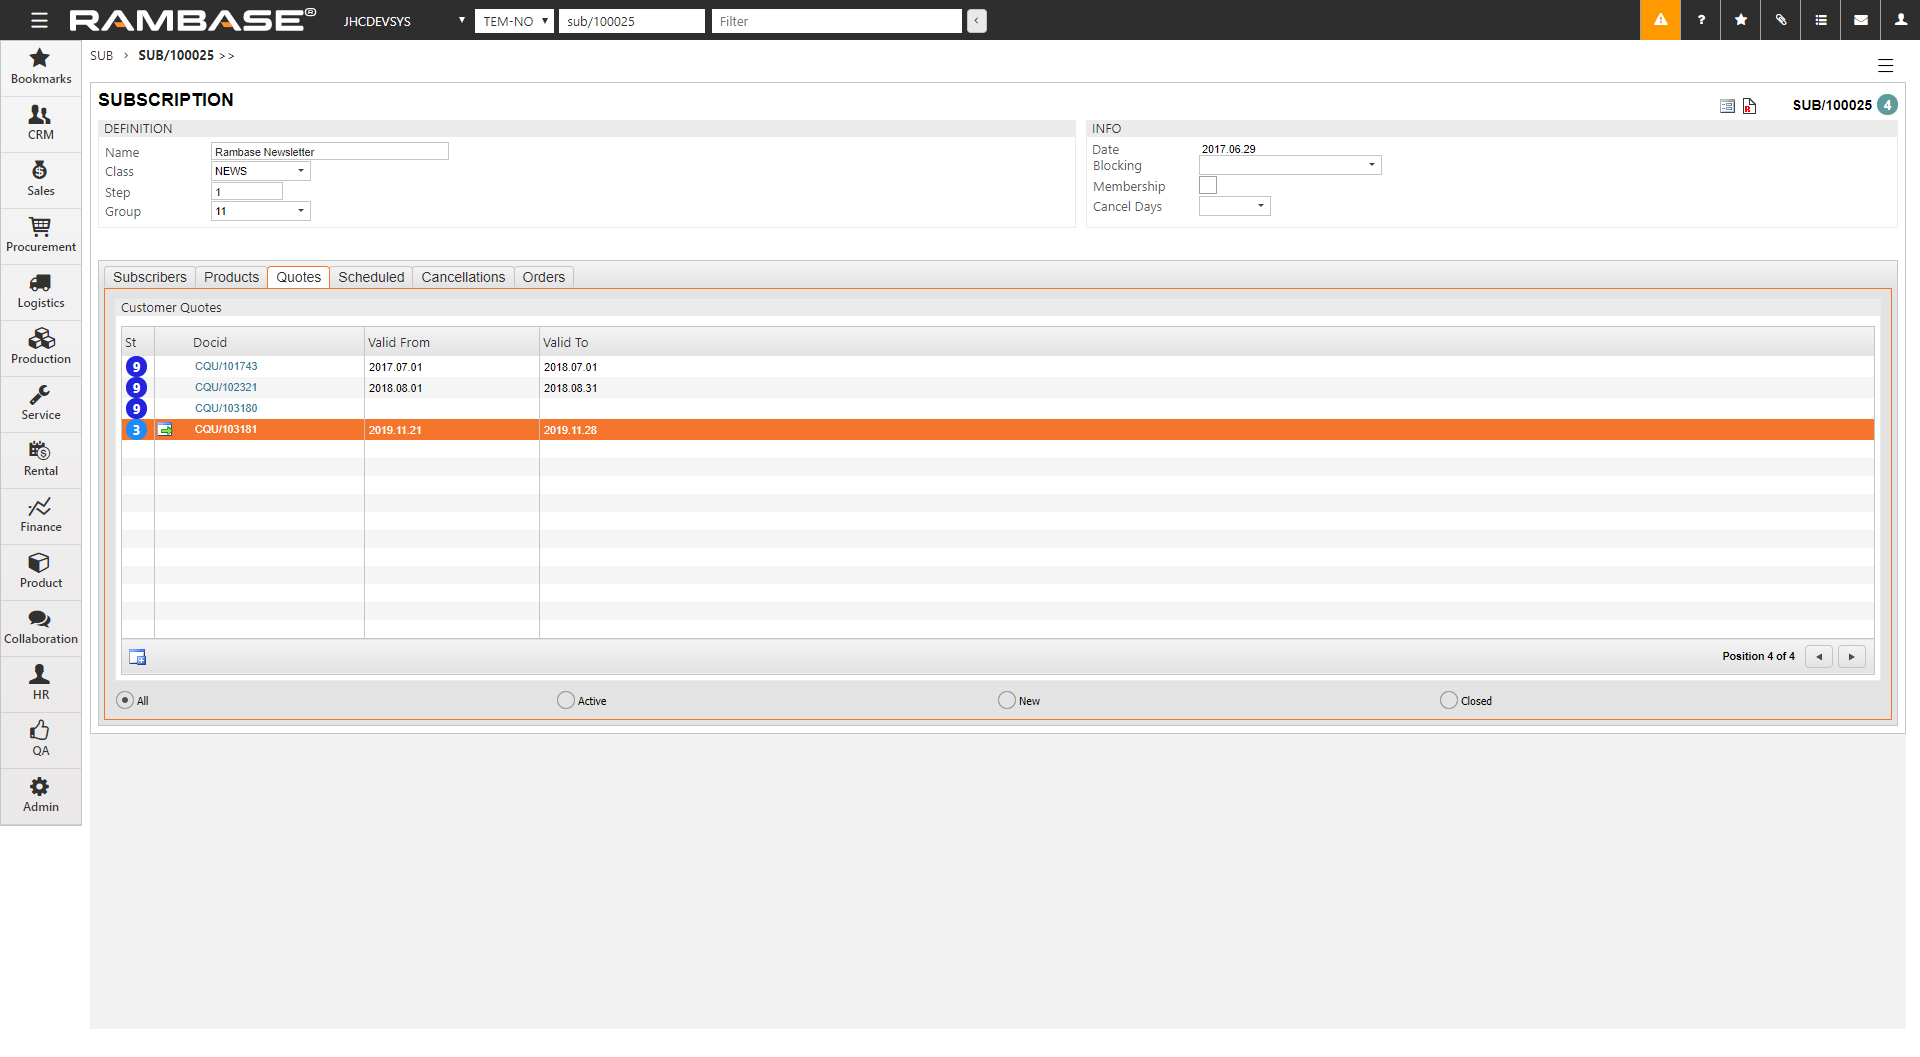
Alternatively, you can start the process directly from the CQU document using the F12 option Start Preorder Process.
The pre-order process starts to transfer products and prices from the CQU to a Sales Order Request (CPO) for all the customers that subscribes to this subscription at the time the process is running. When completed, the CPOs will be set to ST=8, which means that they are scheduled to be sent to the customers. But they may still be cancelled.
You may run the preorder process as many times as you want until you have converted the scheduled orders into firm orders. Any customers that have cancelled their shipments will remain cancelled even if the preorder process is repeated. The orders that were created in the first run will also remain unchanged.
A Sales Order (COA) should be created when it is too late for the customers to cancel the next shipment.
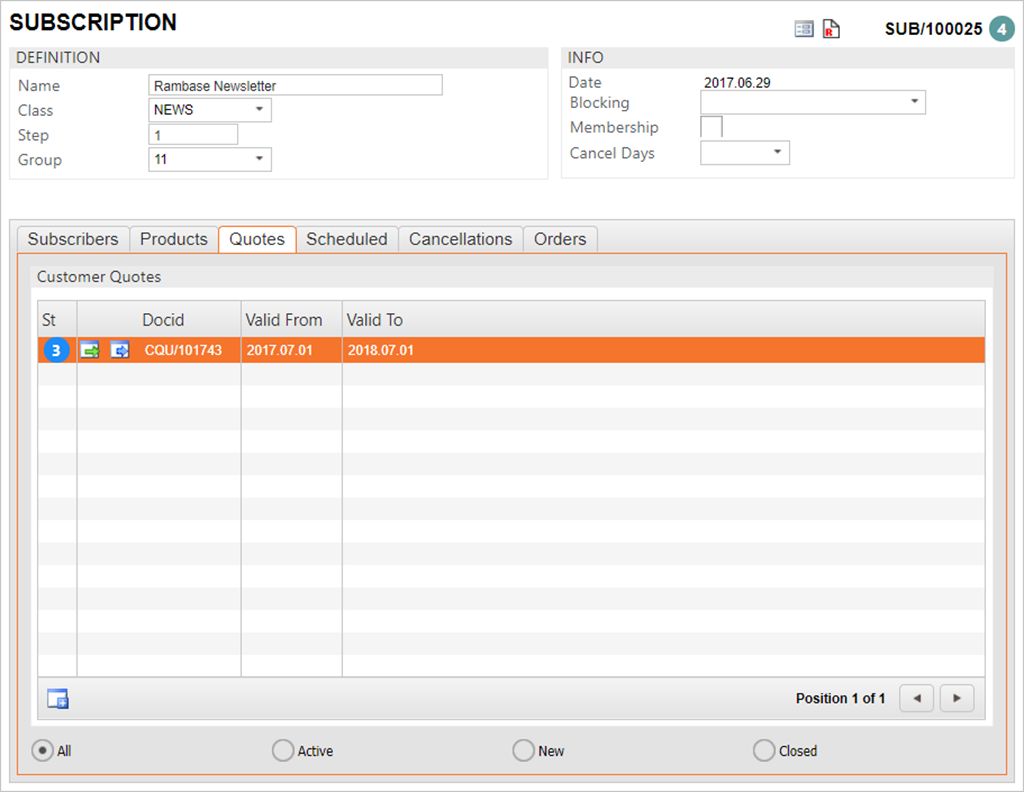
Click the Start order process icon on the item line for the chosen Quote.
Alternatively, start the order process via the F12 option Start Order Process on the Sales Quote (CQU).
The process will transfer all Sales Order Requests (CPO) in ST=8 into Sales Orders (COA). This means that the COAs will now become a part of your backlog and should be treated like any other orders. They are no longer a part of the subscription process.
To open the Customer (CUS) application, find Sales in the RamBase menu and then Customer management. Click Customers to enter the CUS application.
Find the customer in question and highlight the customer line and press ENTER, or double click. This will take you to the Customer document.
Press F12 to open the action menu and choose the option View subscriptions.
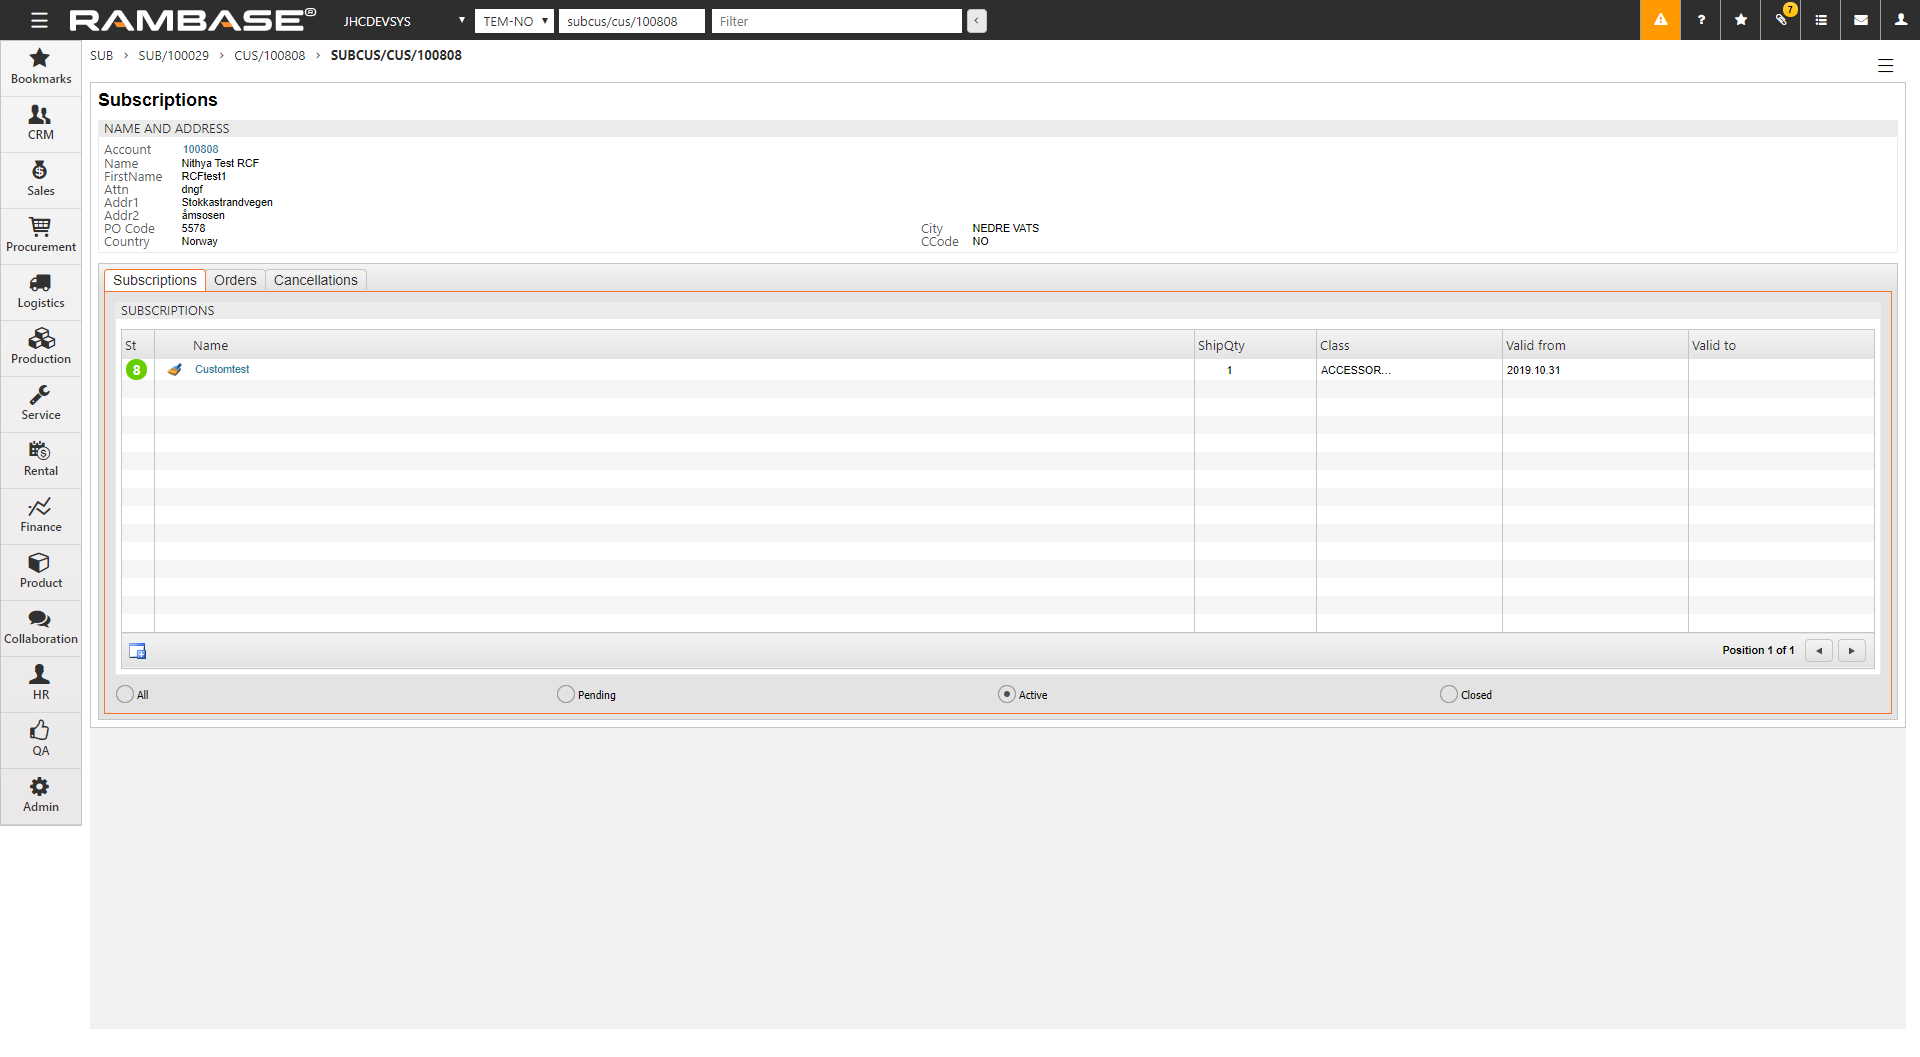
Here you will see all subscriptions for this customer. Each subscription has a status:
ST:4 - Subscribed, but pending, as the date set in ValidFrom has not been reached.
ST:8 - Subscribed and activate, as the date set in ValidFrom has been reached and the date set in ValidTo has not been reached.
ST:9 - Unsubscribed, as the date set in ValidTo has been reached.
Click the Create New Subscription icon to open a open subscription window.
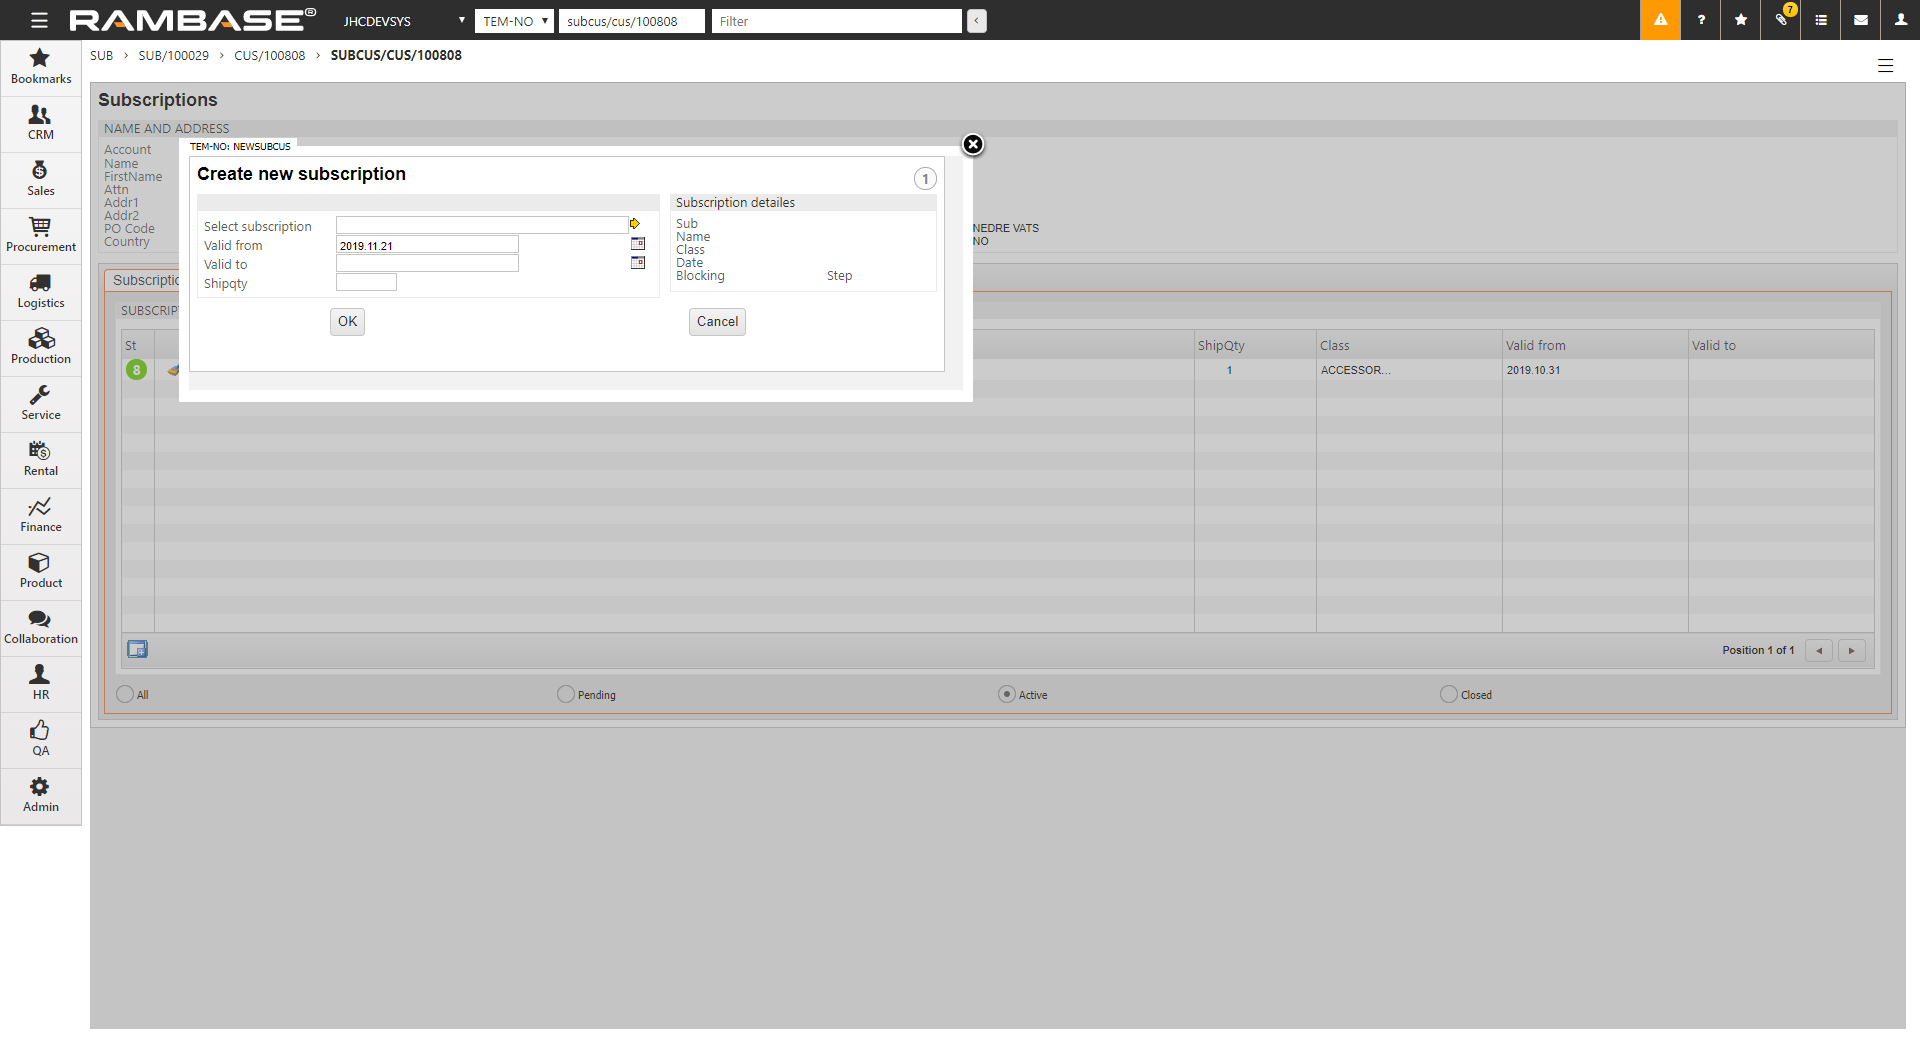
Select a subscription
Enter the subscription period using ValidFrom and ValidTo fields. A blank ValidTo field indicates a indefinite period.
ShipItm is used in instances of Serial class subscriptions where the user earlier has unsubscribed before the series have been fully delivered. With the ShipItm option you have the ability to resume the subscription for the customer at the point where he unsubscribed to complete the series of subscription items.
If you have chosen subscription type Serial, you will need to enter a value in StartItm to indicate which item in the serial the subscription will start at.
Click OK to register the subscription.
Without following up sales, they would dry up quickly. This process is crucial for detecting discrepancies and implementing the necessary measures.
The customer’s backlog is followed up.
The customer’s billing is followed up.
The customer’s booking is followed up.
The customers’ requests/quotes are followed up.
It is wise to spend a good amount of time and resources on following up routines concerning all business areas your company is involved in. Focus on improvement will in most cases result in raised profits or larger market share. Clear routines on handling the customer’s backlog, billing, booking and request will benefit both the customer and the seller.
Reporting to management / following up key numbersThere are many types of reports which may be beneficial to be followed up by management, like backlog, booking, billing and quotes.
There are several types of sales reports in RamBase. To list these reports, type RPM SALES into the program field and press ENTER. This will open a window with a line referring to sales reports. If you highlight and press ENTER on the lines, you will get a categorized overview over most sales reports in RamBase.
All reports in RamBase can be viewed on the screen, exported to a CSV file or printed out directly from RamBase. Depending on the priority of the reports they may be exported by file in, or outside, the core time, which is 08:00 - 16:00 CET.
To access a report on screen you can double click on the line in RPM, where it will be opened ready for inspection.
To export a report to print you will need to enter the report and right click, to open the action menu and choose the option Report by Email/Print. This will open a popup where you may choose the desired output using the drop down menu in the SendTo field. Then you need to set destination in the Printer field.
To export a report to print you will need to enter the report and press F12 to open the action menu and choose the option Report by Email/Print. This will open a popup where you may choose the desired output using the drop down menu in the SendTo field. Then you need to set destination in the Email Address field. At the bottom of the popup you will see when the file will be received at the set destination.
The sales reports are divided into Three categories: Customer Management, Order Handling (shows booking and backlog reports among others) and Quote Handling (typical for following up and see won/loss) Billing reports can be found under Finance module and shipments under Warehouse.
The Customer Backlog (CUSBACKLOG) is a report with extensive filtering possibilities which gives an overview of expected revenue separated into categories and expected delivery dates.
To open the Customer Backlog (CUSBACKLOG) report, find Sales in the RamBase menu and then Reports. Click Backlog overview to enter the CUSBACKLOG report.
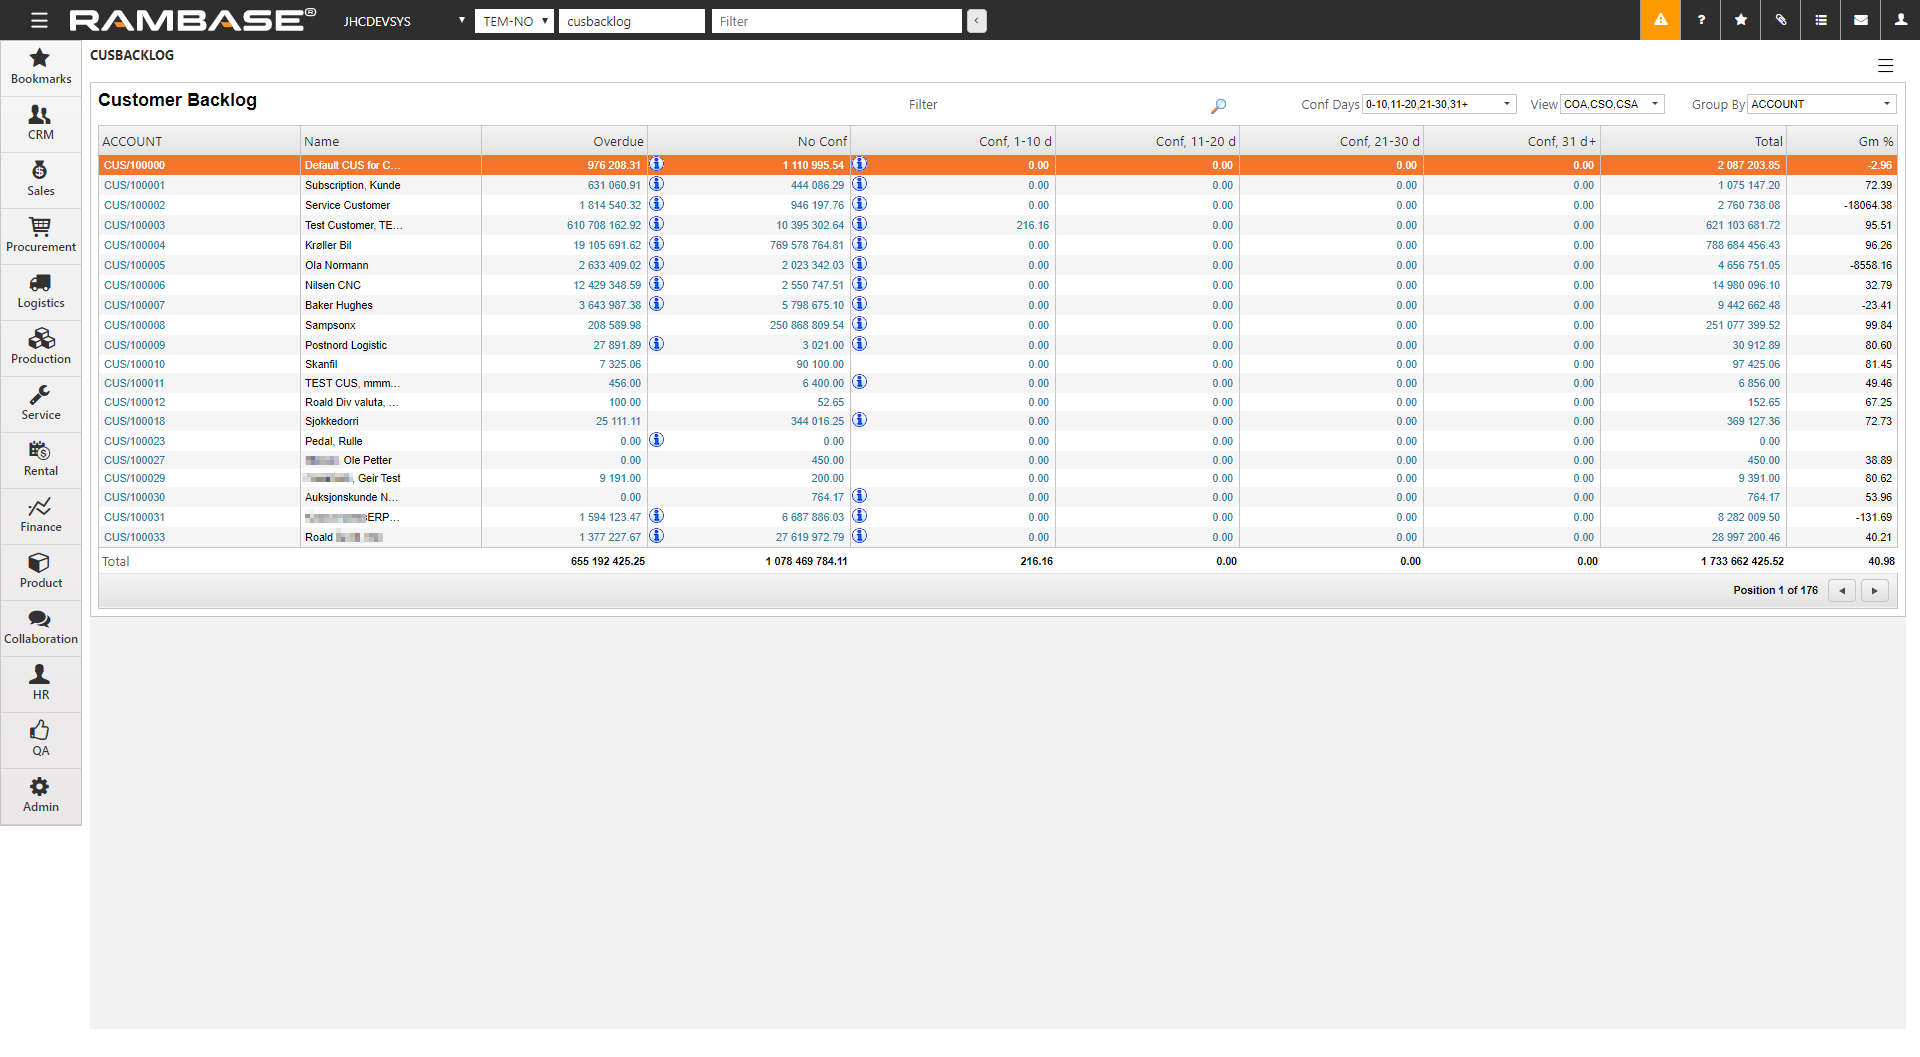
The application lists backlog by customer as default. The deliveries are listed in accordance to their confirmed date. Use the Group By field to list by e.g currency, seller, partnumber, warehouse etc.
To see the pending deliveries of a single customer, select the customer and press ENTER.
A contract is a written agreement between the company and a customer regarding deliveries on a recurring basis. Use the CSC application to keep an overview of your contracts and set up notifications of when a contract need a review, renewal or it is close to the expiration date.
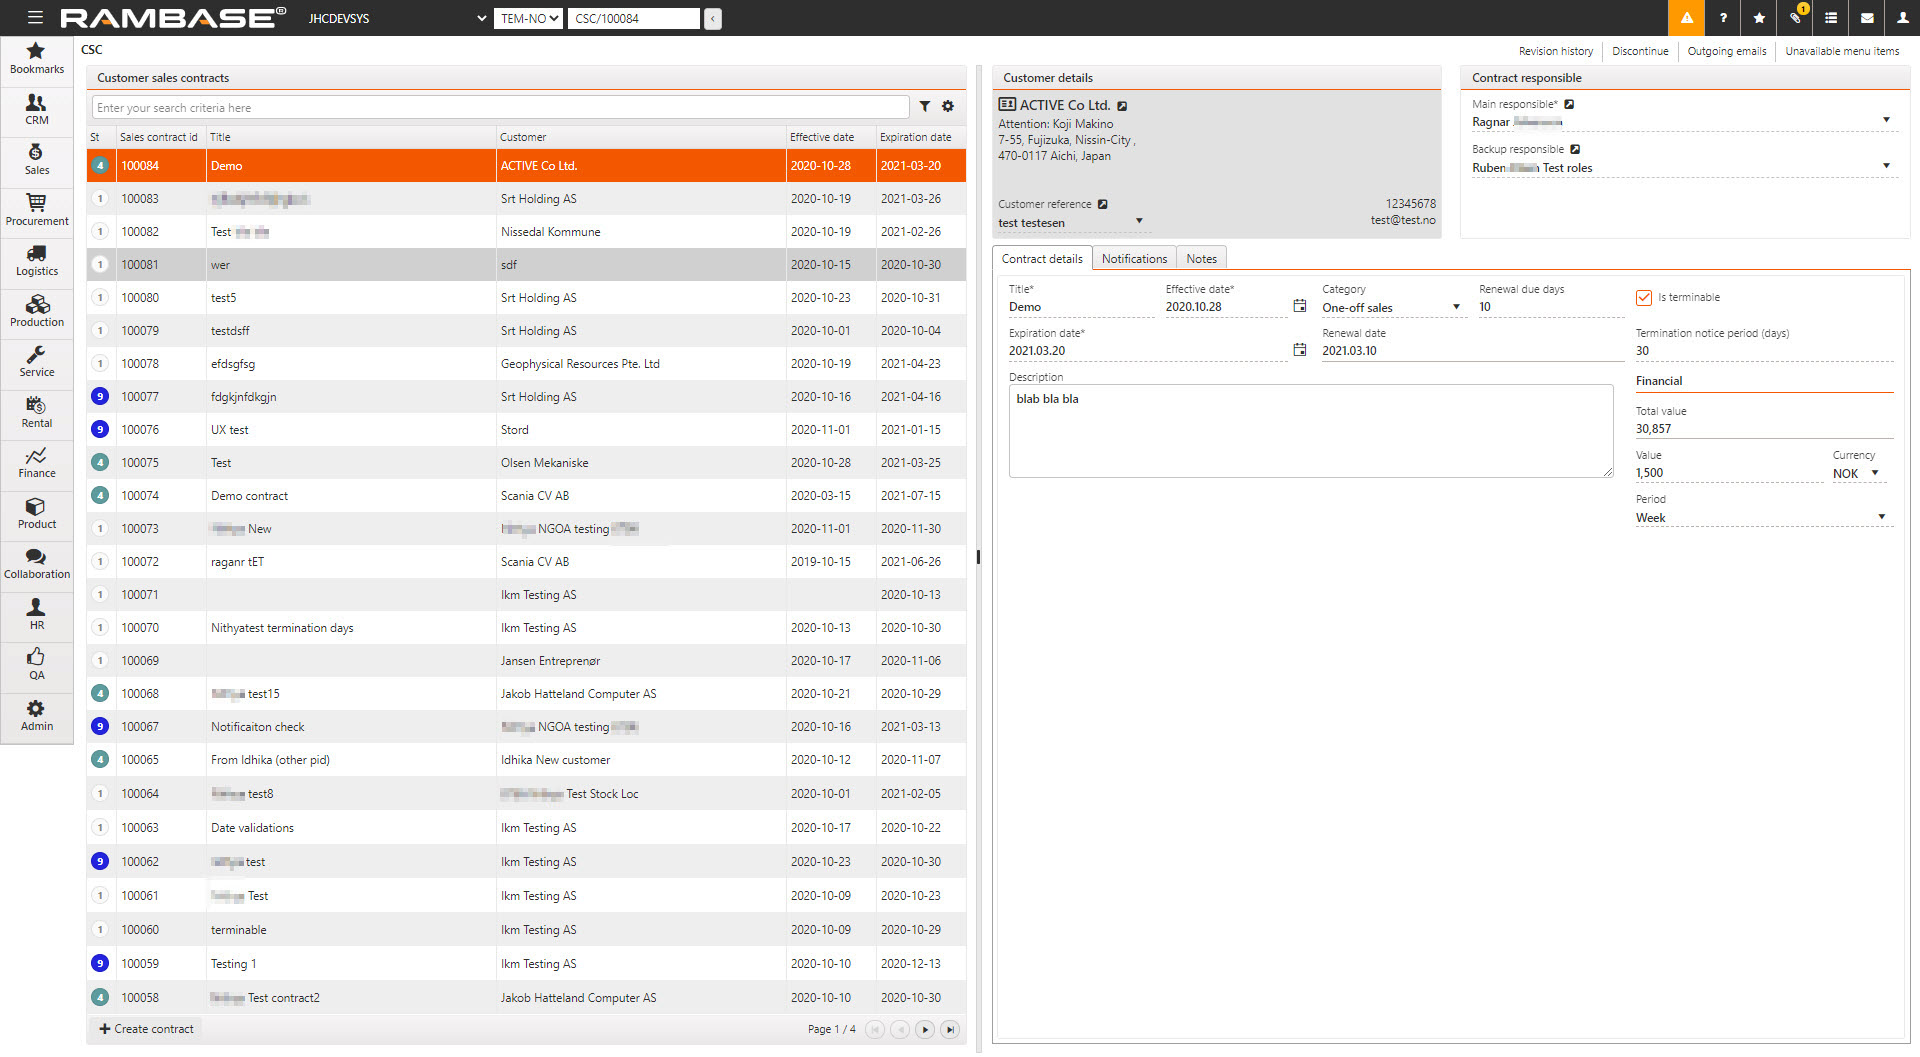
Start in the Customer sales contracts (CSC) application. To open the CSC application, find Sales in the RamBase menu and then Contract management. Click Sales contracts to enter the CSC application.
Click the Create contract button.
Fill in information in the popup:
Title - Name of the contract.
Effective date - The start of the Customer sales contract (CSC).
Expiration date - The end of the Customer sales contract (CSC).
Customer - Select a Customer (CUS) from the CUS application.
Main responsible - Select the person responsible for the contract.
Category - Choose between three categories: Recurring sales, One-off sales & Consulting services.
Renewal due days - The minimum number of days before Expiration date where the contract can be either cancelled or renewed.
Is terminable - Specifies if the contract can be terminated or not.
Termination notice period (days) - The length in days of the termination period.
Click the OK button. This will set the CSC in status 1 (new), which means it is not active.
Select the Activate option in the context menu to set the CSC in status 4 (active).
It is possible to add more optional information:
Backup responsible - Select backup responsible.
Description - Add a description of what the contract is about.
Financial
Total value - Total value of the contract calculated from value per period.
Value - The monetary value per period.
Currency - Three character code following the ISO 4217 standard for currency.
Period - The periodic schedule of the contract. Values: Month = 30 days, Week = 7 days, Year = 365 days & Quarter = 90 days.
Use the Notification tab to set up who will receive the notifications and if it is for renewal, review or expiration.
Use the Outgoing emails option in the context menu to see all emails sent about the selected CSC.
Enter the Notifications tab.
Click the Create notification button.
Fill in information in the popup:
Name - Select the person to receive the notification.
Event - Choose between three events: Renewal, Review & Expired.
Notify days before - Number of days before the Event to receive the notification.
Notify by - How to receive the notification.
Click the OK button to create the notification.
Click the Edit or Discard icons to edit or discard the notification.
To discontinue a CSC, use the Discontinue option in the context menu to set in in status 9 (Discontinue).
To see the changes that were made to the CSC and which user made the change, choose the Revision history option in the context menu.
To see all Sales contracts (CSC) connected to a Customer (CUS), choose the View contracts option in the context menu in the CUS application.
The Project order (POD) application is a Sales sub-module that has to be turned on before a company can start using the functionality. The application is a an internal work tool that can be used by companies to carry out a job, which include working hours, materials and other expenses. The purpose of the Project order (POD) application is to have a tool that can be used to provide a cost/price estimate in advance, and a place to log hours and follow up logistics after a project order has been started. This solution will also show correct accrued costs along the way and be the basis for invoicing to the customer.
There are two pricing models for project orders:
Time & Material (T&M) - The agreement is that the customer will pay based on the real accrued cost.
Fixed Price - The agreement is that the customer pays a fixed price regardless of the real accrued cost.
Regardless of the pricing model, a Project order (POD) can be partially invoiced during the entire process, for example monthly or when milestones are reached. A Project order (POD) can either be external or internal. An external Project order (POD), is always related to a customer. An internal Project order (POD) can e.g be a development project, where cost of hours and materials can be linked to this Project order (POD).
Cost and sales in project orders are not booked directly to the general ledger. The material cost is based on the same way as one calculates cost in stock, the cost is a part of the Project (POD) after one has confirmed consumption of material.
These statuses for the main level of a project order are independent of statuses on item level. Status is in most cases set manually and not calculated by RamBase.
Status | Description |
|---|---|
Status 1 - Pending sealing or registration | The project order is in the initial estimation phase. Can be temporary sealed when a quote is given to a customer, while waiting for feedback if price (estimate) is accepted. If the quote is accepted, the sales order can be created and the project order registered. |
Status 2 - Pending registration | The project order is now sealed, and no updates can be made. The outcome is either to change back to Status 1 if re-calculation of some estimated numbers are required, or to register the project order. |
Status 4 - Active | The project order is now registered and It is possible to log hours, and to start the process for getting assignments for material. |
Status 5 - Paused | It is possible to pause and set a project order on hold for a period. In this period, it will not be allowed to log hours, start for getting assignments for material or change any numbers. |
Status 8 - Pending last invoicing | This is a status that is set by the user, when the work on the project order is finished, but it cannot be closed until some final finance processes have been performed. |
Status 9 - Processed | The project order is completed and closed. |
Status | Description |
|---|---|
Status 1 - Pending sealing or registration | The item is pending registration. |
Status 4 - Active | Item is registered and is active. Work may be logged if it is of category Hours, or the process for getting assignments picking goods can take place if it is for Material. |
Status 5 - Paused | The item is paused, and it is not allowed to log hours, start the process for getting assignments, pick goods, or change any numbers. |
Status 8 - Pending last invoicing | This is a status that is set when the work on the project order item is completed, but cannot be closed until final finance processes have been performed. (The status is set either automatically or by the user.) |
Status 9 - Processed | This item is completed and closed. |
Before it is possible to use the Project order (POD) process, new basic data must be defined in RamBase. All basic data is created from the Product (ART) and Labor group (LAG) applications. The products that are used in Project order (POD) process have Type = WP - Project Order and WH - Work Hours. For material you can use the same products that are already defined in the Product (ART) application as Type = P, M, K & KA. For expenses, product of type V or X, and which are defined as 'non-stock' products, can be used.
Products with Type = WP defines that it belongs to a Project order (POD). If you use this type of item in a Sales quote (CQU) or a Sales order (COA), a Project order (POD) will automatically be created at the same time as the Sales quote (CQU)/Sales order (COA) is registered. The product name will be copied to Project order (POD) name, but can be changed manually if you want a different description for the project.
This is a billable item. Already in the quote phase, you use this type of product to estimate hours and costs that you will invoice later.
Enter the Product (ART) application and create a new Product (ART) with Type = WH - Work hours.
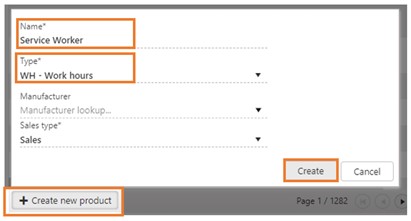
Adding a cost price for work hours is done by adding a purchase price.
Enter the Purchase prices tab that is available in the Properties tab.
Click the Add purchase price button.
Fill in the information to add a purchase price (cost price):
Supplier - Select your own company
Effective date - Today's date is set by default
Expiration date - Optional
Minimum quantity - 1 is set by default
Supplier sells in - Same unit
Net price - Mandatory
Currency - System default
Click the Create button.
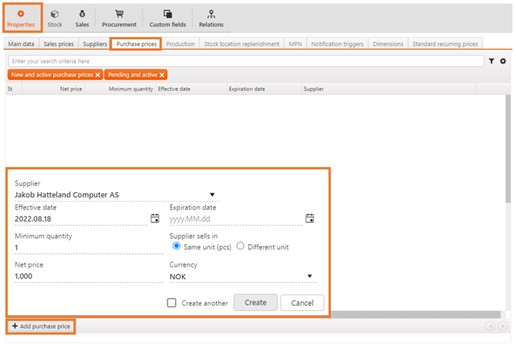
The Labor group (LAG) application is where the different types of work hours (cost) are registered.
ID | Product | Labor cost | Default |
|---|---|---|---|
100000 | Service technician | Service technician | * |
Service technician, 50% overtime | |||
Service technician, 100% overtime |
For each labor cost, there will be a corresponding product in the Product (ART) application. These items will be of Type = WH and will include cost and sales price.
All users who are allowed to log hours on a Project order (POD) must be linked to a Labor group (LAG). It is only allowed to log hours for the company which one is employed in.
If you have defined different labor costs in a Labor group (LAG), it is possible to set up one labor cost as default in each Labor group (LAG). For example, you create one for regular time, one for 50% overtime and one for 100% overtime, and set up the regular as default.
Enter the Labor group (LAG) application to create a new Labor group (LAG).
Click the Create new labor group button.
Enter the labor group name in the Labor group name field and click the Create button to create a Labor group (LAG) in Status 1.
To activate the Labor Group (LAG), use the Activate labor group option in the context menu.
If you want to discontinue the labor group, use the Discontinue labor group option in the context menu. This will set the Labor group to Status 9 and it will not be possible to reactivate it again.
Labor cost is added in the Labor group (LAG) application.
Click the Add labor cost button.
Find the Product (ART) you want to add as a labor cost in the Cost field.
Click the Add button.
This will add the labor cost to the Labor group (LAG) and the first labor cost added to the Labor group (LAG) will be set as default. This can be changed in the Set as default column.
Products (ART) with Type = X - Expenses or V - Value added service and which are marked as non-stock, are a common term for all cost and income that do not have inventory management. It is a non-physical item such as travel cost.
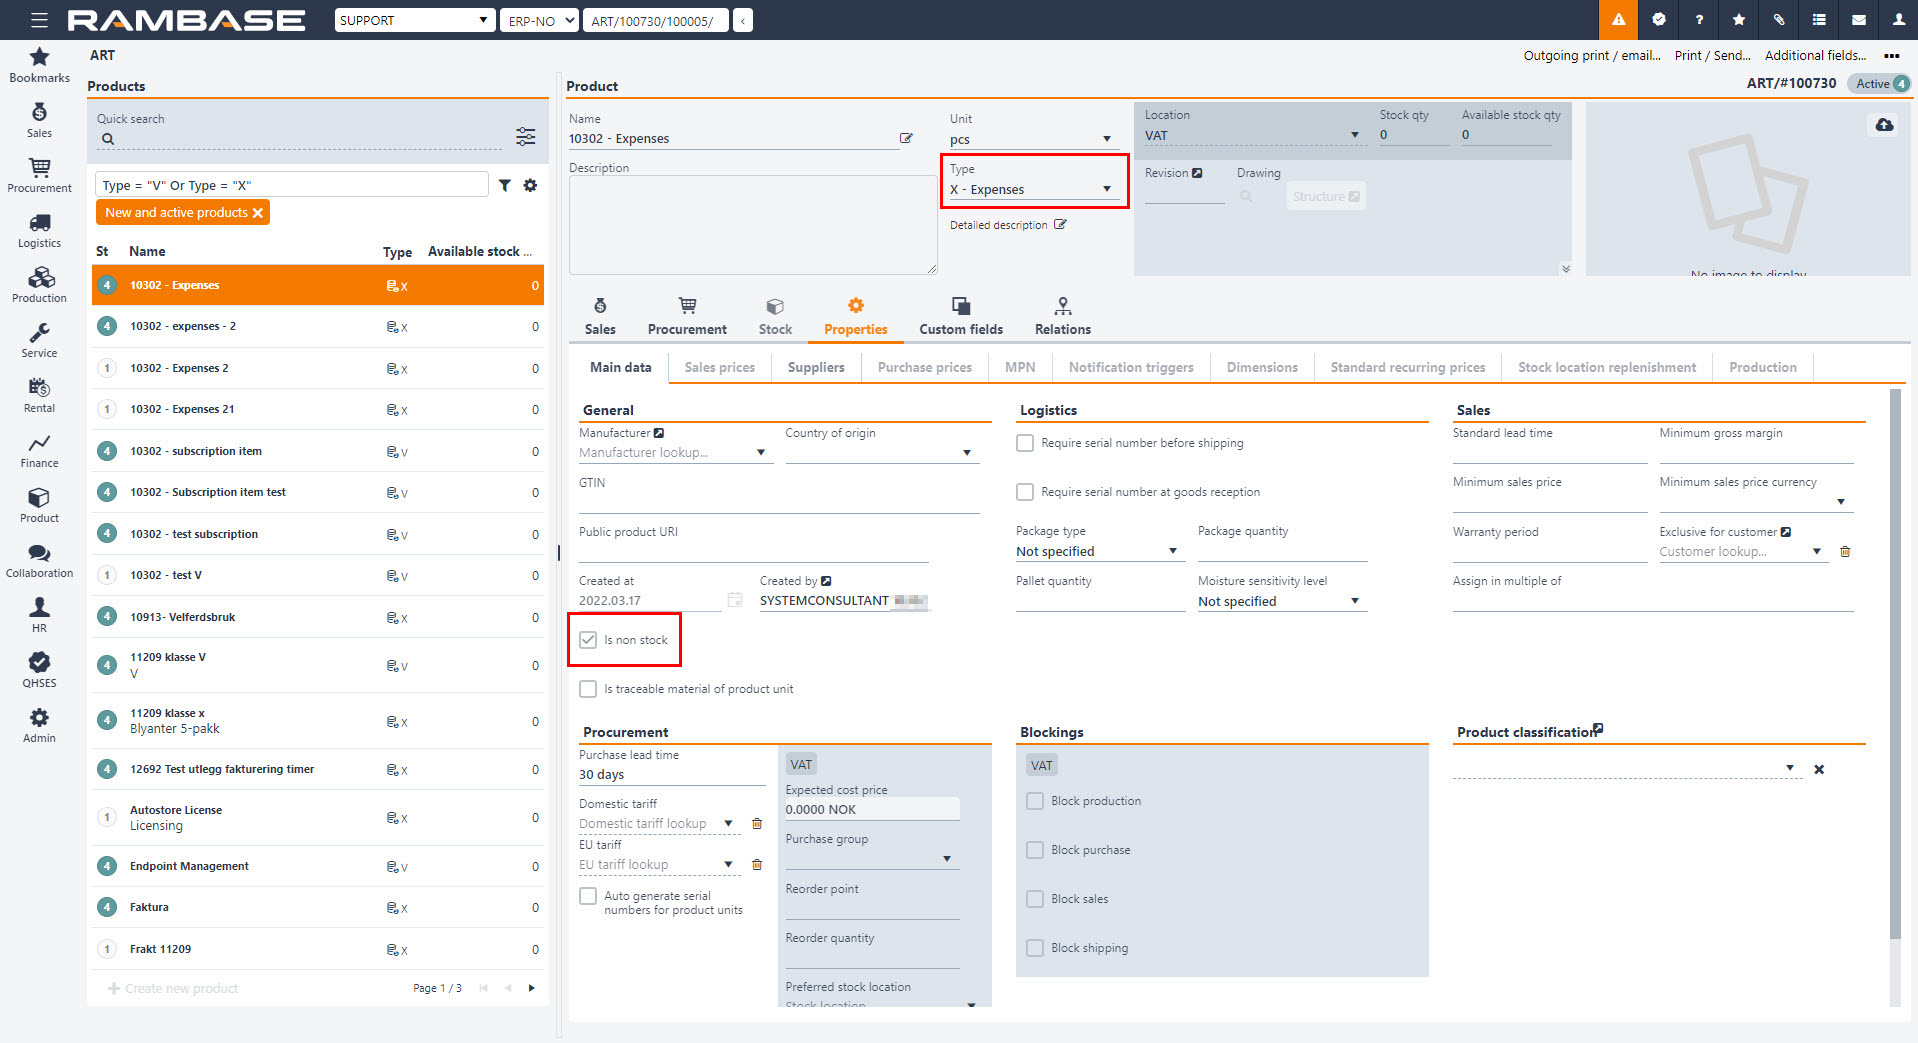
Details about cost and revenues in Project order items (PODITEM) with category: Expenses
Suggested price is found via the standard method for getting a sales price for an item. If there are several applicable prices, the user may choose the preferable price in the Price based field in the Create new item pop-up. Standard cost from product is used as Remaining estimated cost price for the item. Markup pct is then calculated based on these numbers.
Remaining estimated cost price may be manually changed. This will cause a recalculation of Remaining estimated price if a markup pct exists.
Cost in Project order items (PODITEM) with the category Expenses can be based on either Expense logs (EXL) or supplier transactions (like Purchase orders (SPO), Purchase order responses (SOA), Supplier invoices (SIN) and Supplier credit notes (SCN)).
Based on supplier transactions
Remaining estimated price can be changed during the process if accrued sale has not been invoiced yet. To adjust the Remaining estimated price directly, Markup pct must be removed.
If there are Purchase order (SPO)/Purchase order response (SOA) items with reference to this Project order (POD) item, the value of these will be understood as pending cost.
If markup pct is set for the item, this will be used to calculate pending price. If no markup pct, pending price will be set equal to Remaining estimated price.
If there are Supplier invoice (SIN)/Supplier credit note (SCN) items with reference to this Project order (POD) item, the value of these will be understood as accrued cost.
If markup pct is set for the item, this will be used to calculate accrued price. If no markup pct, accrued price will be set equal to Remaining estimated price.
All quantities will always be "1" for these items.
Based on expense logs
Remaining estimated price can be calculated based on Markup pct in the initial phase of the Project order item. When the first expense log is added to the item, Remaining estimated price will be fixed, and Markup disabled. In practice this means that one Project order is required for each selling price to the customer.
Related Expense logs (EXL) which are pending manager approval (Status 3) will influence on pending numbers. Pending price will always be equal to Remaining estimated price.
Related Expense logs (EXL) which are approved (Status 4) will influence accrued numbers. Accrued price will always be equal to Remaining estimated price.
Products defined under this category are all products with Type = P, M, K & KA which you have already created in the Products (ART) application in RamBase. Project order (POD) will also use existing cost and sales price from products.
Details about cost and revenues in Project order (POD) items with category: Material
Price is found via the standard method for getting a sales price for a product. Standard cost from product is used as cost price for the item. Markup pct is then calculated based on these numbers.
Cost price may be manually changed. This will cause a recalculation of price if a markup pct exists.
Remaining price can be changed during the process as long as none of the accrued numbers have yet been invoiced. If a markup pct is set, the price has to be adjusted. To adjust the price directly, markup pct has to be removed.
The numbers will be understood as pending when the internal Sales order (COA) of type Material for project order is created. Pending cost will be equal to cost of the Sales order item (COAITEM).
If markup pct is set for the item, this will be used to calculate pending price. If no markup pct, pending price will be set equal to Remaining estimated price
The numbers will be understood as accrued when picked goods have been confirmed as consumed and when material is returned (Goods reception (SSA)) from customer via the CDV process. Accrued cost will be equal to cost of the Shipping advice (CSA)/Goods reception (SSA).
If markup pct is set for the item, this will be used to calculate accrued price. If no markup pct, accrued price will be set equal to Remaining estimated price.
The process typically starts with a request from a customer. This may cause that someone will create a Project order (POD) in RamBase to do estimations and calculations to see if a quote can be offered.
The owner of the project order adds the information that is known into the Project order (POD). This could be the expected use of man hours, material needs and expenses. Anyway, one can think that other expenses is not known at this point of time, and this will be added later in the process.
All these are services or goods from the Product (ART) application, and they are added as separate items to the Project order (POD). Material needs and other kinds of man hour may be added later in the process.
All Project order (POD) items will get standard cost from the Product (ART), but this can be manually overruled. When a cost estimate is in place, the seller may add a markup percentage to this, or the markup percentage has may be already been calculated based on the suggested sales price when the Project order (POD) item was created. If there only exists gross margin percentage in the Item price agreement (IPA), this must be calculated into a markup percentage. If there exists a markup percentage in Project order (POD) item, the price will always be calculated based on this. If there is no markup percentage, the user is allowed to manually set a price.
Based on the estimated price, a Sales quote (CQU) can be created directly from the Project order (POD).
Fixed Price
The Sales quote (CQU) will contain only one line. This line will tell you what to do, Inspection on Site, and the sales price of the job. The line on the Sales quote (CQU) must be a Product (ART) with Type = WP - Project Order.

Time & Material
This can be the expected use of working hours, material, and other billable costs. There may also be costs that are not known at this time, and these can be added later in the process. All products are retrieved from the Product (ART) application, and they are added as separate lines in the Project order (POD).
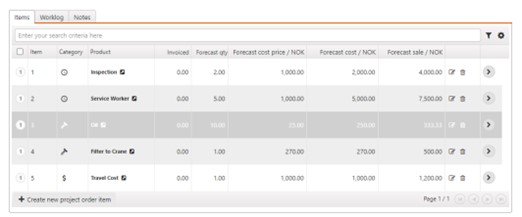
Once a quote has been made, the responsible person can set the Project order (POD) to Status 2, Seal project orders temporary, which means that it is temporarily closed, and the values cannot be changed. If the responsible part and customer end up in a negotiation situation, the Project order (POD) can be changed back to Status 1 for a new calculation. Changes between Status 1 and 2 can occur many times. Once the offer has been accepted, the Project order (POD) is set to Status 4, Register project order, and the Project order (POD) can be started at any time.
The process can also be the opposite. This means that a Sales quote (CQU) can be created first, the quote must then contain a Product (ART) that has the special class (WP) and the Project order (POD) is automatically created when the Sales quote (CQU) is registered. The responsible person for the Project order (POD) must then fill in the details in the Project order (POD) afterwards. A Project order (POD) can contain several Products (ART), and new Products (ART) can be added to Project order (POD) at any time in the process until it is completed.
All Project order (POD) items will have a standard cost from the product, but this can be overridden manually. When a cost estimate is in place, the responsible person for the Project order (POD) can add a markup, or that the markup has already been calculated based on the sales price when the Project order (POD) item was created. It is important to know that this can be overridden manually in the same way as the diet on the Project order (POD) item.
The process usually starts with a request from a customer, and you have two options when creating quotes.
You can create a Sales quote (CQU) from the Sales module. When creating a Sales quote (CQU) to be linked to a Project order (POD), the Sales quote (CQU) must contain a Product (ART) with Type = WP.
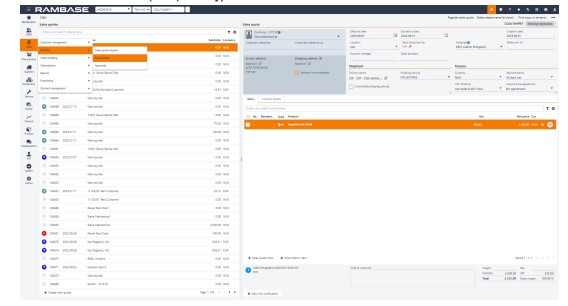
When you use a Product (ART) with Type = WP, a Project order (POD) is created automatically in Status 1, when you register the Sales quote (CQU).
You can create a Sales quote (CQU) directly from the Project order (POD).
To create a Sales quote (CQU) from a Project order (POD), project order must be in Status 2 or 4.
Click on the Create sales quote... option in the context menu.
Select a Product (ART) with the Type = WP, which is descriptive of the job to be performed (Inspection on Site).
Click on the Create button to create a Sales quote (CQU) in the selected Project order (POD). The Sales quote (CQU) document will open in Status 1. In the Sales transaction field in the Project order (POD) application, the link to the Sales quote (CQU) is displayed. If the Sales quote (CQU) is converted into a Sales order (COA), the link to the Sales order (COA) is displayed here.
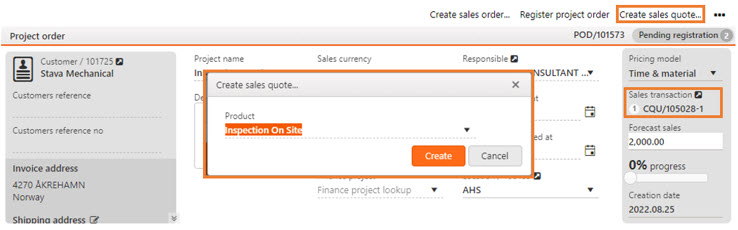
If the Sales quote (CQU) is accepted, this will be forwarded to a Sales order (COA), and the Project order (POD) can be started anytime.
The process may also be the opposite. Which means if the Sales quote (CQU) or the Sales ordre (COA) items may be created first, and when such document for Products (ART) of Type = WP is registered, the Project order (POD) will automatically be created.
The owner of the Project order (POD) must then fill the details in to the Project order (POD) afterwards. The Sales quote (CQU)/Sales order (COA) can have several items, but there will anyway always be a one-to-one relationship between a Sales quote (CQU) item/Sales order (COA) item and a Project order (POD) item. But the Project order (POD) can have many items. New items can also be added to the Project order (POD) at any time of the process until the Project order (POD) is processed. The status of the Sales order (COA) will be set by special rules dependent of the status of the Project order (POD). The Sales order (COA) will be closed when the Project order (POD) is completed.
The process can start with an order from a customer, and you have two options when creating a Sales order (COA).
You can create a Sales order (COA) from the Sales module. When creating a Sales order (COA) to be linked to a Project order (POD), the Sales order (COA) must contain a Product (ART) with Type = WP. When you use an item with Type = WP, a Project order (POD) is created automatically in Status 1, when you register the Sales order (COA).
You can create a Sales order (COA) directly from the Project order (POD).
To create a Sales order (COA) from a Project order (POD), project order must be in Status 4.
Click on the Create sales order... option in the context menu.
Select a Product (ART) with the Type = WP, which is descriptive of the job to be performed (Inspection on Site).
Click on the Create button to create a Sales order (COA) in the selected Project order (POD). The Sales order (COA) document will open in Status 1. In the Sales transaction field in the Project order (POD) application, the link to the Sales order (COA) is displayed
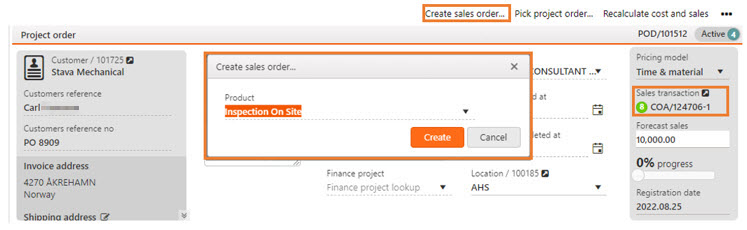
A project order can be created in three ways:
Manually (and the sales process can be stated from the Project order (POD) application, by use of Create sales quote/order in the Context menu).
Automatically from a Sales quote (CQU) or a Sales order (COA).
Copied from an existing project order to a new project order.
To open the Project orders (POD) application, find Sales in the RamBase menu, then Project order, and select Project orders.

Click on the Create new project order button. All fields marked with * are mandatory.
Project order name field: A short description of the type of job to be performed, the text in this field can be entered manually.
Pricing model dropdown menu: Fixed Price/Time & material.
Location dropdown menu: Location (LOC)
Customer dropdown menu: Customer (CUS)
Disable markup as default checkbox: If checked, Project order items (PODITEM), which are automatically created, e.g. when picking material in PODPICK, will have markup disabled. Project order items (PODITEM) which are manually created in the Project order (POD) application will be suggested to have markup disabled.
Relevant Company setting (CSV) for Disable markup as default checkbox
Note that the setting listed below controls if the checkbox is checked or not. The checkbox can at any time be edited on the Project order (POD) and the Project order item (PODITEM) level.
Setting | Description |
|---|---|
Default create value for sales project order - Has markup disabled by default | When a Project order (POD) is automatically created due to that a Sales quote request (CRQ), Sales quote (CQU) or Sales order item (COAITEM) for a product of type 'Project order' (WP) has been registered, the project order will have disabled markup if this setting is turned on. The markup will also be disabled as a suggestion when a new project order is manually created. |
Internal checkbox: It is possible to define if the project order is internal. If the project order is internal, the Customer field must be empty.
When a project order is created, it will get Status 1 - Pending sealing or registration.
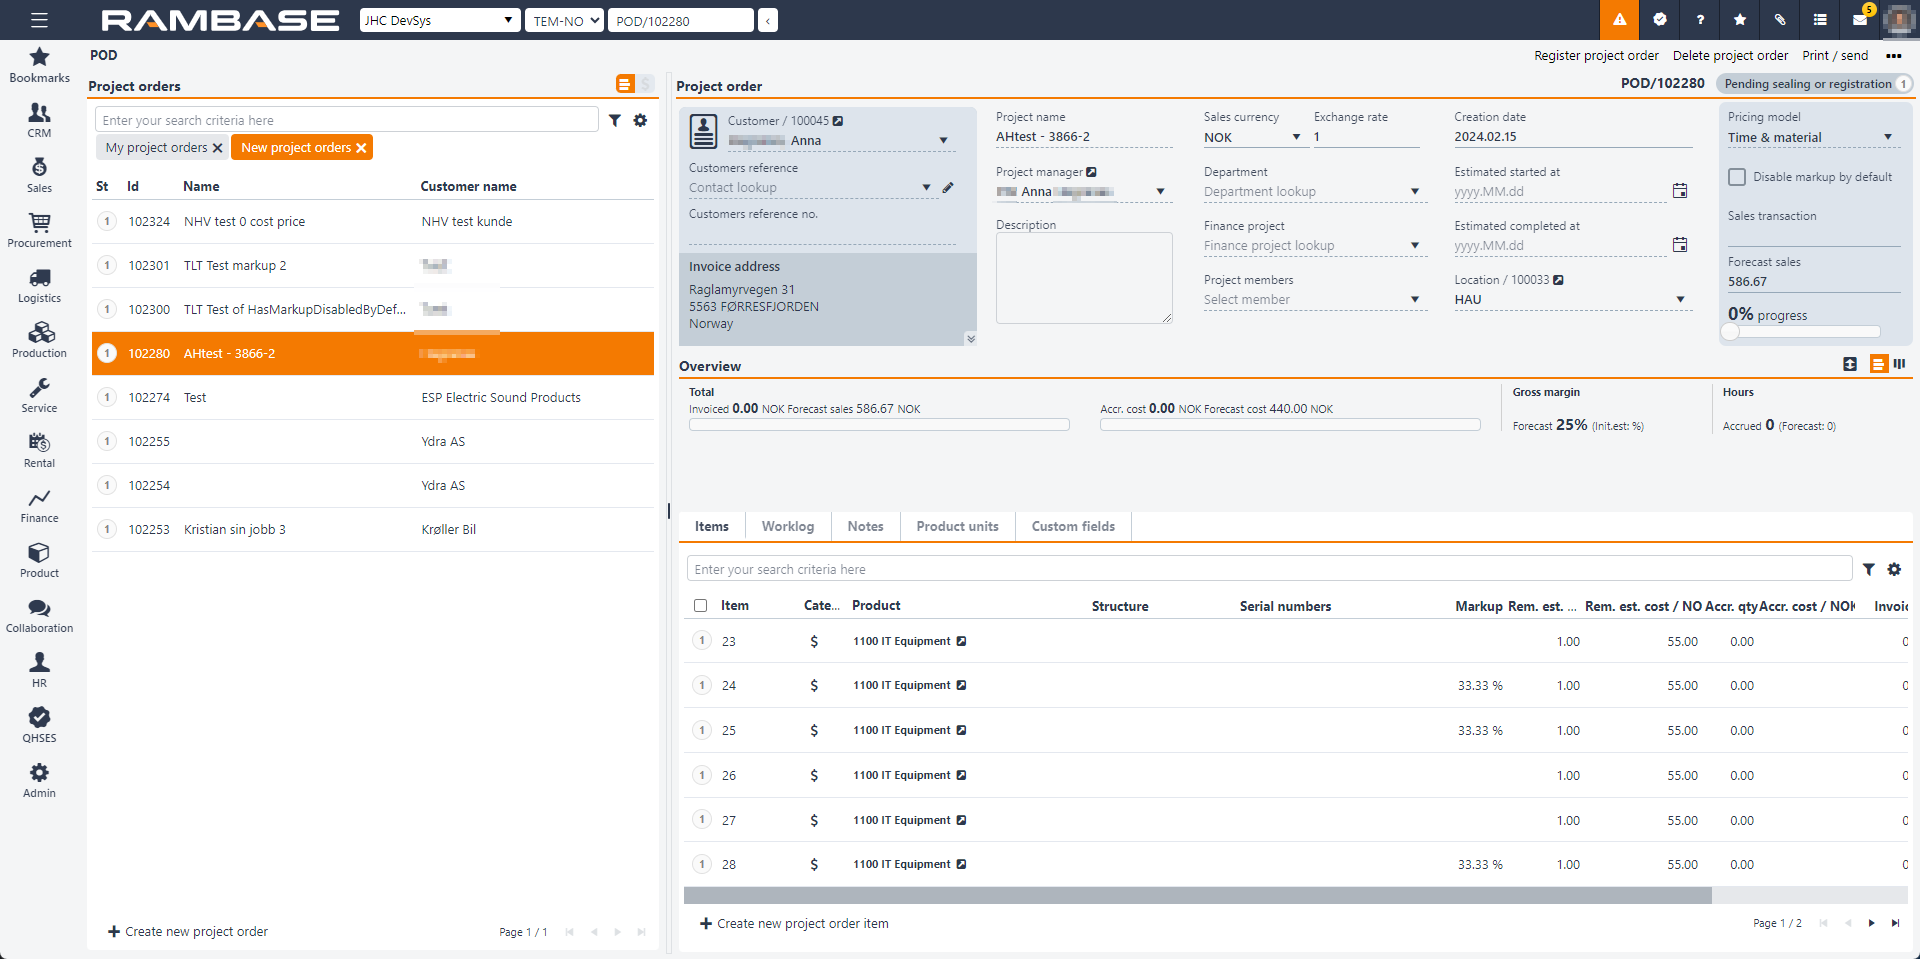
Other fields in the Project order area are:
Estimated start at and Estimated completed at are dates for visual purposes only, and can only be manually updated.
The progress bar is a manual feature and is a visual progress bar that tells you how far you have come in the job. The progress is changed with a drag & drop function.
The overview area shows accrued, estimated, and invoiced cost/price. As the Project order (POD) is still in Status 1, it only shows the estimated cost/price, and no costs have incurred yet. It can be view in two different ways Bar view and Table view. Change the view in the top right corner of the Overview area.
A project order is automatically created when a Sales quote (CQU) or a Sales order (COA) containing a Product with Type = WP is registered.
The project order will inherit information from these fields: Customer reference, Customer reference no, Description, Department, Finance project, Location. These can be overwritten in the project order, if required.
In the Context menu, select Copy project order. This will trigger a pop-up, where the user may:
Choose whether the new project order should be external or internal (and be copied without customer details).
Edit information before the new project order is created:
Project name
Description
Sales currency
Pricing (Copy or suggested price according to setting CSV, Priority of suggested price)
Project manager
Department
Finance project
Select what to copy to the new project order:
Item product descriptions
Internal item note
Item accounting
Project members
Finally, click the Copy button to create the project order in Status 1.
Note
On the main level of the project order, only information in the Item tab will be copied, not the information in the Worklog, Notes or Product units tabs.
Note
On the project order item level, the information in the Worklog, Product units, Billing items and End customer tabs will not be copied.
In the Notes tab, Internal note will be copied if Internal item note was selected in the pop-up.
In the Accounting tab, the information will be copied if Item accounting was selected in the pop-up. If Item accounting was not selected, the information in the Accounting tab will have information from the project order main level - if it exists. If there is no information on the main project order, the information will be from the Chart of Accounts (ACC). In other words, the fields in the Accounting tab on the item level will never be empty when copying a project order to a new project order.
Note
The quantity set in the new project order item will depend on the status of the original project order when it is copied. If the original project order is in Status 1 or 2 when copied, the RemainingEstimatedQty will be copied to RemainingEstimatedQty in the new project order item. If the original project order is in a status higher than 2 at the time of copying, the InitialEstimatedQty will be copied to RemainingEstimatedQty in the new project order item, (if InitialEstimatedQty has a value). If there is no InitialEstimatedQty, RemainingEstimatedQty in the new project order item will be set to "0" (Unless if Category=Expenses and is based on supplier transactions, then it is set to "1". Project order items which are created with RemainingQty=”0”, will get a warning notification.
There are three different categories for a project order item: Hours, Material and Expenses. A Project order (POD) can contain all categories, and there is no limit as to how many items that may be added.
Material - Products (ART) defined under this category are all Products (ART) with Type = P, M, K & KA. These can be found in the Product (ART) application.
Hours - These items will be of Type = WH and will include both selling price and cost. For each labor cost, there will be a corresponding product in the Product (ART) application.
A project order should contain one item for each price that will be invoiced to the customer.
For example: A Product (ART) for Service Technician and one for Service Apprentice. These working hours will typically have different price.
It may also be allowed for a Service Apprentice to log hours as a Service Technician. What kind of hours the different people are allowed to log is limited in the setup for each employee (user). See details under the Basic data topic about Labor groups (LAG).
Expenses - Non-stock Products (ART) of Type X or V, such as travel expenses and overtime food.
Click the Create new project order item button.
Quantity
Hours: price/cost per hour
Material: price/cost per unit
Expenses based on supplier transactions: Qty=1 (No other quantity allowed)
Expenses based on Expense logs (EXL): Any quantity allowed
Product - Search and add the Product (ART).
Disable markup: If this is checked, markup will not be calculated when the items are created.
Create another - Check here to be able to add more item.
Click the Create button to create the project order item in Status 1.
The project order is registered by selecting the Register project order option in the Context menu.
It is still possible to edit the markup and remaining estimated quantity of a project order item.
Highlight the item and press F2 to edit the project order item or click the Edit project order item icon on the item line.
Edit the Markup and/or Rem. est. qty (remaining estimated quantity) fields.
To save the changes, press CTRL + S or click the Save changes icon on the item line. If you need to discard the changes press CTRL + Z or click the Discard changes icon.
In the project order item it is possible to edit both on the item line and in the Cost & price area.
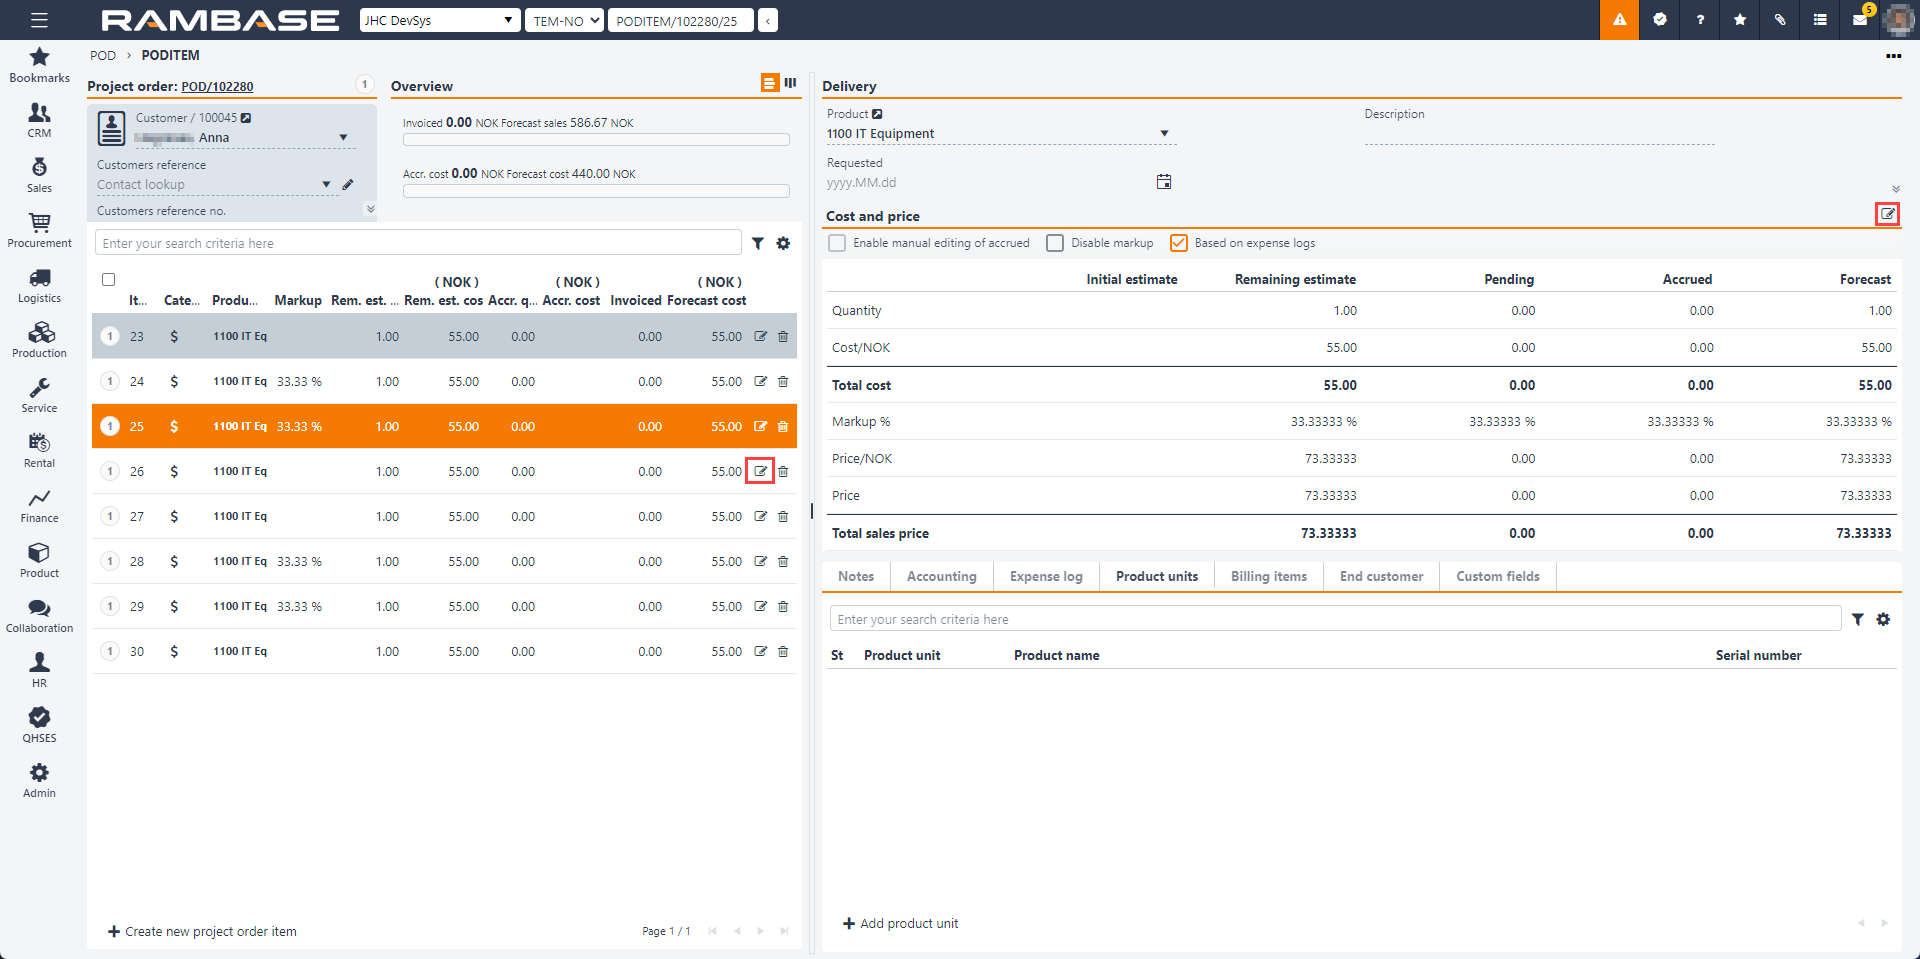
Once a quote has been made, the user can set the project order to Status 2, Seal project orders temporary. This means that it is temporarily closed and the values cannot be changed. If the responsible part and customer end up in a negotiation situation, the project order can be changed back to Status 1 for a new calculation. (There is no limitation as to how many times one can can change the status back and forth between Status 1 and Status 2.) Once the quote is accepted, the project order should be set to Status 4 and the project order can be started at any time. The project order is registered by selecting the Register project order option in the Context menu.
When a Project order (POD) is registered, it changes to Status 4 and the initial estimated numbers will be frozen. The user can now start logging hours and get assignments via the Get material assignments option in the context menu.
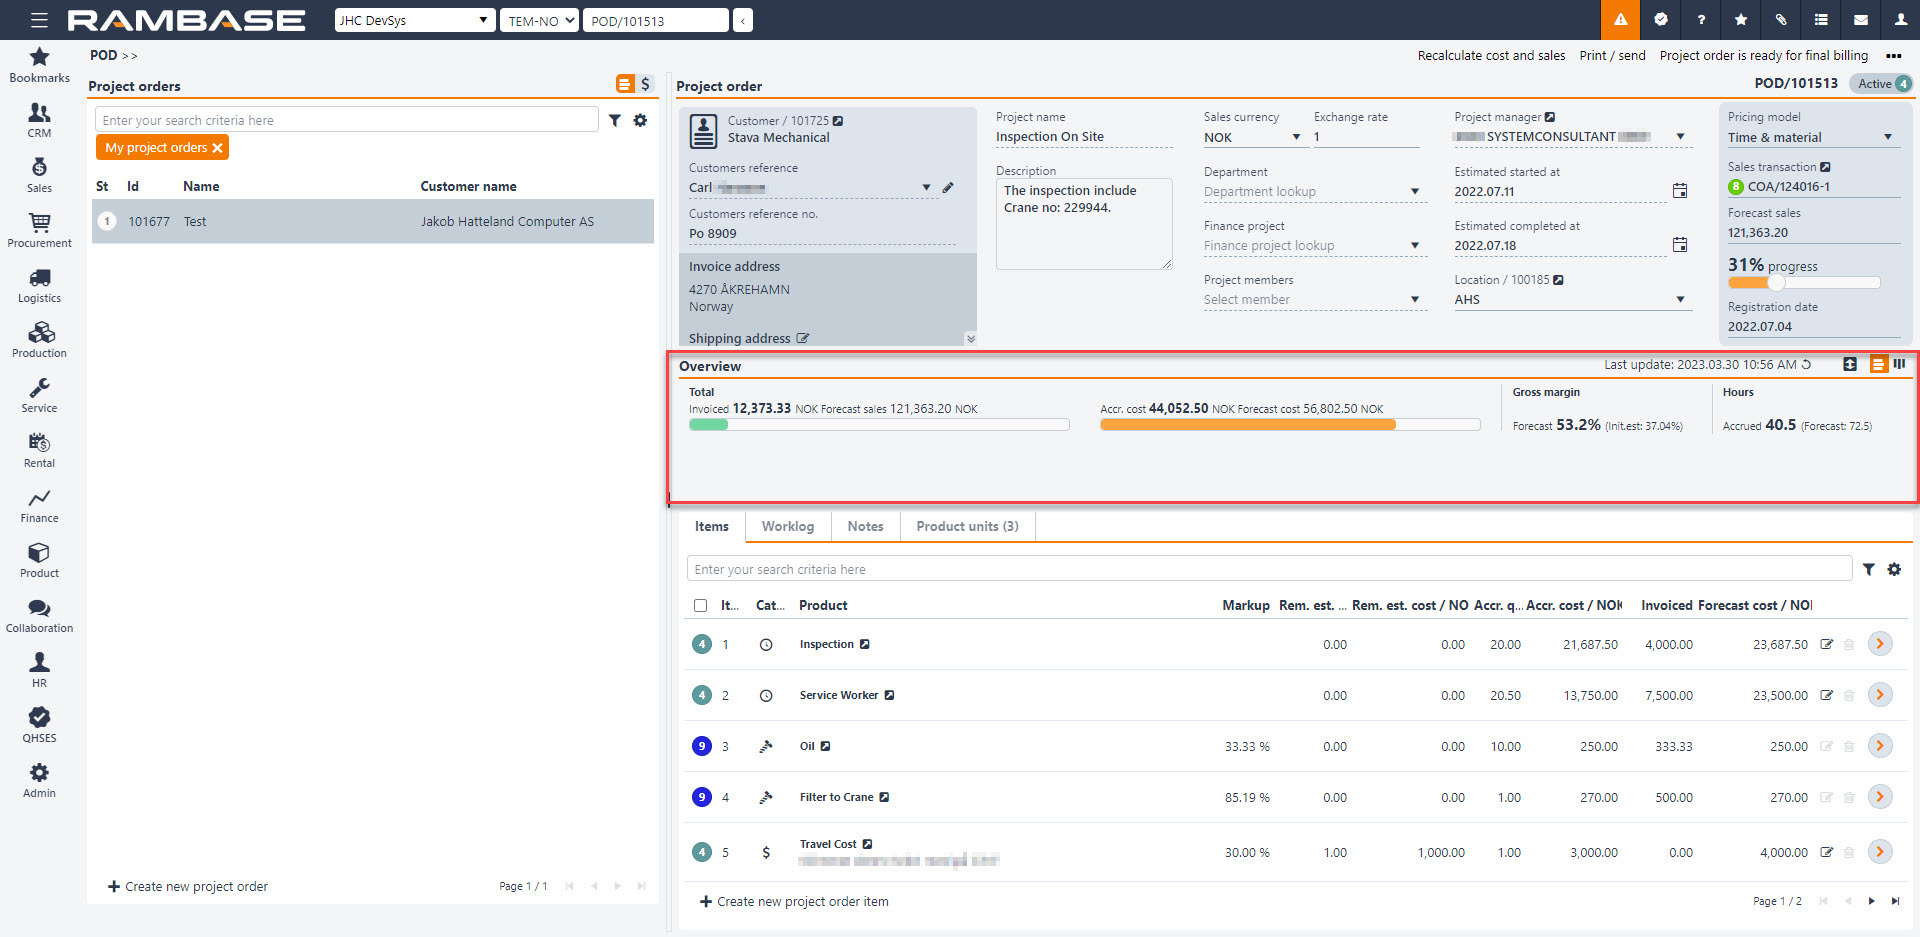
The project manager or other responsible person for the Project order (POD) must start the process for getting goods assignment to the Project order (POD) item of Type = Material. The material may already be in stock, but there may also be a need for a purchase - or that it must be manufactured inhouse.
Regardless of when in the process, it is possible to add more items, and the quantity can be corrected.
Before you can create invoice to the customer, the responsible person for the Project order (POD) must check and approve logged work hours, or move logged hours to another item or to another Project order (POD). It may be that the employee has made a mistake in logging work hours. See details in the Log hours on a Project order (POD) topic. Be aware of that if there are accrued hours (status 4), it will not be allowed to change Remaining estimated price. If the price of the item should be changed in the middle of an ongoing project order, there should be created a new item with new price.
When hours have been approved, the responsible person for the Project order (POD) select which items shall be invoiced. It is also possible to invoice all hours and consumed material until a certain date. See details in the Invoice process for a Project order (POD) topic.
Process for getting assignments means getting material assignments from stock, procurement backlog or production work orders. Or if no available quantity, this process will create a purchasing need in the Purchase (PUR) application, or for manufacturing in the Production planner (PROPPLAN) application. The material will then be Pending in the Stock assignment (SAR) application.
You can start the process for getting assignments for either all Project order (POD) items, only one Project order (POD) item, or you can use the multiselect function. If you want to start the process for all Project order (POD) items at the same time, this is done from the main level on the Project order (POD). The process for only one Project order (POD) item or using the multiselect function is done at the Project order (POD) item level.
When the process for getting assignments is started, an internal Sales order (COA) for Material for project order will be created. Product, Remaining estimated quantity and Remaining estimated price from the Project order (POD) item will be copied to Sales order (COA) item. This Sales order (COA) item will behave like a regular Sales order (COA) item when it comes to logistics. It will get assignments from Goods reception (SSA), Purchase order (SPO), Purchase order response (SOA) or Production work order (PWO), or a purchasing or manufacturing need will be created for this item. It can be picked if there are goods already in stock. There will always be a one-to-one relationship between this Sales order (COA) item and the Project order (POD) item.
If the need for a material is changed after the internal Sales order (COA) has been created, the assigned quantity can be changed by update of remaining estimated quantity, either by a positive or negative number. Use then the context menu item Update quantities for material assignments. This will cause the Sales order (COA) item to be forwarded to a new Sales order (COA), and the number will be reduced or increased according to Remaining estimated quantity. In any case, the number can never be reduced to a lower quantity than what has already been picked.
If the Project order (POD) item(s) is not already registered, the item(s) will have Status 1, you must use the Register project order option in the context menu. The Project order (POD) item will go from Status 1 to Status 4.
Start the process for getting assignments by selecting Project order (POD) item(s). Select the item(s) by clicking on the status symbol on the item line. It is possible to start the process for all Project order (POD) items, one item or you can use the multiselect function. Remember to start the process for getting assignments for all items, must be done on the Project order (POD) main level.
Select the Get material assignments for selected items option in the context menu. This means that the Project order (POD) item will get assignments from stock, procurement backlog, production work order or it will create a need for purchase or manufacturing.
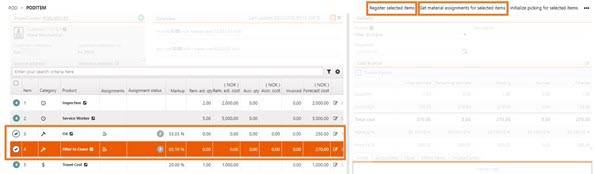
In the Assignments status column you will e.g. see if the Project order (POD) item is in stock or if it must be purchased.
The status shown in this column is the status from the internal Sales order (COA) item that has been created for the purpose of getting assignments. In the Flow tab you can see which Sales order (COA) this Project order (POD) item is linked to.
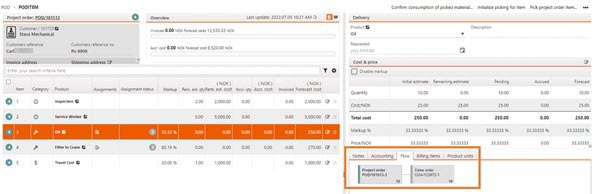
The process for getting assignments can be triggered automatically when a Project order (POD) item is registered. This is set with the Get material assignments automatically during project order item registration setting in the Company settings (CSV) application. If this setting is ON, the material assignments for a Project order (POD) item will be retrieved automatically during the registration.
Expenses are understood as non-stock products, which means that this type of products does not have stock management. This can be a travel invoice such as plane tickets, hotels, overtime food or services that are only billable, which can be documentation or tests that have been performed.
There are three ways to link a cost to a project order item for expenses:
Purchase order (SPO)/Purchase order response (SOA).
Supplier invoice (SIN) / Supplier credit note (SCN).
Expense logs (EXL).
In a process for getting expenses of, for example, airline tickets, you can already link this to a project order item on the the Purchase order (SPO)/Purchase order response (SOA). If there is no Purchase order (SPO)/Purchase order response (SOA), and you receive a Supplier invoice (SIN), this can also be linked directly to a project order item. The Purchase order (SPO) and/or the Supplier invoice (SIN) will then form the basis for cost and income calculation for expenses.
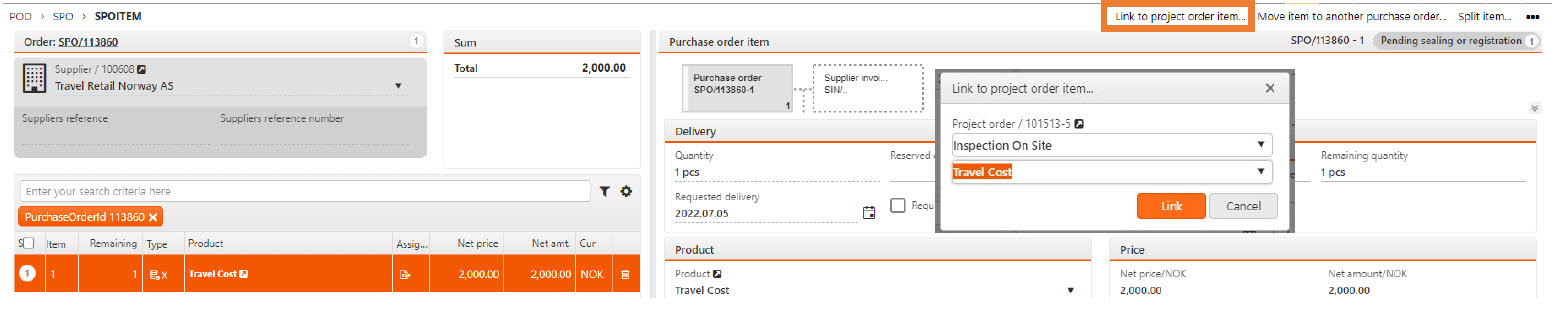
When a Purchase order (SPO) and/or Supplier invoice (SIN) is linked to the project order, it will be visible in the Cost details tab. You will also see here that the cost from the Supplier invoice (SIN), NOK 3,000, is now displayed under the Accrued column, and the cost from the Purchase order (SPO), NOK 2,000, still shows in the Pending column. This means that you have not received an invoice for it yet.
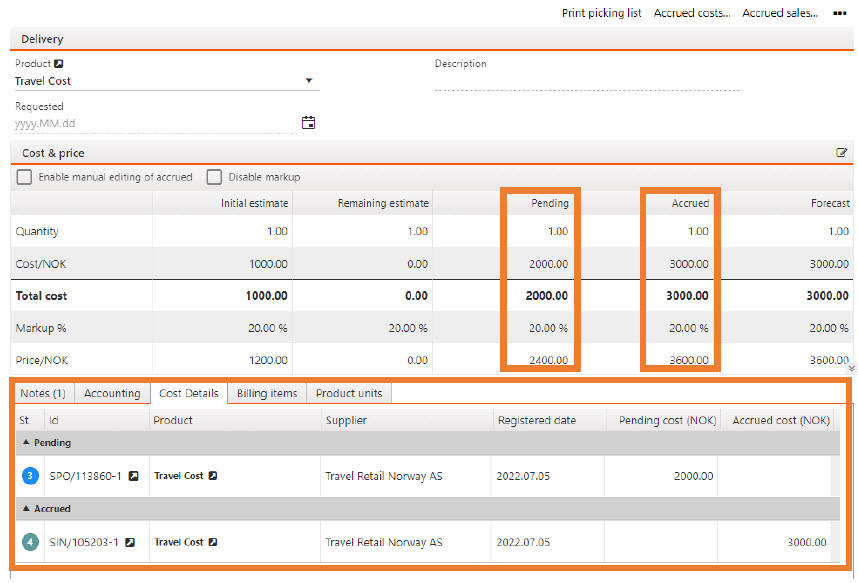
There are two ways to log expenses for a project order:
Directly from the Project order item (PODITEM) application.
From the Expense log (EXL) application (expenses are logged in the same way as in the Project order item (PODITEM) application, but Project order and Project order item must be selected in addition).
Note
To log expenses for a project order, at least one project order item needs to have the category Expenses and be based on expense logs.
An expense log may be logged directly on a project order item via the the Expense log tab of the relevant project order item.
Select the date the expense incurred, quantity and cost price. The sum in the Cost field will be calculated from the values given in the Quantity and Cost price fields.
The Employee look-up field will have the current user as default, but users with a manager role may log expenses for others.
If relevant, type an internal note in the Internal note field.
Users with a manager role have the option to create an expense log and approve it directly to Status 4. This is done by checking the Approve checkbox. If the checkbox is not checked, the expense log will be created in Status 3.
If several expense logs are to be logged on the same project order item, check the Retain input checkbox. This means that values selected for the current expense log will not be removed when a new entry is added. By changing a minimum of information, like the date in the Incurred datefield, several similar entries may be added in an efficient way.
Click the Add button to add the expense to the project order item.
Note
All the fields must have a value, except for the Internal note and External note fields (and the two checkboxes).
Note
The same procedure may be followed to log expenses in the Expense log (EXL) application. However, users must select Project order and Project order item when logging expenses in the Expense log (EXL) application.
If several expense logs have similar values and should be logged on the same project order item, there are three methods to efficiently log them:
Check the Retain input checkbox when adding an expense log. This will ensure that the values added in the first entry will be kept for the next one. Make the necessary changes and add the expense log.
Click the Copy expense log entry icon on the relevant entry to copy the values from this entry to the area where new expense logs are added. Any of the copied values may be edited before the new expense log is added.
Add expense logs in the Multiple periods tab located in the Expense log tab. This is typically useful for expenses related to e.g. driving to the same site several days in a row. The start date is set by clicking on the Calendar icon in the Incurred from field and selecting the correct date. Similarly, the end date is set by clicking the Calendar icon in the Incurred to field and selecting the correct date. Click the Add button to create identical entries for each day in the chosen period. Individual entries may be edited afterwards by clicking the Edit expense log entry icon, and making the necessary changes and finally clicking the Save changes icon.
By default, expense logs are created in Status 3, unless the Approve checkbox was checked when the expense log was created. (Only available to users with a manager role.)
To approve a single expense log, click the Approve entry icon in the Appr column.
In the Expense logs (EXL) application, it is also possible to approve several expense logs at the time. This is done by selecting each expense log to be approved by clicking on the status icon for each of them and selecting the Approve selected entries option from the Context menu. If all the expense logs should be approved, it is possible to select all by checking the Select all items on page checkbox at the top of the column where the statuses are shown. Then select the Approve selected entries option from the Context menu to approve all the expense logs.
Status 3 = Pending manager approval. (Will influence on pending sale and cost.)
Status 4 = Approved. (Will influence on accrued cost and sale and is ready to be invoiced.)
Status 9 = Invoiced
Status D = Discarded
Expense logs with any status may be deleted.
If an expense log is in Status 4 or Status 9 when deleted, it will be visible in the Expense log (EXL) application (and on the related project order item in the Project order item (PODITEM) application) with Status D. (The reason being that it has already influenced the billing basis and maybe even financial transactions.)
There are two different alternatives in the logistics process depending on how the materials are handled. One alternative is based on picking materials that are not shipped out from the warehouse. The materials are either consumed on-site or physically brought to the customer by the operators themselves. The actual consumption is confirmed later on the Project order (POD).
The other alternative follows the standard shipping process, where materials are formally shipped from the warehouse using regular shipping functionality.
Material handling through shipping process is triggered by checking the check box Use shipping process in Project order item (PODITEM).
When Company setting (CSV): Default use standard shipping process for the material on project order is enabled, Use shipping process is suggested as checked when creating material items. This can anyhow be manually changed as long as the Project order item (PODITEM) does not have any assignments. If the setting is disabled, the standard shipping process is not suggested by default, but it is still available.
Material with assignment from stock can be picked according to the standard picking process. The process can be initialized for one Project order (POD) item at a time, or for all Project order (POD) items for material. When pick is initialized, it means that a pick can be confirmed via the Pick list (PICK) application on a computer or Confirm pick by handheld device (SCANPICK) on a handheld terminal (HHT). Therefore, the Project order (POD) item must have assignments from a Goods reception (SSA) item.
There will always be one common pick list for one Project order (POD), regardless of whether the pick is initiated by a Project order (POD) item, or from the Project order (POD) main level. Picklists created for a Project order (POD) will have the same name as the project order.
The picking process can also take place the opposite way. It may be that a user who needs a specific material only enters the warehouse defined in Location (LOC) in the Project order (POD), picks the material, scans the Goods reception (SSA) item or Product (ART) ID (#123456), Stock location (STL) and Project order (POD) ID. This can be done via the Pick (PODPICK) application on a Handheld Terminal (HHT).
If there is an internal Sales order (COA) item for this material in this Project order (POD), this will be confirmed as picked in RamBase. If there is no Sales order (COA) item, the system will create one and confirm specified quantity as picked. And if there is not an existing Project order (POD) item for this material, both Project order (POD) item and Sales order (COA) item will be created by the system and the specified quantity will be confirmed picked.
To allow picking by scanning the Product (ART) ID in Pick (PODPICK), these two settings must be turned on in the Company settings (CSV) application:
Allow to pick project order (POD) from another goods reception (SSA)
Allow to scan product id at pick of project order (POD)
Pick (PODPICK) can also be used to return material that has not been consumed to stock by use of the Unpick tab. This must be done before the material is confirmed as consumed.
Before material can be invoiced, it has to be confirmed as consumed. For a Fixed price Project order (POD), a dummy Sales invoice (CIN) will be created immediately when this confirmation is done.
It is only possible to pick material if the internal Sales order (COA) has assignments from stock.
These two Project order (POD) items defined in the image below have Status 8 which means that material is in stock and that it has assignments from Goods reception (SSA) item. If you enter the SAR icon, it will show which Goods reception (SSA) item. This is the standard process for RamBase and the same principle applies to Project orders (POD).

There are two steps for picking materials for a Project order (POD):
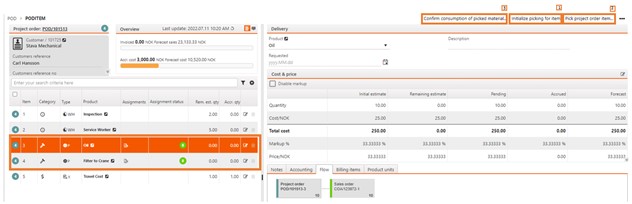
Step 1: Initialize picking
Step 2: Pick project order item. New image opens and standard picking process is performed.
To start the picking process a Project order (POD), you must first initialize picking for the items you want to pick.
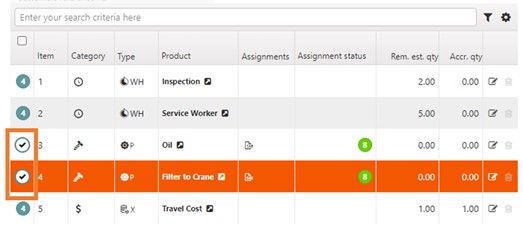
You can choose between initializing picking for a single Project order (POD) item, all Project order (POD) items or use the multiselect function where you select several items initialize picking for. If you choose to use multiselect or want to pick all Project order (POD) items, this must be done from the main level on the Project order (POD).
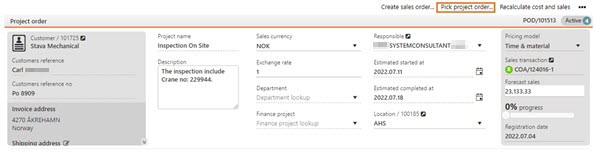
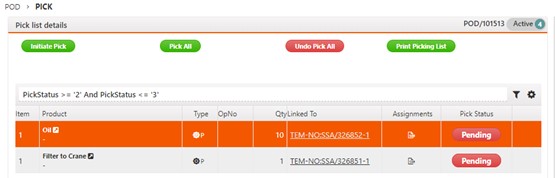
Materials in Project order (POD) can be handled through the standard shipping process by creating a Shipping advice (CSA). This enables materials to be picked and shipped using ordinary shipping functionality rather than being adjusted through post-consumption stock handling.
To handle materials through the shipping process, a Shipping advice (CSA) must be created from the Project order item (PODITEM). This can be done in two ways:
From the Project order item (PODITEM), use the Create shipping advice context menu option to generate a Shipping advice (CSA) for the selected item.
Alternatively, use the multi-select functionality to select multiple Project order item (PODITEM) and create Shipping advices (CSA) for them in one operation.
Once the Shipping advice (CSA) has been created, several key fields become locked and can no longer be changed. This includes the product, quantity, and price. These values are retrieved directly from the Project order (POD) and cannot be edited later. Apart from these restrictions, the Shipping advice (CSA) is treated like normal and follows the standard picking and shipping process.
The functionality does not apply to internal Project orders (POD).
A Project order item (PODITEM), when defined as material can be set up to require serial number before consumption. This requirement can be set up in multiple ways. This requirement also adds additional steps in the picking process for Project order pick (PODPICK).
This topic will cover the following:
Setup Require serial number before shipping in Product (ART) and how to overrule
Pick and unpick material by scanning the Goods reception item (SSAITEM) id and register serial number in the Project order pick (PODPICK) application
Things to be aware of when picking material by scanning the Product (ART) ID identifier combined with the Require serial number requirement
Validate that all consumed materials have registered serial numbers
Recommended reading
If a Product (ART) requires, or does not require a serial number before shipping, it will be inherited to the Project order item (PODITEM). This can be overruled in the Project order item (PODITEM) application.
How to overrule the Require serial number before shipping selection made in the Product (ART) application - from the Project order item (PODITEM) application
From the RamBase menu, click Sales and then Project order and finally Project orders to open the Project order (POD) application.
Select or search for the Project order (POD).
When the project order is selected, click the Items tab and the Project order item (PODITEM).
Double-click, select and press ENTER or click the Right arrow icon to open the Project order item (PODITEM) application.
In the Delivery area, select the Require serial number checkbox.
To pick
From the RamBase menu, select Logistics, then Picking and finally Pick material to Project order by hand held device to open the Pick (PODPICK) application.
Click the Pick option
Select the Project order (POD) in the Select project order dropdown menu.
Click the Scan the goods reception id or product id field.
Scan the Goods reception item (SSAITEM) identifier.
Either type the quantity in the Pick quantity field or click the arrows to select the quantity to be picked.
Scan the stock location in the Pick from stock location field.
This will open the Serial numbers (SERIALNO) application where the user can click the Scan Serial Number field and scan the serial number of the product that has been picked.
The scanned serial numbers will be displayed below the Scan serial number field. When the total number of serial numbers, to be registered are scanned, the user will be redirected to the Pick (PODPICK) application where the user can continue picking.
To unpick
From the RamBase menu, select Logistics, then Picking and finally Pick material to Project order by hand held device to open the Pick (PODPICK) application.
Click the Unpick option
Select the Project order (POD) in the Select project order dropdown menu.
Click the Scan the goods reception id or product id field.
Scan the Goods reception item (SSAITEM) identifier.
Either type the quantity in the Unpick quantity field or click the arrows to select the quantity to be picked.
Scan the stock location in the Unpick to stock location field.
This will open the Serial numbers (SERIALNO) application where the user can click the Scan Serial Number field and scan the serial number of the products that are being returned to stock.
Tip
The picking is done by RamBase either when the Product ID identifier is scanned, or when a Goods reception (SSAITEM) is scanned. The registering of serial number is a secondary operation. When scanning a product ID identifier, RamBase selects an available Goods reception item (SSAITEM). Therefore a mismatch can happen trying to add a serial number to a material, which by RamBase's logic, has not been picked.
Logic
If the ID identifier of a Product (ART) is scanned, it should only be done to products where no tracking is required for the company.
Product ID identifier is scanned - RamBase will select which Goods reception item (SSA) is picked.
Goods reception item (SSAITEM) is scanned - The scanned Goods reception item (SSAITEM) is picked.
Allow to pick to project order (POD) from other goods reception (SSA) | If setting is 'ON' - Allow to pick to Project order (POD) from other Goods reception items (SSA) than the related internal Sales orders (COA) for 'Material to project order' has assignments from. |
Allow to scan product id at pick of project order (POD) | If this setting is 'ON' - Users can scan Product ID (IT number of format #123456) when picking or unpicking to Project orders (POD) by using the Project order pick (PODPICK) application. Will have no effect unless setting 'Allow to pick to project order (POD) from other goods receptions (SSA)' is 'ON'. |
Confirm consumption of picked material with serial numbers
From the RamBase menu, click Sales and then Project order and finally Project orders to open the Project order (POD) application.
Select or search for the Project order (POD).
When the project order is selected, click the Items tab and the Project order item (PODITEM).
In the Context menu, select the Confirm consumption of picked material with serial numbers open to open the related popup.
The popup will display all serial numbers that have been registered, to picked products, up to the selected date in the Picked date field.
If RamBase does not know which serial numbers have been consumed, based on the selected date, the user has to manually select them.
Click the OK button to confirm.
A Project order item (PODITEM) is missing a serial number - How to assign a serial number to a Goods reception item (SSAITEM)
From the RamBase menu, click Sales and then Project order and finally Project orders to open the Project order (POD) application.
Select or search for the Project order (POD).
When the project order is selected, click the Items tab and the Project order item (PODITEM).
To fix this, click the Select serial number icon in the Serial number column.
Note that the Serial number column must be activated in the Column settings.
Register the serial number.
Note that the UsedQty will now be 1. And the Goods reception item (SSAITEM) without a serial number has now been registered, fulfilling the Require serial number requirement.
When using the Project order item (PODITEM) application, it is useful to understand how navigating between items can change which tab is displayed. Understanding this can result in a more efficient work flow.
Initially, when a new Project order item (PODITEM) is created, each item category has a default tab which will be displayed. But as the user selects a different tab, the last tab selected will be cached and displayed when selecting a new item.
Default tab for each Project order item (PODITEM) category:
The category Hours will direct to the Work log tab
The category Material will direct to the Flow tab
The category Expenses - type Expense log entry, will direct to the Expense log tab
The category Expenses - type Supplier invoice basis will direct to the Cost info tab
Navigating between items - Rules for which Project order item (PODITEM) tab is displayed:
If a common tab is selected, in example Notes or Product units, this will be cached for all categories, and will be focused on as default when moving to other items.
If a special tab is selected, a tab unique for that category, it will be cached for that category and focused on as default when moving to other Project order items (PODITEM) of the same category.
If a special tab is selected, moving to another Project order item (PODITEM) of a different category will direct to the default tab for that category, or the previously cached tab.
Example:
The user has selected a Project order item (PODITEM) in the grid, with the category Material, and is directed to the default Flow tab.
The user selects the Notes tab. This tab is common and will therefore be focused on as default when moving to other items.
The user then selects a Project order item (PODITEM) in the grid with the category of Hours. The focus remains and defaults to the Notes tab.
The user then selects the Work log tab in the same Project order item (PODITEM). This tab is special and therefore cached for Project order items (PODITEM) with the category of Hours.
The user selects a new Project order item (PODITEM) with the category Hours. The focus remains and defaults to the special Work log tab.
The user then selects a Project order item (PODITEM) with the category Material. The focus then redirects to the common Notes tab, as the selection made in Step 2, was cached.
There are two ways to log hours for a Project order (POD). One way is directly from the Project order (POD) application, the other way is from the Work log (WOL) application. In this topic it will be logged hours from the Project order (POD) application, but it is done the same way in the Work log (WOL) application. In the Work log (WOL) application you must select the Project order (POD) in the Project order field.
To be able to log hours for a Project order (POD), you must have at least one Project order (POD) item that has the category Hours.
 |
It is possible to log hours from both the Project order (POD) main level and from the Project order (POD) item.
The user starts by enter the Project order (POD) / Project order (POD) item, then select the Worklog tab. Set the start date/time and end date/time in the Started at and Ended at fields.
Today's date will always be default, but it can be changed if you want to log hours for another date. It is also possible to log hours for others if you have a manager role. But the user who is logged in to RamBase will always appear as the default in the Employee field.
All fields in this image must be filled out.
 |
The Project order item field tells you which Project order (POD) item you are going to log hours against.
The Labor cost field tells you which labor cost you are going to log hours as. Such as Normal time or 100% overtime for example. RamBase will use purchase price from the related Product (ART) to find the correct cost for the date the logged hours was worked.
To avoid a lot of manual entries, it is possible to copy some values by default when logging hours. This is done by clicking on the Copy work log entry icon on the work log entry. Values will then be copied from this entry but can be changed before the work is logged.
 |
It is also possible to log hours for several periods. For example if you work 1 hour every day for a week on the same job.
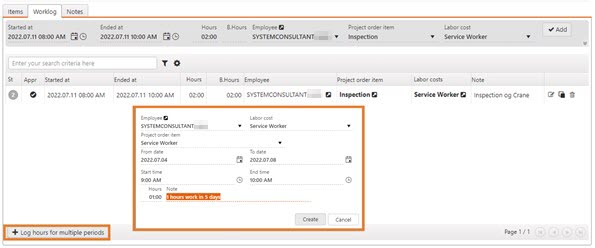
The Work log will then create a line for each day, with one hour for each day for five days
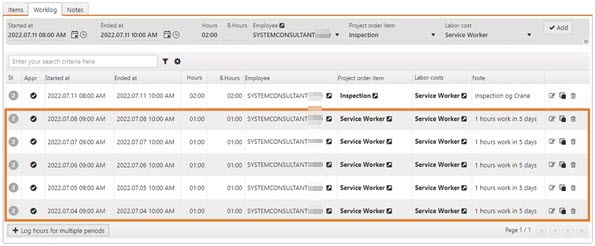
There are two levels for approving logged hours. The first level is that the employees approve their own logged hours. The next level is the approval by manager. Employees approve their own hours before a manager approves them. In cases where users do not have access to RamBase, a manager can both log hours for employees and perform both approval steps.
Three important statuses regarding approval of logged work hours:
Status 2 - Pending employee approval.
Status 3 - Pending manager approval.
Status 4 - Approved.
Click on the Approve entry icon in the Appr column to approve the work hours.
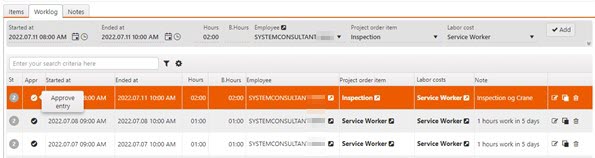
When the Worklog entry change from Status 2 to 3, the hours will be displayed as Pending. When the Worklog hours gets Status 4, they will appear as Accrued and are ready to be invoiced.
It is also possible to approve several entries at the time. To do this, click on the status of each of the items to be approved and then go to the Context menu. Select either Approve selected items which are pending employee approval or Approve selected items which are pending manager approval. The entries will be updated to Status 3 if pending employee approval is selected and Status 4 if pending manager approval is selected.
The manager is also allowed to move logged work hours from one Project order (POD) item to another, or to a Project order (POD) item for another Project order (POD). The manager can also change Labor cost (LAG). If changes are made for approved hours (Status > 3), a reversal log will be created for these, and a new record that has to be approved. This allows the user to track changes back to the original work log, and this history can be found by clicking on the History icon in the Work log (WOL) application.
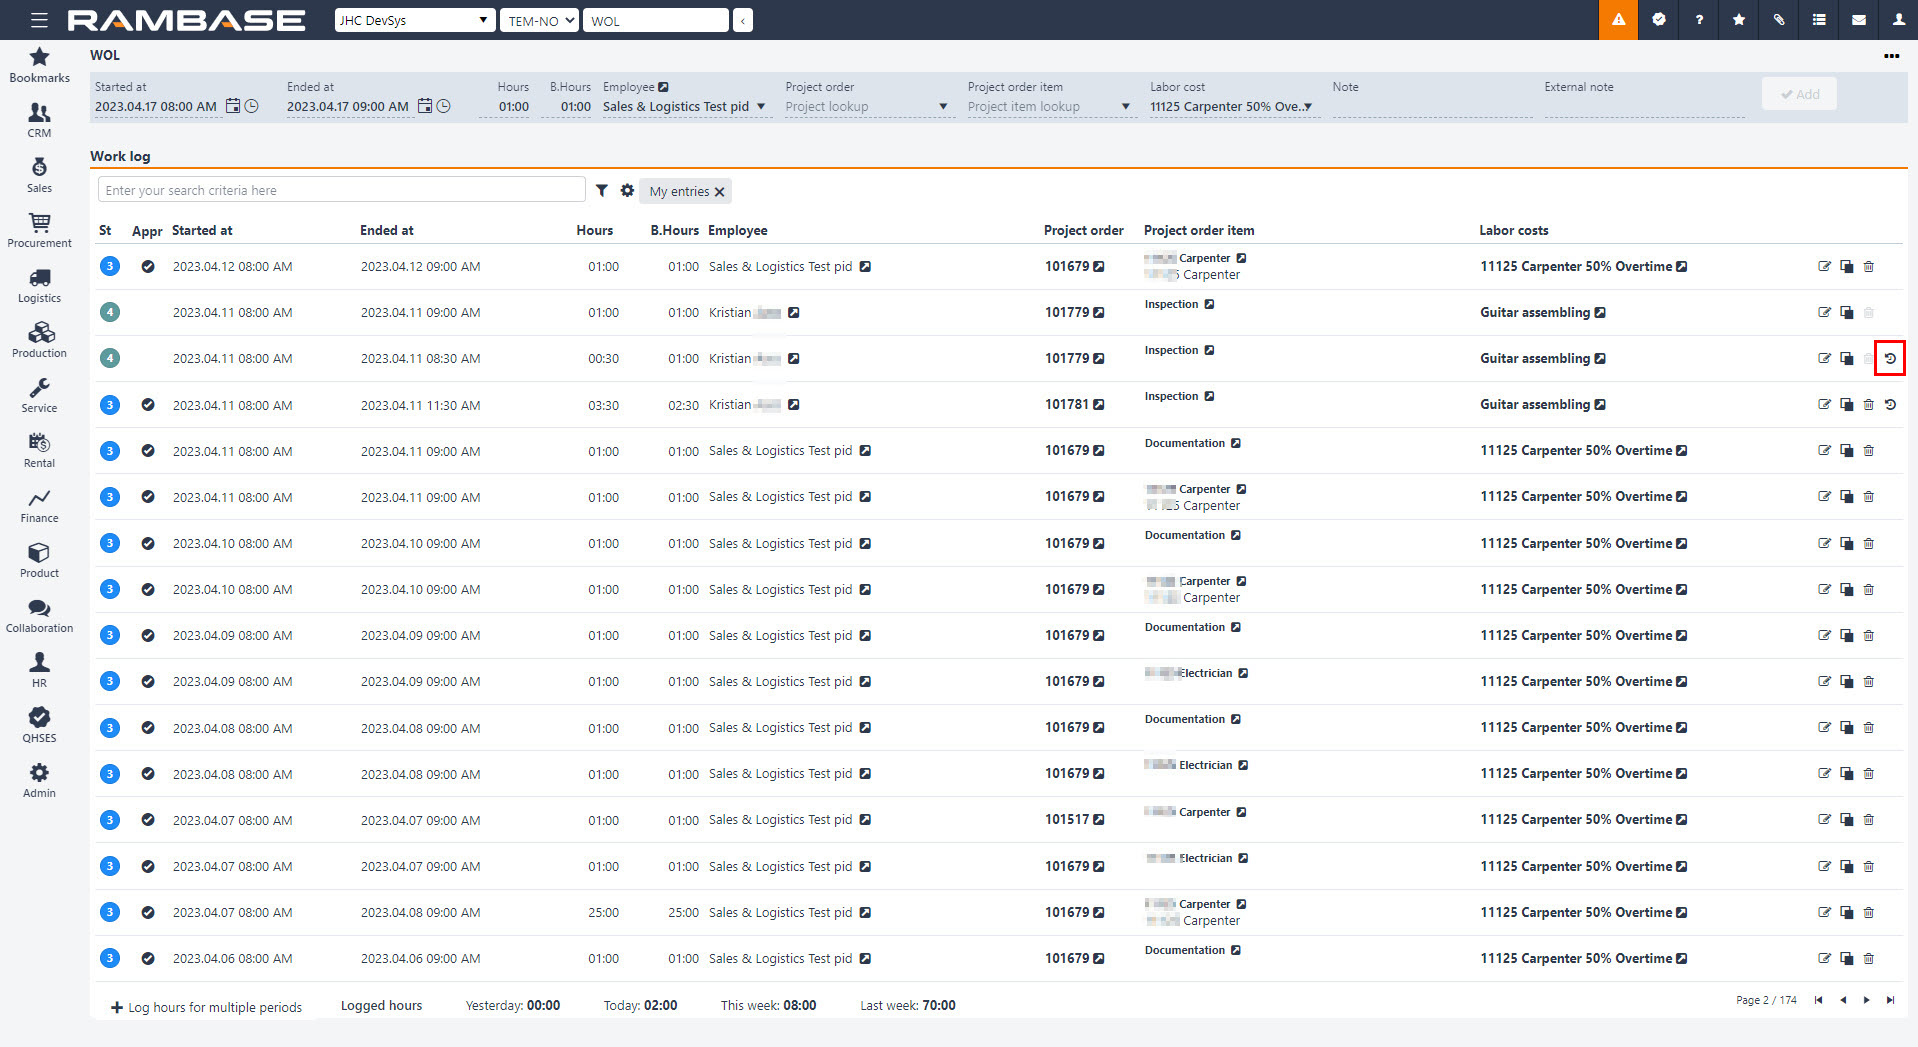
Billable hours will by default be set equal to logged hours, but can be overwritten by the manager, both higher and lower than logged working hours.
If a operator performs an activity on a Product unit (LCM) it will be useful to see if the Product unit (LCM) has any previous history in RamBase. The user registering the Product order (POD) can enter an item on the Product order (POD) and make a connection to a Product unit (LCM). If it is a previous history on that Product unit (LCM), the Products units (LCM) history will be visible. The history details is not readable from the Product order (POD), but it will be a shortcut from the Product order (POD) to the Product unit (LCM).
Open the Product order (POD) item and enter the Product units tab.
Click the Add new product unit button.
You can search for the Product unit (LCM) ID, Serial number and the Product (ART) in the Product unit field.
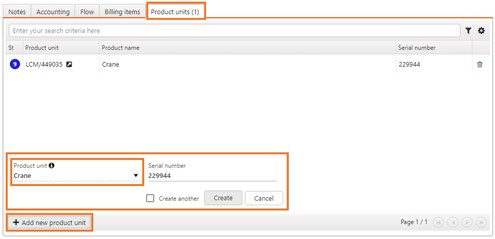
Click the Create button to connect the Product unit (LCM) to the Product order (POD) item.
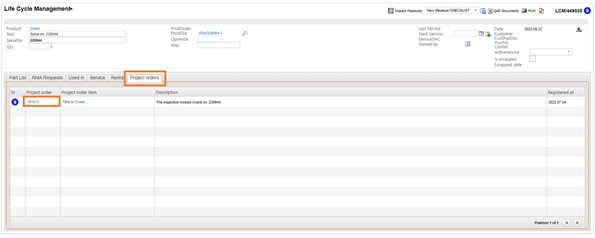
In advance of invoicing, the person in charge of a project order must do a pre-process to be sure that worked hours and expenses have been approved and that material has been confirmed as consumed.
Time & Material
The billing basis for a project order that has Price model= Time & Material is based on the accrued figures:
- Approved hours (Status 4)
- Consumed material, and possibly Goods reception (SSA) for returned goods via the CDV process.
- Supplier invoice (SIN) / Supplier credit note (SCN).
- Approved expense logs
Please note that accrued figures are initially calculated by a batch described under Cost & price, the billing basis will not be correct if accrued figures are not updated. To be safe, the user should trigger manual recalculation of the specific Project order (POD) before invoice is created.
Fixed Price
Billing basis in a project order that has Price model = Fixed price is prepared manually in the Invoice plan tab in the Project orders pending invoicing (POP) application.
Select the Confirm consumption of picked material... option in the context menu. When material is confirmed as consumed, the cost and revenues of this material will be understood as accrued. The internal Sales order (COA) will be forwarded to an internal Shipping advice (CSA). If you want to return material back to stock, this must be done beforehand. If material is returned afterwards, an ordinary return to stock must be made via the CDV process.
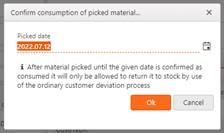
Project order (POD) is invoiced from the Project orders pending invoicing (POP) application. It can be started in the Project orders pending invoicing (POP) application or by a switch in the Project order (POD) application for a specific Project order (POD).
The Project orders pending invoicing (POP) will by default list Project orders (POD) where there is an billing basis (accrued revenue that has not yet been invoiced to the customer). A Project order (POD) can be invoiced at any time in the process, but the use of a date filter in the application will limit the result to only list Project orders (POD) that have a billing basis that has inccured before this date. It can also be set a filter for Project orders (POD) from and to the selected amounts in the Minimum billing basis and Maximum billing basis fields.
When invoicing a Time & Material Project order (POD), the user must choose which Project order (POD) items to be invoiced. The Sales invoice (CIN) will for the category Hours and Expenses get one item per Project order (POD) item, and one item per consumed Material. Price in Sales invoice (CIN) item will be set equal to the accrued price from this Project order (POD) item.
For Hours and expenses based on expense logs, each Project order item (PODITEM) billing basis that has incurred before the date specified in the filter will be invoiced.
It is important to know that for Project order (POD) items of category Materials or Expenses based on supplier transactions, it is not possible to create an invoice before all pending and remaining estimated sales have been accrued, and then it is only permitted to invoice everything or nothing. The reason for this is that the Sales invoice (CIN) will receive a price equal to the accrued price. Since the accrued price is an average price for all the accrued revenues, the invoices will not get a correct price if accrued revenues are invoiced over a period and the Project order (POD) item is still active, because this can also lead to changes in the calculated accrued price.
When you select a Project order item (PODITEM) for Material or Expenses based on supplier transactions, it will be checked if there is any billing basis that has been accrued before the filter date. If so, and there is no revenue left as remaining estimated or pending, all billing basis for this Project order (POD) item will be invoiced. Also, even if accrued date is newer than the filter date.
If there is revenue left as remaining estimated or pending, no invoice will be created for this Project order (POD) item at all.
To open the Project order pending invoice (POP) application, you can type POP in the program field and press Enter. Then you get into an overview of all Project orders (POD).

Or you can use the Project order invoice plan button in the Project order (POD) application. Then you enter the payment plan for this specific Project order (POD). You can easily use this button to go back and forth between the Project order (POD) application and the Project order pending invoice (POP) application.
All Project order (POD) items that are ready for invoicing are displayed in the Items tab in the Project order pending invoice (POP) application. All Project order (POD) items in this image is ready, which means that the material has been consumed, and the hours have been approved.
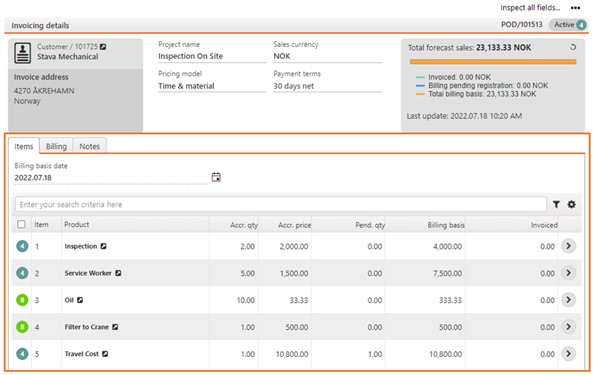
You can choose to create an invoice for all Project order (POD) items with the multiselect option, clicking the checkbox above the statuses, or you can select one or more Project order (POD) items by clicking on the status symbol on the item line. Select the Invoice selected Items option in the context menu.
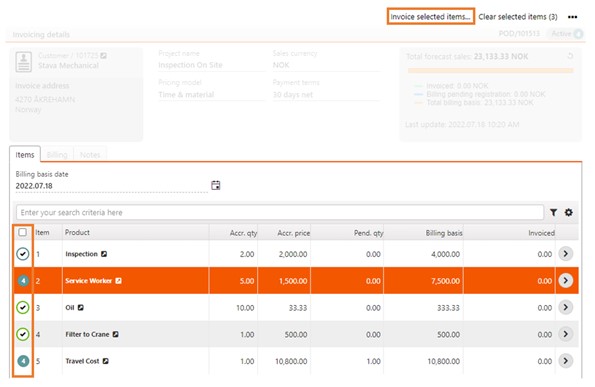
Then you get two choices. You can choose whether you want to Create new Invoice or Add to existing invoice. Click the Invoice button.
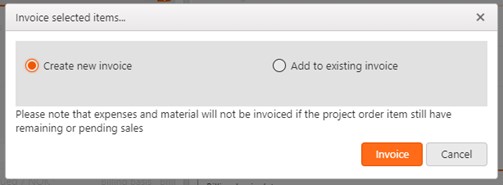
Sales invoice (CIN) that is created will stop in Status 1 (waiting for registration). In the list of Project orders (POD) in the Project orders pending invoicing (POP) application, there is a specific icon (clock icon) that indicates that there exist a Sales invoice (CIN) or Sales credit note (CCN) that is pending registration. The user can then make necessary changes before the Sales invoice (CIN) is registered and sent to the customer. As long as the Sales invoice (CIN) is still waiting for registration, more details about which billing basis is the basis for this Sales invoice (CIN) item are available from the Billing basis (BIB) application which is available through the context menu option, View billing basis, in the Sales invoice (CIN) item application. In the Billing basis (BIB) application, it is also possible to return some of the billing basis to the Project order (POD), so that it can be invoiced later. Material and Expenses based on supplier transactions is only permitted to create a Sales invoice (CIN) for the entire Project order (POD) items, it will also only be permitted to reset all billing basis for these Project order (POD) items.
Use the Register and send sales invoice option in the context menu to register the Sales invoice (CIN) to Status 4.
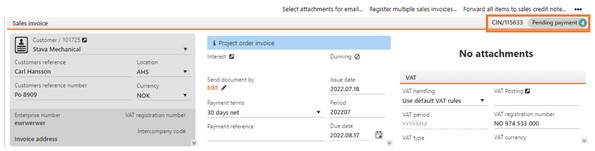
For Project orders (POD) with a Fixed price, an invoice plan has to be set up in the Project orders pending invoicing (POP) application. The total invoice amount that can be planned is forecast sales in the Project order (POD), which is the same as the amount of the related Sales order (COA) item that is confirmed to the customer.
It is then items from this plan that should be selected in the process. A Sales invoice (CIN) will be created with one Sales invoice (CIN) item per selected item from this plan, and with a price based on the price that was confirmed to the customer in the Sales order (COA) item.
In practice, this also means that if the user during the Project order (POD) process agrees on a new fixed price with the customer, the Sales order (COA) must be forwarded to a new Sales order (COA) where the residual price is to be added, -as a changed order.
When the user has made his choice of what to invoice, he must select the context menu option Create invoice for selected lines. This will open a popup where he can choose to create a new Sales invoice (CIN) or to add the selection to an existing Sales invoice (CIN).
This is an example of a Project order (POD) that has a fixed price of NOK 100,000. 20% will be invoiced at start-up, 40% will be invoiced when 50% of the job is done, and the last 40% will be invoiced when the job is finished.
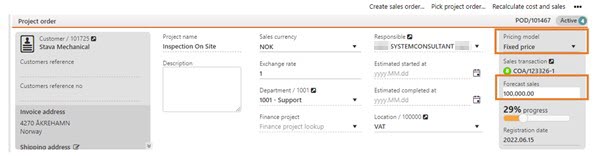
Enter the Project orders pending invoicing (POP) application to create a Invoice plan in the Invoice plan tab.
Note to customer - 20% at start-up
Percentage of forecast sales - 20%
Planned invoice amount - 20,000.00
Click the Add button to create the invoice plan.
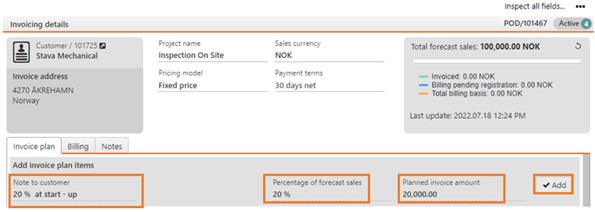
Repeat these until you have created all plans for the milestones you are to invoice.
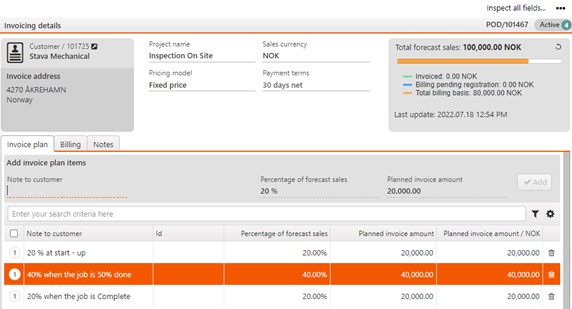
To create invoices according to the plan, select the items that shall be invoiced by clicking on the status icon, and then select the Invoice selected items option in the context menu.
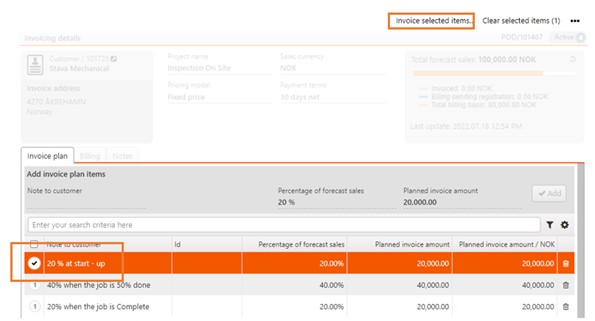
Select Create new invoice or Add to existing invoice, and then click the Invoice button.
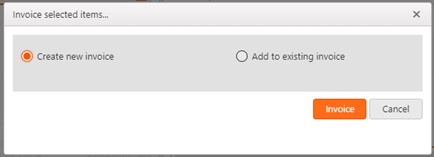
The Sales invoice (CIN) that is created will stop in Status 1 (waiting for registration). The user can then make necessary changes before the Sales invoice (CIN) is registered and sent to the customer.
If there is anything wrong in the Sales invoice (CIN) that was created in the Project orders pending invoicing (POP) application and sent to the customer, it can be forwarded to a Sales credit note (CCN) the ordinary way. Note that it is not possible to credit only a part of the quantity on a Sales invoice item (CINITEM).
As long as the Sales credit note (CCN) is still in Status 1 (pending registration), the application for showing details for which billing basis is the basis for the Sales credit note item (CCNITEM) can be started. The user can then select which item(s) to credit, if not all should be credited. The same rules for Material and Expenses based on supplier transactions apply here: the user either has to choose all or nothing of the billing basis. The billing basis for Material and Expenses that is credited will be reverted to the project order as something that is pending invoice, so it is possible to invoice it again. If expenses based on expense logs should not be invoiced again, the related expense(s) can be deleted. It will then be deleted from the billing basis. The price on the Sales invoice (CIN) is controlled by changing the accrued price on the Project order item (PODITEM). Accrued price will be set equal to remaining estimated price if Markuppct is disabled.
If hours have been credited, the Work log (WOL) will be reverted. This means that the new Work log (WOL) in Status 3 must be edited and approved to be added back as billing basis pending invoice in the project order.
If material is returned to stock via Customer deviation (CDV), a Sales credit note (CCN) should be created by the ordinary process for crediting in the Customer deviation (CDV) application.
It is also possible to create a negative billing basis by creating a project order item with the Expenses category based on Expense logs (EXL) and add a negative price. (This could be relevant if the seller owes the customer a discount, or wants to clear up invoicing/pricing errors.)