
Procurement may be easily defined as the process where a company buys one or several products, where products are defined as goods or services.
A one-time purchase of a product.
Contractual purchase of products.
A purchase of goods originates from a demand in stock, or requirements to fulfill a customer or a production order. The procurement process is a large logistical interaction that often gets its requirements from other parts in the value chain. For instance, if a purchase has to be done as soon as possible, the terms and conditions will often differ greatly if you compare it to a repetitive contractual purchase.
Maintain the suppliers
The suppliers must be defined and handled as suppliers, with contact persons and terms & agreements etc.
Receive and process purchase requests
The purchasing needs received from the store manager, production planner, customer responsible or others must be processed and followed up by handling requests.
Complete orders
Suppliers will follow up the requests and the purchasers will place orders, which must be processed and completed.
Handle contractual terms & agreements
Some specific products or suppliers are often more purchased than others and may be candidates for registering contractual terms & agreements upon.
Reporting
The analysis phase needs information in the form of reports and statistics to successfully follow up customers and agreements.

A supplier may be a private person or a company. All suppliers have different terms and preferences, all of which must be maintained and updated.
A new supplier is registered.
The supplier's terms are maintained.
The supplier's contact information is maintained.
All you need to register a new supplier is name, address, payment terms, delivery terms and contact information.
If there is a business relationship with larger suppliers, you will normally have relations with several contact persons. Some may be sellers while others will be invoicing and following up the purchases or projects. These people need to be defined with their contact- and work information, in addition to which situations they will be contacted.
Register a new supplier
A request or an order is sent, and the requested party must be registered as a supplier.
Maintain and update the suppliers
Either expand or reduce the terms for the supplier, update information and similar.
Document handling
Setting- rules for suppliers regarding where the different documents will end up.
Communication with the supplier
Sending out or receiving reports, price lists and other correspondence.
A supplier is a private person or a company that supplies goods or services. The Supplier (SUP) application contains information about suppliers. For instructions on creating a new supplier, refer to Create a new supplier.
To open the Supplier (SUP) application, select Procurement > Supplier management > Suppliers.

Select a supplier in the Suppliers pane to view, add and change information about the supplier by selecting the tabs and sub-tabs on the right. Select
 to use the filter. Drag the tabs and sub-tabs to rearrange them.
Select Set message in the context menu to add a note that is shown in the SUP window, and also on supplier documents such as purchase orders. Select the icon to the right of the message to clear or change the message.
If a payment block is set on the supplier, the Blocking set message is shown. To unblock the payment, select the icon to the right of the message. Clear Block payment in the dialog box.
The following tabs and sub-tabs are available in SUP.
The Overview tab provides a quick summary of the supplier’s activity and performance. It includes:
Timeline: Displays recent interactions and transactions.
Charts: Visual representations of supplier metrics.
Key figures: Important statistics such as total purchases, number of orders, and now delivery performance
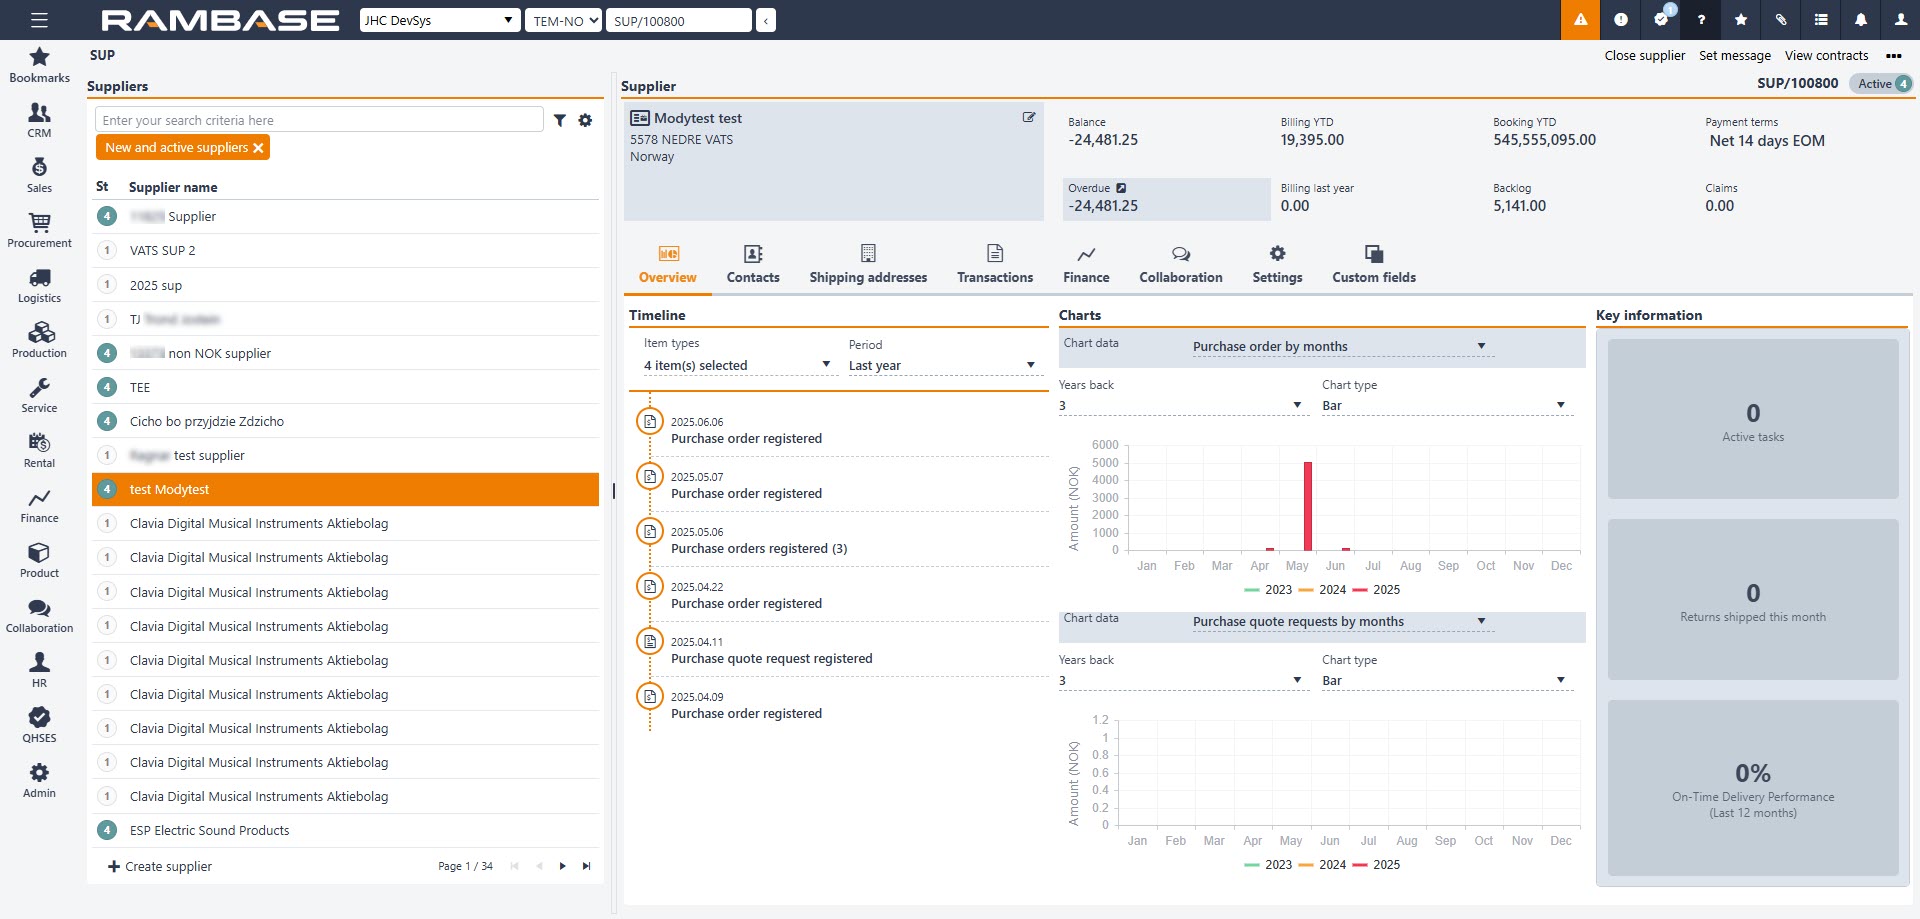
In Timeline, select the period for which you want to view the items in Period. Select the type of Items to view in Item types. You can view Notes, Tasks, SPO - Purchase Orders, SRQ - Purchase quote requests, SOA - Purchase order responses and SSA - Goods receptions. Select any item in the timeline to expand it.
You can view supplier information as charts. Select Chart data to view the Purchase order by months, Purchase quote requests by months, or Billing 5 years. The chart type can be Bar, Bar stacked, Fluctuating line or Accumulated line. Billing 5 years is shown as a pie chart. Hover over any bar in the chart to see more information about the statistic.
Key figures: Active tasks, Returns shipped this month, On-Time Delivery Performance (Last 12 months)
Active tasks - Displays the number of active TASKs. When clicked, the TASK application opens with a filter on Supplier (SUP) and active statuses.
Returns shipped this month - Displays the number of shipped Supplier returns (SRT) (Status >= 4). When clicked, the Supplier return (SRT) application opens with this filter.
On-Time Delivery Performance (Last 12 months) -This percentage is calculated based on how many Goods reception items (SSAITEMS) that are received the last months is received on the date that was confirmed from supplier in their purchase order response. If the user click on this percent, they will be re-directed to DPS (delivery performance statistics) for this supplier.
Select Contacts to view and change the contacts at the supplier. Select
 to edit the default phone and email address. Select
  to delete the contact or
  to open the CNT application where you can view and edit more contact information. Select Create contact to create a new contact, or Select contact to open the contact lookup to add an existing contact.
Select Shipping addresses to view and change the shipping address for the supplier. Every supplier can have one or many shipping addresses. If there are multiple addresses, you can set one as the default.

Select Transactions to view the following.
Purchase orders. Select this sub-tab to view the purchase orders issued to the supplier, and the purchase order responses.
Returns. View information on supplier returns. Select
in the item to open Supplier Return (SRTITEM).Billing. View supplier billing information here.

Select Finance to view important financial figures such as:
All transactions to view all the key financial information.
Due amounts to view the payments due to the supplier, by due date. Double-click any row to open SUPDUE.
Pay statistics to view the Supplier Payment Statistics by period.

Select Collaboration to view and create Notes, Tasks and Emails attached toRam the supplier in the following sub-tabs. Emails must be added using the RamBase Office Add-in.
Notes.
Tasks.
Emails.

Select Settings to view and add data in the following sub-tabs.
Select Main data, to view and change Supplier information, Shipping Terms, Preferred language and the Supplier classification.
Select Output control to view the documents to send and the communication channels such as Email, Print or FTP/SFTP. Select Add document to send to send one or more documents to the supplier. In Send to, specify the recipient, which can be:
An existing contact.
A new contact that you create.
The main email address for the supplier.
The Recipient from a source document.

Select Finance to view and change financial information related to the supplier:
The Currencies for payments and quotations.
Select the Intercompany code from the list.
View or enter the VAT registration number.
Select the VAT handling rules.
Select the Default general ledger account.
Specify if the supplier is related business entity.
Specify if the supplier is using cash for settlement.
Specify the Payment method.
Specify the Payment terms.
View, change or add Bank accounts to pay the supplier.
Users can discontinue a supplier bank account by clicking the Discontinue supplier bank account button in the Edit bank account popup. This can be found by clicking the edit icon in the Bank accounts field. If a bank account is discontinued (Status 9), it cannot be used in the remittance process. A validation message will appear during the remittance process in the Pay management (PAM) to check if the bank account is active (Status 4).
An error message will appear if a user discontinues a bank account if it is used in an open document, such as in a Supplier invoice (SIN).

Bank accounts tabs
Description
St
Status code
Item
Item
Currency
Currency used for the bank account
C code
Two-character code (ISO 3166) identifying the country.
Account
Account number used to identify the bank account
Account type
Account type of the bank account, for example BBAN, Bankgiro and Plusgiro
IBAN
International bank account number
Swift
The SWIFT (Society for Worldwide Interbank Financial Telecommunication) Code is a standard format for Business Identifier Codes (BIC) and it's used to uniquely identify banks and financial institutions globally. These codes are used when transferring money between banks, in particular for international wire transfers or SEPA payments.
Bank name
Name of the bank
Bank code
A code assigned by a central bank, a bank supervisory body or a Bankers Association in a country to all its licensed member banks or financial institutions.
Clearing code
National clearing code of the bank account
Clearing bank identifier
National clearing bank identifier of the bank account
Select Custom Fields to view and interact with fields your sales partner created. Contact your sales partner if you want to create several custom fields.

Context menu
The context menu in SUP gives the following options:
Close supplier. Select this option to set the supplier to status ST:9, Discontinued. You cannot discontinue a supplier if there are transaction documents related to the supplier. Select Activate supplier to activate a supplier in status ST:1, New or status ST:9, Discontinued. The activated supplier is set to status ST:4, Active.
Select Supplier - All transactions to see the Supplier statement of all transactions, both present and past.
Select Inspects and Views gives the following options:
Select Show total balance to see the total balance of payments over 0 to 30 days, 30 to 60 days and beyond 60 days.
Select Delivery performance to view the delivery performance statistics categorized as Early, On time, or Late deliveries from the supplier.
Select Revision history to see the history of revisions to the SUP.
Select Quality assurance events to inspect the Quality Report Archive (QAR) filtered by supplier.
The Activities and operations menu gives the following options:
Select Discard supplier to discard the supplier and set the status to D. If you discard a supplier, all the supplier data is discarded. Select this option only when you create a supplier in error. Select Close supplier if you want the supplier data to be stored in RamBase.
Select Prepayment to supplier to make a prepayment such as an agreed advance payment.
Select Send supplier statement of account to send a statement of accounts to the supplier. You can choose to send a statement of All transactions or only Open transactions.
The Statement reports menu gives the following options:
Supplier & customer - All transactions. Select this option to see all the supplier and customer transactions. The Customer & Supplier Account Movements report (NGREP) opens.
Select Supplier - Open transactions to see the Supplier statement of presently open transactions.
Select Supplier - All transactions to see the Supplier statement of all transactions, both present and past.
To open the Supplier (SUP) application, select Procurement > Supplier management > Suppliers. For more information on the SUP application, refer to Supplier (SUP).

Select Create Supplier.
Enter the supplier information such as the Name, Enterprise number, VAT number and the address. Address fields marked with * are mandatory.
The Postal code lookup is available in some countries. The Name or Enterprise number lookup is available in some countries.
You can also search for a company by entering the VAT Number.
The new supplier is created with a status of ST:1, New. Select Activate supplier in the context menu to activate the supplier with a status of ST:4, Active.
The VAT Information Exchange System (VIES) validates single VAT numbers of any business entity registered in the EU when you enter the VAT number in the Customer (CUS) or Supplier (SUP) applications, or when the CUS or SUP applications are opened.
If you enter a valid VAT number for a business entity based in the EU, a message displays, stating that the VAT number is valid and registered in VIES.

Select Update name and address to retrieve the entity name and address from the VIES database.

A notification message is displayed in the application that the VAT is registered in VIES. The validation is performed every time you select a customer or supplier based in an EU member nation. If the service is unavailable for any reason and the VIES validation was not done, no notification is displayed. If the VAT number is not valid, the notification states that VAT not registered in VIES. If you hover over this notification, a popup notification states that VAT number is not valid or not registered in VIES.


If there is a mismatch between the address held in RamBase and the retrieved address, a notification is displayed in the General Settings. Select Update name and address to overwrite the currently entered address with the address retrieved from VIES.

In the Supplier (SUP) application you can update any new information about the supplier. This may be This may be a change in contacts, shipping addresses or change in main and financial settings. Also refer to Supplier (SUP) for more information.
Select Settings to see the settings. There are three tabs in Settings.
Main Data
Main data contains the following fields.
General
Name. Enter the name of supplier (name of company or surname/familyname/lastname of a person)
Secondary name. Enter the Firstname/givenname if the supplier is a person.
Enterprise number. Enter the suppliers unique enterprise/organization number.
VAT Number. Enter the unique number assigned by the relevant tax authority to identify a party for use in relation to value added tax (VAT).
EORI number. Enter the supplier's EORI number. An EORI (Economic Operator Registration and Identification number) number is required of any party intending to import into the EU or export from the EU.
Created by. Enter the user (employee or RamBase-server) that created the supplier
Created date. Enter the date and time of creation.
Website. Enter the address for the suppliers website/homepage/webpage.
Shipping terms
Delivery terms. Specify the Delivery terms and Delivery terms place.
Ship by. Enter the shipping service identifier.
Outgoing ship by. Enter the shipping service identifier fr the outgoing shipping service.
Classification
Preferred language. Specify the preferred language for the supplier. that Is used in prints, emails etc.
Supplier classification. Specify the classification of the supplier.
Purchase
Confirmed delivery date buffer. If the confirmed delivery date is unreliable, you can specify a buffer in days to be added. This buffer will be used when the requested delivery date for purchase orders is calculated. This buffer will also be added to the confirmed delivery date when creating purchase order responses.
Blockings
Block payment. Select this checkbox to block payment to this supplier.
Output control
Output control contains the following fields and controls.
Add document to send. Select this icon to specify the documents to send to the supplier.
Finance data
Finance data contains the following fields.
Currencies. Select the currencies to use for invoices from or payments to this supplier. You can specify multiple currencies here.
Intercompany code. Enter the Intercompany database the supplier belongs to.
VAT registration number. Enter the unique number assigned by the relevant tax authority to identify a party for use in relation to value added tax (VAT).
VAT handling. Specify how value added tax (VAT) should be calculated. Either always include VAT, always exclude VAT or use standard/default VAT rules.
Default general ledger account. Specify the general ledger account identifier.
Is related business entity. Specify if a supplier is related business entity to the company.
Is using cash for settlement. Specify if a supplier is using cash method for settlements.
Stop automatic forward of imported invoices. Select the checkbox to block automatic forwarding of ISI-documents to SIN (Supplier invoice).
Terms
Payment method. Specify the default payment method for the supplier.
Payment terms. Specify the default payment terms to use in new documents.
Bank accounts
Select Add bank account and specify the:
Bank name. Enter the name of the bank.
Currency. Enter the currency in which the account is operated. The currencies displayed in the drop-down menu in the Supplier Bank Accounts popup reflects the currency(-ies) defined as valid for this supplier.
Account. Enter the account number.
Bank code. Enter the bank code. It is accepted that Swift is blank if you have entered a Bank Code.
Swift. Enter the swift code.
IBAN. Enter the bank account number in IBAN format.
Country. Enter the country where the bank is located.
Delivery Terms and Delivery Terms Place
To align more closely with the International Commercial Terms (Incoterms), in which the place of delivery is explicitly named, RamBase has added a field called Delivery terms place to the Delivery terms. This makes the delivery terms legally valid. You can specify the default Delivery terms place for your suppliers. This is a mandatory field and you cannot validate some outgoing documents during a change of status if you do not specify the Delivery terms place. Any printouts such as PDF will also show the Delivery terms place.

To specify the Delivery term place for a supplier.
Enter SUP in the Program field and select the Enter key to open the Supplier (SUP) application.
In SUP, select Settings > Main data.
Select
 in Shipping terms.
Enter the Delivery terms place below the Delivery terms list.
You can add a different default Delivery terms and Delivery terms place for every shipping address for your customer.

There are some settings for Delivery terms and Delivery terms place in the CSV.

You can specify the default values for the Delivery terms (DELTERM) field when creating new suppliers.
Enable Default create value for suppliers - Delivery Terms and select the default delivery terms for new suppliers in the field below.
You can specify the default values for the Delivery terms place (DELTERMPLACE) field when creating new suppliers.
Enable Default create value for suppliers - Delivery Terms Place and specify the default delivery terms place for new suppliers n the field below.
It is possible to control the document logistic in RamBase by predefining the recipients of specific documents for a given customer. These setting can be controlled from the Document Handling tab in the folder Handling in the Supplier (SUP) view.
To add recipients you click the icon Add Contact Person, which opens a popup where you may choose which types of documents this contact will receive. These documents are listed in the drop-down menu under Document(s) to Send, with names in short form. You may also choose which method the document is to be delivered, which may be EDI, e-mail, CSV-file or physical print.
The contact must be defined in the Contact Persons (CNT) application and connected to the supplier. If not you will need to create a CNT.

A quoting process may be defined as the process where one, if there are no set agreements or contractual obligations in place, agree with a supplier regarding price, delivery time, payment terms and the product specification.
Single transaction with agreed terms.
Contract for agreed terms within a defined period.
Rejection of the request from supplier.
Sorting out and declining bad offers.
Some products have a fixed price independent of the buyer, while other buyers are given a special price for specific products. Receiving different prices depending on product and buyer is common practice in certain industries. This is mainly due to some companies being larger and expecting contractual prices on a larger product range, while smaller companies must purchase using standard prices. In addition, one could also say that the supplier’s power in the market certainly will affect the flexibility, nor the lack of flexibility, when trying to negotiate terms.
This process is usually started with a request for quote, where information regarding price and availability are gathered and forms the basis of the purchase.
After a quote is received from the supplier, there will be a period where the quote is open for acceptance or rejection. Any negotiations regarding price and/or terms in addition to acceptance or rejection, are logged in the ERP system.
Receiving a request for quote
A request for purchase is received from an internal department, typically sales or production.
Create a request for quote
Make a one-time-request for a certain quantity of a product.
Send the request for quote
Send the quote to one or several recipients by mail or print.
Follow up on the request for quote
Track status changes when validity date is approaching.
Register quotes
Register quotes from the suppliers based on the received feedback on the request.
Select quote
Select and start a purchase order process for the best suited offer received from the suppliers.
Mark rejected quotes
Quotes received from the suppliers which are rejected and archived.
Setting name | Description |
Attach files when sending documents by email | Decide if emails sent from documents should attach the attached files or not. If value is "ON" - Only selected attachment will be sent. If value is "OFF" - Send automatically all attached files. If settings has no value - Attachments will not be sent. |
Default Mode on Supplier Quote Management (SQM) | Value in this setting is the default value in Mode field on Supplier Quote Management (SQM). The default value can be overwritten on Supplier Quote Management. If no value is added, the Mode fileld must be filled manually when entering Supplier Quote Management. Values to be used: TRADE (Ordinary Products), PROD (Production Products) and ALL (All Products) |
Purchase Quote (SQU) Expiration Date days | Value in this setting is a number of days after the Expiration date is passed, -that status on Purchase Quote (SQU) will change to status 9 |
Purchase Quote (SQU) Expiration Date warning | Value in this setting is a number of days before the Expiration Date on Purchase Quote (SQU) is reached, - that status will change to 6 (warning status) |
Purchase Quote Item (SQU-ITM) Agreement Expiration Date days | Value in this setting is a number of days after the Agreement expiration date on Purchase Quote Item (SQU-ITM) has expire, - before Purchase Quote item will change to status 9. Just for info: This setting for Agreement Expiration date days will override the setting for Expiration date days |
Purhcase Quote Item (SQU-ITM) Agreement Expiration Date warning | Value in this setting is a number of days before the Agreement Expiration Date on Purchase Quote Item (SQU-ITM) is reached, - that status will change to 6 (warning status) |
Show Docby Popup Before Registering Purchase Quote Request (SRQ) | If this setting is"ON" - Docby Popup will show before you can register a Purchase Quote Request (SRQ). In this popup you can select how the document should be sent to customer. |
Purchase Quote Request (SRQ) is the request for quote sent to a supplier for a specific part, and for a specific quantity.
To open the Purchase Quote Reques (SRQ) application, find Procurement in the RamBase menu and then Quoting. Click Purchase quote request to enter the SRQ application.

To select multiple items for forwarding or deletion, select the checkbox to select all the items. Any operation selected from the context menu such as forwarding or deletion applies to all the selected items. To select one item at a time, click in the status column of the item.

To open the Purchase Quote Request (SRQ) application, find Procurement in the RamBase menu and then Quoting. Click Purchase quote request to enter the SRQ application.
Click the Create new quote request icon in the lower left corner.

Enter the supplier in the Supplier field and choose the desired Supplier (SUP). Clicking the down-arrow to the right in the field will open a list of suppliers with filer options.
Use the Create New item icon to create an item line.

Enter the desired quantity in the Qty field and choose the desired article in the Product field. If there is a target price, it can easily be edited in the field. Enter a Requested delivery date in the last field and click OK.
Choose the option Register and send purchase quote request in the context menu to send the request for quote to the supplier.
Define how the document should be sent (Email, print, EDI, etc.) in the Send By column and the recipient in the Send To column. If there is a pre-defined layout for the document, this can be selected in the Format/Layout column. Click the Forward button when finished. This will send the document to the recipient and set the document to ST:3.
Supplier Quote Management (SQM), is an efficient way to create requests for quote and manage supplier quotes in response to customer requests.
To open the Supplier Quote Management (SQM) application, find Procurement in the RamBase menu and then Quoting. Click Purchase quote management to enter the SQM application.

The documents which are visible under the Pending folder are Sales Quote Requests (CRQ) in ST:2 which needs further processing. The application is used to create requests to the suppliers and create offers in the system based on the suppliers reply.
There are two different modes to choose from, depending on the company type:
TRADE: for distribution companies.
PROD: for production companies.
All the postings are ready for further processing, so you may highlight a desired line and press ENTER to proceed.

This opens a window where the right part of the window shows key figures concerning the part requested and the left parts lists all open SRQs with your PID.
Here you may either create a new SRQ by using the Create New icon down in the left corner, or highlight an existing SRQ and press ENTER to add the item to the chosen SRQ.
After you have added, or created a new, SRQ, press ESC to go back to the list of active SRQs.
Click the SQM process done icon to the left in the item line to remove a CRQ-ITM from the list when it has been placed on relevant SRQs. The item on the CRQ will go from ST:2 to ST:3, and is to be understood as it is now pending a quote from the supplier.
When pressing ENTER on a SRQ document line in the SRQ Documents folder, this will list all the items the SRQ contains, in the SRQ Items folder. Up in the left corner you will also find a link to the main document. Press that link to open the specific SRQ in a popup. Here you can send the SRQ to your supplier by using the action menu items.

All SRQs which are pending feedback from the supplier are found in the SRQ Documents tab in SQM in ST:3.
The reply from the supplier will include the SRQ number. Enter SRQ and that number in the program field and press ENTER. When in the SRQ, highlight the item and press ENTER.
NOTE: There are two setting controlling when the document will change status to ST:6 or ST:9. These settings are called:
Days before expiration date a Purchase Quote Request (SRQ) change to status 6
Days after expiration date a Purchase Quote Request (SRQ) change to status 9
Use the Forward all items option and then choose the Forward all items to purchase quote option.

Choose whether to forward to a new, or an existing, Purchase Quote. Click forward when finished and the new purchase quote is created.
A Purchase Quote (SQU) is a document that contains an offer from a supplier. SQUs can be created from the corresponding Purchase Quote Request (SRQ) or directly from the Purchase Quote (SQU) application.
To open the Purchase Quote (SQU) application, find Procurement in the RamBase menu and then Quoting. Click Purchase quotes to enter the SQM application.

To select multiple items for forwarding or deletion, select the checkbox to select all the items. Any operation selected from the context menu such as forwarding or deletion applies to all the selected items. To select one item at a time, click in the status column of the item.

The reply from the supplier will most likely have a reference to the SRQ you sent. Enter SRQ and that number in the program field and press ENTER.
When in the SRQ, highlight the item line and press ENTER. Use the context menu option Forward to purchase quote. Then choose Forward to new purchase quote or Forward to existing purchase quote.

Enter the desired information.
Product
Name of the product
Product description
Description of the product
Forward quantity
The amount of products you want to forward
Price
The price of the product, if set
Expiration date
The expiration date of the quote
Standard lead time
The standard delivery time from supplier, measured in days
Supplier reference number
If the supplier gives you a reference number for their quote, you can add it here.
Heat number
The quality of the material the product is made of
Note
A free text field to enter any note you might find necessary
NOTE: The Is Ship and Debit check box is only available for companies running “Ship & Debit” agreements with their suppliers.
Click the Forward button to perform the item transport which sets the SRQ item to ST:9.
A new SQU document is created and set to status code 1.

Use the context menu option Register Purchase Quote to register the SQU.

A purchasing process may be defined as the process for acquiring goods or services to accomplish the goals of an organization.
Purchasing need is identified.
Several purchasing needs for one article is consolidated.
Purchase registered and allocated to a customer- or production order.
Purchase registered.
Requisition purchase registered.
A purchase may be related to a quoting process where terms and agreements are set, or it may be a purchase completely without the time extensive quoting process. If so, there is less room for negotiations and comparing different offers from the suppliers. With smaller requisition purchases, there is no need for requesting and receiving quotes.
The essential thing when purchasing goods based on the needs related to customer orders, production orders or other orders going out is that the purchased goods are allocated to those.
Identify need for purchase
The working queue for one purchaser is often a list of articles or services which is needed.
Create purchase orders
Make purchase orders for the wanted goods.
Setting name | Description |
Attach files when sending documents by email | Decide if emails sent from documents should attach the attached files or not. If value is "ON" - Only selected attachment will be sent. If value is "OFF" - Send automatically all attached files. If settings has no value - Attachments will not be sent. |
Days after expiration date a Purchase Quote Request (SRQ) changes to status 9 | Value in this setting is a number of days after the Expiration date is passed, - that status on Purchase Quote Request (SRQ) will change to status 9. The change of status may be performed by a nightly batch, or that Expiration date is manually changed |
Days before expiration date a Purchase Quote Request (SRQ) change to status 6 | Value in this setting is a number of days befor the Expiration date is reached, -that status on Purchase Quote Request will change to status 6. The change of status may be performed by a nightly batch, or that Expiration date is manually changed. |
Default Purchase Currency | Value in this setting should be the Currency that is going to be default PurchaseCurrency when creating new Purchase Prices in the folder 'Purchase' on Product (ART). If no value added in the setting, - the PurchaseCurrency field must be updated manually when creating new Purchase Prices. Recommended value: Currency that the firm is registered with |
Default Purchase Price Type | Value in this setting should be the Type that is going to be default PurchasePriceType when creating new Purchase Prices in the folder 'Purchase' on Product (ART). If no value added in the setting, - the PurchasePriceType field must be updated manually when creating new Purchase Prices. Recommended value: STD (Standard) |
Default Purchase Quantity | Value in this setting should be the Quantity that is going to be default PurhaseQuantity when creating new Purchase Prices in the folder 'Purchase' on Product (ART). If no value added in the setting, - PurchaseQuantity must be updated manually when creating new Purchase Prices |
Default Purchase Status | Value in this setting should be the Status that is going to be default PurchaseStatus when creating new Purchase Prices in the folder 'Purchase' on Product (ART). If no value added in the setting, - PurchaseStatus must be updated manually when creating new Purchase Prices. Options to be used in the setting are: 1=Unregistered, 4=Valid, 8=Preferred and 9=Obsolete. Recommended value: 4=Valid |
Default Requested Delivery Date on Supplier Purchase Order (SPO) | Value in this setting must be a number of days from 0-365. This number of days will be used to update Requested Delivery Date on Supplier Purchase Order (SPO) when a new document is created. If the value in the setting is '0', - Requested Delivery Date will be todays date. If the value is '2' - Requested Delivery Date will be 2 days ahead from today. The field can manually be changed on the Supplier Purchase Order |
Default View in Purchase (PUR) | If this setting is "OFF" - The default view in Purchase (PUR) when selecting Supplier Purchase Order (SPO) will be 'Suppliers with Valid Purchase Price'. If the setting is "ON" - you may chose between three values. If selected value is 'ALL' - The default view will be 'My open SPOs' (Supplier Purchase Orders). If selected value is 'PREF' - The defalut view will be 'Preferred Suppliers Only. If the selected value is 'SQUSUP' - The default view will be 'SQU Supplier'. It is possible to change view (radiobutton) in the Select SPO pop-up manually |
DeliveryAndRequestDateMarginDays | Number of days, used in calculation of LINKDELDATE and LINKREQ. |
Department as mandatory on Supplier Purchase Order (Requisition) | If this setting is "ON" - Department field in Accounting folder on Supplier Purchase Order (Type=Requisiton) must be filled before the Supplier Purchase Order can be forwarded to the customer |
Department as mandatory on Supplier Purchase Order (Service) | If this setting is "ON" - Department field in Accounting folder on Supplier Purchase Order (Type=Service) must be filled before the Supplier Purchase Order can be forwarded to the customer |
Print Supplier Product Name from Product (ART) | If this setting is "ON" - If the field Supplier Product Name on Purchase document items are empty, Supplier Product Name from Product (ART) will be printed when forwarding Purchase documents. If the setting is "OFF" - No information for Supplier Product Name from Product will be printed, only the information in the field on Purchase document items |
Project is mandatory on Supplier Purchase Order (SPO) | If this setting is "ON" - Project field in Accounting folder on Supplier Purchase Order Item (SPO-ITM) must be filled before the document can be forwarded to Supplier. Same rules for Ordinary and Requisition Supplier Purchase Order |
Purchase LeadTime Margin Days | Number of days to be used in the calculation of ART.FirstReq that show in PUR. |
Select Product (ART) from this Supplier (SUP) | If this setting is "ON" - The checkbox 'Include Parts from this Supplier only' will be marked as default in ITMSART (In Select Part pop-up when adding a Product (ART) to a Supplier document). It is possible to unmark the checkbox manually |
Ship Average Weeks in Purchase (PUR) for Direct Purchase | Value in this setting should be the number of weeks that is used in the 'Ship.avg' (Average Shipped Quantity) column in Direct Shipment folder in Purchase (PUR). The number of weeks in this setting will be used for presenting Average Shipped Quantity for this periode |
The Purchase (PUR) application lists all purchase needs ready for internal processing. Typical examples of where purchasing is needed is when stock is below the desired minimum quantity, or if Sales Orders (COA) or Production Work Orders (PWO) can not be fulfilled due to lack of goods.
To open the Purchase (PUR) application, find Procurement in the RamBase menu and then Purchasing. Click Purchase handling to enter the Purchase (PUR) application.

The user may add several filters to decrease unwanted search results. The header offers three checkboxes to increase desired search results:
Mode drop-down menu
All - Displays all Products (ART).
Min Stock - Displays the shortage of goods according to a minimum stock level set for the Product (ART).
Purchase Firm Orders (PUF) - Displays all Products (ART) for which there exists a purchase requirement due to lack of goods to fulfill Sales orders (COA) or Production work orders (PWO).
Loc drop-down menu - Filter on a specific location from the Locations (LOC) application.
PurchGroup drop-down menu - Filter on specific groups as defined in the Purchase group (PUG) application.
Note
Shortage of goods according to minimum stock level (Reorder point) set for a product is calculated as:
Reorder point - Effective stock
Effective stock includes the following, but customer owned and rental goods are anyway excluded:
Available stock
Available quantity in Goods reception item (SSAITEM)
Available purchase backlog which is expected to be received within lead time:
Available quantity in Purchase order response item (SOAITEM) which has confirmed delivery date within lead time
Available quantity in Purchase order response (SOAITEM) which has blank confirmed delivery date, but requested delivery date within lead time
Available quantity in Purchase order item (SPOITEM) which has requested delivery date within lead time
Available quantity in production work order (PWO) which has scheduled completion date within lead time
Available quantity in production work order (PWO) which has blank scheduled completion date, but scheduled start date within lead time
This option is available in the Pending Articles and Direct Purchase tabs. This is a drop-down menu to limit the results to Products (ART) that have to be purchased with a requested date within a given period, such as 3 days, 1 week, several weeks, etc.
This option is available in the Pending Items and External work tabs. This is a drop-down menu to limit the results to orders that have a delivery date within a given period, e.g 1 week, 1 month etc.
You may create a filter in the PUR Filters popup window by clicking the Filter icon (magnifying glass), or by pressing Ctrl + f. Enter one or more criteria and click the OK button. If you need special filters, you may enter them directly in the Filter field.
The External Work tab is for production companies only and the filter popup here differs slightly from the filter popup in the other tabs. When clicking the Filter icon, the magnifier glass, next to a search field, the list displayed contains relevant data only. For example, in the PUR Filters popup, when clicking the icon next to the Operation field, the list displayed contains only external operations which currently are connected to a Production Work Order (PWO) and at the same time are pending to be purchased.
Pending Articles
Displays the pending quantity for each product in the list. The pending quantity reflects the accumulated shortage in stock when all pending orders are taken into account. When there are several pending orders, the FirstReq column shows the first requested date.
Select the intended Product (ART) and press ENTER to open the Purchase (PUR3/SPO) application.
You may inspect the details of the product needs in the different columns.
The column Shortage which show dates when the articles are needed.
The column Backlog shows all orders related to the purchasing needs.
The Sup Backlog Status column show the forecast for product quantity updated on orders and planned purchase.
To fill the order needed, press ENTER on the intended week.
Select the intended Purchase order (SPO) connected to your PID, you would like to add the order to, and the option to create a new Purchase order (SPO).
Pending Items
Displays all the Sales orders (COA) and Production work orders (PWO) that need purchase of goods. The tab gives access to the corresponding orders with details like delivery date and quantity, to help the purchaser to decide which order to prioritize. The requested delivery date from the DelDate field on the Sales order (COA) or Production work order (PWO) will be used as request date on the Purchase Order (SPO).
Note
If a value is added in the confirmation margin field, the PoConfMargin field on the Supplier (SUP) account, the number of days defined here will be subtracted from the request date on the Purchase order (SPO).
Direct purchase
Very similar to the Pending Articles folder, but contains additional details to support fast order entry, and it also skips some popups.
SPO Documents
Contains any Purchase orders (SPO) in Status 1 or 2. Sometimes the purchaser may need to add or discard item lines.
SPO Items
Contains Purchase order (SPO) items. Sometimes it may be necessary to make changes to specific item lines.
External Work
Displays all external operations pending to be purchased. The tab gives access to the corresponding Production Work Order (PWO) and its serial number if assigned, and other details like delivery dates and pending quantity units.
Note
An Information icon is displayed on the item line. Hover over to display information from the PoNote field in the Production work order (PWO) application, derived from the Structure button in the Links area.
From the Purchase (PUR) application, clicking the Information icon will open the popup Structure operation item detailing the item.

You may filter the Purchase orders (SPO) with the radio buttons to narrow your results.
To inspect purchasing needs you must use the Purchasing (PUR) application.
To open the Purchase (PUR) application, find Procurement in the RamBase menu and then Purchasing. Click Purchase handling to enter the PUR application.
Here you may change the view using the drop down menu called Mode, where you can set the filtering criteria. There are several options, depending on your company's settings, to easier find the orders where attention is required.

Shows purchasing needs for articles with a minimum stock requirement, when the stock has dropped below this level. This list is generated from the articles where minimum stock has been registered on the article itself. More information regarding this can be found in the Article section. You may see the quantity of articles missing from stock in the column Shortage.
Note: Several factors can affect the purchase suggestions from RamBase using minimum stock, such as lead time, active production work orders, sales orders or items which needs to be bought in quantity. If the purchase needs state unexpected orders, please check for these factors.
With this filter you may inspect the quantity missing for pending orders in the column PendingQtyUnit.
To correct these numbers you will need to purchase the articles needed by either creating a new Purchase Order (SPO), or adding the articles to an existing SPO.
To create an order based on the missing quantity, you must first highlight the desired article line and press ENTER.

Field descriptions:
Part Information
Part = Name of the article
Text = Description of the article
Mfr = Manufacturer
PackQty = The packing quantity of a product delivered in multiple-item packs.
SubQty = Number of packages inside a package
Class = Classification of the article
Unit = Pieces/meter/kg etc.
PurchaseLeadTime = Lead time in number of days specified on the article
AssignmentWindowDate = The last day of the assignment window. Orders within this date will link to thewarehouse, productions and supplier backlog in SAR, and not with pending, such as the orders outside the assignment window.
Warehouse
Free = Available quantity on stock
Stock = Total quantity on stock (can be linked to i.e. sales orders)
Min.stock = Minimum stock quantity specified on the article
In transit = Quantity used in goods transfers (transfer from one location to another).
Open Supplier Orders = Quantity on purchase order/responses in status 1 (not registered)
Supplier Backlog = Ordered, but not yet delivered quantity (registered, status 3)
Open Customer Orders = Unconfirmed quantity on sales orders and production work orders (status 1)
Backlog = Quantity ordered by customer (PWO/COA), but not yet shipped
Consumed/Shipped = Quantity that has been decreased in warehouse due to shipments/productions/corrections etc.
You may inspect the article needs details in the different columns.
The column Shortage which show dates when the articles are needed.
The column Backlog shows all orders related to the purchasing needs.
The Sup Backlog Status column show the forecast for article quantity updated on orders and planned purchase.
To fill the order needed, press ENTER on the week line.

Here you may choose which SPO connected to your PID you would like to add the order to, and the option to make a new one.
To make a new SPO, please see the documentation related to creating Purchase Orders (SPO).
You may filter the SPOs by the radio buttons to narrow your results.
From the RamBase menu click on Procurement and then select Purchasing. Click on Purchase handling to enter the Purchase (PUR) application.
Navigate to and click on the intended article to select it and press ENTER. Purchase information about the stock levels, the customer and supplier backlogs and open orders for the next 20 weeks will be displayed.
The user would typically select the first week where a shortage is identified, press ENTER, and go on from there to create a Purchase order (SPO).
In the new popup window, Select SPO, you may create a new Purchase order (SPO) or select an existing Purchase order (SPO). If a minimum order quantity is registered on the product, the purchase quantity will be adjusted accordingly. If not, you may also change the quantity for example based on a given package quantity. This is done by pressing ENTER on a line and selecting a location in the following popup.
If you select an existing Purchase order (SPO), the Purchase order (SPO) Item window is displayed. Here you can inspect supplier offers and select one as the basis for the Purchase order (SPO), prices and historical records. In addition, you can inspect the delivery list, stock assignments and customer-related information. You can add additional data, such as SumWeight, or merge, split, move item lines to another Purchase order (SPO).
If you need higher efficiency when creating Purchase orders (SPO), use the checkboxes and create multiple Purchase orders (SPO) simultaneously. The criteria is that the MODE is set to Purchase firm orders (PUF) and LOC is not set to All Locations.
Use the checkboxes to select the Products (ART) for which you want to create Purchase orders (SPO). You can also use the header above the checkboxes to filter the products.
When you complete the selection, click the Select Action button, the Purchase (PUR) Select Action popup window displays.
Validate the selected products in the PUR Select Action popup window. This function is blocked for certain types of products. If there are blocks set on the product, the products are not validated. Remove any lines if necessary.
Click the Make Order button. The Start Action - PUR - MAKEORDER window displays.
Click the Start Action button in the Start Action - PUR - MAKEORDER window. The batch job to create the purchase orders commences.
If a value is chosen in the Req Within drop-down menu on the right, there will be a validation regarding pending quantity within the chosen time range. One item will be made per week where there is pending quantity, the same way it works if you make individual purchase orders. If the Req Within-function has been used, items will not be made after the period stated in Req Within expires.
Note
When multi selecting articles the supplier must have a valid purchase price.
If a minimum order quantity is registered on the product, the purchase quantity will be adjusted accordingly.
A Purchase Order (SPO) is a document that is used to purchase goods from a supplier.
To open the Purchase Order (SPO) application, find Procurement in the RamBase menu and then Purchasing. Click Purchase orders to enter the SPO application.

A Purchase Order (SPO) may be created from the Purchase (PUR) application, or manually from the SPO application.
To select multiple items for forwarding or deletion, select the checkbox to select all the items. Any operation selected from the context menu such as forwarding or deletion applies to all the selected items. To select one item at a time, click in the status column of the item.


To open the Purchase Order (SPO) application, find Procurement in the RamBase menu and then Purchasing. Click Purchase orders to enter the Purchase order (SPO) application.
Click Create new order button in the lower left hand corner to create a new Purchase order (SPO).
Enter the supplier account name, or parts of it, to look up in the archive, and click Create.
Shipping address can be changed using the menu option Change ship to address.
The addresses are picked from Supplier (SUP).
Go to the Items tab and click the Create new item button to add products to the order.
Set the intended quantity in the Qty field.
Enter the intended product name, or use the product lookup in the Product field.
To look up details regarding the product, such as lead time, you can click the View icon next to the product name and follow the link back to the product.
Enter the requested delivery date in the Requested delivery date field.
Enter a net price in the Net price field.
Check the Create another checkbox if you need to add more items.
Click the Create button to finish.
Click the Register Purchase Order button. The Purchase order (SPO) will be set to Status 3.
Note
Enter a quantity in the ReservedQty field if you want to reserve a quantity of the items (need to be above Status 1 for this option to be available).
If the procurement is directly based on a customers need, and the goods are customer owned. The option Set owner of goods that will be received is available from the context menu.
If a product of type KS is selected in a Purchase order item (SPOITEM), it won’t be allowed to register the Sales order (COA) or Purchase order (SPO) until the KS structure is expanded into it’s structured parts. This is done by CMI/Split product structure in to separate items.
In situations where a supplier offers the same product from two different manufacturers, the user can change which product is ordered, based on the Manufacturer part number (MPN).
The default Manufacturer product name (MPN) will be selected, but this can be changed.
The change is done from the Purchase order item (SPOITEM) application and requires that a Purchase order (SPO) is created.
To open the Purchase orders (SPO) application, from the RamBase menu, select Procurement and then Purchasing and finally Purchase orders.
Select or search for the Purchase order (SPO) with the Purchase order item (SPOITEM) which needs to be changed.
Once selected, from the Items tab, click and press ENTER on the item, or click the Right arrow icon to open the Purchase order item (SPOITEM) application.
To change the Manufacturers product name (MPN), find the Product area and click the Manufacturers product name (MPN) drop-down field.
Select the Manufacturers product name (MPN) and if there is a price update, verify or decline in the following popup.
To open the Purchase Orders (SPO) application, select Procurement > Purchasing > Requisition purchase orders.

To create a new requisition, select Create new requisition.
Enter the supplier name in Supplier. The predictive suggestion window suggests the suppliers, based on the first character you enter. The suggestions are refined as you enter more characters.

Select the location by selecting the down arrow in Location or by entering the location. The predictive suggestion window suggests the locations, based on the first character you enter. The suggestions are refined as you enter more characters.
If the supplier has several currencies registered, select the applicable currency in Currency.
To add products to the order, select Create new item in the Items tab.

Enter the quantity in Qty.
Enter the product name in Product. The predictive suggestion window suggests the products, based on the first character you enter. The suggestions are refined as you enter more characters. The products you can purchase using a requisition are those that are set up for not using assignments.
To look up information about the product, such as lead time, select the View product link to open the Article (ART).

Enter the requested delivery date in Requested delivery date. You can also select the calendar on the right to specify the requested delivery date from the calendar. If you do not specify a date, Rambase suggests the current date.
Enter the net price in Net price.
To add more items, select Create another.
Select Create.
If the requisition must be approved, the information is displayed in the Notes tab in SPOITEM. Select the applicable note to approve the requisition. If you are not the designated approver, select the approver by selecting Request Approval and wait for the approval.

Select Register and Send Purchase Order in the context menu of the SPO. The status of the SPO is set to ST:3, pending order response.
Select Forward all items in the context menu to forward all the items to a purchase order response. Select Forward to new purchase order response to forward the items to a new purchase order response or Forward to existing purchase order response. The items are forwarded according to your selection.
Select Register purchase order response in the context menu of the SOA when the supplier's terms are added, such as the confirmed delivery date.
When you receive the goods ordered by the requisition, select Product received in the context menu of the SPO or SOA item, or All non-stock products received in the context menu of the SPO or SOA. The status of the SPO or SOA is set to ST:4, pending supplier invoice.
Suppliers can trade in many currencies. The currencies are defined for each supplier in the Supplier (SUP) application.
If a supplier trades in more than one currency, you will get a popup asking you to choose currency when entering a new document.
A Purchase Order Response (SOA) is a response from the supplier regarding the purchase order or a change request. The SOA document is important for the statistics gathered in the Delivery Performance Statistics (DPS) application.

The SOA-items can be forwarded to either a new SOA (if there are new changes), or to a Goods Reception (SSA) document when the purchase order is received.
To select multiple items for forwarding or deletion, select the checkbox to select all the items. Any operation selected from the context menu such as forwarding or deletion applies to all the selected items. To select one item at a time, click in the status column of the item.

Lead time is the standard delivery time from supplier, measured in days. The lead time registered in RamBase is mainly for information purposes. However, it’s used to identify available backlog which is expected to be received within leadtime as a part of effective stock when calculating shortage due to reorder point for a product. You can enter or edit the lead time both on Products (ART) and the specific Suppliers (SUP) for the product in question.
To open the Product (ART) application, find Product in the RamBase menu and then Product management. Click Products to enter the ART application.
Highlight the ART for which you want to edit the lead time and press ENTER.
Enter the Purchase folder and find the field called StdLeadTime (standard lead time). Enter the lead time as number of days.
You can also perform this action in the Main Data folder by using the magnifying glass icon next to the leadtime field.
To open the Product (ART) application, find Product in the RamBase menu and then Product management. Click Products to enter the ART application.
Highlight the ART you want to change lead time for a specific supplier, and press ENTER.
Enter the Supplier Info folder. Click the Create ARTSUP icon on the bottom to add a new supplier.
Enter the information needed as you would normally when adding a new supplier. The field SupLeadtime controls the leadtime for the product from this supplier. Enter the supplier lead time as number of days.
Click submit when finished. This lead time for the specific supplier is now visible in the LeadTime column in the Supplier Info folder on the ART.
The lead time shown in the Purchase (PUR) application will always show the standard lead time (StdLeadtime). To find the lead time of specific suppliers, you will need to enter the product and look into the Supplier Info folder.
If the supplier is not set up for this product:
Purchase leadtime from Product (ART) is used and the Company setting (CSV), Days in week included in purchase lead time is taken into account. Then is number of days in Leadtime buffer for the combination of product and location added. If Leadtime buffer is not set, is days in Company setting (CSV) Purchase lead time buffer days added instead.
If the supplier is set up for this product and has a Standard leadtime:
Standard leadtime for supplier is used, and Company setting (CSV) Days in week included in purchase lead time is taken into account. Then is number of days in Leadtime buffer for the combination of product and location added. If Leadtime buffer is not set, is days in Company setting (CSV) Purchase lead time buffer days added instead. On top on that is Confirmed delivery date buffer from Supplier (SUP) added.
If the supplier is set up for this product, but no Standard leadtime:
Purchase leadtime from Product (ART) is used and the Company setting (CSV), Days in week included in purchase lead time, is taken into account. Then is number of days in Leadtime buffer for the combination of product and location added. If Leadtime buffer is not set, is days in Company setting (CSV), Purchase lead time buffer days added instead. On top on that is Confirmed delivery date buffer from Supplier (SUP) added.
Freight price based on a percentage of the goods shipped may be added as a one time occurrence. The criteria is that the Purchase order item (SPOITEM) is in Status 1.
To open the Purchase orders (SPO) application, find Procurement in the RamBase menu and then Purchasing. Select Purchase orders to enter the SPO application.
Select the relevant Purchase order (SPO) in the list in the Purchase orders area.
To enter the product, go to the Items tab under the Purchase order area, and click the circular arrow button to the far right on the Item line.
In the Price area to the right, locate the Freight percent field and type the percentage point.
In order to set a default percent markup, go to the Products (ART) application. (Either via the Rambase menu, Structures management, Product structures or via the Program field (type ART and press ENTER.))
In the Context menu, select Additional fields.
Type the percentage point in the Freight pct field. Click Save.
Some Production Work Orders (PWO) require operations done by external companies. Most common is the external operation where the product is sent out of the company premises to the external company. An other option is to purchase an in-house external operation where there is someone who is coming to your company to perform the operation for you.
External operation orders must be created from the External Work folder when using the Purchase (PUR) application.
To open the Purchase (PUR) application, find Procurement in the RamBase menu and then Purchasing. Click Purchase handling to enter the PUR application.
There are three ways to enter the External Work folder:
Open the Purchase (PUR) application.
Select the External Work folder.
Open the actual Production Work Order (PWO).
Click the Magnifier icon in the Part Section to Inspect links to stock and purchase orders.
Click on "Pending" in the Linked To-column on the external operation's item line.
The application will open the External Work folder in PUR for this selected operation.
Open the Production Planning (PRODPLAN) application.
Select the External Operations folder.
Click on "Pending" in the Order-column on the item line for the actual external operation and production order.
The application will open the External Work folder in PUR for this selected operation and production order.

When entering the External Work folder in Purchase (PUR) application from the Production Planning application (PRODPLAN) or from the selected Production Work Order (PWO), you order only one operation for the selected line.
When entering the External Work folder directly from PUR, you may order several external operations on the same purchase order by bulk handling. To open the Purchase (PUR) application, find Procurement in the RamBase menu and then Purchasing. Click Purchase handling to enter the PUR application.
Select documents for action
It is possible to mark one, some or all of the documents by using the check-boxes or the drop-down menu above the check-boxes.
To view selected documents, use the radio button. The documents may be un-checked if needed.
Select an action
Click the Select Action-button below the document list to open the Select action popup.
Here you will be presented with the option Make order.
This action will affect all items shown, so if you want to remove an item before the next action you may use the Remove Item icon.
Click the Make order-button to continue the process.
Start action
Click the Start Action button to finish the process.
Through this process a new Purchase Order (SPO) is created. The SPO is editable, which means that you may add items to this order. The further handling of this SPO is as for the rest of the purchasing process in RamBase.
Direct Shipment is used in situations where the supplier ships goods directly to the customer. The situations where this is useful is for example if the delivery is time sensitive, or there are geographical reasons for choosing a shorter route.
To perform a direct shipment in RamBase, you will need a location (LOC) defined as CLASS:DIRECTSHIP.

Create a Sales order (COA) and add the goods you want to ship directly to the customer from the third-party supplier.

Choose the option Start direct shipment process, which is located in the Context menu under Activities and operations.

Choose whether to create a new purchase order or use an existing purchase order. Choose the Company and the supplier who will ship the goods to the customer. Once these fields have been filled, choose which currency the purchase order will use. If you use an existing Purchase order (SPO) or Purchase order response (SOA), the Products(s), and Quantity(s) must match on Sales order item (COAITEM) and Purchase order (SPO) / Purchase order response (SOA).
Click Start shipment process once finished. The location of Sales order (COA) will be changed to the location used for direct shipment (CLASS:DIRECTSHIP) A Supplier purchase order (SPO) has been created as a copy of the Sales Order and with the same location. In order to register the purchase order and sales order, the system requires that the same quantity and product must exist on both.
Note
A Supplier purchase order (SPO) is only created if the shipped goods are physical goods, and will not be created for articles with for example class:X (Expenses).
It is possible to change the country code and VAT data in a Sales order (COA) as long as the Sales order (COA) is in Status 1. Changing the country code and VAT data in a Sales order (COA) can be done by clicking the Change country for direct shipment… option in the context menu. When this option is selected, the user will be allowed to choose country codes based on the VAT numbers which are set up in the VAT data tab in the Location (LOC) application.
NOTE: If you want to reverse the direct shipment, use the option Undo direct shipment under Activities and operations. You will then be able to change the location of the Sales order and Purchase order from the direct shipment location to another you select.
Purchase Groups (PUG) is an application for creating groups of purchasers within each location (LOC).

The Purchase groups area to the left shows a list of all purchase groups. The Purchase group area to the right shows the details, including the purchasers, of the chosen purchase group.
To create a new purchase group:
Click the Create a new purchase group
Add a name and a description.
Click the Add Employees button to the right to add employees to the group. Use the filtering options at the top if necessary.
Use the Deactivate Purchase Group button if you want to discontinue the purchase group. This option will set the purchase group to status 9.
The purchase group you have created will now be available in the Purchase (PUR) and Purchase backlog management (PBM) applications in the PurchGroup/Purchase Group dropdown menus. Connecting a Product (ART) and a location to a Purchase group (PUG) is performed in from the Properties tab, and then the Main data sub-tab, in the Procurement area.
Material requirements planning applications, requirements plan- and overview, is used to calculate the materials and components of manufactured products, and provide you with information on what must be available, in right quantities- and time.
The material requirements planning applications aims to show, how various transactions affect both physical- and available stock, identify deviations and provide you with purchase- and Production work order (PWO) suggestions.
The requirements plan is presented in the context of an item, and can have several inputs. These are:
Demands originating from Sales orders (COA) and/or Sales forecasts (FCC). How much is wanted and when is it wanted - considered as independent demand.
On-hand stock quantities and inventory management data.
Bill of materials (BOM) - what and how much is required of sub-assemblies, components and material - considered as the dependent demand.
Products (ART) application item will have an overview by clicking Stock and then the Requirements plan tab. The overview can be used for both production- and purchase planning purposes, but also during sales. The intention is to create a more structured planning process, as well as making it more efficient to check for availability of products, materials and components.
The presented transactions in the overview is based on actual linking in the background Stock assignment (SAR). There will be a nightly batch that calculates the requirements, but also with an option of manually triggering it when desired.

The requirements plan is presented per item. General information such as stock quantity, available quantity and location for the item in question, is displayed in the item header.
The transaction overview presents each transaction with planned date and related quantity, planned accumulated stock with reference to the source document and reference information depending on actual transaction – Purchase orders (SPO), Sales orders (COA), or Production work orders (PWO). The list is sorted on date, and it is also possible to present it per different periods. When sorting the list on period, the transactions are consolidated.
Transactions such as Sales orders (COA), Production work orders (PWO) (if it is a component, material, or sub-assembly in another manufactured product) and sales forecast are examples on what could decrease the stock. Whereas Purchase orders (SPO) and Production work orders (PWO) are two examples on what increases stock.
When registering an order on a manufactured product, the requirements plan should show the initial requirement on top-level (sold product), as well as requirements for all components and materials included in the product bill of material. The sold product should have a reference to the Sales order (COA), whereas the components and materials should have a reference to the Production work order (PWO) if it is created. If the Production work order (PWO) is not created for the sold product, then the requirements plan for the underlying components, assemblies etc. will have a reference to the product it is withdrawn to.

From the presented requirements plan you are able to see that the first two lines are purchase orders that increase stock for the item in question, but also how the next production work orders decrease stock. This is how you should be able to follow the material requirements plan on all the different items and see how it will affect the inventory of this particular item. The clue here is to be able to easily identify the instances where deviations occur.
Column name | Description |
|---|---|
Estimated date | Sorting based on date. Required or confirmed date is used if the defined date is not in the past. If the date is in the past, todays date is used. |
Req.del.date | Requested delivery date. |
Conf.del.date | Confirmed delivery date. |
Type | Type of product. |
Item | Name of the document and item numbers are displayed. |
Assignments | Stock assignment register. |
Transaction quantity | Quantity related to the transaction in question. |
Stock quantity | Physical on hand quantity. Includes allocated items. |
Available quantity | On hand quantity that is not allocated. Displays changes (increase and decrease) in available quantity. |
Suggested | Suggested purchase- or production quantity. |
In summary, it is a material plan that shows how the various transactions affect both physical- and available stock.
Column name | Description |
|---|---|
Period/Type | Transactions collected at either weekly level, monthly level, quarter or year. |
Available in stock | On hand quantity that is not allocated. |
Suggested quantity | Total suggested purchase- or production quantity for the defined period. |
Stock quantity | Physical on hand quantity. Includes allocated items. |
Increase in stock | Total increase in stock quantity for the defined period. |
Decrease in stock | Total decrease in stock quantity for the defined period. |
Change in quantity | Total change in stock quantity for the defined period. |
In addition there are different ways of grouping, called By periods. If we compare By period and Transactions, by period is a grouping of the various periods, this controls how you want to plan.
Chart illustrates development of stock over time, where parameters such as re-order point, available stock, stock quantity and 0-level are presented.

The reorder point is the level of inventory which triggers an action to replenish that particular inventory stock. When the defined re-order point is reached, it will trigger either a purchase- or production need, depending on what type of item it is. In this image there is a reorder point of 25.
Purchase- and Production work order (PWO) suggestions will also be displayed in the requirements plan. When a deviation occurs, negative available stock or below re-order point, a suggestion will be presented. The suggested quantities will consider parameters from the item, such as: re-order quantity, maximum stock, suppliers minimum order quantity and package quantity on bought items, and minimum production order quantity and multiple quantities on manufactured items. The suggested quantity can also be adjusted for the manufactured items.
Note
When calculating suggested Purchase quantity in the Requirements overview (REO) application, Maximum stock set up in Product (ART) may be taken into consideration if the product is set set up with a Reorder point.
If Reorder quantity is defined - system will use Reorder quantity as suggested purchase quantity for replenishment.
If Reorder quantity is not defined, but Maximum stock is defined - System calculates suggested purchase quantity as Maximum stock - Effective stock.
If neither Reorder quantity or Maximum stock is defined - system calculates suggested purchase quantity as Reorder point - Effective stock.
Note
Shortage of goods according to Reorder point set for a product is calculated as:
Reorder point - Effective stock
Effective stock includes the following, but customer owned and rental goods are anyway excluded:
Available stock
Available quantity in Goods reception item (SSAITEM)
Available purchase backlog which is expected to be received withing lead time:
Available quantity in Purchase order response item (SOAITEM) which has confirmed delivery date within lead time
Available quantity in Purchase order response (SOAITEM) which has blank confirmed delivery date, but requested delivery date within lead time
Available quantity in Purchase order item (SPOITEM) which has requested delivery date within lead time
Available quantity in production work order (PWO) which has scheduled completion date within lead time
Available quantity in production work order (PWO) which has blank scheduled completion date, but scheduled start date within lead time
The requirements overview (REO) application consists of two tabs, purchase order- and production work order suggestions. These tabs represent all items with deviation, e.g. negative available stock or available stock below reorder point, from the requirements plan. The purpose is to have one common overview where all items with deviation are identified and where all necessary actions can be taken.
All details behind the presented figures can be inspected. This will lead you to the requirements plan for the item in question. Additionally, both purchase- and Production work orders (PWO) can be created directly from the overview. By doing so, you will create Purchase orders (SPO) or Production work orders (PWO) in Status 1.
There are several filter options presented for both tabs. These are: location (option for both tabs) supplier and purchase group for purchase order suggestions, and manufacturing area and planning category for production work order suggestions.


An order handling process may be defined as the process where one confirms, -not negotiate, price, delivery time, payment terms, articles and quantity.
Single purchase with confirmed terms.
Contractual purchase.
Canceled purchase with pre-confirmed terms.
Following up on confirmed, not delivered orders.
An order process which originates from a quoting process mainly contains agreed terms. The terms have been discussed and the parties have agreed upon the terms set. An order process, which requires an order confirmation, can be said to be legally binding. It is at this point you may include the order in the company's financial records for expected future costs.
An order process may also start without originating from a quoting process. This may be due to the order being small, or the selling part has an agreement of terms to be set on all transactions, such as purchases from a web shop. These agreements may be written or oral, with terms such as delivery time and price agreed upon and implemented in all transactions. Contractual terms are often required by purchasers representing big companies.
In addition to the several other tasks in the order process, it is important to mention the tasks where you should follow up the acknowledged, but not delivered orders. You are handling the supplier backlog, which could be defined as what the suppliers owe the purchasers company. Within this task you could follow up the supplier backlog based on requests or in internal routines. For instance, getting confirmed dates from supplier/production, control that orders are delivered according to confirmed date or attempt to expedite purchase orders/productions if customers requested date is not fulfilled.
Good internal routines for following up the supplier backlog is vital. If the suppliers seldom deliver in time, the company the purchaser represents will not be able to deliver on time. This may be rectified by closely following up the backlog to avoid discrepancies.
A supplier order may, as all other processes, be canceled until a certain threshold has been reached.
Send the purchase order
Send the purchase order to one or several recipients by mail or print.
Allocating goods
Ensuring that the allocation to customer or production work orders is optimal according to when the goods are required.
Follow up on the supplier backlog
Even if the order is already acknowledged it may not be delivered in time and must be chased.
Change an order
After request and agreement with the supplier, create a new version of the purchase order.
Setting name | Description |
Attach files when sending documents by email | Decide if emails sent from documents should attach the attached files or not. If value is "ON" - Only selected attachment will be sent. If value is "OFF" - Send automatically all attached files. If settings has no value - Attachments will not be sent. |
Include Pending Sales Orders (COA) in Stock Assignment pop-up (SARS) | If this setting is "ON" - The radiobutton 'Include Pending Orders' is marked as default in Stock Assignment pop-up (SARS). This means that pending Sales Orders are visible in the Stock Assignment overview with the links between the Supplier document and the Customer documents. It is possible to unmark the option manually in the Stock Assignment |
RecalcSupBacklogOnArticleChargeChange | Controls if kitcost table of supplier backlog should be recalulated when chargetable is changed in ART. |
SupBacklogHiLoStockAmountLimit | Used in calculation of SBM HiLo stock. If free amount is above the limit it will update the document. |
SupBacklogHiLoStockPctLimit | Used in calculation of SBM HiLo stock. If free percentage is above the limit it will update the document. |
The Purchase backlog management (PBM) application provides the user with key supply and demand information.
The Purchase backlog management (PBM) application is an efficient, yet comprehensive tool for following up Purchase order response (SOA) items and Purchase order (SPO) items.
The application is divided into the header area, the document items area and the show details area.
To open the Purchase backlog management (PBM) application, find Procurement in the RamBase menu and then select Order handling. Click Purchase backlog management to enter the Purchase backlog management (PBM) application.

Filtering the listed document items is done from the header area. The available fields and checkboxes are listed in the table below:
Fields and checkboxes | Description |
|---|---|
Quick search | A free text search field. Can be used to search for most values added to an item, including notification values. Clicking on the Quick search filter icon will list a series of checkboxes. The user can decide which categories are to be included in the search. Hover over the Quick search filter icon to quickly see which categories are included in the search. |
Location | Filtering on a specific Location (LOC) can be done by selecting a location from the drop-down menu. Only one location can be selected at a time. |
Purchase group | Filtering on specific Purchase groups (PUG) can be by done selecting one from the drop-down menu. Only one purchase group can be selected at a time. |
Supplier | Filtering on specific Supplier (SUP) can be done by selecting one from the drop-down menu. Only one supplier can be selected at a time. Clicking on the View icon will access the Suppliers (SUP) application and provide further information and functions on the selected item. |
Include all order types | Checking the Include all order types checkbox will include the following document types: Purchase order responses (SOA)
Purchase orders (SPO)
|
Note
The Purchase backlog management (PBM) application saves the selection of included categories in the drop-down menus. Clicking the Clear filters button will reset all changes done from the drop-down menus. This does not apply to the Quick search filter.
The items in the document items area are either Purchase order (SPO) items or Purchase order response (SOA) items. The document items area includes a search field. The scope of the search is done by clicking the Filter builder icon to the right of the search field. Clicking the Filter builder icon will display a popup with the options to add a Standard filter and/or Create custom filters. All custom filters can be saved and then added to the My saved filters area.
Filtering the Document items
Standard filters | Filter description |
|---|---|
Backlog items (Status 3-5) | The filter includes items in Status 3, 4, and 5, and leaves out pending items. This filter can not be active with the Items pending registration (Status 1-2) or the Processed items (Status 9) filters. |
Items arriving early | The filter includes items that are arriving early, meaning that the earliest consumption date is earlier than requested or confirmed delivery date. This filter can not be active with the Items arriving late filter. |
Items with non-stock products | The filter includes items without assignments, i.e. requisition items. |
Items with stock products | The filter includes items that are expected to be registered as stock. |
Items arriving late | The filter includes items that are arriving late, meaning that the earliest consumption date is later than requested or confirmed delivery date. This filter can not be active with the Items arriving early filter. |
Processed items (Status 9) | The filter includes items in Status 9. This filter can not be active with the Backlog items (Status 3-5) or Items pending registration (Status 1-2) filters. |
Items pending registration (Status 1-2) | The filter includes items in Status 1 or Status 2. This filter can not be active with the Backlog items (Status 3-5) or the Processed items (Status 9) filters. |
Items with available quantity | The filter includes items with available quantity. |
Custom filters
The Filter builder is a useful tool in further customizing the output from the Purchase backlog management (PBM) application.
Example 1. Using custom filters to filter document items- with example
In this example, the user will filter on the notification values added to the item. The notification will be added first, then the filter will be built. This example will let the user filter on items tagged with the notification urgent.

Step 1: Adding notification
Enter the Sales order (COA) application and select the Sales order (COA) to be tagged with the notification.
From the Sales order area, click on the Add info notification button.
In the Info popup, type a value to be filtered on.
In this example, Urgent.
Click on the Add button to close the popup and save the notification.
Note that the notification has been added above the Add info notification button with an Information icon and date and time.
Step 2: Build custom filter
From the Sales order area, click on the Filter builder icon next to the search field.
In the Create custom filters area, click the Field drop-down menu and select the ContainingNotificationMessage option.
In the Operator drop-down menu, select the = option.
In the Value field enter the value to be filtered on. In this example, type Urgent.
Click on the Save filter button to save the filter.
In the Name for the custom filter field, enter the intended name for the filter. In this example, Urgent Sales orders.
Click on the Check mark icon to save the filter.
The filter is now saved and editable from the My saved filters area in the popup. Hover over the filter to either edit or delete, then click the corresponding icon of the intended action.
To add the filter to the search scope, click on the Filter builder icon and select the filter from the My saved filters area.
Note that the filter is now active underneath the search field in the Sales orders area.
Functions in the Document items area
Icons
Drilling down on a document line item is done by clicking on an icon linked to the requested information. Pressing ENTER will open the Forward to Purchase order response (SOA) popup for the selected item.

Icon | Hover over description | Result |
|---|---|---|
|
| Opens the linked document or product. An example would be to access a Purchase order item (SPOITEM). |
| Request change | Will create a new Change request (SRC) in Status 1 (pending registration). |
| Forward to Purchase order response | Will open a popup where the following choices, fields and drop-down menus are available:
Click the Forward button to forward the item to a Forward order response (SOA). |
| Status icon | The Forward items to SOA and Clear selected items functions are now available in the context menu. The items need to be of the same Purchase order (SPO) or Purchase order response (SOA) for them to be forwarded. In example: SOA/10000-1, SOA/10000-2, SOA/10000-3. |
| Open SAR | Opens the Stock assignment (SARS) application. |
| Inspect PUR | Opens the Purchase (PUR) application. |


Columns
The viewed columns are highly customizable and the available information can be edited by clicking on the Column settings icon to the right of the Enter your search criteria here field. A list with all the available columns and the corresponding checkboxes can be selected from here. Hover over to view an expanded description of a column, cell or an icon.
Note
Include custom fields - The user can also select the Include custom fields option from the Column settings. Note that the custom field added, must be activated for both the document item types Purchase order (SPO) and Purchase order response (SOA).
This is done in the Object types to show field in area in the Custom fields (CUSTOMFIELDS) application.
A selection of the available columns are listed in the table below.
Column name | Description |
|---|---|
Status | The status of the Purchase order (SPO) item or the Purchase order response (SOA) item indicated with an icon numbered 0-9. |
Item | Name of the document and item numbers are displayed. Notes that are set on the item will also be displayed. |
Type | If the document is either a Purchase order (SPO) or a Purchase order response (SOA), this field will be blank. If the document is a requisition, the field will note Requisition. |
Remaining | Remaining number of units to be forwarded. |
Initial order (SPO) | Lists the identifier of the initial Purchase order (SPO). Click the View icon to open the Purchase order item (SPOITEM) application. |
Initial registration date | Displays the initial registration date of the Purchase order (SPO) listed in the Initial order (SPO) column. |
Gross price/CUR | Gross price per unit converted to company currency, before any discounting is applied. |
Net price/CUR | Final price per unit converted to company currency, after deducting all discounts. |
Gross amount/CUR | Total gross amount converted to company currency. |
Net amount/CUR | Total net amount converted to company currency. |
Currency | The currency used on the net price, gross price, net amount and gross amount. |
Gross price | The price per unit before any discounting is applied. |
Net price | Final price per unit after deducting all discounts etc. |
Gross amount | Represents the item amount before any discounts etc. is applied. |
Net amount | Final item amount after deducting all discounts etc. |
Product | Name and description of the product. |
Type | Type of product. |
Purchase group | Name of purchase group. |
Manufacturer | Shortname/code of the manufacturer. |
Manufacturer name | Company name of manufacturer. |
Manufacturers product | The manufacturers product name. |
Location | Unique abbreviation or short name of the location |
Registration date | Date of registration. |
Requested delivery date | The delivery date as requested by the buyer/purchaser. |
Confirmed delivery date | Confirmed delivery date. |
Estimated time of departure | This is a date which is supplied by the vendor and is the day they expect to ship this consignment. |
Estimated time of arrival | This is a date which is supplied by the vendor or the forwarder, and is the day the consignment is estimated to arrive at warehouse. |
Actual time of departure | This is a date which is supplied by the vendor or the forwarder, and is the day the consignment is handed over to forwarder. |
Actual time of arrival | This is the actual time of when the consignment were received at the warehouse, and will be automatically set when the Purchase backlog management (PBM) is changed to Status 3. |
Earliest consumption date | The earliest date that these items can be used or consumed based upon the Assignment register (SAR) with the earliest production date, if it is linked to a Production work order (PWO). Or if it is linked to a Sales order (COA), then the earliest requested date on the linked Sales orders (COA). |
Latest consumption date | Latest consumption date shows the earliest date that these items can be used or consumed based upon the Assignment register (SAR) with the latest production date if it is linked to a Production work order (PWO). Or if it is linked to a Sales order (COA), then the latest requested date on the linked Sales orders (COA). |
Deviation earliest | Shows the difference between Earliest Consumption Date and Confirmed date, or if there are no Confirmed Date the Requested date is used. |
Deviation latest | Shows the deviation between Latest Consumption Date and Confirmed date, or if there are no Confirmed Date it uses Requested date. |
Delivery terms | Delivery terms. |
Supplier | Name of supplier (name of company or surname/family name/last name of a person). |
Note | Note from supplier if the item is an Purchase order response (SOA). Note to supplier if the item is a Purchase order (SPO). |
Suppliers reference number | Suppliers or sellers item reference number. Typically to an external system. |
Initial order | Item number of the Purchase order (SPO). |
% Unassigned | Percentage of the quantity in Purchaser order item (SPO) or Purchase order response item (SOAITEM) which is unassigned. This is calculated each night. |
Highlighted notification | Will display the latest notification set in the Stock info area, with the +Add notification button. |
Note
To reset changes and selections done in the Column settings, click on the Column settings icon and select Reset to Default View.
Enabling the details view gives the user additional information and actions on the selected item. This is displayed by the tabs; Stock info, Purchase and Custom fields.
To enable, navigate to the header and click on the checkbox Show details in the upper right corner.

Listed below are the various tables and functions available in each tab.
Stock info tab
Table and functions | Description |
|---|---|
Supplier | Provides name of the supplier, lead time and minimum order quantity. |
Stock information | Provides stock information per location: available stock, stock and available backlog. |
Note to/from supplier | Notes to/from the supplier can be added in this free-text field. Notes added here will also be added on the Purchase order response (SOAITEM) or Purchase order (SPOITEM) items. |
Notifications | A list of notifications connected to the backlog item. Clicking the Information icon on a notification will open a popup where further information and free-text options are available. |
Add notification | Notifications can be added to the item in the details view. Clicking the Information icon on an added notification will open a popup where further information and free-text options are available. |
Delete notification | Notifications related to items can be deleted by clicking the Delete this notification from the item icon next to the corresponding notification. Note that this will also delete the notification on the initial Purchase order (SPO) or Purchase order response (SOA) . |
Forward to SOA | Items can be forwarded to a new or another existing Purchase order response (SOA) from the Stock info tab. |
Request change | A Change request (SRC) can be created by clicking the Request change button. This will open the Change request (SRC) application. |
Purchase tab
The Purchase tab is divided into the tables Demand, Supply and Purchase and the row Available. Individually these tables display the current status and future needs, and collectively these tables display an overview of current status and forecasts availability. This is evident in the Available row.
Heading | Row | Source |
|---|---|---|
Available | Shows a forecast of product stock that is or will be available. | Sum of the Supply table minus sum of the Demand table. |
Demand | ||
Confirmed sales orders | Accumulated quantity from sales orders with a confirmed delivery date. | |
Unconfirmed sales orders | Accumulated quantity from sales orders without a confirmed delivery date. | |
Confirmed service orders | Accumulated quantity from service orders with a confirmed delivery date. | |
Unconfirmed service orders | Accumulated quantity from service orders without a confirmed delivery date. | |
Production work orders | Quantity demanded for Production work orders (PWO). | |
Reserved | Quantity demanded by reserving quantity in Purchase orders (SPO), Purchase order responses (SOA) or Goods receptions (SSA). | |
Blocked stock | Quantity demanded by blocking stock quantity in Stock locations (STL). | |
Goods transfer | Quantity demanded for sending, or sent, Goods transfers (STW) in Status 8 or lower. | |
Shipping advices | Quantity demanded for Shipping advices (CSA) in Status 3 or lower. | |
Supplier returns | Quantity demanded for Supplier returns (SRT) in Status 3 or lower. | |
Stock adjustments | Quantity demanded for unregistered stock adjustments reducing the stock in Status 8 or lower. | |
Sales quote Buffer stock | Quantity demanded as buffer stock quantity in Sales quotes (CQR). | |
Supply | ||
Stock | Quantity supplied from stock. Calculated stock balance at the start of the period. This calculation initially reads stock quantity from Goods receptions (SSA) and then adds available quantity from earlier stock periods. | |
Purchase orders Unregistered | Quantity supplied by Purchase orders (SPO) in Status 1 (pending registration). | |
Purchase orders Registered | Quantity supplied by registered Purchase orders (SPO) in Status 3 or 5. | |
Purchase order responses Unconf | Quantity supplied by Purchase order responses (SOA) without confirmed delivery date. | |
Purchase order responses Conf | Quantity supplied by Purchase order responses (SOA) with confirmed delivery date. | |
Production work orders Unconf | Quantity supplied by Production work orders (PWO) without confirmed delivery date. | |
Production work orders Conf | Quantity supplied by Production work orders (PWO) with confirmed delivery date. | |
Purchase | ||
Pending | Quantities from Sales orders (COA), Service orders (COA) and Production work orders (PWO) which are not assigned to stock or Supplier backlog (SUPBACKLOG). This quantity is pending purchase. | |
Reorder point | Quantity which needs to be purchased to keep the reorder point level. | |
Pending blocked by PWO | Quantity of pending purchase, but blocked for purchase in Production work orders (PWO). |
Custom fields tab
The custom fields tab shows all the custom fields which are connected to the backlog item. The user can read and edit these fields. Read more here and learn how to create custom fields. To view the custom fields, on item level, click the View details icon in the Item column. From the Order response (SOAITEM) application or Order (SPOITEM) application, click on the Custom fields tab to view the custom fields.
The Supplier Backlog Management (SBM) application is an efficient tool for following up purchase orders. Typical examples may be when requested date deviates from confirmed date or if the confirmed date is overdue. The SBM could also be used to check status of unconfirmed supplier orders, and order items which are without any assignments to customer orders or production work orders. These cases often need immediate attention.
To open the Supplier Backlog Management (SBM) application, find Procurement in the RamBase menu and then Order handling. Click Purchase backlog management to enter the SBM application.

Doc
Purchase Orders (SPO) and Purchase Order Responses (SOA).
NetQty
Remaining undelivered quantity on the specific order line.
Amount
Net Price * Quantity.
PART
Purchased part.
DelDate
Calculated delivery date for delivery to customer or production order. Delivery date is calculated by the system based on the requested/confirmed date, the customers delivery claims and available stock. If the customer accepts to receive delivery of goods before confirmed time when this is possible, the DelDate will be equal to Req date. If the Customer does not want to receive delivery of goods before confirmed time, the DelDate will be equal to Conf.
Req
The customers' requested delivery date.
Conf
The suppliers' confirmed delivery date.
YourItm
The Customers' order number.
Case
Reference to the original SPO.
C (Class)
Article classification code like P=Part, M=Material, K=Kit,...
Forecast
Sales forecast on article.
%Fr
(Percentage Free)Percent free of the requested item, means not allocated to customer or Production Work Orders (PWO).
HLSHigh/Low
Stock compared to the suppliers' confirmed delivery date. Calculated in number of days to late or to early delivery compared to required date from the customer or Production Work Order (PWO) the PO is allocated to.
You can filter the list by using the radio buttons at the bottom. This enables you to view all documents or only your documents, which is set as default.
The Supplier Backlog application enables you to have complete control over the supplier backlog. A supplier backlog may be defined as all purchase orders not yet received in stock. This overview may be defined with your own filters for personal customization.
If you filter a selection of purchase orders, it is this selection which will be the basis for any reports sent to file. You may filter by article, supplier, date, amount and many others.
To produce a file from the backlog you press F12 to bring up the action menu and choose the option Download SBM to CSV file.
This will prompt a report job in RamBase and the file will be sent to the e-mail account registered to your PID.
A Purchase order change request (SRC), is a document which is used to ask supplier for a change to the purchase order by forwarding the purchase order lines from an Purchase order (SPO)/ Purchase order response (SOA) to a Purchase order change request (SRC), where the necessary modifications are made.
When registered, the Purchase order change request (SRC) is sent to the supplier, and the Purchase order (SPO)/ Purchase order response (SOA) is set to Status 5, indicating we are waiting for the supplier to give feedback to the change request. When the supplier feedback is received, the relevant items on the original Purchase order (SPO)/ Purchase order response (SOA) are transported to a new Purchase order response (SOA), with hopefully a new confirmed date, price, article, if accepted by supplier. The Purchase order change request (SRC) is then set to Status 9. When using Request change for all items, there is a limit of 100 lines.
To open the Purchase order change request (SRC) application, find Procurement in the RamBase menu and then Order handling. Click Purchase order change requests to enter the Purchase order change request (SRC) application.
Note
NB! You cannot request a change when Reserved quantity is set on the item.

A Purchase order change request (SRC) is created when a purchaser requests a change in a Purchase order (SPO) or a Purchase order response (SOA).
The change in matter can be a delivery date, a request for change in purchase price or a change in the product.
The requested change may apply for one or more items on the Purchase order (SPO)/Purchase order response (SOA), or it may apply for the whole document.

Open the relevant Purchase order (SPO)/Purchase order response (SOA).
For requesting change to a single item - Enter the item and select the Request change for item option in the context menu.
For requesting change to all items on the document - Select the Request change for all items option in the context menu on the main document.
This will open the Purchase order change request (SRC) item application. Here you can request modification, splitting or cancellation of the item(s) using the three buttons in the Requested changes to current item area. Be sure that the correct item is chosen in the menu to the left. The active item will be shown in the Current item area.
Make the requested changes on the Purchase order change request (SRC) item(s) before it is sent to the Supplier (SUP). The Purchase order (SPO)/Purchase order response (SOA) goes to Status 5 (Pending response to request for change) while waiting for a reply from the Supplier (SUP).
When the Supplier (SUP) replies, the Purchase order (SPO)/Purchase order response (SOA) is transported to a new Purchase order response (SOA) where the requested changes are confirmed and the new Purchase order (SPO) is registered. The Purchase order change request (SRC) automatically goes to Status 9 (Completed) and the change process is complete.
Note
When a Purchase order response (SOA) is cancelled via a Purchase order change request (SRC), a new Purchase order response (SOA) is created with Quantity = 0 in Status 1 (Pending registration). This Purchase order response (SOA) can be reviewed and must be registered with the Register Purchase order response option in the context menu. This will forward it directly to Status 9 (Processed), and the order is cancelled.
Reference to the previous Purchase order response (SOA), the initial Purchase order (SPO) and information about what change was made to the order is found on the Purchase order change request (SRC) item.
Ship and Debit refers to the process where a certain amount of goods can be sold to a lower price, for instance as a special offer. Using a special price on a ship and debit clause requires an agreement with the vendor stated on a quote document. The vendor will cover the difference between the original price and the special price on the ship and debit quote.
The process of creating and registering ship and debit (SD) claims begins with a Purchase Quote (SQU).
To open the Purchase Quote (SQU) application, find Procurement in the RamBase menu and then Quoting. Click Purchase Quotes to enter the SQU application.
Click the Ship & Debit SQU icon to open the Purchase Quote - Ship & Debit window.
It is also possible to create the SD for a certain customer group, using the icons in the RESALE box in the item view.
The SQU also needs to have the Expired field filled out in addition to the ValidFrom and ValidTo fields.
Choose the option Register Purchase Quote in the context menu to register the SQU. This sets the SQU to ST:4.
The SD is now ready to be included in orders.
To handle a Sales Order (COA) where the SD claim is to be included, enter the COA item.

In the Landed Cost folder, click on the downward arrow in the Purchase quote item field.

Here you may choose the SD claim and link it to the order. You can now see the cost will change, depending on the difference on the price set on the quote.
After an order which is linked to a S&D quote is shipped, it can be claimed against supplier.
Open the Ship & Debit Management (SDM) application, find Procurement in the RamBase menu and then Claiming. Click Ship & debit management to enter the SDM application.

Click the Create Ship & Debit Claim icon in the left corner to create a new claim.

Use the fields to filter the desired results. The remaining results will be the selection you take further. When the desired documents have been chosen, click the OK button.
This will create a Supplier Credit Claim (SCC) document which you may inspect in the SD Management overview.
Highlight the SCC item line in the SD Management program and press F12 to open the action menu and choose the option Register Credit Claims.
You may inspect the batch reference in the Reference field. Click OK to continue.
Price Protection is basically the concept where a supplier is responsible for the value of goods in stock. If the supplier drops the value on goods (reasons might be that time has passed or newer models are available) the same supplier is also responsible for reimbursing the company with the difference between the new price and the price paid when the goods were bought from the supplier. If the concept seems strange, you can think of it as a kind of remote-storage, where the company keeps the goods for the supplier but is not financial responsible for the price of the goods before the goods are actually sold.
To open the Supplier (SUP) application, find Procurement in the RamBase menu and then Supplier management. Click Suppliers to enter the SUP application.
Highlight the desired SUP and press ENTER.
Enter the Purchase folder.

There are four fields in the Price Protection box to the right where you need to make adjustments. These specify the period in which Price Protection (PP) may apply.
StockIncrAge
A number of weeks that indicates the age of stock that will be price protected if the prices increases. (SSA)
StockDecrAge
A number of weeks that indicates the age of stock that will be price protected if the prices decreases. (SSA)
PoIncrAge
A number of weeks that indicates that POs that are requested/confirmed within this period will be price protected if the price increases. (SPO / SOA)
PoDecrAge
A number of weeks that indicates that POs that are requested/confirmed within this period will be price protected if the price decreases. (SPO / SOA)
Adjust the values as needed.
Find the desired document to register a price protection (SPO / SOA / SSA). Enter the item to be price protected by clicking on the arrow on the right side of the item line.
Click the Activities and operations menu option and choose the Do price protection.

You will now be presented with a popup where you must enter the relevant information regarding price and date. Click OK when finished.
The SSA will now be updated with the new pricing information.
A SCC is created. A price protection may also be performed by upload of new purchase prices from a csv file.To undo the price protection you may use the F12 option Undo Price Protection. This will also delete the related Supplier Credit Claim (SCC) document.
Without following up the procurement side of your business it may badly affect the other business. The procurement process is crucial for detecting discrepancies and implementing the necessary measures.
The supplier’s backlog is followed up.
The supplier’s billing is followed up.
The supplier’s booking is followed up.
The supplier’s requests/quotes are followed up.
Any serious company will spend a good amount of time and resources on follow up routines concerning every business area they are involved with. Focus on improvement potential and then focus on measures to use this potential will in most cases result in raised profits or larger market share. Clear routines on handling the supplier’s backlog, billing, booking and request will benefit both the supplier and the purchasing part.
Reporting to management / following up key numbers
There are many types of reports which may be beneficial to be followed up by management, either backlog, booking, billing or quotes.
The Supplier Backlog (SUPBACKLOG) application is an all-in-one backlog overview that allows one to filter and group open supplier orders by a large number of predefined fields. It is a report with extensive filtering possibilities which gives an overview of expected expenses separated into categories:
Account, Name
Is determined by the Group by field, which defaults to Account if no other field is selected.
Overdue
Totals the amount on deliveries that are overdue.
No Conf
Totals the amount on documents with no confirmed dates.
Conf 1-10 d, Conf 11-20 d, Conf 21-30 d, Conf 31 d+
Totals the amounts on documents with a confirmed date that is ahead of today's date. The intervals may be selected from Conf Day's select box.
Total
Totals the amount on all documents: Overdue, not confirmed and confirmed.
GM %
Shows the Gross margin in percent.
Filter
Add a filter for the results.
Conf Days
List by confirmed delivery dates.
View
List results by document types.
Group By
Sort result by different categories.
To open the Supplier Backlog (SUPBACKLOG) application, find Procurement in the RamBase menu and then Reports. Click Backlog overview to enter the SUPBACKLOG application.

Sales Forecast (FCC) is a used to create a forecast for estimating future sales, to enable calculating production and purchase requirements.

To create a sales forecast, upload a comma separated value (CSV) file with details of the forecast. Refer to Load Sales forecasts (FCC) - INP/70096 for the CSV file format. The CSV file can be uploaded from the Import/export Wizard (IOQWIZ).
The FCC displays the following information.
Customer gives the customer number and name. Select
 to view more customer information in the Customer (CUS) aoolication.
Customers reference is retrieved from the uploaded forecast.
Customers reference no is retrieved from the uploaded forecast.
Requested delivery date, This is the date by which the customer has requested delivery.
Location gives the location of the product.
Source gives the source of the sales forecast.
Probability percent gives the estimated probability of the order being received as percentage.
Product gives the product number of the product that is forecast to be ordered.
Quantity is the estimated quantity in the order.
Type gives the type of product ordered,
Product description describes the product.
The History tab displays the history of the sales orders.
Sales orders displays all the sales orders belonging to the custome for a specific productr. By default, only the Sales Orders having a requested delivery date as given in the Requested delivery date field are shown. Select X in the Requested delivery eq forcasted request delivery to disable the filter and view all sales orders for the customer.
You can create a Sales Order (COA) from a Sales Forecast (FCC), if the FCC is for a specific customer.
Select
 and select Columns.
Select Sales Order to display the Sales Order column.
Select
 in any row to create a COA from the FCC, if the control is enabled. If the control is disabled, a COA has already been created from that FCC.
The Sales order column displays the newly created COA:
Select
 to open the COA in the COAITEM application.
Clicking the arrows next to the quantity will open that product in the FCC application where you can see more details and edit if necessary.

Status descriptions for FCC
ST:4: Forecast for current and future periods
ST:8: Latest forecast for periods in the past. When forecast are uploaded, active forecasts with a Requested delivery date that is earlier than the first Requested delivery date from new forecast are set to Status 8
ST:9: Old and discarded forecast
Sales and operations planning (SOP) is a planning tool that takes the sales forecast and creates a plan for production and purchasing to meet the sales requirements.

Description of the tab overview below:
This tab contains all information regarding the planning process.
General options:
Name field
Text field for entering a name for the process.
Description field
Text field for optional description.
Location drop-down menu
Location identifier
Granularity drop-down menu
Granularity used to present the different plans in the Sales operation planning process, either by week or month.
Requested delivery day when purchasing drop-down menu
Preferred day of delivery. Used to consolidate purchase order suggestions. Default is all days.
Create purchase requirements for materials from all production work orders checkbox
By enabling this option, materials from all ongoing and planned production work orders are included as gross purchase requirements. This means that you might get purchase requirements for materials belonging to production work orders not related to the production requirement plan. If this option is disabled, only materials needed to fulfill the production requirements are included as gross purchase requirements.
Note
Note that even if this option is disabled you will still get purchase requirements for materials in ongoing and planned production work orders (PWO) consumed by (net off) the production requirements.
Treat supplier backlog as stock for purchase requirements checkbox
By enabling this all purchase orders and purchase order responses will be treated as stock. Any purchase orders and purchase order responses confirmed in the future (ex. in two months) is available from today and can be used to net off purchase requirements. By not enabling this, you might end up with purchasing products that could instead be acquired by requesting change of delivery date on existing supplier backlog.
Treat production work orders as stock checkbox
By enabling this, existing, but not completed, production work orders will be treated as stock. Any production work orders can be used to net off production requirements. By not enabling this, you might end up with creating new production work orders instead off re-planning already existing production work orders.
Demand forecast area
Sales forecast source drop-down menu The source to use from the sales forecast.
Include sales backlog checkbox
If sales backlog is included, everything from the backlog is added to the demand forecast. Note that backlog from products sales forecast by customers (through the sales forecast source), will not be included.
Minimum and maximum probability percent field
Minimum and maximum probability in percentage to include from the sales forecast
Include re-order point for purchase checkbox
If products which are purchased have specified re-order point quantity for the location used in the Sales and operation planning process, the re-order point quantity will be added as a demand. This will then be included in the gross quantity of the purchase requirements. Note that this also includes products with product structures manufactured externally.
Include re-order point for production checkbox
If products which are manufactured have specified re-order point quantity for the location used in the Sales and operation planning process, the re-order point quantity will be added as a demand. This will then be included in the gross quantity of the production requirements. Note that this does not includes products with product structures manufactured externally.
Data updates area
Demand forecast
Date and time demand forecasts were created
Production requirements
Date and time production requirements were updated for this Sales and operation planning process.
Purchase requirements
Date and time purchase requirements was updated in this Sales and operation planning process.
Purchase order suggestions
Date and time purchase requirements was updated in this Sales and operation planning process.
This tab shows all production requirements which follows the sales forecast. Each production requirement represents a product and a requested delivery date.
Key fields are:
Updated at
Date and time production requirements were updated.
Requested delivery date
The delivery date as requested.
Product
The required product
Available quantity
Total quantity available to be subtracted from the demand quantity (gross quantity). This is the sum of all goods receptions and production work orders ready to be consumed at requested delivery date.
Gross quantity
Gross quantity of the production requirement. This is the total demand before any subtractions or adjustments is considered. Initially set as the sales forecast quantity, but will be changed if the net quantity of parent product structures changes.
Adjusted quantity
Quantity adjusted by the users. Can be both negative and positive. The sum of gross quantity and adjusted quantity can never be less than zero.
Subtracted quantity
Quantity of stock and production work orders subtracted from the gross quantity.
Production adjusted quantity
Some products are only produced in multiple of a specified quantity. In that case, the net quantity might need an adjustment.
Net quantity
Net production requirement quantity. This is calculated by subtracting production work orders, stock and adjusted quantity from the gross quantity.
Options related to production requirements
Treat production work orders as stock
By enabling this, existing, but not completed, production work orders (PWO) will be treated as stock. Any production work orders can be used to net off production requirements. By not enabling this, you might end up with creating new production work orders instead off re-planning already existing production work orders.
This tab shows all the purchases required to fill the orders. Each purchase requirement represents a product and a requested delivery date.
Options related to purchase requirements:
Treat supplier backlog as stock
By enabling this all purchase orders and purchase order responses will be treated as stock. Any purchase orders and purchase order responses confirmed in the future (ex. in two months) is available from today and can be used to net off purchase requirements. By not enabling this, you might end up with purchasing products that could instead be acquired by requesting change of delivery date on existing supplier backlog.
Require materials from all production work orders
By enabling this option, materials from ALL ongoing- and planned production work orders are included as gross purchase requirements. This means that you might get purchase requirements for materials belonging to production work orders not related to the production requirement plan. If this option is disabled, only materials needed to fulfill the production requirements are included as gross purchase requirements. Note that even if this option disabled you will still get purchase requirements for materials in ongoing- and planned production work orders consumed by (net off) the production requirements.
Key fields are:
Updated at
Date and time purchase requirements were updated
Requested delivery date
The delivery date as requested by the customer.
Product
The required product.
Available quantity
Total quantity available to be subtracted from the gross quantity. This is the sum of all goods receptions, purchase orders and purchase order responses ready to be consumed at requested delivery date.
Gross quantity
Gross quantity is initially the same as the sales forecast quantity but might have changed during the production requirement planning. The gross quantity is the final required quantity for given product at requested delivery date.
Subtracted quantity
Quantity of stock, purchase orders and purchase order responses subtracted from the gross quantity.
Net quantity:
Net purchase requirement. This is the quantity needed to be ordered for this product at this requested delivery date. The net quantity is calculated by subtracting stock, purchase orders and purchase order responses from the gross quantity.
This tab creates purchase orders for all the purchase requirements, based on the information from the Sales and operation planning (SOP). Each purchase order suggestion represents a product and a requested delivery date.
Options related to purchase order suggestions:
Requested delivery day
Preferred day of delivery. Used to consolidate purchase order suggestions. Default is all days.
Each purchase order suggestion represents a product and a requested delivery date.
Key fields are:
Updated at
Date and time purchase order suggestions were updated.
Requested delivery date
The delivery date as requested.
Product
The required product.
Supplier
The suggested supplier.
Suppliers product name
Suppliers product name.
Lead time
Lead time for product and suggested supplier.
Deadline date
Deadline for purchasing product from supplier. Calculated by subtracting lead time from requested delivery date.
Quantity
Quantity suggested to purchase.
Gross purchase price
Gross price of the purchase order suggestion.
Gross requirement quantity
The gross demand for supplier, product and requested delivery date.
Subtracted requirement quantity
Quantity from open purchase orders and purchase order responses subtracted from the gross demand quantity to get the net demand quantity.
Net requirement quantity
Net demand quantity for this product, supplier and requested delivery date. The net quantity is the current demand, and will be the base for creating the quantity of the purchase order suggestion.
Click the New Process button in the Sales and operation planning (SOP) window.
Enter the necessary details in the popup window and finish by clicking the Create button.
Name: Create a name for the SOP.
Description: Enter a description of the SOP.
Location: Location to retrieve the sales forecast and backlog from.
Use the same process options as current process.
Choose the desired granularity in the Granularity dropdown menu. You have two choices:
Week: Presents the plan by week.
Month: Presents the plan by month.
Choose Preferred day of delivery in the Requested delivery day when purchasing dropdown menu. This is used to consolidate purchase order suggestions. The default is all days.
Check the desired choices below:
Create purchase requirements for materials from all production work orders: By enabling this option, materials from ALL ongoing- and planned production work orders are included as gross purchase requirements. This means that you might get purchase requirements for materials belonging to production work orders not related to the production requirement plan. If this option is disabled, only materials needed to fulfill the production requirements are included as gross purchase requirements. Note that even if this option is disabled you will still get purchase requirements for materials in ongoing- and planned production work orders consumed by (net off) the production requirements.
Treat supplier backlog as stock for purchase requirements: By enabling this all purchase orders and purchase order responses will be treated as stock. Any purchase orders and purchase order responses confirmed in the future (ex. in two months) is available from today and can be used to net off purchase requirements. By not enabling this, you might end up with purchasing products that could instead be aquired by requesting change of delivery date on existing supplier backlog.
Find the desired forecast source in the Sales forecast source dropdown menu. You have two choices here:
From customers: This is the forecast from one or several customers prepared in the Sales Forecast (FCC) application.
No sales forecast: This option is used if you have no forecast. You can either use the sales backlog (make sure you select the Include sales backlog option) or create your own.
Add or edit the probability percent:
Minimum probability percent: Minimum probability in percentage to include from the sales forecast.
Maximum probability percent: Maximum probability in percentage to include from the sales forecast.
Check the desired choices below:
Include sales backlog: If sales backlog is included, everything from the backlog is added to the demand forecast. Note that backlog from products sales forecasted by customers (through the sales forecast source), will not be included.
Include re-order point for purchase: If products which are purchased have specified reorder point quantity for the location used in the SOP process, the reorder point quantity will be added as a demand. This will then be included in the gross quantity of the purchase requirements. Note that this also includes products with product structures manufactured externally.
Include re-order point for production: If products which are manufactured have specified reorder point quantity for the location used in the SOP process, the reorder point quantity will be added as a demand. This will then be included in the gross quantity of the production requirements. Note that this does not includes products with product structures manufactured externally.
Click the action menu option Calculate production requirements. This may take a few minutes and will set the SOP to Status 2: Pending calculations of production requirements, and then Status 3: Pending production requirement planning when the calculation has been performed.
The Production Requirements is now done, unless you have changes. It is possible to edit the information supplied and re-click the action menu option Calculate production requirements.
For the next step, click the Calculate purchase requirements and the SOP will be set to Status 4: Pending calculation of purchase requirements. When the batch job has finished, the SOP will be set to Status 5: Pending purchase requirement planning.
The purchase requirements are now done, unless you have changes. It is possible to edit the information supplied and re-click the action menu option Calculate purchase requirements.
For the next step, click the Calculate purchase order suggestions, which will set the SOP to Status 6: Pending calculation of order suggestions. When the batch job has finished, the SOP will be set to Status 8: Pending actions on purchase order suggestions.
The purchase order suggestions are now done and the process has been completed.
It is suggested that the SOP is archived after completion to save resources. This is done using the Archive process action menu option. This will set the SOP to Status 9: Archived.
The RamBase Supplier Portal is a portal where suppliers can log in and confirm purchase orders and check Purchase Order (SPO) details, including delivery terms and more.
The front page of the portal offers two choices:
Orders pending confirmation - Here you will be able to change certain details regarding the order and confirm it.
Confirmed purchase orders - Here you will be able to see updated details regarding already confirmed orders.
The login screen for the Supplier portal is where you enter you username and password to log in. The address is portal.rambase.net.

If you have forgotten you password, you can click the Forgot Password-button in the password field. This will take you to a page where you can enter your username and receive an email with a link where you can reset your password. The link will be sent to the email currently set on the user.

If you want to change the password, use the Change password-button on the lower left side. This will send you to a page where you will have to enter your email, username, current password and the new password you would like. Click Apply when finished.

This view shows all the orders pending confirmation. By choosing one of the lines and clicking on the arrow to the right opens the item view.

The item view shows all necessary details of the order. If all the details are correct, you can use the Confirm all pending items button to confirm the whole purchase order with all items. If you need to change any details, use the Edit and confirm item button at the item view to open a popup where certain details can be changed:
Quantity
Confirmed delivery date
Net Price
Reference number
Note to buyer
After the details have been edited you can click the Confirm button, and the item has been confirmed.
You will need to repeat this process for all items, or use the Confirm all pending items button to confirm the remaining items on the purchase order.

The Confirmed purchase order items application show all the confirmed purchase order items. As with the previous, clicking on the arrow to the right in the item line will bring you to the detail view.

The item detail view shows all details regarding the specific confirmed purchase order item. No changes can be done by the supplier here. If changes are needed, contact the customer.

A contract is a written agreement between the company and a supplier regarding deliveries on a recurring basis. Use the SPC application to keep an overview of your contracts and set up notifications of when a contract need a review, renewal or it is close to the expiration date.

Start in the Supplier purchase contracts (SPC) application. To open the SPC application, find Procurement in the RamBase menu and then Contract management. Click Purchase contracts to enter the SPC application.
Click the Create contract button.
Fill in information in the popup:
Title - Name of the contract.
Effective date - The start of the Supplier purchase contract (SPC).
Expiration date - The end of the Supplier purchase contract (SPC).
Supplier- Select a Supplier (SUP) from the Supplier (SUP) application.
Main responsible - Select the person responsible for the contract.
Category - Choose between various categories.
Renewal due days - The minimum number of days before Expiration date where the contract can be either cancelled or renewed.
Is terminable - Specifies if the contract can be terminated or not.
Termination notice period (days) - The length in days of the termination period.
Click the OK button. This will set the SPC in status 1 (new), which means it is not active.
Select the Activate option in the context menu to set the SPC in status 4 (active).
It is possible to add more optional information:
Backup responsible - Select backup responsible.
Description - Add a description of what the contract is about.
Financial
Total value - Total value of the contract calculated from value per period.
Value - The monetary value per period.
Currency - Three character code following the ISO 4217 standard for currency.
Period - The periodic schedule of the contract. Values: Month = 30 days, Week = 7 days, Year = 365 days & Quarter = 90 days.
Use the Notification tab to set up who will receive the notifications and if it is for renewal, review or expiration.
Use the Outgoing emails option in the context menu to see all emails sent about the selected SPC.
Enter the Notifications tab.
Click the Create notification button.
Fill in information in the popup:
Name - Select the person to receive the notification.
Event - Choose between three events: Renewal, Review & Expired.
Notify days before - Number of days before the Event to receive the notification.
Notify by - How to receive the notification.
Click the Edit or Discard icons to edit or discard the notification.
In the Notes tab, users may add notes to have them at hand and available when handling the quality issue. The tab also has filtering functionality. Notes added here, will also be available in the Notes (NOTE) application.
The Approval rules tab allows users to define and manage approval workflows for Supplier purchase contracts (SPC). This ensures that purchases are reviewed and authorized according to company policy before being finalized.
Each approval rule entry includes the following fields:
Approver: The individual responsible for approving the contract.
Product: The specific product or service the rule applies to.
Approval Rule: The name or identifier of the rule applied.
Effective Date: The date from which the rule becomes active.
Expiration Date: The date after which the rule is no longer valid.
To streamline the approval process, users can create auto approval rules by clicking the Create new auto approval rule button. This allows for automatic approval under predefined conditions, reducing manual intervention.
A contract can be created and associated with one or more pre-approved products. Supplier reference numbers and other relevant identifiers are recorded to allow automatic matching during invoice processing. The contract specifies validity periods and amount ranges for each product and is submitted for approval via an APC rule. Once authorized users approve the contract using the APPROVAL tool, it becomes active. When invoices arrive in ISI, validation rules detect the appropriate product and contract reference, triggering automatic approval in SIN. The invoice is then fully approved and ready for registration.
For more information about the Approval configuration (APC) application, click here.
To discontinue a Supplier purchase contracts (SPC), use the Discontinue option from the context menu to change its status to Status 9 - Discontinued. Alternatively, the Supplier purchase contracts (SPC) will be automatically deactivated once its expiration date is reached.
To see the changes that were made to the SPC and which user made the change, choose the Revision history option in the context menu.
To see all Purchase contracts (SPC) connected to a Supplier (SUP), choose the View contracts option in the context menu in the SUP application.
From the RamBase dashboard, click on the Procurement tab to view a collection of useful procurement widgets. These can be removed by hovering over the intended widget and clicking on the Remove icon. To add a widget, click on the +Add widget button in the upper right corner.

It is recommended using the widgets in conjunction with the Purchase backlog management (PBM) application.
Read more about the Purchase backlog management (PBM) application here.
The Open purchase order items widget is closely tied with the Purchase order (SPO) application. The widget gives a collective overview of Purchase order items (SPOITEM) and their statuses. Clicking on a slice will open the Purchase order items (SPOITEM) application and directly filter on the category selected. In example, clicking on the blue slice, Pending order response, will open the Purchase order item (SPOITEM) application and filter on Pending order response.
This also applies to the fields: Pending registration, Pending sealing or registration, Pending order response , Pending supplier invoice and Pending response to request for change in the footer of the widget.

Hover over the widget and click on the Filter icon in the top right corner to filter on the available categories:
Type
Customer owned products
Returned from customer
Repaired by supplier
Replacement from supplier
Purchase order
Part from dismantle
Customer owned product for repair
Part changed during production
Requisition order
Product for service
Inbound retail
Assignee
Lists all available assignees from the Personnel (PER) application. Click on the intended option to filter on it.
Supplier
Lists all available Suppliers (SUP) from the Supplier (SUP) application. Click on the intended option to filter on it.
Purchase group
Lists all available Purchase groups (PUG) from the Purchase group (PUG) application. Click on the intended option to filter on it.
Location
Lists all available Locations (LOC) from the Location (LOC) application. Click on the intended option to filter on it.
The Open purchase order response items widget is closely tied with the Purchase order response (SOA) application. The widget gives a collective overview of Order response items (SOAITEM) and their statuses. Clicking on a slice will open the Order response items (SOAITEM) application and directly filter on the category selected. In example, clicking on the blue slice, Pending goods reception, will open the Order response (SOAITEM) application and filter on Pending goods reception.
This also applies to the fields: Pending registration, Pending goods reception, Pending supplier invoice and Pending response to request for change in the footer of the widget.

Hover over the widget and click on the Filter icon in the top right corner to filter on the available categories which are listed below:
Type
Byproduct from production
Customer owned product
Product from service
Customer owned product for repair
Returned from customer
Part changed during production
Repaired by supplier
Replacement from supplier
Requisition order response
Purchase order response
Part from dismantle
Inbound rental
Assignee
Lists all available assignees from the Personnel (PER) application. Click on the intended option to filter on it.
Supplier
Lists all available Suppliers (SUP) from the Supplier (SUP) application. Click on the intended option to filter on it.
Purchase group
Lists all available Purchase groups (PUG) from the Purchase group (PUG) application. Click on the intended option to filter on it.
Location
Lists all available Locations (LOC) from the Location (LOC) application. Click on the intended option to filter on it.
The Procurement backlog widget is closely tied with the Purchase backlog management (PBM) application. The widget gives a collective overview of Purchase order items (SPO) and Order response items (SOAITEM), and their statuses. Clicking on a bar will open the Purchase backlog management (PBM) application and directly filter on the category selected. In example, clicking on the yellow bar, early, will open the Purchase backlog management (PBM) application and filter on Items arriving early 10 days or more.
This also applies to the fields: On time, With deviation, Early and Late in the footer of the widget.

Hover over the widget and click on the Filter icon in the top right corner to filter on the available categories which are listed below:
Assignee
Lists all available assignees from the Personnel (PER) application. Click on the intended option to filter on it.
Supplier
Lists all available Suppliers (SUP) from the Supplier (SUP) application. Click on the intended option to filter on it.
Purchase group
Lists all available Purchase groups (PUG) from the Purchase group (PUG) application. Click on the intended option to filter on it.
Location
Lists all available Locations (LOC) from the Location (LOC) application. Click on the intended option to filter on it.
The Procurement items arriving early widget is closely tied with the Purchase backlog management (PBM) application. The widget gives a collective overview of Purchase order items (SPOITEM) and Purchase order response items (SOAITEM) and their arrival status. Clicking on a field will open the Purchase backlog management (PBM) application and directly filter on the category selected. In example, clicking on the 1-3 days field will open the Purchase backlog management (PBM) application and filter on Arriving early from 1 to 3 days.
This applies to all fields: 1-3 days, 4-9 days, 10+ days and All items.

Hover over the widget and click on the Filter icon in the top right corner to filter on the available categories which are listed below:
Assignee
Lists all available assignees from the Personnel (PER) application. Click on the intended option to filter on it.
Supplier
Lists all available Suppliers (SUP) from the Supplier (SUP) application. Click on the intended option to filter on it.
Purchase group
Lists all available Purchase groups (PUG) from the Purchase group (PUG) application. Click on the intended option to filter on it.
Location
Lists all available Locations (LOC) from the Location (LOC) application. Click on the intended option to filter on it.
The Procurement items arriving late widget is closely tied with the Purchase backlog management (PBM) application. The widget gives a collective overview of Purchase order items (SPOITEM) and Purchase order response items (SOAITEM) and their arrival status. Clicking on a field will open the Purchase backlog management (PBM) application and directly filter on the category selected. In example, clicking on the 1-3 days field will open the Purchase backlog management (PBM) application and filter on Arriving late from 1 to 3 days.
This applies to all fields: 1-3 days, 4-9 days, 10+ days and All items.

Hover over the widget and click on the Filter icon in the top right corner to filter on the available categories which are listed below:
Assignee
Lists all available assignees from the Personnel (PER) application. Click on the intended option to filter on it.
Supplier
Lists all available Suppliers (SUP) from the Supplier (SUP) application. Click on the intended option to filter on it.
Purchase group
Lists all available Purchase groups (PUG) from the Purchase group (PUG) application. Click on the intended option to filter on it.
Location
Lists all available Locations (LOC) from the Location (LOC) application. Click on the intended option to filter on it.