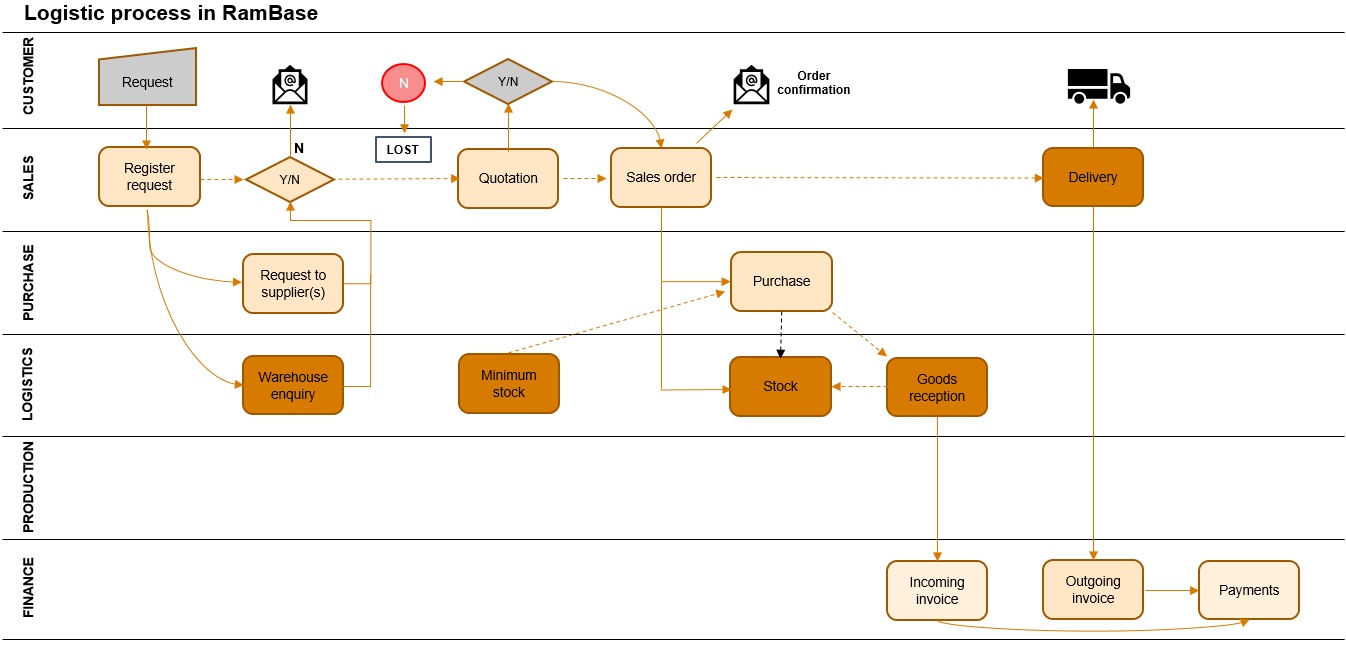
Logistics may be defined as the process where goods flow between the point of origin and the point of consumption.
Reception, picking and shipping of physical items.
Distribution and handling of information and resources.
The logistics process handles all the tasks when goods or resources are to be transported from the origin source to the consumption source. The information flow between these two sources can be enormous, and in those cases an ERP-software would take care of the integration between information and physical items. The main goal for the involved parts in logistics is always to use a minimum of resources which are required to handle the different flows. Requirements such as reception of goods, inspections, quality assurance, picking of goods and shipping of goods must be performed, registered and documented in the most proper way.
Receive goods related to purchase orders
Goods transported and delivered to the warehouse must be registered and documented as received.
Inspect received goods
The received goods may be inspected and approved before they are entered in stock.
Warehouse management
E.g putaway to stock, optimize stock by moving goods between stock locations, doing stock takings.
Pick goods related to shipping advices
Goods which are to be shipped must be picked and registered out of stock.
Complete shipping of goods
Goods which has been picked for sending may have to be measured, weighted, packed and registered towards a forwarder’s tracking number.
Customs clearance
Goods going out to foreign countries can require customs clearance.
Handle stock transfers between warehouses
Moving goods between warehouses may be registered out from stock and in to the new stock location.
Handle deviations
Goods which have not passed the inspection or later are observed as broken, missing or registered with wrong quantity, must be acted upon.
Reporting
The analysis phase needs information in form of reports and statistics to successfully follow up suppliers, customers and the warehouse.
SAR (assignment register) is the RamBase archive which stores the assignments of goods from stock (SSA) and backlog (SPO/SOA/PWO) to orders (COA)/CSO), quotes (CQU), production work orders (PWO), stock corrections (SAW), goods transfers (STW), supplier returns (SRT) and shipping advice (CSA).
How goods are assigned to transaction documents which needs assignments from SAR
Abbreviations that are used:
Pending - Pending assignments, will show up as a need for purchase or manufacturing
CSV - Company settings
SSA - Goods reception item
SPO - Purchase order item
SOA - Purchase response item
PWO - Production work order
COA - Sales order item
CSO - Service order item
CQU - Sales quote item (it is only buffer qty which require assignments)
CSA - Shipping advice item
SRT - Supplier return item
STW - Goods transfer
SQU - Purchase quote
CDV - Customer deviation
REQ - Requested delivery date
CONF - Confirmed delivery date
DELDATE - Delivery date ('Scheduled shipping date' for a COA and 'Planned start date' for a PWO or a specific operation in PWO)
CLASS - Product type
ACCESS - Field in SAR which holds a customer id
ITMLOC - Location at item level of a transaction document
LOC - Location at main level of a transaction document
ITMLOC - Location at item level of a transaction document
KITSQUID - Reference to an SQU for a specific product in a special structure. Landed cost will be calculated based on this.
CUSOWNED - Type 'Customer owned product'
CUSOWNEDRETURN - Type 'Repaired for repair or service'
INBOUNDRENTAL - Type 'Inbound rental'
CUSRETURN - Type 'Returned from customer'
REPAIRSUPRETURN - Type 'Repaired by supplier'
ART - Product
Assignments are in many situations created automatically by RamBase, but can also be overruled manually by users. When assignments are created automatically, this will happen according to certain rules. There are two sets of rules that can apply: standard rules or special rules.
Which rules that should apply is set up at location level in CSV. If no configuration is done, standard rules will apply for all locations in the company.
If a company wants to run special rules for some locations, this has to be set up as follows:
Turn the CSV/"Use special assignment (SAR) rules for certain locations" ON
The locations where special rules should apply must be set up in the CSV/"Locations where special assignment rules apply", (e.g. VAT/HAU).
In addition there are two more child settings for special rules:
CSV/'Window for prioritizing stock assignments for special assignment rules'. X number of days from todays date where assignments from SSA item have the highest priority. If DELDATE (REQ is used instead of DELDATE for COA which is pending registration (Status 1)) is todays date or earlier, stock will always have highest priority, even if the setting don't have any value.
CSV/'Confirm margin for special assignment rules'. X number of days. Here you may set up that CONF in SOA/PWO must be e.g. 2 days before PWO/transaction documents DELDATE to be regarded as time to fulfill DELDATE. (REQ is used instead of DELDATE for COA which is pending registration (Status 1).)
The different rules will apply when automatically getting assignments to different transactions documents, like e.g. when a COA item is created or when a PWO is registered and also if nightly optimalization of SAR is running.
For COA and CSO program searches for available quantity in the following order:
SSA sorted ascending by DATE. If any of the SAR documents have ACCESS set to Customer id matching customer COA, these SAR documents are assigned first.
SOA/PWO with CONF>"", sorted ascending by CONF.
SOA/PWO with CONF="", sorted ascending by REQ.
SPO sorted ascending by REQ.
Pending.
For PWO the program search for free quantity in the following order:
SSA sorted by ascending DATE. In case ENDCUSTOMERACCOUNT is set in PWO, and there exist SAR documents with ACCESS set to this ENDCUSTOMERACCCOUNT, the program will only assign to these SAR documents.
SOA/PWO with CONF>"", sorted ascending by CONF.
SOA/PWO/SPO with CONF="", sorted ascending by REQ.
Pending.
For COA and CSO program searches for available quantity in the following order:
SOA/PWO with CONF in time to fulfill DELDATE. (REQ is used instead of DELDATE for COA which is pending registration (Status 1).)
SSA sorted by ascending DATE. If any of the SAR documents have ACCESS set to Customer id matching customer in COA, these SAR documents are assigned first.
SOA/PWO with CONF to late to fulfill DELDATE (REQ is used instead of DELDATE for COA which is pending registration (Status 1)), sorted ascending by CONF.
SOA/PWO with CONF="", sorted ascending by REQ.
SPO sorted ascending by REQ.
Pending.
For PWO the program searches for available quantity in the following order:
SOA/PWO with CONF in time to fulfill REQ date.
SSA sorted by ascending DATE. In case ENDCUSTOMERACCOUNT is set in PWO, and there exists SAR documents with ACCESS set to this ENDCUSTOMERACCOUNT, the program will only assign to these SAR documents.
SOA/PWO with CONF too late to fulfill DELDATE, sorted ascending by CONF.
SOA/PWO with CONF="", sorted ascending by REQ.
SPO sorted ascending by REQ.
Pending.
In addition to dates, there is a lot of other data that will be taken into consideration when creating assignment.
CQU/CSA/SAW/STW/SRT:
These do only get assignments from stock (SSA), not from backlog (SOA/SPO/PWO) or 'Pending'.
Buffer quantity in CQU will also only get assignment from stock and if not enough available stock, the rest will be pending.
SRT will only get assignment from SSA with equal currency.
If the CSV/" Supplier return (SRT) linked to Goods reception (SSA) with another Supplier Id" is ON, SRT will only get assignments from SSA which is from the same supplier.
PWO:
In case the product (part in structure) has CLASS="WX" or CLASS="XF", or if KITSQUID is set, the PWO will be 'Pending'.
LOC/ACCESS:
If ITMLOC is set in item, the item will get assignment from this location, otherwise from LOC at main level.
If the setting CSV/"CusOrderAllowLinkToStockAtOtherLocation" is ON, and there is no available stock/backlog, the program will check if there do exist available stock at other locations. If there is enough stock available to cover the total need for the item, this will be assigned and ITMLOC will be changed to the location for this stock.
In case ACCESS in SAR has a customer reference, it is required that this value match. Otherwise a sales transaction document will not get assignments from this.
Check on CLASS:
COA/CQU with CLASS="KS" will not get any assignments at all.
COA with CLASS="WX" or KITID>"" will be 'Pending'.
If the setting CSV/'Automatically link Products (ART) with Product Structure to Pending' is ON, COA with CLASS="K" or CLASS="KA" will be 'Pending' (this rule does not apply if the COA is of TYPE="CUSOWNEDRETURN").
RENTAL handling:
If the setting CSV/'Do not get automatically assignments from stock or backlog for rental order' is ON, COA of TYPE="RENTALORDER" will always be 'Pending'.
Only COA/CSA with DOCTYPE="RENTALORDER" or SRT of TYPE="INBOUNDRENTAL" can be linked to goods of TYPE="INBOUNDRENTAL".
Check on TYPE="CUSOWNED*"
If the setting CSV/'Document link for Returns' is OFF, the following will apply:
CQU/COA/CSA of TYPE="CUSOWNED*" only get assignments from SSA of TYPE="CUSOWNED*" and where customer equals customer in the sales transaction document.
CQU/COA/CSA which are not of TYPE="CUSOWNED*" will never get assignments from SSA of TYPE:CUSOWNED, "REPAIRSUPRETURN", "CUSRETURN" or "CUSOWNEDRETURN". DOCTYPE="CUSOWNEDRETURN".
CDV handling:
In case Sellers ref. no in COA has reference to a CDV, and CUSRETURNDOC in CDV has reference to an SSA, COA will get assignment from this SSA. In case WAREHOUSEACTCODE in CDV is "Return to Sup for repair", SUPERTURNDOC control which SSA that will be assigned.
'Assign in multiple of':
COA will get assignment according to the quantity in 'Assign in multiple of' in ART. Example: If 'Assign in multiple of'='5' and a COAITEM is created for a quantity of 18, COA will only get assignment for 15 from stock/backlog and the remaining 3 will be 'Pending'. Manually assignments can be created for these 3 afterwards.
(SAR) Optimize according to standard rules.
Abbreviations which are used:
SSA (Goods reception which are used to store goods in stock)
SOA (Purchase order response, which is a purchase order that has been confirmed and is a part of supplier backlog. This is to be understood as goods that are to be received into stock in the future)
SPO (Purchase order, which is a part of supplier backlog. This is to be understood as goods that are to be received into stock in the future)
PWO (Production work order, which is used for manufacturing products in-house. In this documentation PWO means each and one material in the kit structure of a PWO)
COA (Sales order, which is a sales order that has been acknowledged by the selling company)
SAR (Stock assignment register, which keeps the assignments between Stock/Supplier backlog/Production work orders and Production work order/Sales order)
KITSTARTDATE (This is a calculated date for each material in the kit structure of a PWO. It is set equal to the date the OPR (Operation) it is linked to should start)
PUR (The purchase application used for creating SPO)
ART (The archive of products)
S&D (Ship & Debit)
SQU (Purchase quote)
BREF (The base (derived from) for calculating landed cost in a COA)
REQ (Requested Date)
CONF (Confirmed Date)
DELDATE (Delivery date. ('Scheduled shipping date' for a COA or 'Planned start date' for PWO or a specific operation in PWO.)
FIFO (First In - First Out, a principle for selling out/using the oldest stock first)
The assignments between SSA/SOA/SPO/PWO and PWO/COA are stored in SAR. If there is not enough goods available in stock or backlog, the PWO/COA will be 'Pending' assignment. This will generate a purchase need that is visible in the PUR application or a need for manufacturing if it is a product with structure.
The purpose of the SAR Optimize batch is to assign goods to PWO and COA in an optimized order. The program will try to achieve that these get assignments from SSA, SOA, SPO and PWO which fulfill their DELDATE. The COAs and PWOs that are going to be delivered first will get the 'best' assignments etc. 'Best assignments’ is to be understood as closer to stock in time, -the better.
As a pre-step for optimizing SAR, the program will check whether DELDATE in existing assignments to PWO are correct calculated. If they are not, they will by default be recalculated as KITSTARTDATE - x days. X is a number of days set up as a margin in the Company settings (CSV) 'DeliveryAndRequestDateMarginDays'. If the company setting option CSV/'Production-PlanningBasedOnProductionLeadTime' is ON, 'Production start date' from PWO will be used instead of KITSTARTDATE.
This step is optional, the setting Margin for SalesLeadTime Assignment Window, that can be found in the Company settings (CSV) application, must be given a value, and at least one of the settings Use Assignment Window for Sales Order (COA) or Use Assignment Window for Production Work Order (PWO) must be turned on. The Assignment Window is defined as Standard lead time for a product plus the margin set in the Margin for SalesLeadTime Assignment Window setting.
The purpose of step two in the SAR Optimization Batch is to ensure that only COA/PWO with DELDATE inside the Assignment Window will get assignments from stock and backlog. COA/PWO with DELDATE outside of the Assignment Window will be ‘Pending’ assignments, and these items are marked in Stock Assignment Register to prevent Step 3 of the SAR Optimize Batch to get assignments from stock/backlog.
This step runs as default for PWO, COA is optional. If it should run for COA as well, the setting Sales Order (COA) included in the Assignment Register Optimize job in the Company settings (CSV) application must be turned on. This documentation assumes this setting is ON.
Class must have a value before 'V' in the alphabet but not 'KM'. In practice this means ordinary parts/material/kits and not service or cost products.
For these products, the program will check whether there exists COA or PWO that are candidates for getting better assignments.
The requirements for COA and PWO to be a candidate are:
Has got assignment from SPO, SOA, PWO or is ‘Pending’. (If it has assignments from stock, it will not be a candidate as stock is defined as the 'best assignment' one can get)
Must be active. This means that status must be >1 and >9
Production is not started for a PWO (Means status must not be 5,7 or 8)
Picking process is not started
The SAR assignments are not blocked for re-assigning (locked links)
SAR assignments are not defined as outside of the assignment window
SAR is not set up with access only for a specific customer
COA does not have a special structure
COA is not linked to a non-S&D SQU in BREF. PWO is not linked to a non-S&D SQU in KITSQUID
COA/PWO does not have existing assignments from anything else than than ordinary purchase, productions, replacement from supplier or by-product from supplier.
Based on these claims the program builds a list of all products found that are matching the criteria above. The list is sorted so that the product which have the highest number of assignments is sorted first. The job optimizes one and one product and loops through all candidates that possibly could get better assignments. When there are no more assignments to optimize for this product, the program starts with the next and continues with the same procedure until there are no more products left in the list.
The candidates are sorted by DELDATE in ascending order to ensure that the ones that need goods first will get the best assignments.
After sorting on DELDATE, the priority sorting for optimization is as follows:
COA which is ‘Pending’
COA which has assignment from SPO, sorted descending by REQ in SPO + PWO which is 'Pending'
COA which has assignments from SOA without CONF, sorted descending by REQ in SOA + PWO which has assignments from SPO or SOA without CONF, sorted descending by REQ in SPO/SOA
COA and PWO which has assignments from SOA with a CONF, sorted descending by CONF in SOA
Re-assigning
The next step is to try to re-assign to the ‘best assignment' for COAs and PWOs in the list ‘Find COAs and PWOs that are candidates for optimization.’ under ‘Step 3 Optimize links’
The preferred assignments for PWO are in prioritized order:
SSA with available quantity, sorted ascending by Date of the SSA
SSA which are assigned to COA/PWO with a DELDATE which is later, sorted ascending by Date of the SSA
SOA/PWO with CONF and available quantity, sorted ascending by CONF. CONF in SOA/PWO must be earlier than CONF in the assignment to the the PWO
SOA/PWO with CONF and which has assignment to COA/PWO with a later DELDATE, sorted ascending by CONF. CONF in SOA/PWO must be earlier than CONF in the existing assignment to the PWO
SPO with available quantity, sorted ascending by REQ. REQ on SPO must be earlier than REQ in the existing assignment to the PWO or SOA/PWO without CONF, but with available quantity, sorted ascending by REQ. REQ in SOA/PWO must be earlier than REQ in the existing assignment to the PWO
SPO which is assigned to COA/PWO with a later DELDATE, sorted ascending by REQ. REQ in SPO must be earlier than REQ in the existing assignment to the PWO or SOA/PWO without CONF, which are assigned to COA/PWO with a later DELDATE sorted ascending by REQ. REQ in SOA/PWO must be earlier than REQ in the existing assignment to the PWO
The preferred assignments for COA are in prioritized order:
SSA with available quantity, sorted ascending by Date of the SSA
SSA which are assigned to COA/PWO with a DELDATE which is later, sorted ascending by Date of the SSA
SOA/PWO with CONF and available quantity, sorted ascending by CONF. CONF in SOA/PWO must be earlier than CONF in the existing assignment to the COA
SOA/PWO with CONF and which is assigned to COA/PWO with a later DELDATE, sorted ascending by CONF. CONF in SOA/PWO must be earlier than CONF in the existing assignment to the COA
SOA/PWO without CONF, but with available quantity, sorted ascending by REQ. REQ in SOA/PWO document must be earlier than REQ in the existing assignment to the COA
SOA/PWO without CONF which are assigned to COA/PWO with a later DELDATE, sorted ascending by REQ. REQ in SOA/PWO must be earlier than REQ in the existing assignment to the COA
SPO with available quantity, sorted ascending by REQ. REQ in SPO must be earlier than REQ in the existing assignment to the COA
SPO which is assigned to COA/PWO with a later DELDATE, sorting ascending by REQ. REQ in SPO must be earlier than REQ in the existing assignment to the COA.
If the SSA/SPO/SOA/PWO that is found has enough available quantity, the COA/PWO will get new assignment from this.
If the SSA/SPO/SOA/PWO that is found does not have enough available quantity, the optimize program will first remove its existing assignments to COA/PWO to increase available quantity. Then the existing assignments to the COA/PWO will be removed and it will get new assignments.
If the existing assignment is to a PWO with CONF and the setting IgnoreConfInWorkOrderAtOptimizationBySpecialRules is turned “OFF”, or a COA with CONF and the setting KeepConfInSalesOrderAtOptimizationBySpecialRules is turned "ON", the batch will only remove assignments if it can find enough available qty to fulfill the need of the PWO/COA in prioritized order:
SSA, sorted ascending by Date
SOA/PWO with CONF that is earlier than CONf of the PWO/COA, sorted ascending by CONF
In case the settings implies that CONF in COA/PWO don’t have to be fulfilled, the COA/PWO for which assignments from SSA/SOA/SPO/PWO were removed, will be ‘Pending’ and added to the list described in ‘Find COA's and PWOs that are candidates for optimization.’ ’ under ‘Step 3 Optimize assignments’.
This COA/PWO will now be handled during a later iteration of the re-assigning process described in step 3"-Re-assigning’.
If a product is set up with ‘Assign in multiple of’, the optimize batch will only get assignments to COA for quantity that is multiple with this. This rule does not apply for PWO.
This step runs as default for PWO, COA is optional. If it should run for COA as well, the setting Sales Order (COA) included in the FIFO step for Optimize job in the Company settings (CSV) application must be turned ON. This documentation assumes this setting is on. The purpose of this step is to ensure that the oldest stock is consumed or shipped out first.
The first thing the FIFO step does is to find which products that are candidates for being re-assigned.
The requirements for a product to be re-assigned are:
Product is to be found in SSA with available quantity
Product is to be found in SSA which has assignment to PWO/COA
Picking process has not yet started
LinkLock is not set in SAR
The stock is not of type special structure
Stock is not reserved for another customer
Stock is not returned to supplier for repair
DELDATE is not outside of the Assignment Window
The product is not excluded from auto relinking
The PWO or COA with the earliest DELDATE should get assignments from the oldest goods first. The re-assigning starts with the first SSA in the list described in ‘Find stock that should be optimized.’ The program searches for PWO/COA that have assignments from other SSA with a newer Date.
The PWO/COAs that are found are sorted ascending by DELDATE and are handled one by one. If any of them have an earlier DELDATE than the PWO/COA that do have existing assignments from the SSA that is handled, the assignments will be removed and thePWO/COA with an earlier DELDATE will get assignment from the SSA. The COA/PWO that ‘lost’ its assignments, will then be added to the list of COA/PWO that will be handled in the next iteration according to its DELDATE.
If a product is set up with ‘Assign in multiple of’, the FIFO step will get assignments to COA for a quantity that is in multiple of this. This rule does not apply for PWO.
not
SAR Optimize according to special rules.
Abbreviations which are used:
SSA (Goods reception which are used to store goods in stock)
SOA (Purchase order response, which is a purchase order that has been confirmed and is a part of supplier backlog. This is to be understood as goods that are to be received into stock in the future)
SPO (Purchase order, which is a part of supplier backlog. This is to be understood as goods that are to be received into stock in the future)
PWO (Production work order, which is used for manufacturing products in-house. In this documentation PWO means each and one material in the kit structure of a PWO)
COA (Sales order, which is a sales order that has been acknowledged by the selling company)
SAR (Stock assignment register, which keeps the assignments between Stock/Supplier backlog/Production work orders and Production work order/Sales order)
KITSTARTDATE (This is a calculated date for each material in the kit structure of a PWO. It is set equal to the date the OPR (Operation) it is linked to should start)
PUR (The purchase application used for creating SPO)
ART (The archive of products)
S&D (Ship & Debit)
SQU (Purchase quote)
BREF (The base (derived from) for calculating landed cost in a COA)
REQ (Requested Date)
CONF (Confirmed Date)
DELDATE (Delivery date. ('Scheduled shipping date' for a COA or 'Planned start date' for a PWO or a specific operation in PWO))
FIFO (First In - First Out, a principle for selling out/using the oldest stock first)
The assignments between SSA/SOA/SPO/PWO and PWO/COA are stored in SAR. If there is not enough goods available in stock or backlog, the PWO and COA will be 'Pending' assignment. This will generate a purchase need that is visible in the PUR application or a need for manufacturing if it is a product with structure.
The purpose of the SAR Optimize batch is assign goods to PWO and COA in an optimized order. The program will try to achieve that these get assignments from SSA, SPO, SOA and PWO which fulfill their DELDATE. The COAs and PWOs that are going to be delivered first will get the 'best' assignments etc.
As a pre-step for optimizing SAR, the program will check whether DELDATE in existing assignments to PWO are correct calculated. If they are not, they will by default be recalculated as KITSTARTDATE - x days. X is a number of days set up as a margin in the Company settings (CSV) application, CSV/’DeliveryAndRequestDateMarginDays’. If the company setting CSV/'ProductionPlanningBasedOnProductionLeadTime' is ON, 'Production start date' from PWO will be used instead of KITSTARTDATE.
This step is optional, the setting Margin for SalesLeadTime Assignment Window, that can be found in the Company settings (CSV) application, must be given a value, and at least one of the settings Use Assignment Window for Sales Order (COA) or Use Assignment Window for Production Work Order (PWO) must be turned on. The Assignment Window is defined as Standard lead time for a product plus the margin set in the Margin for SalesLeadTime Assignment Window setting.
The purpose of step two in the SAR Optimization Batch is to ensure that only COA/PWO with delivery date inside the Assignment Window will get assignments from stock and backog. COA/PWO with delivery date outside of the Assignment Window will be ‘Pending’ assignments, and these items are marked in Stock Assignment Register to prevent Step 3 of the SAR Optimize Batch to get assignments from stock/backlog.
This step runs as default for PWO, COA is optional. If it should run for COA as well, the setting Sales Order (COA) included in the Assignment Register Optimize job in the Company settings (CSV) application must be turned on. This documentation assumes this setting is ON.
The requirements for a product to be optimized are:
Class must have a value before 'V' in the alphabet but not 'KM'. In practice this means ordinary parts/material/kits and not service or cost products.
For these products, the program will check whether there exists COA or PWO that are candidates for getting better assignments.
The requirements for COAs and PWOs to be a candidate are:
Must be active. This means that status must be >1 and >9
Production is not started for a PWO (Means status must not be 5,7 or 8)
Picking process is not started
The SAR assignments are not blocked for re-assigning (locked links)
SAR assignments are not defined as outside of the assignment window
SAR is not set up with access only for a specific customer
COA does not have a special structure
COA is not linked to a non-S&D SQU in BREF. PWO is not linked to a non-S&D SQU in KITSQUID
COA/PWO does not have existing assignments from anything else than ordinary purchase, productions, replacement from supplier or by-product from supplier.
Based on these claims the program builds a list of all products found that are matching the criteria above. The list is sorted so that the product which have the highest number of assignments is sorted first. The job optimizes one and one product and loops through all candidates that possibly could get better assignments. When there are no more assignments to optimize for this product, the program starts with the next and continues with the same procedure until there are no more products left in the list.
The candidates are sorted by DELDATE in ascending order to ensure that the ones that need goods first will get the best assignments.
After sorting on DELDATE, the priority sorting for optimization is as follows:
COA/PWO which is 'Pending'
COA/PWO with assignment from SPO, sorted descending by REQ in SPO
COA/PWO with assignment from SOA/PWO with CONF=””, sorted descending by REQ in SOA/PWO
COA/PWO with assignments from SOA/PWO with a CONF where this CONF is too late according to DELDATE of COA/PWO, sorted descending by CONF in SOA/PWO
COA/PWO with assignment from SSA
COA/PWO with assignment from SOA/PWO with a CONF where this CONF is in time according to DELDATE of COA/PWO, sorted descending by CONF in SOA/PWO
Re-assigning:
The next step is to try to re-assign to the ‘best assignment' for COAs and PWOs in the list ‘Find COAs and PWOs that are candidates for optimization.’ under ‘Step 3 Optimize links’.
The preferred assignments for COA/PWO are in prioritized order:
SOA/PWO with CONF and available quantity, sorted ascending by CONF. CONF in SOA/PWO must be earlier than CONF in the existing assignment to the COA/PWO, and CONF in SOA/PWO must be early enough to meet DELDATE of COA/PWO.
SOA/PWO with CONF and which has assignment to COA/PWO with a later DELDATE, sorted ascending by CONF. CONF in SOA/PWO must be earlier than CONF in the existing assignment to the COA/PWO, and CONF in SOA/PWO must be early enough to meet the delivery date of COA/PWO.
SSA with available quantity, sorted ascending by Date of the SSA
SSA which have assignment to COA/PWO with a DELDATE which is later, sorted ascending by Date of the SSA
SOA/PWO with CONF and available quantity, where CONF in SOA/PWO is too late to meet the delivery date of COA/PWO, sorted ascending by CONF. CONF in SOA/PWO must be earlier than CONF in the existing assignment to the COA/PWO
SOA/PWO with CONF and which is assigned to COA/PWO with a later DELDATE, sorted ascending by CONF, where CONF in SOA/PWO is too late to meet the delivery date of COA/PWO. CONF in SOA/PWO must be earlier than CONF in the existing assignment for the COA/PWO.
SOA/PWO without CONF, but with available quantity, sorted ascending by REQ. REQ in SOA/PWO document must be earlier than REQ in the existing assignment to the COA/PWO.
SOA/PWO without CONF which are linked to COA/PWO with a later DELDATE, sorted ascending by REQ. REQ in SOA/PWO must be earlier than REQ in the existing assignment to the COA/PWO.
SPO with available quantity, sorted ascending by REQ. REQ in SPO must be earlier than REQ in the existing assignment to the COA/PWO
SPO which is assigned to COA/PWO with a later DELDATE, sorting ascending by REQ. REQ in SPO must be earlier than REQ in the existing assignment to the COA/PWO.
The term ‘early enough to meet DELDATE of COA/PWO’ means that CONF in SOA/PWO + X days added from the setting StockAssignmentConfirmMargin gives a date before or equal to DELDATE of COA/PWO. The setting StockAssignmentStockWindow defines X number of days from todays date where assignments from SSA has the highest priority. If DELDATE is today’s date or earlier, stock will always have highest priority, even if the setting don’t have any value.
If the SSA/SPO/SOA/PWO that is found has enough available quantity, the COA/PWO will get new assignment from this.
If the SSA/SPO/SOA/PWO that is found does not have enough available quantity, the optimize program will first remove its existing assignments to COA/PWO to increase available quantity. Then the existing assignments to the COA/PWO will be removed and it will get new assignments.
If the existing assignment is to a PWO with CONF and the setting IgnoreConfInWorkOrderAtOptimizationBySpecialRules is turned “OFF”, or a COA with CONF and the setting KeepConfInSalesOrderAtOptimizationBySpecialRules is turned "ON", the batch will only remove assignments if it can find enough available qty to fulfill the need of the PWO/COA in prioritized order:
SOA/PWO with CONF early enough to meet DELDATE of the COA/PWO which it has assignments to, sorted ascending by CONF
SSA, sorted ascending by Date
In case DELDATE of the COA/PWO that will have its assignments removed is within the period where stock has highest priority, SSA will be prioritized before SOA.
In case the settings implies that CONF in COA/PWO doesn't have to be fulfilled, the COA/PWO for which assignments from SSA/SOA/SPO/PWO were removed, will be ‘Pending’ and added to the list described in ‘Find COA's and PWOs that are candidates for optimization.’ ’ under ‘Step 3 Optimize assignments’.
This COA/PWO will now be handled during a later iteration of the re-assigning process described in step 3"-Re-assigning’.
If a product is set up with ‘Assign in multiple of’, the optimize batch will only get assignments to COA for quantity that is multiple with this. This rule does not apply for PWO.
This step runs as default for PWO, COA is optional. If it should run for COA as well, the setting Sales Order (COA) included in the FIFO step for Optimize job in the Company settings (CSV) application must be turned ON. This documentation assumes this setting is on. The purpose of this step is to ensure that the oldest stock is consumed or shipped out first.
The first thing the FIFO step does is to find which products that are candidates for being re-assigned.
The requirements for a product to be re-assigned are:
Product is to be found in SSA with available quantity
Product is to be found in SSA which has assignment to PWO/COA
Picking process has not yet started
LinkLock is not set in SAR
The stock is not of type special structure
Stock is not reserved for a specific customer
Stock is not returned to supplier for repair
Delivery date is not outside of the Assignment Window
The product is not excluded from autorelinking
The PWO or COA with the earliest DELDATE should get assignments from the oldest goods first. The re-assigning starts with the first SSA in the list described in ‘Find stock that should be optimized.’ The program searches for PWO/COA that have assignments from other SSA with a newer Date.
The PWO/COAs that are found are sorted ascending by DELDATE and are handled one by one. If any of them have an earlier DELDATE than the PWO/COA that do have existing assignments from the SSA that is handled, the assignments will be removed and thePWO/COA with an earlier DELDATE will get assignment from the SSA. The COA/PWO that ‘lost’ its assignments, will then be added to the list of COA/PWO that will be handled in the next iteration according to its DELDATE.
If a product is set up with ‘Assign in multiple of’, the FIFO step will get assignments to COA for a quantity that is in multiple of this. This rule does not apply for PWO.
Assignment Window is used to ensure that only Sales order (COA) items and Production work orders (PWO) with scheduled delivery date inside this window get assignments from Stock (SSA), Production work orders (PWO) and Supplier backlog (SPO/SOA). This way, there will be available goods to short-term Sales orders (COA) and Production work orders (PWO).
There are a few setting that needs to be enabled before this function can be used:
The setting Margin for SalesLeadTime Assignment Window must be turned on for Assignment Window to apply. In this setting, the user also has to set X number of days as a margin that will be added to the number of days in Standard lead time for the product (ART). In case no margin is to be used, the value should be set to 0.
In case Assignment Window should apply for Sales order (COA), AssignmentWindowForSalesOrder must be turned on.
In case Assignment Window should apply for Production work order (PWO), AssignmentWindowForProductionOrder must be turned on.
The company will in addition need to be set up to run the nightly SAR Optimize job
The stock assignment window is defined using Standard lead time of the product (ART), where the amount of days will be added to the amount of days set in the setting.
As scheduled shipping date is not calculated until an order is registered, all orders will by default get assignments the ordinary way when they are created. But when the order is registered, there will immediately be run a validation to check if the order is inside or outside assignments. If the order is outside the stock assignment window, it will get assignments set as Pending (unless the link is locked).
Orders outside assignment window will not be visible in the Purchase (PUR) program, or Prodplan, as long as the Assignment Window filter is active, -as it will be by default when the settings above are turned on.
Clicking the pending article in PUR will open the pending article view. Here you can see a new column called Outside Assignment Window, which shows if a product is inside or outside the assignment window. The same goes for Production Work Orders (PWO) in Prodplan, where you can find this same column in the folder Pending by Week when clicking on a pending production.
Example: If a sales order is created and contains a product that has 15 days as Standard lead time, and zero days of margin in the settings, the sales order will not be available for purchasing/production until 15 days prior to scheduled shipping date.
The nightly SAR optimize job will each night check if there exists order which are now inside assignment window, and assign goods to these according to which assignment rules that apply to the company.
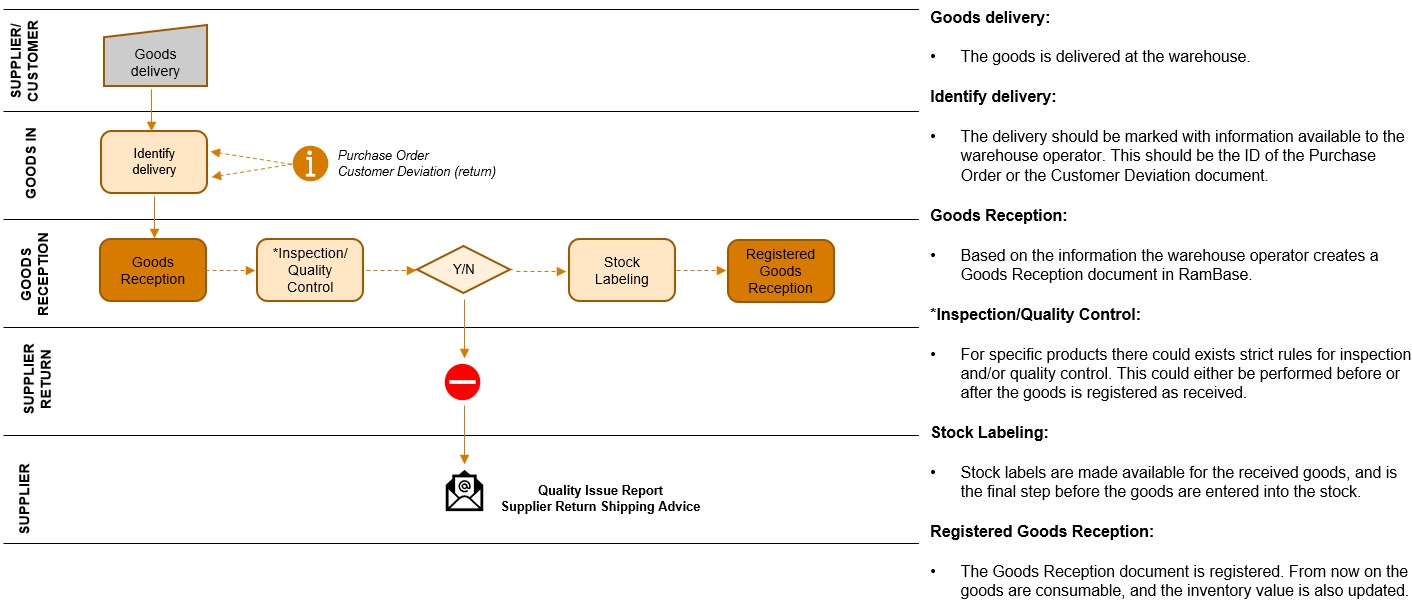
The reception process is where goods related to purchase orders are received.
Documentation prepared for goods coming into stock.
Tracking of goods expected to be delivered to stock.
Goods registered into stock.
Correct goods reception is a prerequisite for the efficient function of warehouse processes. The goods reception is performed by personnel, either manually or by assistance of electronic equipment such as handheld terminals. Incoming goods related to purchase orders are received, inspected and put into stock. If a company is losing the traceability within the warehouse, or the link between the warehouse and an ERP-system, it may have unfortunate consequences. A low turnover in the stock is not good for the economy, a lost traceability for goods in stock is not good for the delivery performance, and a lack of inspections and quality control may result in high amount of reported deviation cases.
Create waybill in
The forwarder of the shipment may be registered upon a shipping consignment.
Perform inspection control of goods
All, or parts of the received goods, may be inspected before they are put to stock.
Print stock labels
If the goods must be labeled before putting to stock, the warehouse worker may print stock labels.
Put goods into stock
Goods are physically put to internal stock locations and must also be registered as available, or at least "received".
Setting name | Description |
Max 1 item per goods reception (SSA) | If this setting is "ON" - Only one item is allowed per goods reception (SSA). Mostly used for companies that are using external software/hardware for warehouse management. e.g. HHT (Handheld devices), Pater Noster etc). If setting is "OFF" - Several items can be added per goods reception. PS!! If a company is using handheld devices to put away goods to stock, this setting MUST be "ON" |
Directly prepare Goods Reception (SSA) for put away | If this setting is "ON" - When a document is transported to a goods reception (SSA), the goods reception will automatically be registered to status 2. If the setting is "OFF" - goods reception will be be created in status 1, and must be handled manually from there. In addition the setting 'Max 1 item per goods reception (SSA)' must be "ON". |
Register goods reception (SSA) directly to stock | If this setting is 'ON' - When a purchase order (SPO) or purchase order response (SOA) item is transported to a goods reception (SSA), you may choose to automatically register the goods reception to stock (status 3 or 9 depending on document type) If the setting is 'OFF' - goods reception will remain in status 1 or 2, depending on if setting 'Directly prepare goods reception (SSA)for put away' is 'OFF' or 'ON'. The settings 'Max 1 item per goods reception (SSA)' and 'Directly prepare goods reception (SSA) for put away" must anyway also be switched 'ON' to get this option. |
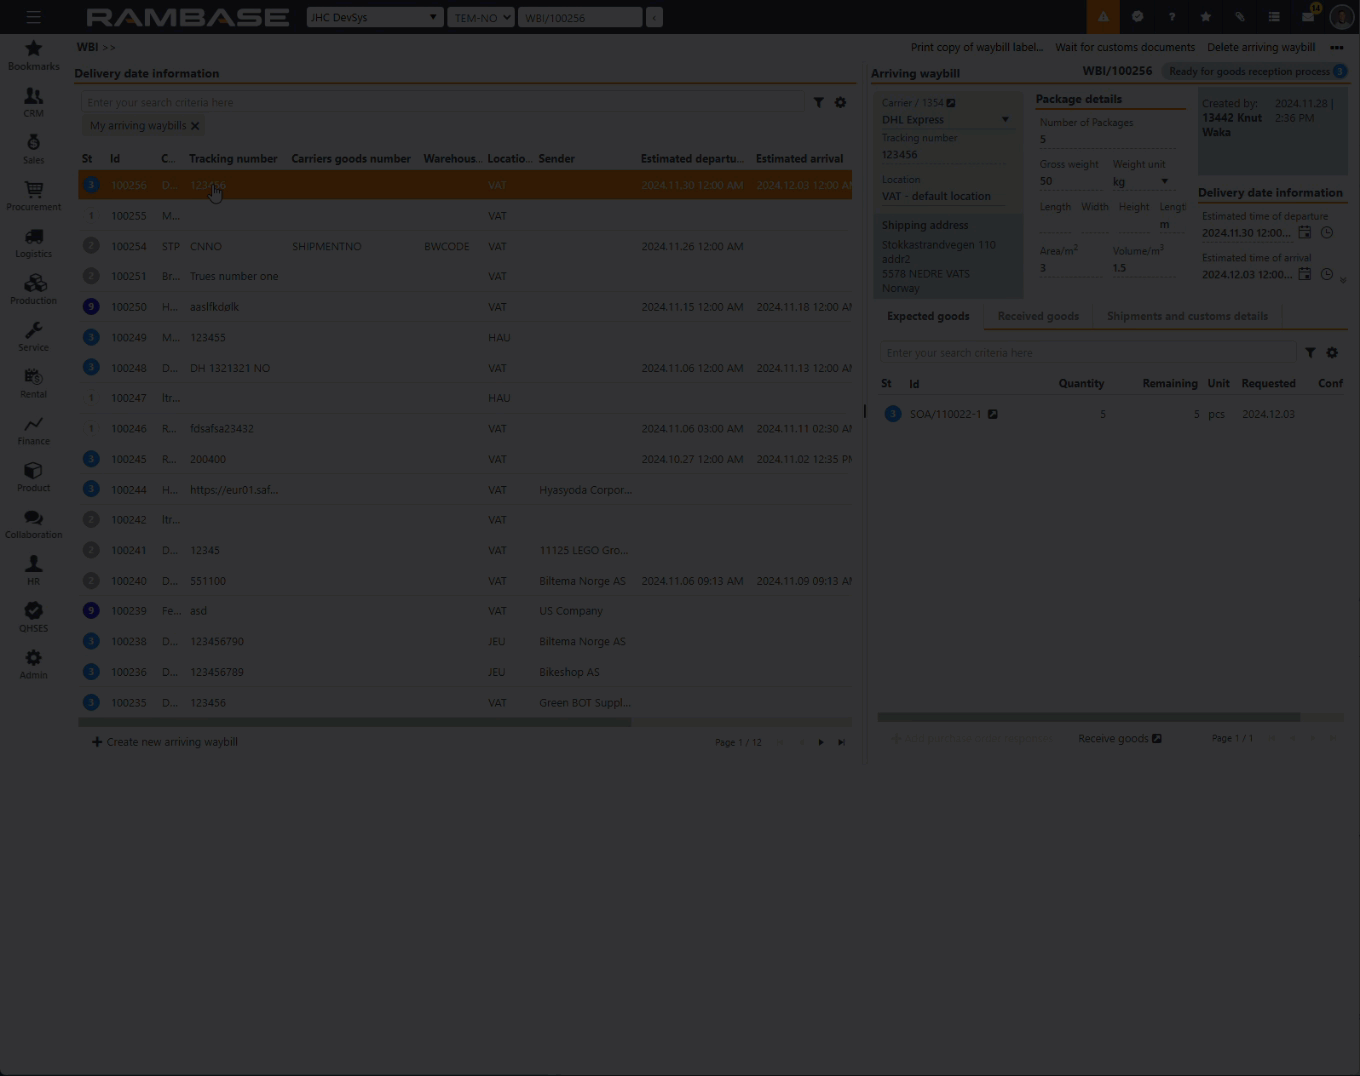
An Arriving Waybill (WBI) is used to identify a specific consignment of goods. One consignment can contain several Goods receptions (SSA).
To open the Arriving waybills (WBI) application from the RamBase menu, select Logistics followed by Reception, then finally Arriving waybills.
For the purpose of presenting the information included in the application, the text has been structured according to the overview picture below.
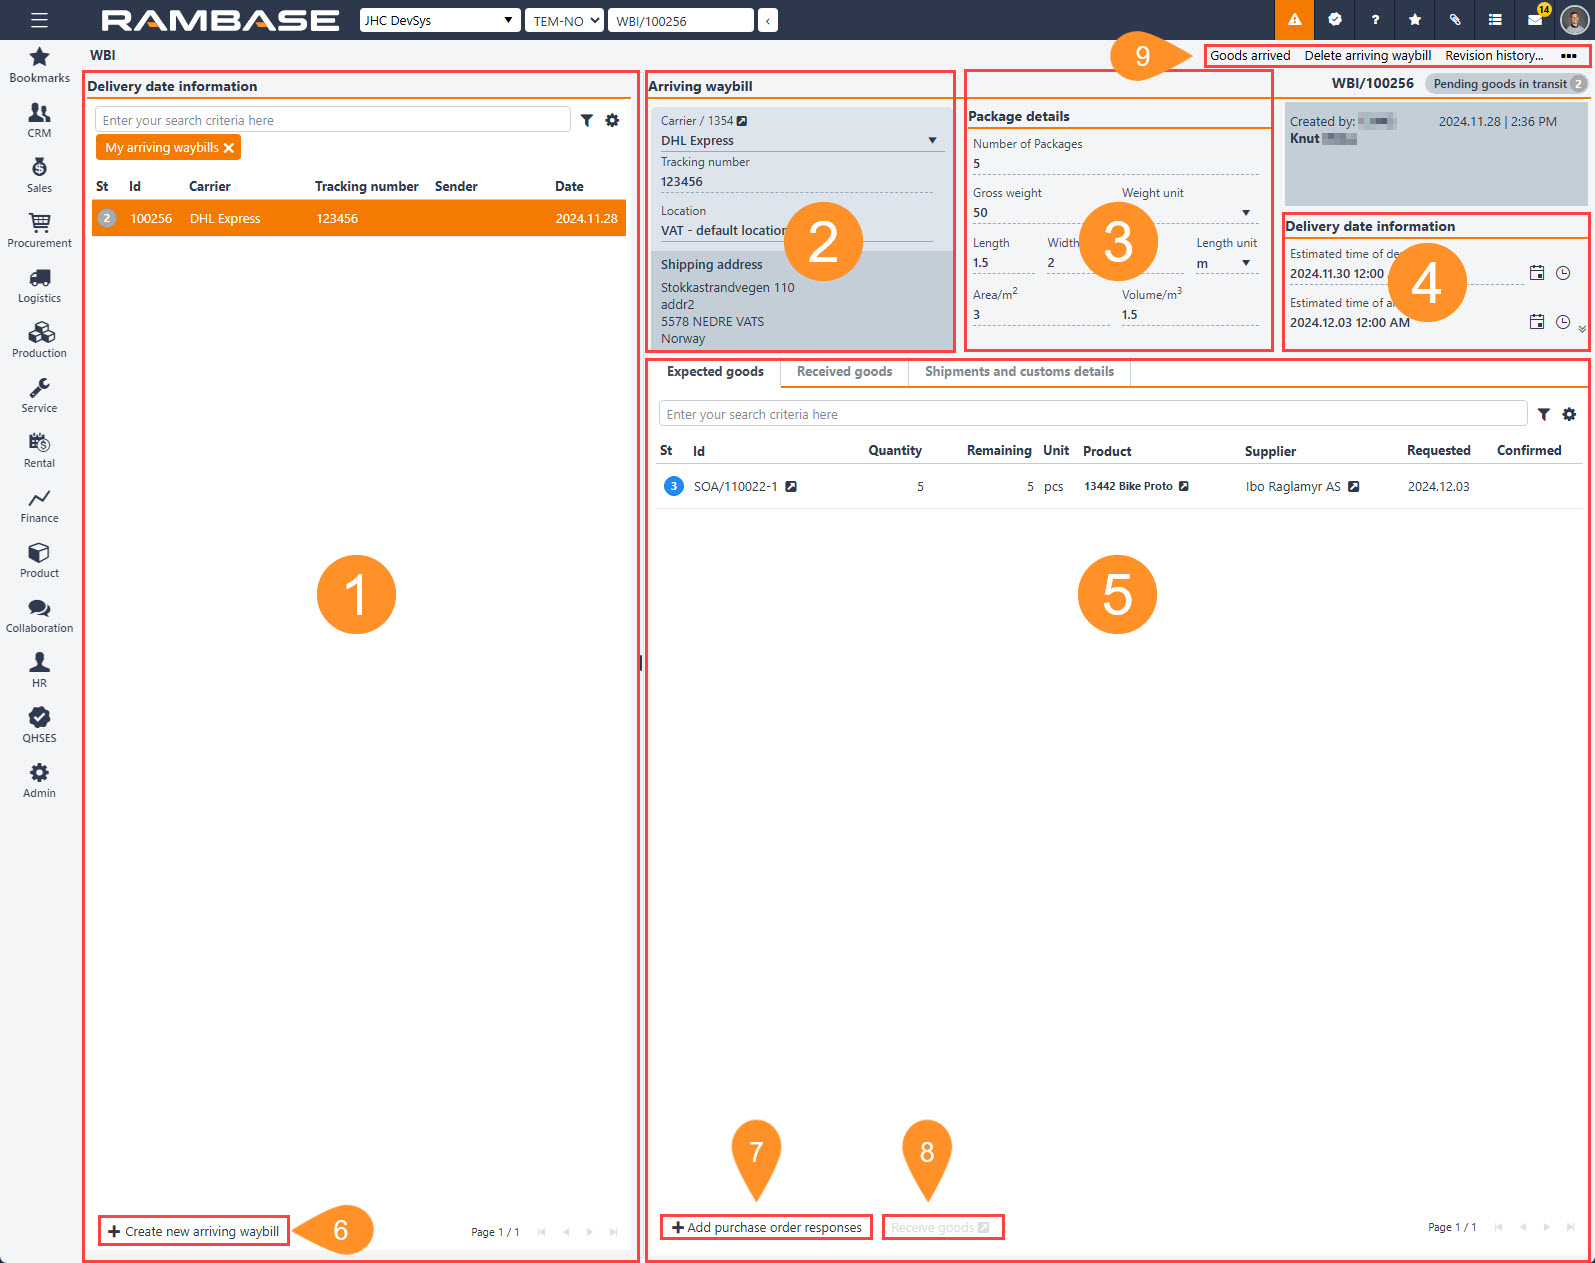
The Arriving waybill list lists all Arriving waybills (WBI).
The Search field, Filter builder and Column settings uses the standard RamBase functionality.
The header contains multiple options to filter the list.
The available columns are described in the table below:
Column | Icon | Description |
|---|---|---|
Status |
| The status icon indicates the current progress of the Arriving waybill (WBI). Potential statuses:
To progress the status of an Arriving waybill (WBI), please take a look at the Context menu options or follow the steps outlined in Arriving waybill (WBI) procedure - Create, add handle, putaway and register. |
Id | Displays the Arriving waybill identifier (WBI). Combining the application abbreviation with the identifier allows for quick access from the Program field. Example: "WBI/100000" | |
Carrier | Displays the Carrier (CAR) name providing the carrier service. Set when creating the Arriving waybill (WBI). | |
Tracking number | Displays the Carriers (CAR) tracking number for the Arriving waybill (WBI). Set when the information is received from Supplier (SUP) or Carrier (CAR). If Carrier (CAR) is set up with a Tracking uri at a proper format, the user can open carriers tracking site for the specific tracking number by clicking on the navigation icon. | |
Carriers goods number | Displays the carriers goods number for bonded warehouse. This allow the carrier to transport the goods domestic, -from the border to the owner of a bonded warehouse. To edit, click the Shipments and customs details tab and edit the Carriers goods number for bonded warehouse field. | |
Warehouse owners goods number | Displays the warehouse owners goods number for bonded warehouse. Formatted as "year + bonded warehouse code +location code + day number (day of the year) + number of consignment today". It Is sent to the carrier to confirm that goods have been received to the bonded warehouse. | |
Estimated departure | This is a date which is supplied by the vendor and is the day consignment is expected to ship. Can be specified in the Delivery date information area. | |
Estimated arrival | This is a date which is supplied by the vendor or the forwarder, and is the day the consignment is estimated to arrive at the warehouse. Can be specified in the Delivery date information area. | |
Actual departure | This is a date which is supplied by the vendor or the forwarder, and is the day the consignment is handed over to forwarder. Can be specified in the Delivery date information area. | |
Actual arrival | This is the actual time of when the consignment were received at the warehouse, and will be automatically set when the Arriving waybill (WBI) forwarded to Status 3 - Ready for goods reception process. | |
Date | Displays the date the Arriving waybill (WBI) was created. |

Button | Options |
|---|---|
|
Result: An Arriving waybill (WBI) in Status 1 - Pending registration will be created and added to the list. |

Details the Arriving waybill (WBI) selected in the Delivery information list.
Field and drop-down menu | Icons | Description |
|---|---|---|
Carrier |
| Displays the Carrier (CAR) identifier and name. Set when creating the Arriving waybill (WBI). To open the Carrier (CAR) application to view and edit carrier details, click the View icon. |
Tracking number |
| Displays the tracking number. Set when the information is received from Supplier (SUP) or Carrier (CAR). If the Tracking number is added to the Arriving waybill (WBI), and the URL for the carrier's tracking website is added in the Tracking URI field in the Carrier (CAR) application, clicking the View icon will open the forwarders tracking website and display the potential tracking information. |
Location | The location (from LOC archive) where the consignment is going to be delivered. | |
Shipping address | The address defined in the Location (LOC) application. When adding Purchase order response items (SOAITEM),, the Shipping address must be the same for both documents. |

Package details can be edited by clicking each field and providing details.
Override Area/m2 and Volume/m3
The listed fields are calculated based on Length, Width and Height, but can be overridden by the user.
Field and drop-down menu | Description |
|---|---|
Number of Packages | Number of packages belonging to this arriving waybill. |
Gross weight | The gross weight of the consignment this arriving waybill presents. |
Weight unit | Unit used for measuring weight on the consignment in this arriving waybill. Will default to WeightMeasureUnit from location, but can be overwritten in each arriving waybill. |
Length | The length of the consignment. |
Width | The width of the consignment. |
Height | The height of the consignment. |
Length unit | Unit used for measuring length, width and height of the packages in the shipment. Will default to LengthUnit from location, but can be overwritten in each arriving waybill. |
Area/m2 | The area an incoming consignment will use. This is calculated from length and width, but can be overridden by the user. |
Volume/m3 | The volume of the consignment. Is calculated from length, width and height - but can be overridden by the user. |
After entering the package details, you can choose a stock location from the Stock location drop-down menu. The selected stock location provides information about the staging area of the shipment before it is unpacked, checked, and put away in the warehouse.
The Delivery date information area provides estimated date and time information along with the options of setting actual departure and arrival time.
Field | Icon | Description |
|---|---|---|
Estimated time of departure |
| This is a date which is supplied by the vendor and is the day they expect to ship this consignment The Calendar and Clock icon can be clicked to edit time and date. |
Estimated time of arrival |
| This is a date which is supplied by the vendor or the forwarder, and is the day the consignment is estimated to arrive at warehouse The Calendar and Clock icon can be clicked to edit time and date. |
Actual time of departure |
| This is a date which is supplied by the vendor or the forwarder, and is the day the consignment is handed over to forwarder. The Calendar and Clock icon can be clicked to edit time and date. |
Actual time of arrival | This is the actual time of when the consignment were received at the warehouse, and will be automatically set when the Arriving waybill (WBI) is changed to Status 3 - Ready for goods reception process |


The tabs allow for efficient handling, from expecting goods to reception while providing the option of tuning shipment and custom details.
The available tabs are detailed below.
The Expected goods tab lists all Purchase order responses items (SOAITEM) linked to the Arriving waybill (WBI), which are expected to be a part of this Arriving waybill (WBI).
The Search field, Filter builder and Column settings uses the standard RamBase functionality.
The header contains multiple options to filter the list.
The information provided is collected from the specification set in the Purchase order (SPO) application and detailed in the table below:
Column | Icons | Description |
|---|---|---|
Status |
| Displays the status of the Purchase order response item (SOAITEM) Potential statuses for Purchase order response items (SOAITEM):
|
Id |
| Displays the Purchase order response item identifier (SOAITEM). Example: "SOA/100000" To view and edit details of the Purchase order response item (SOAITEM), click the View icon to open the Purchase order response item (SOAITEM) application. |
Purchase order id (initial) | Displays the initial identifier of the Purchase order item (SPOITEM). Example: "SPO/100000-1" | |
Quantity | Displays the quantity of the Purchase order response item (SOAITEM). | |
Remaining | Displays the remaining number of units to be forwarded. | |
Unit | Displays the measurement unit of the ordered Product (ART). Examples are:
| |
Product |
| Displays the name and description of the ordered Product (ART). To view and edit details, click the View icon to open the Product (ART) application. |
Supplier |
| Displays the Supplier (SUP) name. To view and edit details, click the View icon to open the Supplier (SUP) application. |
Suppliers reference number | Displays the suppliers/sellers item reference number. Typically to an external system. | |
Requested | Displays the delivery date as requested by the buyer/purchaser. | |
Confirmed | Displays the confirmed delivery date in the user specified date and time format. | |
 | Displays a warning icon for items that require quality control. |
Button | Options |
|---|---|
| Purchase order response items (SOAITEM) in Status 3 - Pending goods reception and Status 5 - Pending response to request for change, can be added. To be able to add Purchase order response items (SOAITEM) the Arriving waybill (WBI) must be registered, meaning in Status 2 - Pending goods in transit.
Result: Selected Purchase order response item(s) (SOAITEM) will be added to the list in the Expected goods tab. |
| To be able to Receive goods (RPP), the Arriving waybill (WBI) must be in Status 3 - Ready for goods reception process.
Result: When the Purchase order response items (SOAITEM) have been handled in the Receive goods (RPP) application, the Purchase order response item (SOAITEM) will be forwarded to Status 9 - Processed. Continue handling in the Received goods tab. |


The Search field, Filter builder and Column settings uses the standard RamBase functionality.
The header contains multiple options to filter the list.
Column | Icon | Description |
|---|---|---|
| Displays the status of the Goods reception (SSA). To activate the buttons in the footer of the tab, select all by clicking the Checkbox icon at the top of the Status icon column. Or select individual Goods receptions (SSA) by clicking the Status icon. Potential Goods reception (SSA) statuses:
| |
Id |
| Displays the Goods reception identifier (SSA) of the received goods. Example: "SSA/100000" To view and edit details, click the View icon to open the Goods reception (SSA) application. |
Supplier |
| Displays the name of the Supplier (SUP) of the Goods reception (SSA). To view and edit details, click the View icon to open the Goods reception (SSA) application. |
Assignee | Displays the name of the employee assigned to handle the Goods reception (SSA). | |
Registration date | Displays the date the Goods reception (SSA) was forwarded from Status 2 - Pending registration to Status 3 - Pending supplier invoice. |

Note
A Goods reception (SSA) must be selected to make the Register selected goods reception and the Print labels and prepare selected goods reception for putawaybuttons available.
For a Goods reception (SSA) to be forwarded from Status 2 - to Status 3 - Pending supplier invoice, labels must be printed and preparations must be completed.
Select individual Goods receptions (SSA) by clicking on the Status icon, or select all by clicking on the Checkbox icon located at the top of the column.
Button | Options |
|---|---|
|
Result: The Goods reception (SSA) has now been forwarded from Status 1 - Pending label print to Status 2 - Pending registration |
|
Result: The Goods reception (SSA) has now been forwarded from Status 2 - Pending registration to Status 3 - Pending invoice. |


Fields and drop-down menus | Description |
|---|---|
Note | For internal notes, user the Note textbox. |
Report date | Displays the date when this arriving waybill was printed on the goods journal. |
Transport method | A code for which transport (vehicle, aircraft, or ship) was used when the goods were crossing the border - i.e. plane, train, car, car on ferry etc. |
Shipped from country | Two-character code (ISO 3166) identifying the country this consignment was shipped from. |
Shipped to country | Two-character code (ISO 3166) identifying the country where this consignment is received |
Carriers goods number for bonded warehouse | Carriers goods number for bonded warehouse. This allow the carrier to transport this goods domestic, -from the border to the owner of a bonded warehouse. |
Warehouse owners goods number for bonded warehouse | Warehouse owners goods number for bonded warehouse. Consist of "year + bonded warehouse code +location code + day number (day of the year) + number of consignment today". Is sent to carrier to confirm that goods have been received to bonded warehouse. |
Import declaration id | Import declaration identifier. Customs authorities sequel number for import declaration of goods that have been a part of bonded warehouse. |
Context menu option | Description |
|---|---|
Waiting for goods in transit | To forward an Arriving waybill (WBI) from Status 1 - Pending registration to Status 2 - Pending goods in transit, select the Waiting for goods in transit option. In short, this option will register the Arriving waybill (WBI) and allow Purchase order response item(s) (SOAITEM) to be added as expected goods. |
Goods arrived | When the goods have arrived, the Goods arrived context menu option is used to forward the Arriving waybill (WBI) from Status 2 - Pending goods in transit to Status 3 - Ready for goods reception process. Purchase order responses (SOA) can no longer be added to the Arriving waybill (WBI). The user may still edit package details and perform other actions to detail the Arriving waybill (WBI). The user may also use the Receive goods button in the Expected goods area to open the Receive goods (RPP) application, where the Purchase order items (SPOITEM) and Purchase order response items (SOAITEM) can be forwarded to Goods reception (SSA). |
Print copy of waybill label... | Printing a copy of the label of the waybill label is performed by clicking the Print copy of waybill label option. Selecting this option will open the Print copy of waybill label popup where the user can select which version to handle; copy or original, edit the waybill and preview the label. |
Print journal of goods received to bonded warehouse | Information must be provided in the Carriers goods number for bonded warehouse field, in the Shipments and customs details for this option to be available. To open the Print journal of goods received to bonded warehouse popup, where the user can print the journal of new Arriving waybills (WBI) or print a copy of the journal, select the Print journal of goods received to bonded warehouse, NoteLeave the From date and To date fields empty to print the journal of new Arriving waybills (WBI). If you want to print a copy of the journal, specify the From date and To date fields. |
Wait for customs documents | If waiting for customs documents, this option can be used to forward the Arriving waybill (WBI) to Status 5 - Pending customs documents. When customs documents are received, use the Customs documents received to forward the Arriving waybill (WBI) to the current status. |
Customs documents received | If the Arriving waybill (WBI) is in Status 5 - Pending customs documents, the Customs documents received option is used to forward the Arriving waybill (WBI) to the current status, as soon as customs documents are received. |
Delete arriving waybill | An Arriving waybill (WBI) can be deleted using the Delete arriving waybill option. WarningThe Arriving waybill (WBI) will be deleted, and this action can not be reverted. |
Close arriving waybill | To forward the Arriving waybill (WBI) to Status 9 - Processed, select the Close arriving waybill option. |
Reopen waybill | To reopen a closed Arriving waybill (WBI) in Status 9 - Processed, select the Reopen waybill option. |
Goods reception items received in this arriving waybill | This option will open the Goods reception item (SSAITEM) application with the legacy filter: "legacyFilter('SHIPMENTNO="WBI/100256"')" The application will then list all Goods reception items (SSAITEM) received in the Arriving waybill (WBI). This option is especially useful as it will take advantage of all the options available in the Goods reception item (SSAITEM) application. |
Receive goods for service | This option will open the Goods in (GIN) application where Goods receptions (SSA) for service can be handled. |
Receive rental goods | This option will open the Goods in (GIN) application where Goods receptions (SSA) for rental can be handled. |
Revision history | This option will open a popup where the user can inspect all changes made to the Arriving waybill (WBI). |
Clear selected items (*) | If one or more Goods reception (SSA) are selected in the Received goods tab, the user can clear the selection by selecting the Clear selected items option in the Context menu. |
An Arriving Waybill (WBI) is used to identify a specific consignment of goods. One consignment can contain several Goods receptions (SSA).
To open the Arriving waybill (WBI) application from the RamBase menu, select Logistics followed by Reception, then finally Arriving waybills.
To create a new Arriving waybill (WBI) in Status 1 - Pending registration, click the Create new arriving waybill button.
In the following popup, provide the following information:
Carrier (CAR) - By clicking the Carrier drop-down menu and selecting the Carrier (CAR) providing the service.
Tracking number - By clicking and typing in the Tracking number field.
To create, click the Create button.
Result: An Arriving waybill (WBI) in Status 1 - Pending registration will be created and added to the list.
If available, the following information can be provided in the Delivery information area:
Carrier
Tracking number
Location
And in the Package details area:
Number of packages
Gross weight
Weight unit
Length
Width
Height
Length unit
Area/m2
Volume/m3
Information provided from the vendor or the forwarder will increase accuracy in delivery. Provide the following information, if available, in the Delivery date information area:
Estimated time of departure
Estimated time of arrival
Actual time of departure
To forward an Arriving waybill (WBI) from Status 1 - Pending registration to Status 2 - Pending goods in transit, select the Waiting for goods in transit option, found in the Context menu options.

Context menu options icon
In short, this option will register the Arriving waybill (WBI) and allow Purchase order response item(s) (SOAITEM) to be added as expected goods.
Result: Purchase order response items (SOAITEM) can now be added to the Arriving waybill (WBI).
Purchase order response items (SOAITEM) in Status 3 - Pending goods reception and Status 5 - Pending response to request for change, can be added.
To be able to add Purchase order response items (SOAITEM) the Arriving waybill (WBI) must be registered, meaning in Status 2 - Pending goods in transit.
To add Purchase order response item(s) (SOAITEM) to the Arriving waybill (WBI), click the Add purchase order responses button.
In the Add purchase order response popup, select the Purchase order response item(s) to be added to the Arriving waybill (WBI).
To select all, click the Checkbox at the top of the Status icon column.
To select individual Purchase order response item(s) (SOAITEM), click the Status icon.
When selection is done, click the +Add selected items button to finish adding Purchase order response item(s) (SOAITEM) to the Arriving waybill (WBI).
Result: Selected Purchase order response item(s) (SOAITEM) will be added to the list in the Expected goods tab.
When the goods have arrived, the Goods arrived context menu option is used to forward the Arriving waybill (WBI) from Status 2 - Pending goods in transit to Status 3 - Ready for goods reception process.
Purchase order responses (SOA) can no longer be added to the Arriving waybill (WBI).
Result: The user may now use the Receive goods button in the Expected goods tab to open the Receive goods (RPP) application, where the Purchase order response items (SOAITEM) and Purchase order response (SOA) can be forwarded to Goods reception (SSA).
To be able to Receive goods (RPP), the Arriving waybill (WBI) must be in Status 3 - Ready for goods reception process.
To receive the goods, click the Receive goods button to open the Receive goods (RPP) application.
Continue handling the reception according to the information provided here:
The Receive goods (RPP) application
Result: When the Purchase order response items (SOAITEM) have been handled in the Receive goods (RPP) application, the Purchase order response item (SOAITEM) will be forwarded to Status 9 - Processed. Continue handling in the Received goods tab.
A Goods reception (SSA) must be selected to make the Register selected goods reception and the Print labels and prepare selected goods reception for putaway buttons available.
For a Goods reception (SSA) to be forwarded from Status 2 - to Status 3 - Pending supplier invoice, labels must be printed and preparations must be completed.
To print labels and prepare the Goods reception (SSA) to be put away, click the Print labels and prepare selected goods reception for putaway button.
Result: The Goods reception (SSA) has now been forwarded from Status 1 - Pending label print to Status 2 - Pending registration
To register the selected Goods reception (SSA) to stock, click the Register selected goods receptions button.
Result: The Goods reception (SSA) has now been forwarded from Status 2 - Pending registration to Status 3 - Pending invoice.
Receive goods (RPP) is an application where products are received. The Purchase orders (SPO) are listed in the menu with all related details in the following columns. The products are both products that are using assignment (physical products) and products that are NOT using assignments (non-physical products, such as services). The incoming Purchase orders (SPO) are either marked as received (set to Status 4), for products without assignments, or forwarded to Goods reception (SSA) for products with assignments.
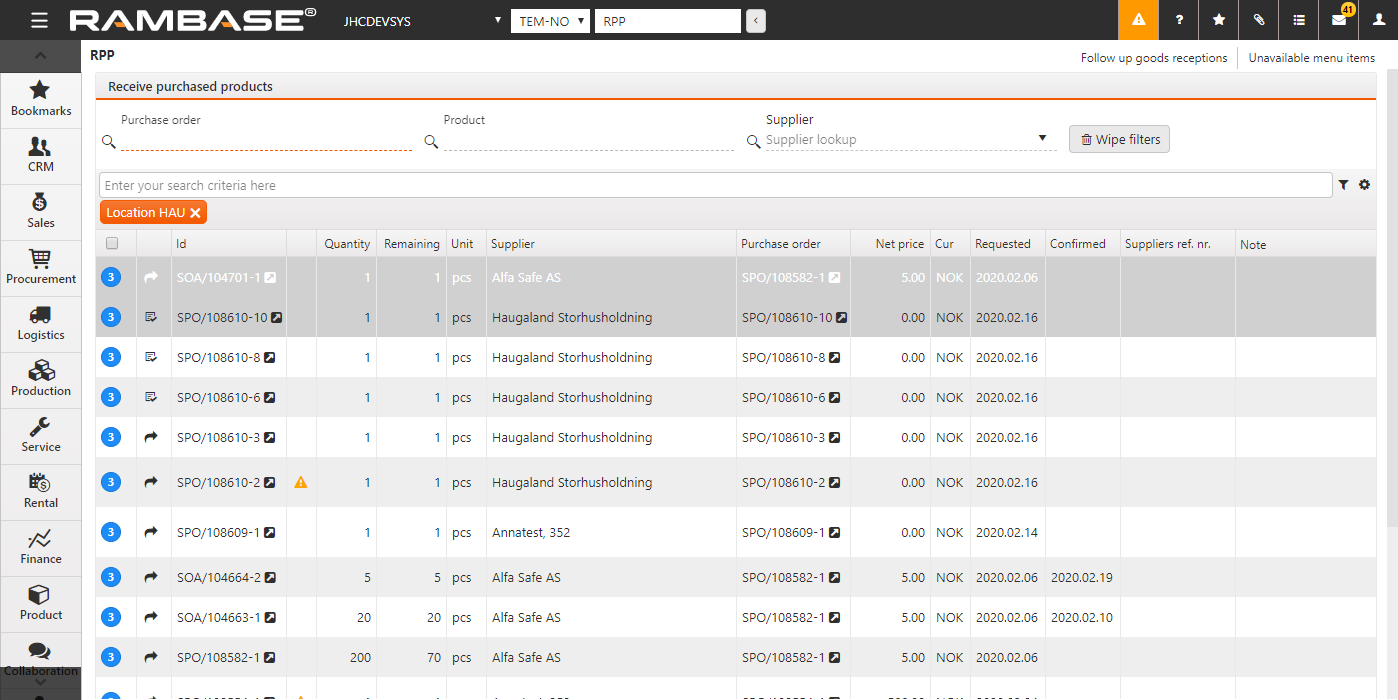
The filter fields at the top are used to filter down to the desired documents. Two notable Standard filters, found by clicking the Filter builder, are useful in filtering the list for products with assignments and for those without.
Use the Forward to stock icon in the second column, to either register the products to stock (products with assignment) or set the product as received (products without assignments).
Icon | Description |
|---|---|
| Forward to stock |

Choose several item lines by using the status icon as a checkbox and choose the desired Context menu option at the top right. As with singular selection, the choices are either Forward selected items to Goods reception (SSA) for products with assignments, and Selected purchase orders received for the products without assignments.
When forwarding a product to a Goods reception (SSA), you will see a popup window with details. The field called Product validation is used to scan the product name (also manufacturer and supplier name) to ensure that the correct product is being received. The scanned name will be compared with the name of the original order (SPO-/SOA-ITM). If the comparison finds a match you will see a green check-mark next to the field. If the comparison fails you will see a yellow Warning icon.
The same applies to the Manufacturer part name validation field. As a Warning icon will be displayed next to the field, if validation fails.
If a Goods reception item (SSAITEM) is created and there is a Manufacturer part name (MPN) mismatch between the newly created item and the Purchase order item (SPOITEM) or Purchase order response item (SOAITEM), the Goods reception item (SSAITEM) will have a notification stating "Mismatch between purchased MPN and received MPN".
Users who are assigned approval rights can then be notified and decide how the mismatch should be handled.
The approver may:
Change the MPN in the Goods reception item (SSAITEM)
Remove the MPN in the Goods reception item (SSAITEM)
The Goods reception item (SSAITEM) can then be approved and registered to stock.
The validation message can be configured in the Company settings (CSV) application:
Company setting (CSV) | Description |
|---|---|
Deactivate approval message - mismatch between purchased and received MPN | If this setting is "ON" - The document message is not activated. If the setting is "OFF" - The document message is activated for Goods reception item(s) (SSAITEM). |
The approval rights can be configured in the Approval rule (APC) application:
Approval rule (APC) | Sub rule | Description |
|---|---|---|
Approve mismatch between purchased MPN and received MPN | Configure which users and roles can, and must, give approval in situations where there is a mismatch between the Manufacturer part name (MPN), when forwarding from Purchase order (SPO) or a Purchase order response (SOA), to Goods reception item (SSAITEM). | |
Automatic assign approval request | Value - "ON/OFF" "Automatic assign approval request" can be enabled to ensure that approval is automatically sent to the designated default approver(s). These can be verified in the Default approvers column. Multiple default approvers can be defined, meaning all default approvers must provide approval before the Purchase order items(s) (SPOITEM) or Purchase order response item(s) (SOAITEM) can be forwarded. |
The Parcels field can be edited, and is one of the contributing factors in calculating the number of stock labels to be printed.
The Parcels field also includes the option to calculate the number of parcels. To do so, click the Calculate number of parcels icon. The calculation is based on the input in the Forward quantity field and the contents of the Package quantity field.
When forwarding a single Purchaser order (SPO) or Response item (SOAITEM) to Goods reception (SSA), a stock location can be selected in the pop-up that appears. If a preferred stock location is defined for the product, it is suggested automatically but can be overridden.
The Goods reception (SSA) is then created and prepared for PUTAWAY, and the goods are placed directly in the selected stock location, provided the required Company settings (CSV) Move received goods directly to stock location are enabled. NOTE! - The setting can only be used in combination with the following Company settings (CSV) Max 1 item per goods reception (SSA) and Directly prepare goods reception for put away.
The custom fields columns which are common for both Purchase orders (SPO) and Purchase order responses (SOA) items can be found by clicking the Column settings icon and then click the Include custom fields option.
The Split and forward to goods reception icon
From the Receive goods (RPP) application, click on the Split and forward to goods reception icon right next to the Forward to goods reception icon and a popup will appear to efficiently plan a split on a single Purchase order item (SPO-/SOAITEM) into several Goods reception items (SSAITEMS).
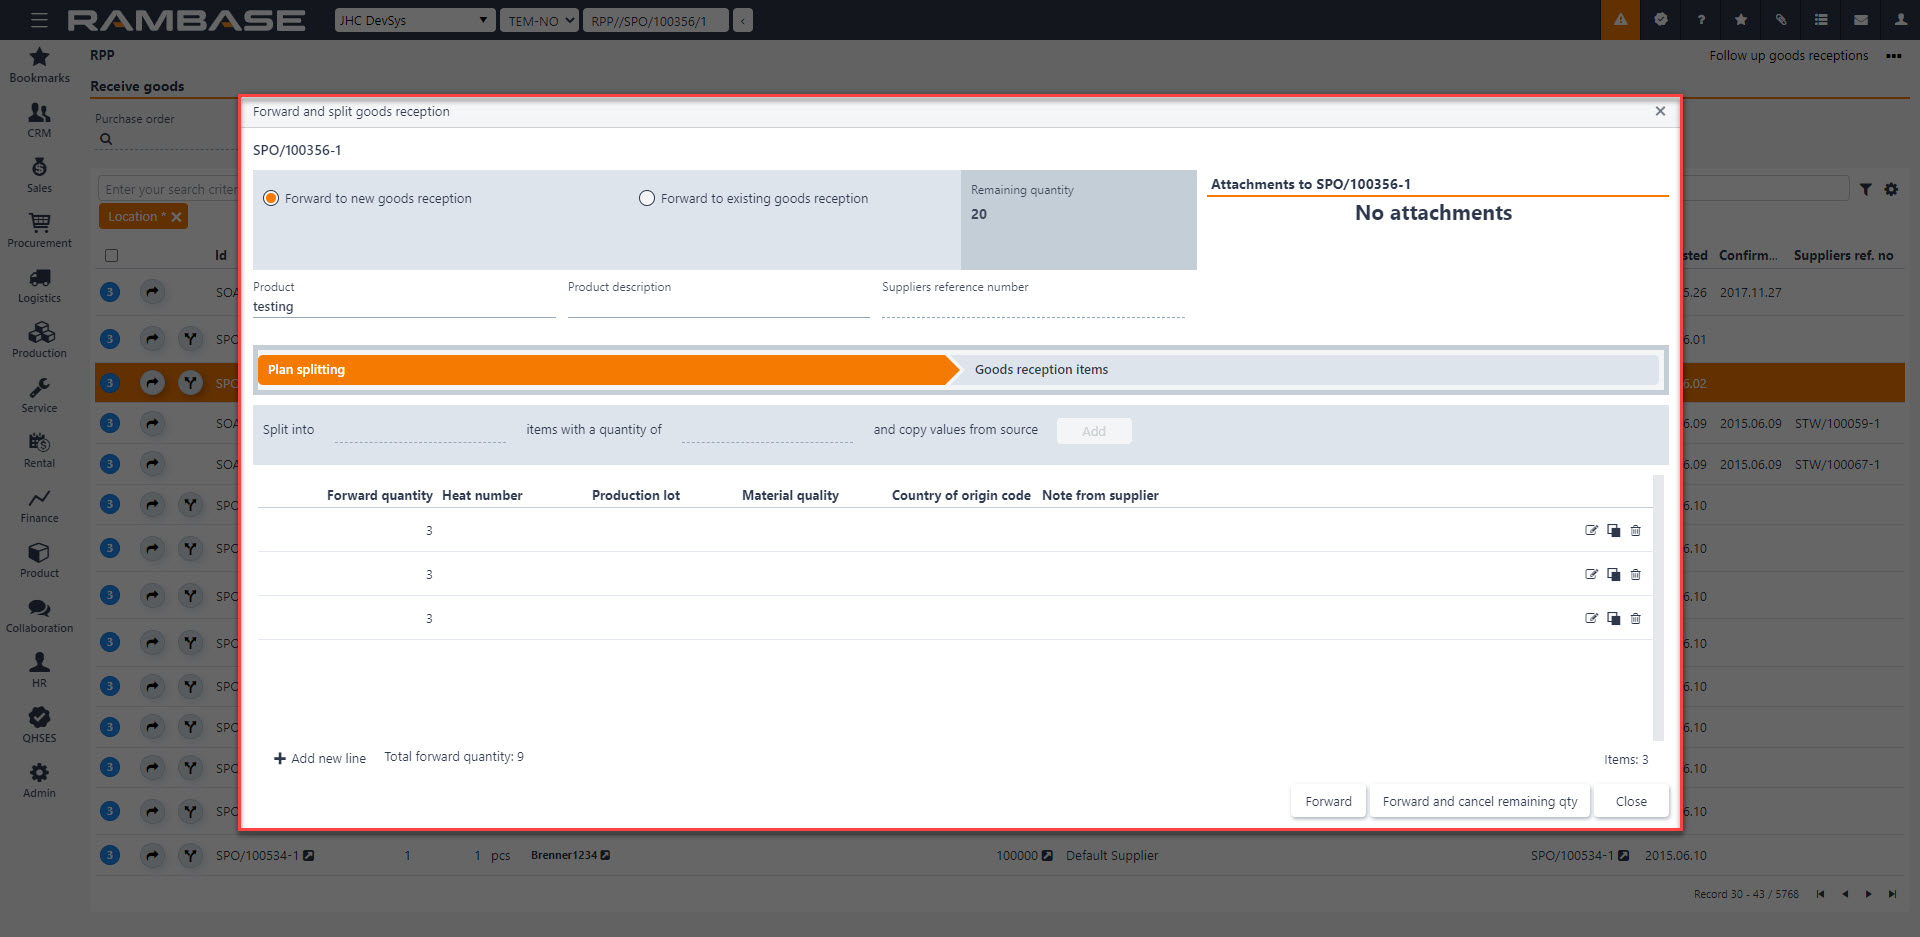
The Plan splitting stage:
1. Choose if the Purchase order (SPO-/SOAITEM) should be forwarded to a new Goods reception (SSA) or to an existing Goods reception (SSA) by clicking the Forward to new goods reception or Forward to existing goods reception options.
2. Product, Product description, Supplier reference number and Attachments to SPO will be copied to Goods reception items (SSAITEMS) by forward. It is also possible to add attachments to Purchase order item (SPO-/SOAITEMS) in the planning process by dragging them in to the popup.
3. Plan a split by entering desired items you want to split into a desired quantity, the split will make a plan to forward the calculated quantity from the Remaining quantity.
4. The split can be edited, copied and added manually as well by clicking the Add new line button.
5. Click the Forward button to forward to a Goods reception items (SSAITEMS) or click the Forward and cancel remaining qty button to forward to a Goods reception items (SSAITEMS) and cancel the remaining quantity the supplier does not deliver.
The Goods reception items stage:
After forwarding there are created a split with the desired quantity on several Goods reception items (SSAITEMS). At this stage you can edit the attachments and lines as well. It is possible to link an attachment to all Goods reception item (SSAITEM) or only to a specific Goods reception item (SSAITEM).
Note
NOTE! When using the split functionality, the received quantity must not exceed the remaining quantity in the Purchase order (SPO) or Purchase order response (SOA). If a higher quantity is received and cannot be processed as a single forward to Goods reception (SSA), the item must be forwarded from the Purchase order (SPO)/Purchase order response (SOA) to an Purchase order response (SOA). The quantity in the Purchase order response item (SOAITEM) should then be adjusted to match the physically received quantity.
A Goods reception (SSA) is a document that contains a list of goods that has been received from the supplier. And it is used for holding stock in the Stock assignment (SAR)
It is possible to see the history of what happened to the stock over time, whether it has been corrected, transferred to another location or stock location, or been counted.
To open the Goods reception (SSA) application, find Logistics in the RamBase menu and then Reception. Click Goods receptions (SSA) to enter the application.
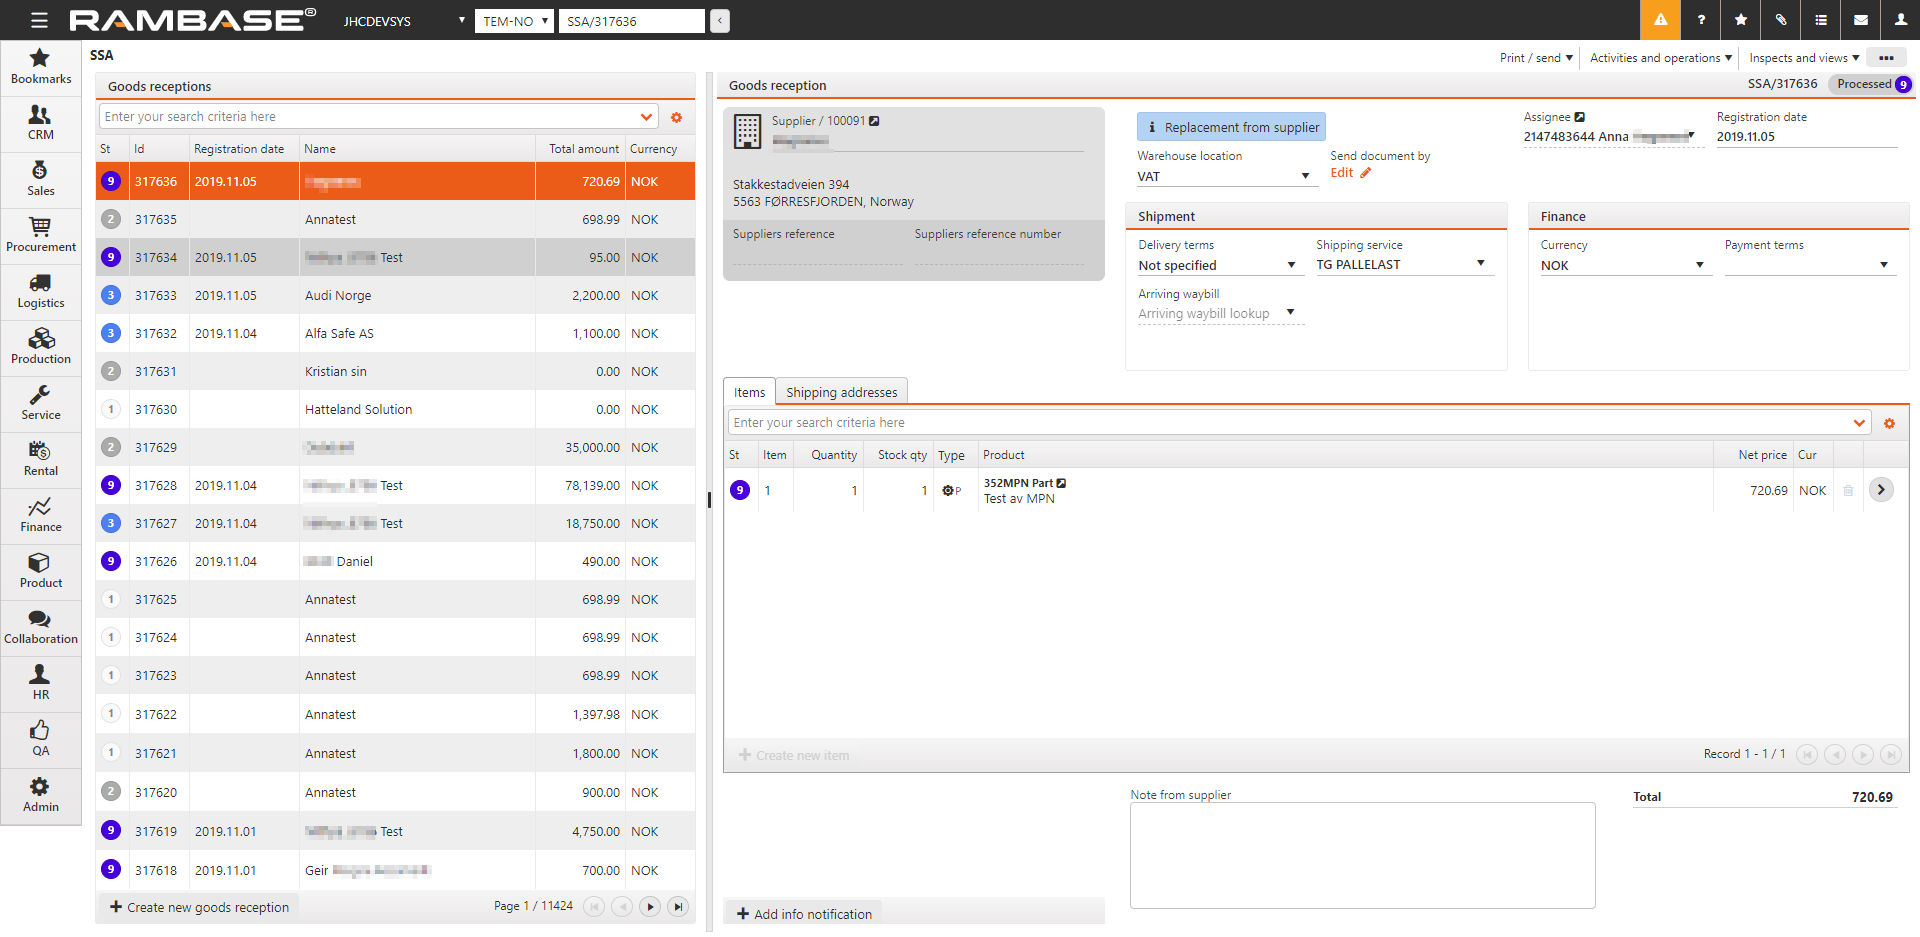
A Purchase order (SPO) is sent to the supplier and then returned as a Purchase order response (SOA) confirming the Purchase order (SPO). The goods are received from the supplier and then the Goods reception (SSA) document is issued. On the reception of goods from the supplier, warehouse personnel use the Receive goods (RPP) application to look up the associated Purchase order (SPO) or Purchase order response (SOA), and to transport the item lines to an Goods reception (SSA). Use the Goods in (GIN) application for service and rental documents.
Note
NB! Once registered, it is not possible to backdate or change the period on a Goods reception (SSA) document.
Quality control trigger (QCT) define when quality control is required during incoming Goods reception process.
Quality control triggers allow you to control:
When a quality control notification is required
Which products, suppliers and locations it applies to
What message is shown to the users in Goods reception item (SSAITEM)
When a Purchase order item (SPOITEM) matches a configured Quality control trigger (QCT), a quality control notification is automatically created upon registration.
The quality control requirement is visible early in the process, for example in Receive goods (RPP), allowing warehouse management to plan resources and tools accordingly. The requirement follows the item through the logistics flow and remains visible when the item is forwarded to Purchase order response (SOA) and Goods reception (SSA), including in the Expected goods view.
If a Purchase order item (SPOITEM) does not match any QCT, quality control notifications can still be added manually.
When the defined conditions are met, a notification is created and displayed on the Goods reception item (SSAITEM) to ensure the required approval is performed.
When goods that have been returned to the supplier via a Supplier return (SRT) are received back at the warehouse, a Goods reception item (SSAITEM) is created from the Supplier return (SRT). This Goods reception item (SSAITEM) will then be checked against Quality control trigger (QCT) and may result in a quality control notification.
During the quality control process, the inspection can result in one of the following outcomes:
Approved - Quality of the goods are aligned with the requirements
Cancelled - A quality manager is allowed to override the requirement for quality control and decided that it's not needed anyway
Rejected - Allows user to specify a certain quantity which doesn't fulfill the quality requirements
Tip
Navigate to the application
Option 1: RamBase menu -> Logistics -> Reception -> Quality control trigger
Option 2: RamBase meni -> QHSES -> Quality control trigger
Option 2: Click the Program field and type "QCT" and press ENTER.
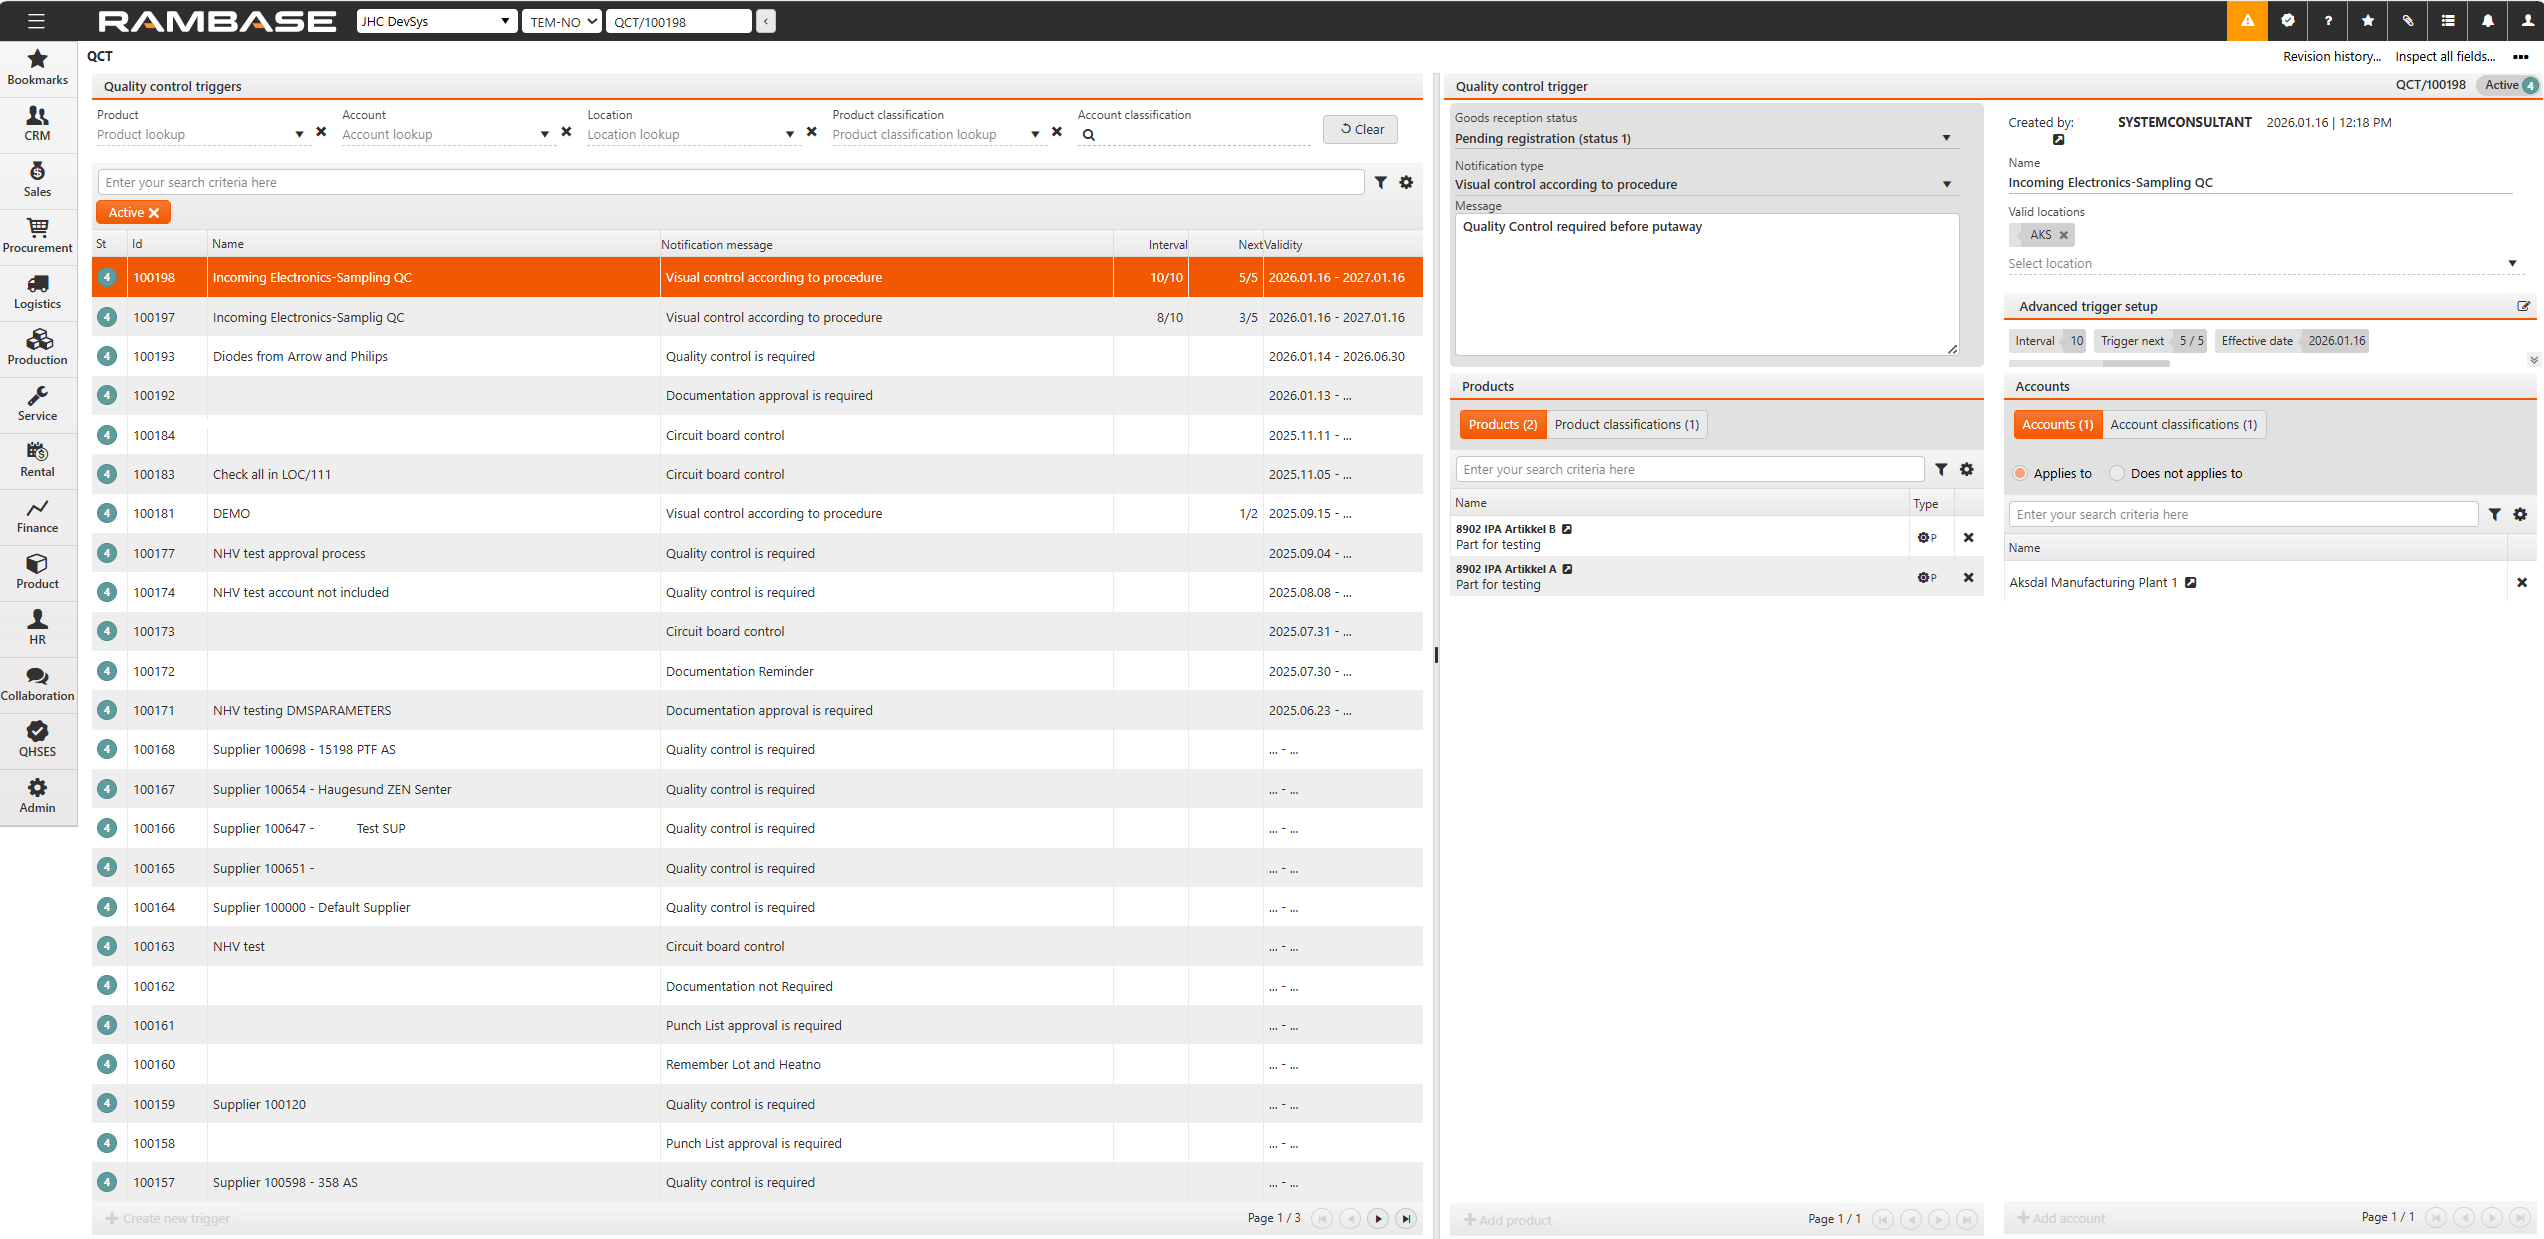
The application is divided into:
The Quality control triggers area
The Quality control trigger details area
Products
Accounts
The Quality control triggers area is filter based and can list all intended triggers.
The header includes search fields, the Filter builder icon and the Column settings icon.
The list includes all filtered triggers and is divided into columns. The user can create a new trigger by clicking the Create new trigger button in the footer.
The user can quickly search for a trigger. Click the Quick search bar to include or exclude the following in the search:
Product
Account
Location
Product classification
Account classification
The Filter builder includes a set of predefined filters, listed below. A selected and active predefined filter will be placed underneath the search field and marked with color orange. A selected and inactive field will still be placed underneath the search field, but marked with color gray. Click the Remove icon to remove the predefined filter.
Active - This filter will list all Quality control triggers in Status 4 - Active.
The user can also create saved filters by combining Field, Operator and Value in the Create custom filter area. Click the Save filter button to add the custom filter to the My saved filters area. A selected custom filter will be displayed underneath the search bar like a predefined filter.
Click the Column settings icon to open the column settings. Here the user can add and remove columns from the Quality control triggers area, Export to excel, Reset to default view and Include custom fields.
The triggers area includes all included columns and filtered quality control triggers. The user can create a new quality control triggers by clicking the Create new trigger button.
Columns | Description |
|---|---|
St | Displays the status of the quality control triggers.
|
Id | Quality control trigger identifier. |
Name | Displays the Quality control trigger name. |
Notification message | Displays the notification definition message in user language. |
Interval | Intervals can be used to specify that this quality control should not be triggered for example on every fifth purchase. |
Next | You can choose to apply quality control for example to the next 5 purchases. |
Validity | Effective/Expiration date. |
The details area is used to handle the specific trigger, most notable building the trigger and applying products, triggers setup and accounts.
Goods reception status - Quality control will be triggered by attempt to register Goods reception (SSA) from this status to the next status.
Notification type - Notification type identifier.
Has documentation requirement - If this is checked, the attached files to Goods reception (SSA) will be validated against documentation requirements for this purchase order. If fulfilled, the quality control notification will be automatically approved and doesn't require any manual action. This option is only available for the notification type Documentation approval is required.
Message - Message with additional information for a quality control. Text to be visible in transaction document item when a notification is added due to this trigger.
Created by - Who the quality control trigger is created by.
Name - Name of quality control trigger.
Valid locations - Quality control can be limited to certain locations. You may select one or more locations, and selecting a product or supplier is optional.
The advanced trigger setup enables configuration of trigger intervals and the application of quality control for a defined duration or for selected products or suppliers.
Trigger interval - Intervals can be used to specify that this quality control should be triggered for example on every fifth purchase.
Trigger next - If quality issues have been observed recently, for example with specific products or suppliers, you can choose to apply quality control for example to the next 10 purchases.
Remaining - The remaining number of new objects for which the quality control trigger will be triggered. This is a number that will be counted down based on the number that is set up in Next. E.g Next is 20, means that this QCT should be triggered for the next 20 order items. First time it’s triggered, RemainingNext is counted down to 19. Next time to 18 etc. When it’s triggered 20 times, it doesn’t apply any more.
Effective date/Expiration date - The date the quality control trigger is effective from. Expiration date: The date when the quality control trigger expires.
Products - Which product this quality control trigger applies for. Can also be blank to apply for all products.
Product classifications - Which product-classification this quality control trigger applies for. Can also be blank to apply for all products.
Add product
Accounts - Which supplier account this quality control trigger applies or not applies to. Can also be blank to apply for all accounts.
Account classifications - Which account classification this quality control trigger applies to. Can also be blank to apply for all account classifications
Add account
While in the Goods In (GIN) application and in the SSA-Documents folder, or from the Goods Reception (SSA) application, you can highlight the desired SSA and press ENTER, which will take you to the SSA-Item folder, where you press ENTER on the item line to enter the SSA Item.
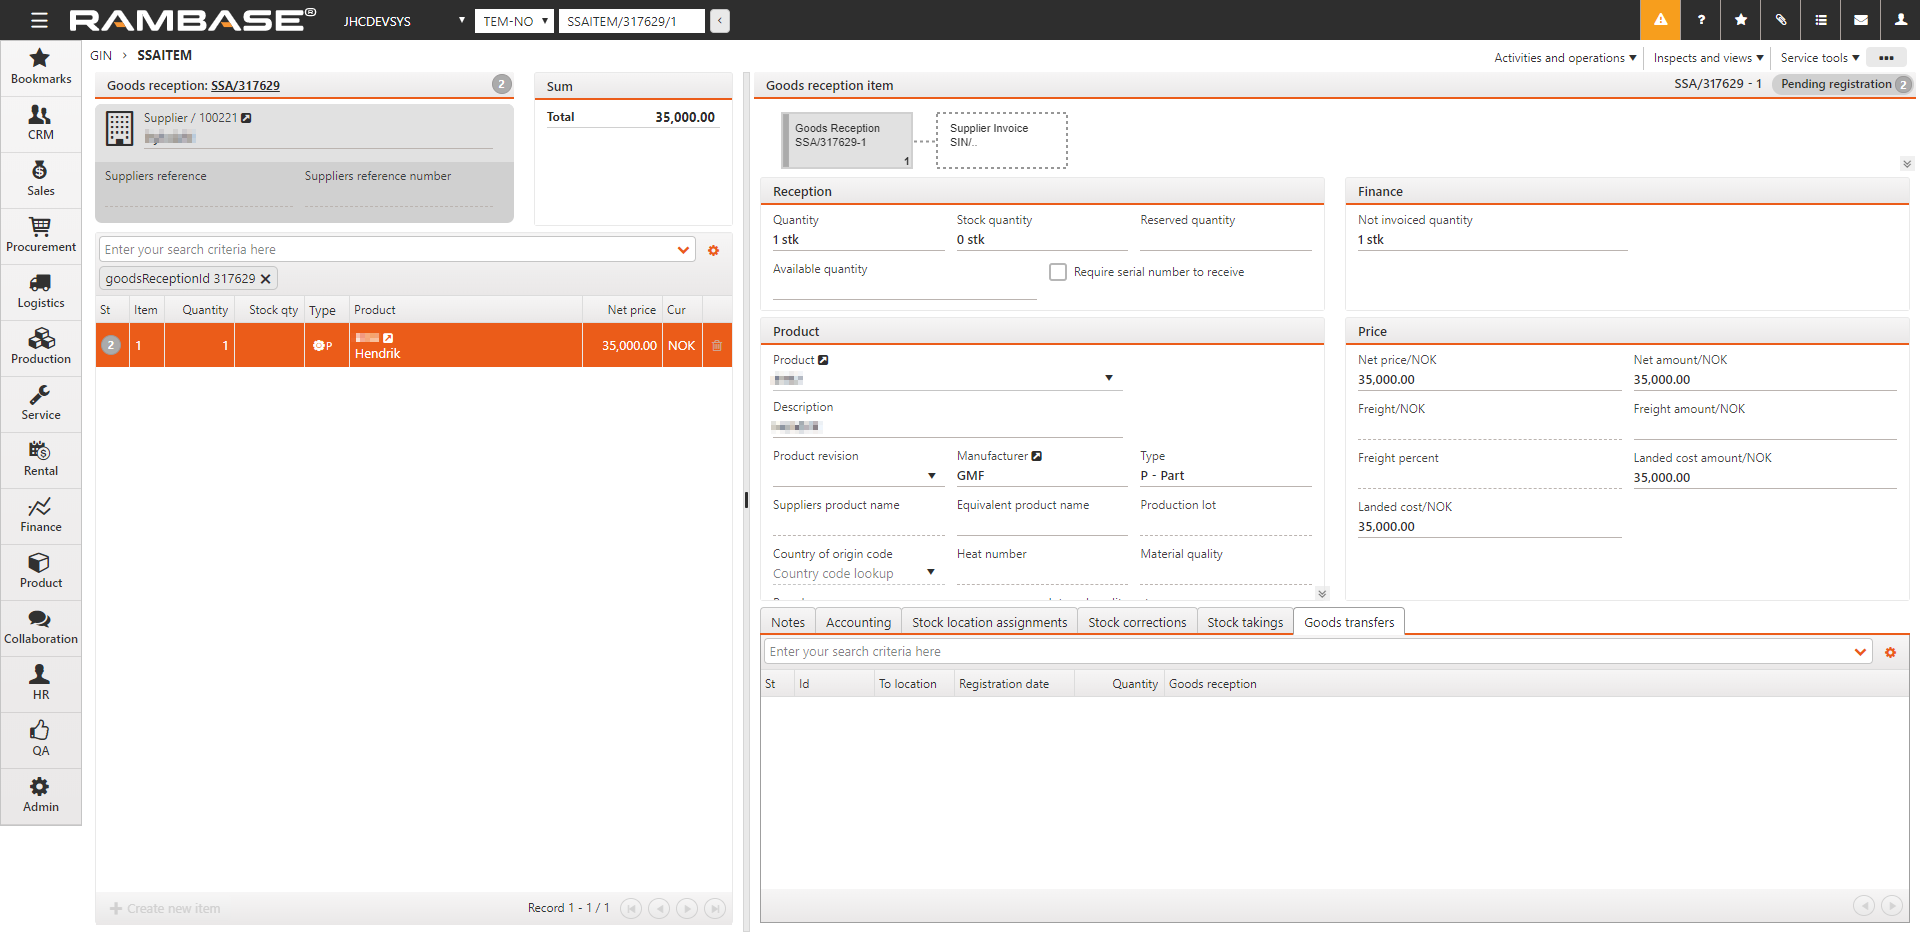
If GIN was started from WBI, you can now see the WBI number has been added to the document in the Arriving waybill field.
Depending on the company settings, the SSA ends up in ST:1 or ST:2.
If the SSA receives ST:1, you will need to use the option Print labels and prepare for put away in the context menu, which will set the SSA to ST:2.
When the SSA is in ST:2, choose the option Register as stock in the context menu.
The goods are now registered and entered into stock, to an unassigned stock location. To assign a stock location, enter the SSA item and choose the Move goods to other stock location option in the context menu. This will take you to the Stock Move (STM) application.
The process of moving stock to a stock location and registering the SSA can also be done via the PUTAWAY application on a handheld device.
It may be necessary to register serial numbers to the incoming goods.
To register serial numbers for incoming goods, open the actual Goods Reception (SSA) document. This will be prompted if the option RequireSnoToReceive in Product (ART) (located in the Misc folder) has been set to YES.
Enter the desired item by highlighting the item in the item line and press ENTER.
Choose the Serial numbers... option in the context menu.
In this popup you can enter serial numbers one by one, or if a sequential number series has been received, you may use prefix and multiple update.

The serial numbers can also be scanned via the Serial Numbers (SERIALNO) application on a handheld device.
If you need to retain stock for any reasons, the field Reserved quantity can be used.
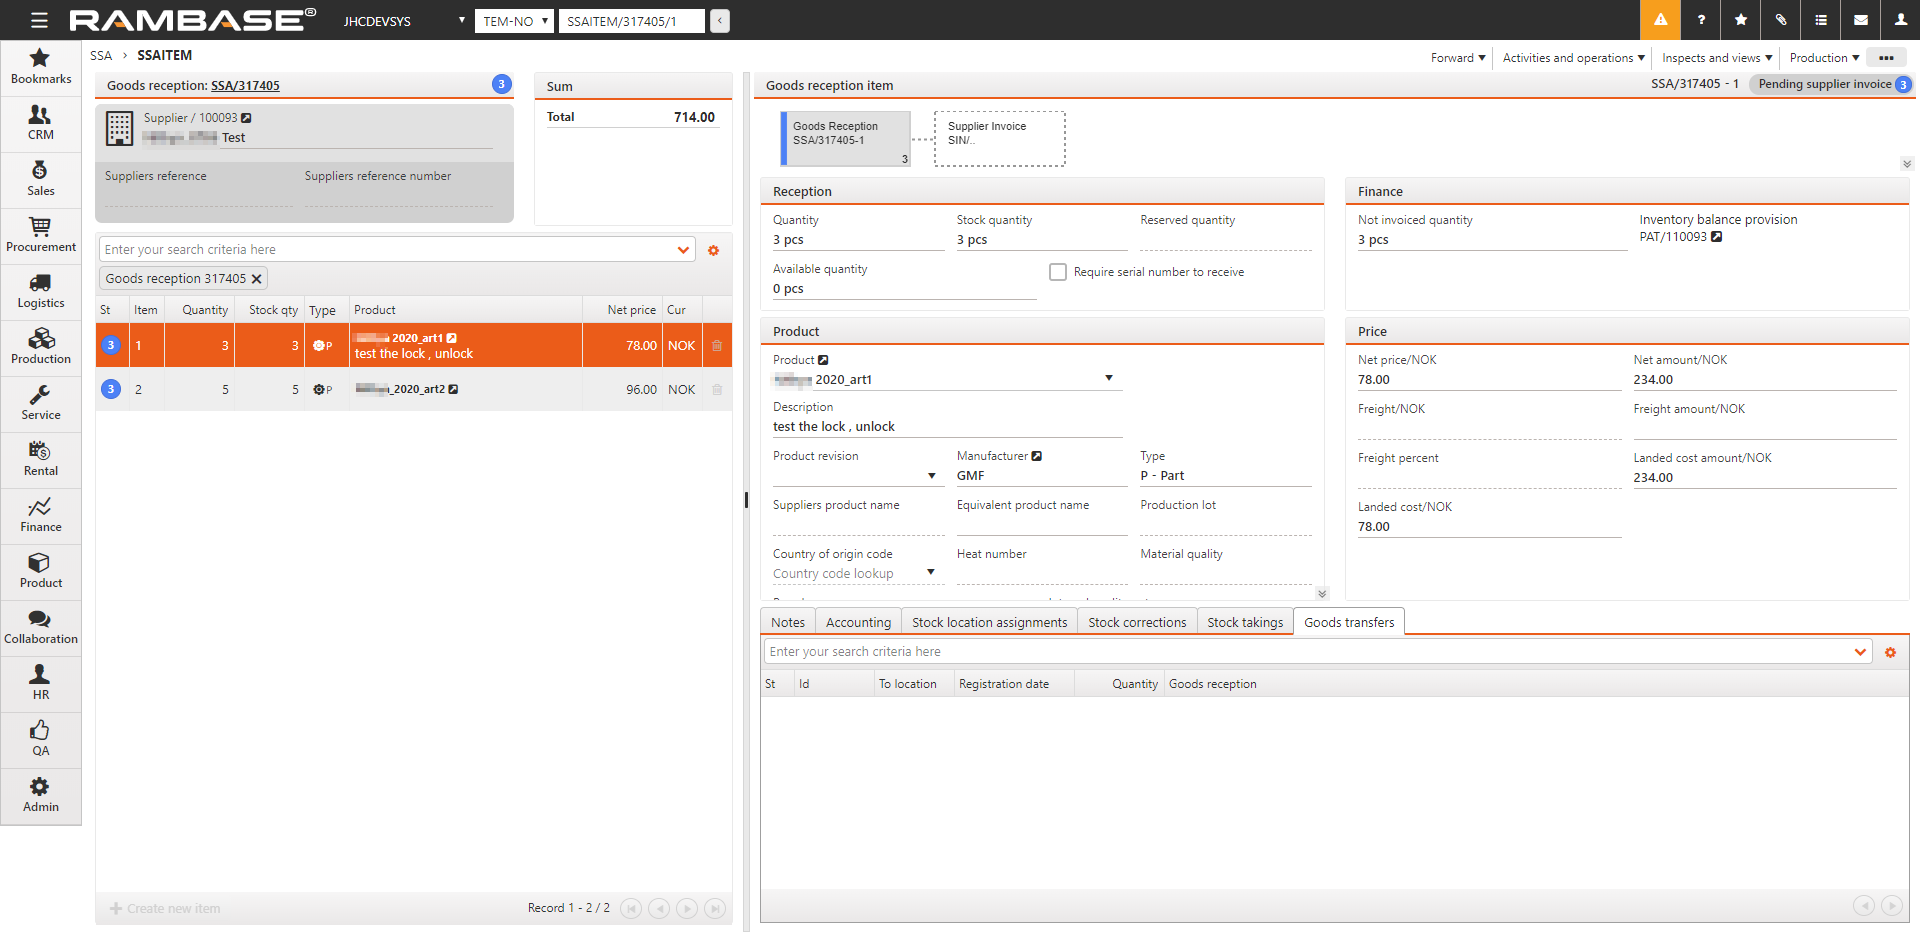
Enter the SPO / SOA / SSA document you want to reserve items on.
Enter the specific item you want to reserve.
In the field Reserved quantity, enter the amount of goods you want to reserve.
This amount will now be locked and cannot be linked to other documents until the reserved quantity is reduced. Application that shows stock assignments for PWO, COA, SRT, STW will show the Reserved quantity in a separate column. To release allocated goods, the Reserved quantity has to be decreased.
The Stock Move (STM) application is used to assign stock location to received goods. To open the Stock Move (STM) application, find Logistics in the RamBase menu and then Warehouse management and Move goods. Click Move goods to enter the STM application. Or use the context menu option Move goods to other stock location from the related Goods Reception (SSA) item.
Find the unassigned goods you want to assign a stock location. If you have used the context menu option Move goods to other stock location on the SSA, the goods will already be highlighted in STM. If not, highlight the desired item line.
After the item line has been highlighted, options to move and split the Stock Location Assignments (SAP) will appear.
The column Move Qty. will have a box where the quantity you want to assign a stock location can be entered. If less than full amount is entered, the remaining goods will remain unassigned and the SAP will split.
The next field in the Move to Stock Location column is then used to find the desired location for the stock. Either start typing the location name, or find it from the menu. The move will happen immediately after the location has been entered.
When you highlight the desired item line, you can block the goods from picking and linking using the checkboxes in the Stock Location Assignment Details area.
The move can be seen in the Stock Location Assignment History down in the right corner, with the latest change at the top.
To register goods to preferred stock location using handheld terminal, you will need to use the PUTAWAY application.
To open the Putaway (PUTAWAY) application, find Logistics in the RamBase menu and then Warehouse management and Move goods. Click Put away by handheld device to enter the PUTAWAY application.
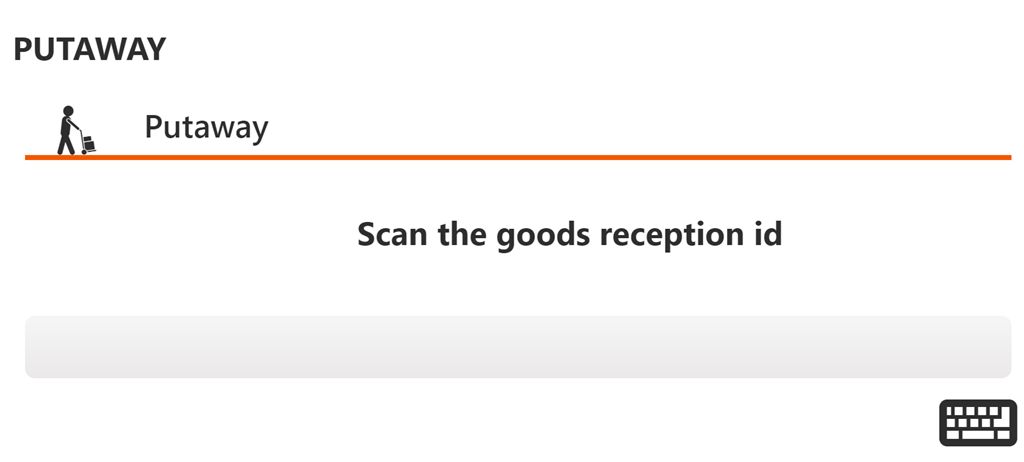
Scan the goods reception ID. You can also type the details in the text field by clicking the keyboard icon.

This window shows all the relevant information regarding the SSA-item. If preferred stock location has been set on the Product, this will show as a default value for the item.
Click the pen icon next to the quantity to choose the desired quantity you want to place at the given stock location.
The next step will be to set the stock location by either scanning the stock location label or entering the stock location name manually.
The next window will confirm the stock location placement and quantity. If the details are incorrect, click the Undo Operation button and redo it. The history of the stock location assignments are saved in the history listing below in the PUTAWAY application.
The program is now ready for the next stock location assignment.
It is possible to view stock assignments for a product from the Item view using the Stock Assignment (SAR) icon. This will open a new window which shows if there are assignments to the following documents: Sales Order (COA), Shipping Advise (CSA), Customer Quote (CQU), Production Work Order (PWO), Supplier Return (SRT) and Goods Transfer (STW), Service Orders (CSO), Stock Correction (SAW) and Stock Location Assignment (SAP).
To open the Stock Assignment (SAR) window for an SSA item, enter the SSA.
Click the cogwheel in the Items folder.
Select Columns and click on the Assignments check-box.

Click the SAR icon in the Assignments column to open the Stock Assignment window.

ItmSt
Status of the documents with assignments.
LinkQty
The quantity that is assigned to this document. If “Pending” is showing in the “Pending” column, then this quantity is pending purchase/manufacturing. If not, it is the quantity that is assigned from the respective Goods Reception.
Bound
The quantity that is assigned to this document from Purchase Order (SPO), Purchase Order Response (SOA), Goods Reception (SSA) and Production Work Order (PWO).
Docid
ID of the document.
Revision
The product revision from the document.
Pending
Displays the value “Pending” if the document is pending purchase/manufacturing. You can choose to remove remove documents by unchecking the “Show Pending Orders” button.
ProdStart
If the assigned documents is a Production Work Order, this is the Start Date from this.
Icons
Inspect to other applications.
Loc
The warehouse locations these documents have assignments from.
UserId
Assignee of the document.
Req
Requested Delivery date from the document.
Conf
Confirmed Delivery date from the document.
Gm
The documents Gross Margin in percent.
Price/NOK
Price of the documents, converted to currency from the Goods Reception.
FreeQty
The Goods Receptions available quantity for new assignments.
StockQty
The quantity of this Goods Reception which have not yet been shipped out from warehouse or been consumed in historical Production Work Orders.
ReservedQty
A quantity that for any reason is reserved in this Goods Reception. This will reduce available quantity accordingly.
ProdQty
The quantity from this Goods Reception that has been picked to active Production Work Order.
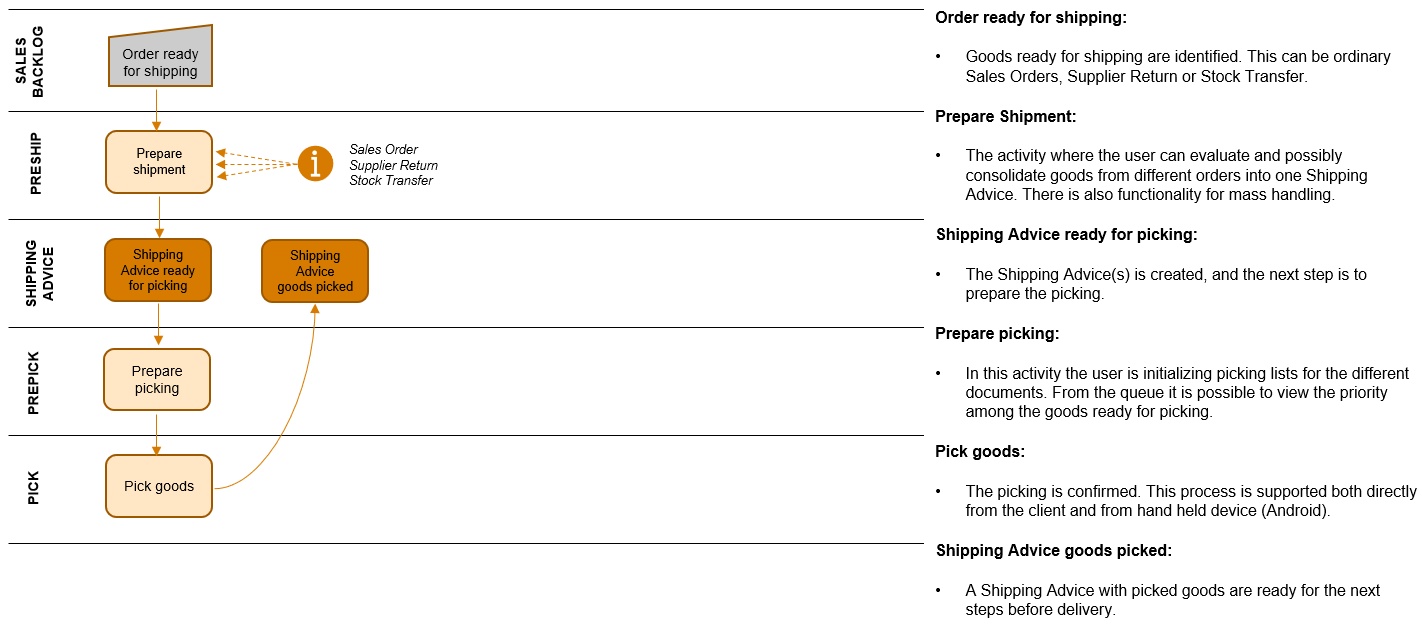
The picking process may be defined as the process where goods are physically picked and allocated to prepared shipments.
Picking for one order completed.
Picking for several orders consolidated and completed.
For outgoing orders with physical goods involved, the goods must be picked and registered as picked. To maintain the control over the goods related to a specific order, the information telling the warehouse workers which product to be picked, must be followed. The entire picking process can be assisted by a handheld terminal / PDA. For companies delivering thousands of orders each day, the most efficient way of picking is picking for several orders at once. For companies delivering less, but bigger orders, picking for order by order may be advisable.
Initialize pick and print picking lists
The picking list that describes the items to be picked must be printed.
Pick goods
The physical picking of the goods must be performed and must in most cases be assisted with the picking list.
Register goods as picked
When the listed goods are found and picked, they must be registered as picked to deduct the picked items from the stock count.
Setting name | Description |
|---|---|
Allow to Swap Assignment With Shipping Advice (CSA) | If this setting is 'ON' - the users have the option to swap assignments with shipping advices (CSA). |
Allowance for Production Operator to pick from another Goods Reception where pick is initialized | Allow that a production operator and shipping operator can pick from another GoodsReception than the ProductionWorkOrder or ShippingAdvice is assigned to in Assignment Registry. The assignments can also be initialized for picking. This setting will have no effect if the settings ProductionWorkOrderAllowToPickFromAnotherGoodsReception or ShippingAdviceAllowToPickFromAnotherGoodsReception is turned off. |
Allowance for Production Operator to start the ScanPick application | If this setting is 'ON' - Allow that a production operator can start the ScanPick application from different production applications. |
Allowance for Shipping Operator to pick from another Goods Reception | If setting is 'ON' - Allow that a shipping operator can pick from another Goods Reception (SSA) than Shipping Advice (CSA) is linked to in Stock Assignment Register (SAR). |
Allow picking customer goods from restricted Stock Locations | If this setting is ON: allows to pick customer goods from SSA (CLASS: CUSOWNED) if related PWO is for same customer. |
Document link for Returns | If this setting is "ON" - Sales Order/Sales Quote/Shipping Advice (COA/CQU/CSA) will automatically be assigned to Goods Reception (SSA) with DOCTYPE:CUSRETURN. If this setting is "OFF" - standard Assignment Register (SAR) linking rules will not automatically assign these documents, but they can be assigned manually. |
Link to other location on Sales Order (COA) | If this setting is "ON" - The Sales Order item (COA-ITM) will, if stock is not available at the Sales Order (COA) location (main location on Sales Order), link to available stock on a Goods Reception (SSA) in any other location, and Warehouse location (location on Sales Order item) will be changed accordingly. If there are quantity available in the Supplier backlog on the same location as the Sales Order, the quantity will still link to free stock on other location. If setting is "OFF" - If there is no available Stock on main location on Sales Order, quantity will be linked to "Pending". If the are quantity availabe in the Supplier backlog on another location than main location on Sales Order, the quantity will anyway link to Pending. |
Pick on Production Work Order (PWO) from another Goods Reception (SSA) | If setting is 'ON' - Allow that a production operator can pick from another Goods Reception (SSA) than the Production Work Order (PWO) is linked to in the Stock Assigment Register (SAR). |
Sales Order (COA) included in the Assignment Register Optimize job | If this setting is "ON" - Sales Order (COA) will be included in the Assignment Register Optimize jobs. There are several rules for which Products and documents that are candidates for re-linking to better links. For new Customers the setting can be 'OFF', -but could be turned 'ON' in agreement with the Customer after they have been explained the consequences. For more information: https://help.rambase.net about SAR Optimize. |
Sales Order (COA) included in the FIFO step for Optimize job | If this setting is "ON" - Sales Order will be included in the FIFO (first in first out) step in the Assigment Register (SAR) Optimize job. This means that Sales Order with the earliest Scheduled Shipping date will be linked to the goods first received in Stock (oldest Goods Reception - SSA). For new Customers the setting can be 'OFF', -but could be turned 'ON' in agreement with the Customer after they have been explained the consequences. For more information: https://help.rambase.net about SAR Optimize. |
Update SerialNumber in addition to Select from SSA | If this setting in "ON" - Possible to update SerialNumber by select Single Update/Multiple Update in the Serialnumber Registration pop-up on CSA/SRT/STW/COA, in addition to "Select from SSA". |
The Fulfillment Planning (PFP) application by default displays all Sales orders (COA) and Service orders (CSO) that are ready for delivery, based on the scheduled shipping Date field within the Sales order items (COAITEM) and Service order items (CSOITEM). From here Shipping advices (CSA) can be created, and both Shipping advices (CSA), Supplier returns (SRT) and Goods transfers (STW) can be prepared for the picking process. It is possible to change the filters to see the entire order backlog and plan ahead.
To open the Fulfillment planning (PFP) application, find Logistics in the Rambase menu and then Picking. Click Fulfillment planning to enter the application.
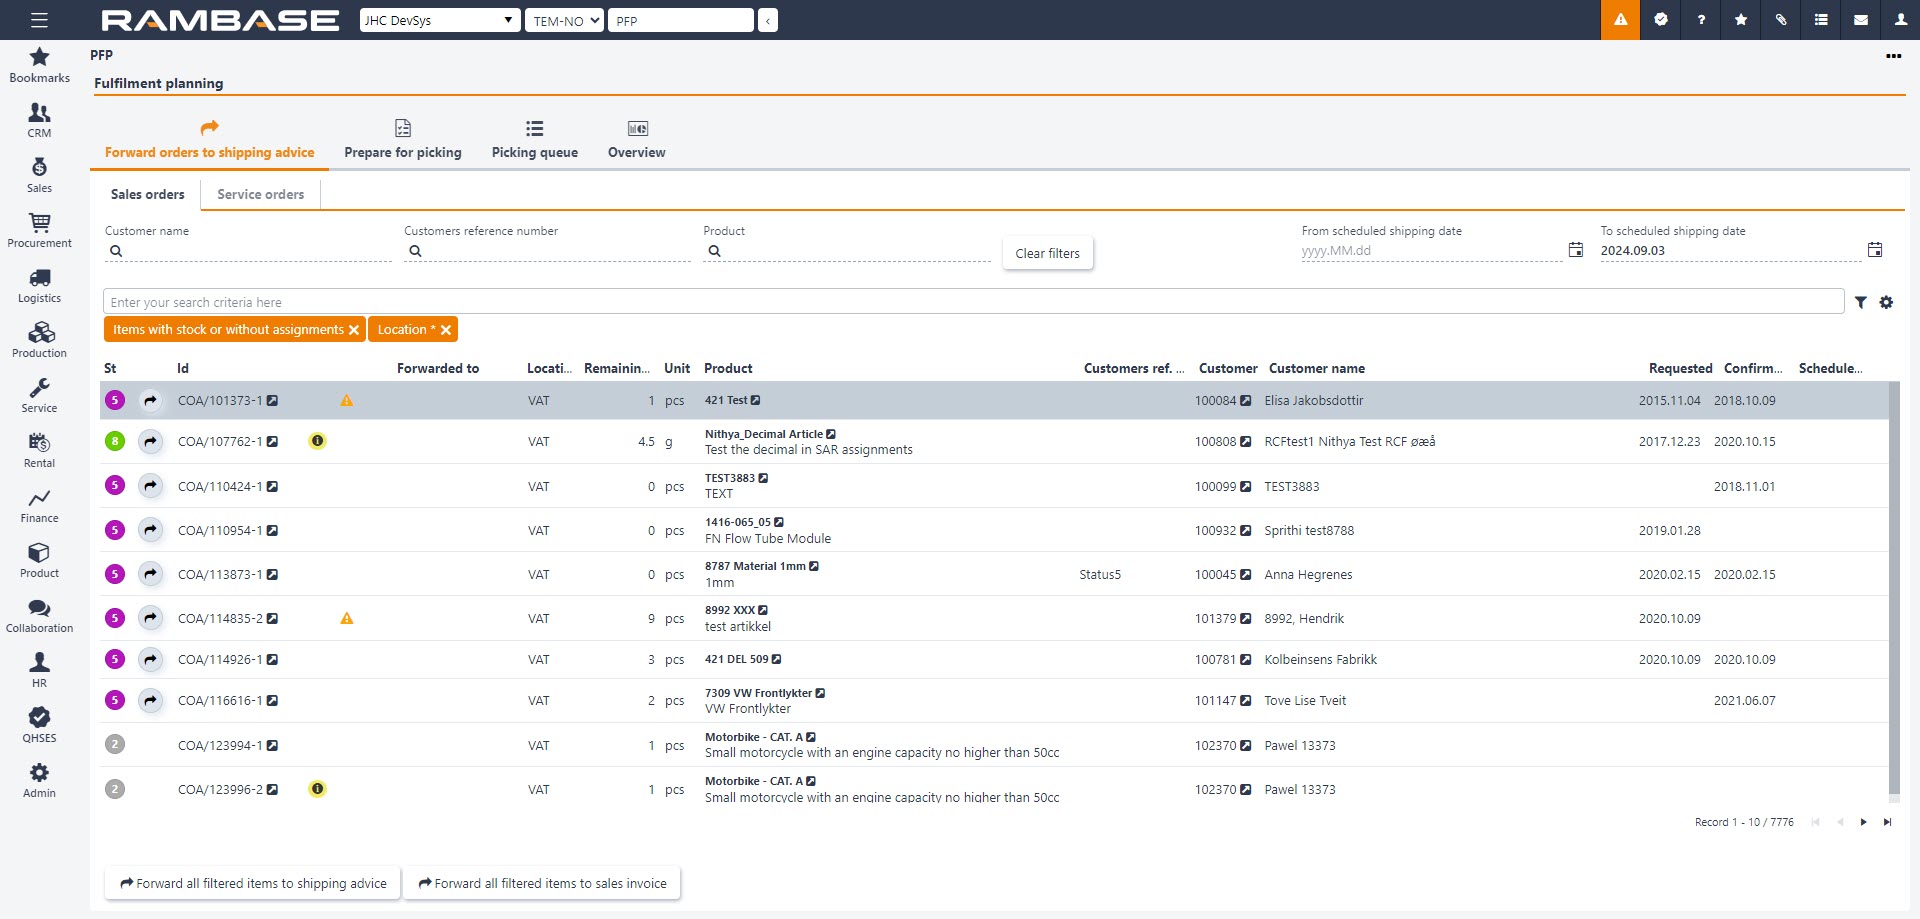
The application gives the user the option to transfer all filtered Sales order item (COAITEM) or Service order item (CSOITEM) in Status 8 - Ready for shipment, to a Shipping advice (CSA) in Status 0 - Under preparation for picking process, Status 2 - Pending picking or Status 3 - Pending shipping. It also gives the user the opportunity to add all Shipping advices (CSA) and Goods transfers (STW) to pending picking (Status 2) or to start picking (Status 3), enabling the user to create picking lists.
There are several fields and icons in the Forward orders to shipping advice tab which will make it easier to use:
The most used filter fields is at the top of the application and these are free text filters:
Customer name - Write the customer name to search for a specific customer. This will search for either the Name or the FirstName of the Customer (CUS)
Customer reference number - Write the customer reference number to search in the Customer ref. no. column.
Product- Write the name of a product to search in the Product column.
The From scheduled shipping date field is set blank by default. This means that the application will display all Sales order items (COAITEM) that should have been sent up until the date in the To scheduled shipping date field. Use the Calender icon to change the date.
The To scheduled shipping date field is set to today's date by default. Use the Calender icon to change the date.
The Enter you search criteria here field can be used to filter the search more specific.
Items with stock or non stock products - This filter is set as default and will display all Sales order items (COAITEM) that are ready to be forwarded. Remove this to see all Sales order items (COAITEM).
Location * - The application will use the location specified by the user in the Warehouse Location field within the Personnel (PER) application.
Arrow icon- Forwards item to Shipping advice (CSA). The Sales order (COA) and Service order (CSO) will go to Status 9 - Processed and the Shipping advice (CSA) will be in Status 0. The Sales order (COA) and Service order (CSO) will be displayed in the application as long as the Shipping advice (CSA) is in status 0.
There are three unnamed columns next to the Id column:
First column - An icon here means that the Sales order (COA) must be approved before it can be forwarded.
Second column - An icon here means that the Sales order (COA) has a setting in the Shipment area that is blocking it from being forwarded. For example: Only ship entire orders.

Third column - An icon here means that the item cannot be forwarded to a Shipping advice (CSA) until payment is registered.
It can be a trash-bin icon in the last column. Click this to delete the Shipping advice item (CSAITEM) and backward it to Sales order (COA).
It is possible to forward a single Sales order item (COAITEM) to a Shipping advice (CSA) or all filtered items to a Shipping advice (CSA).
First navigate to the Forward orders to shipping advice tab and then the Sales order tab. To forward a single sales order item (COAITEM) to shipping advice, click the arrow icon next to the Status code on Sales order item (COAITEM) line. This will send the Sales order item (COAITEM) to a Shipping advice (CSA) in Status 0.
Forward all filtered items to shipping advice:
This batch job will forward all filtered items that are not limited by approvals or any other configurations to a Shipping advice (CSA), regardless of status.
Use the search bar to find all items ready to be forwarded to a Shipping advice (CSA).
Click the Forward all filtered items to shipping advice button.
This will open the Forward all filtered items to shipping advice popup and have three choices:

Leave as system generated (Shipping advice (CSA) in Status 0).
Add to picking queue (Shipping advice (CSA) in Status 2).
Start picking (Shipping advice (CSA) in Status 3).
Click the Forward button when done.
It is possible to forward a single Service order item (CSOITEM) to a Shipping advice (CSA) or all filtered items to a Shipping advice (CSA).
Forward a single service order item to Shipping advice (CSA):
First navigate to the Forward orders to shipping advice tab and then the Service order tab. Click the arrow icon next to the status code on Service order item (CSOITEM) line. This will send the Service order item (CSOITEM) to a Shipping advice (CSA) in Status 0.
Forward all filtered items to Shipping advice (CSA):
Use the search bar to find all items ready to be forwarded to a Shipping advice (CSA).
Click the Forward all filtered items to shipping advice button.
This will open the Forward all filtered items to shipping advice popup and have three choices:
Leave as system generated (Shipping advice (CSA) in Status 0).
Add to picking queue (Shipping advice (CSA) in Status 2).
Start picking (Shipping advice (CSA) in Status 3).
Select priority and click the Ok button.
By default, the Prepare for picking tab will display all Shipping advices (CSA) in Status 0. Remove the Shipping advices filter to display Goods transfers (STW) in Status 0.
Click on the Column settings to open the different columns and choose between the Add to picking queue column (this will forward the Shipping advice (CSA)/Goods transfer (STW) to Status 2) or the Start picking (this will forward the Shipping advice (CSA)/Goods transfer (STW) to Status 3).
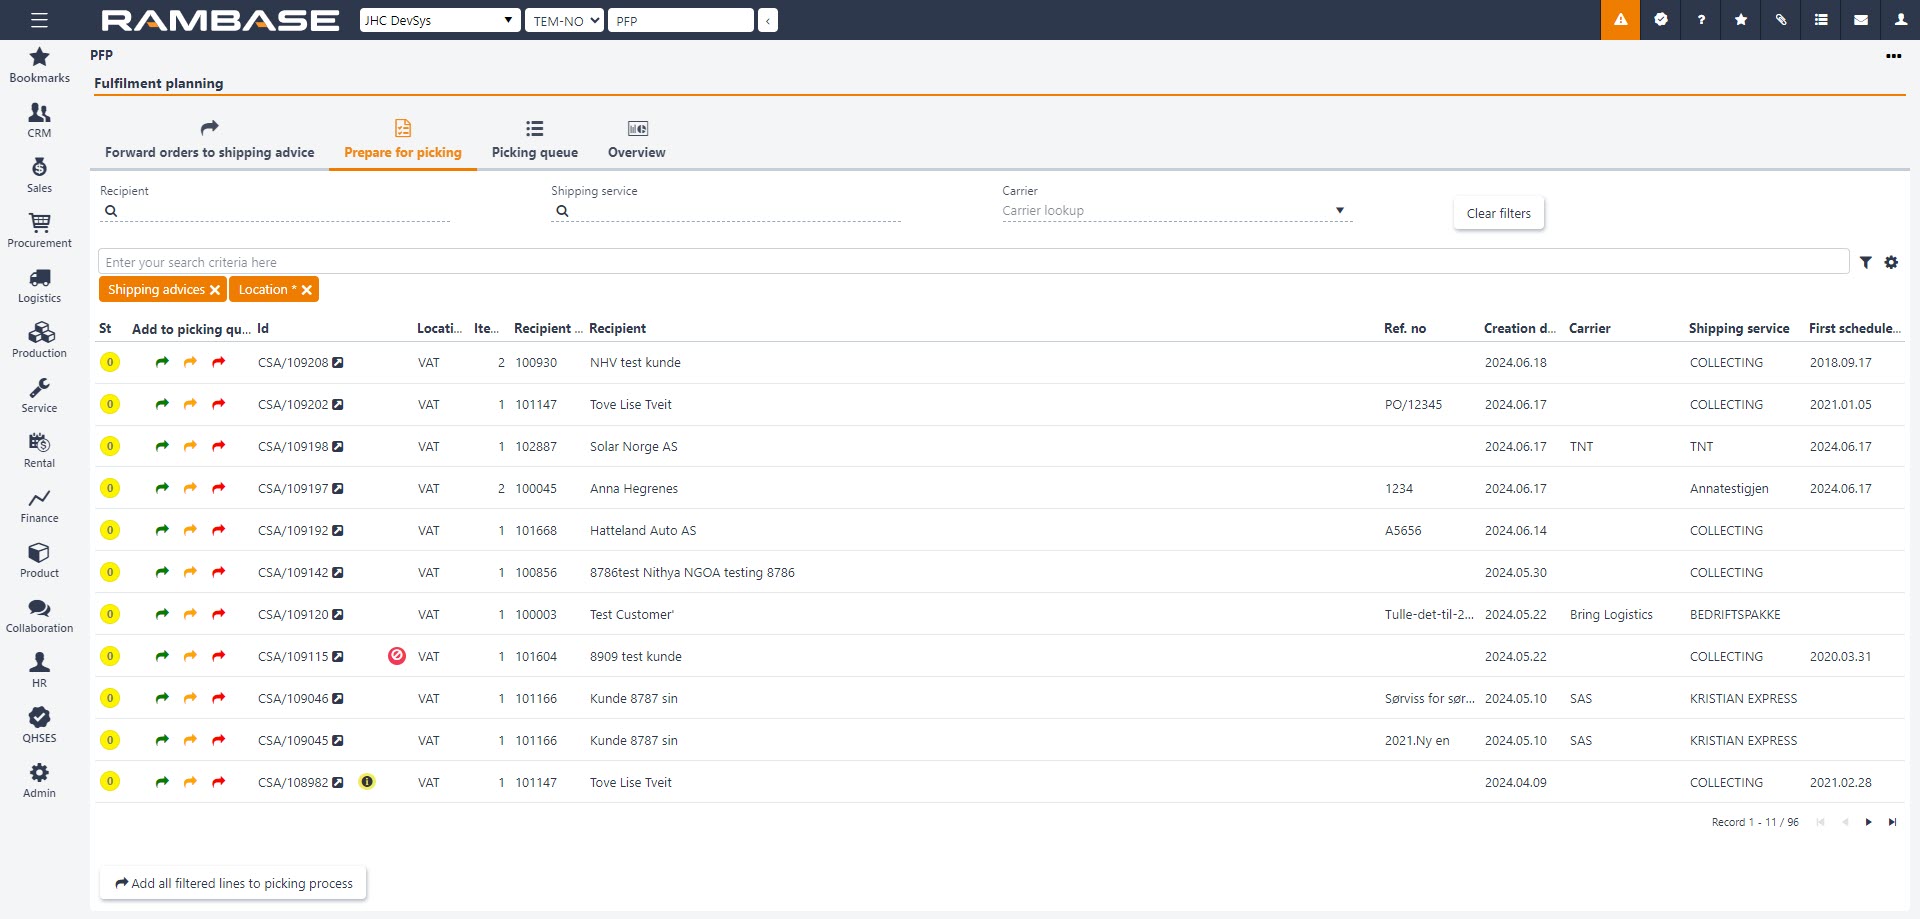
Add a single shipping advice or goods transfer for picking process:
Click the Green arrow (low priority), Yellow arrow (normal priority) or Red arrow (high priority) to set the Shipping advice (CSA) in Status 2 - Add to picking queue or Status 3 - Start picking.
Add all filtered lines to picking process:
Use the search bar to find all the Shipping advices (CSA) and Goods transfers (STW) ready to be added to picking queue or started picking.
Click on the Add all filtered lines to picking process button.
This will open the Send filtered items to picking process popup and have two choices:

Add to picking queue
Start picking
When clicking on the Start picking option, users can choose to assign picking list to an employee by clicking the Select assignee option and lookup an assignee.
If multiple documents are selected, users can can choose between creating a single picking list for each document, or a common for several. This can be further customized using the Group by option.
After choosing the picking process, select a priority and then click the Ok button.
The Picking queue tab lists Shipping advices (CSA), Supplier returns (SRT) and the Goods transfers (STW) which are in Status 2 - Pending picking. From this tab, users can initiate the picking process for creating picking lists, and eventually print both picking lists and labels.
When you select a document from the list by clicking the Plus icon, a pop-up will appear displaying the selected document along with any other documents pending picking for the same customer or supplier. The user can choose additional documents to include in the same picking process before clicking the Start Picking button. During this process, the documents status will change from Status 2 to Status 3.
Users can also multi-select documents or apply various filters to refine their selection. Once filtered, a picking list can be created based on the narrowed results. If multiple documents are selected, users can choose between creating a single picking list for all documents or generating separate lists for each. This can be further customized using the Group by order or Group by common options. There is also an option to assign a person to the task, though this is entirely optional.
The Overview tab in the Fulfillment planning (PFP) application displays charts for Sales order items (COAITEM) scheduled to be delivered and Shipping advice (CSA), Supplier return (SRT) and the Goods transfer (STW). You can use these charts as planning tools to prepare for picking and shipping operations.
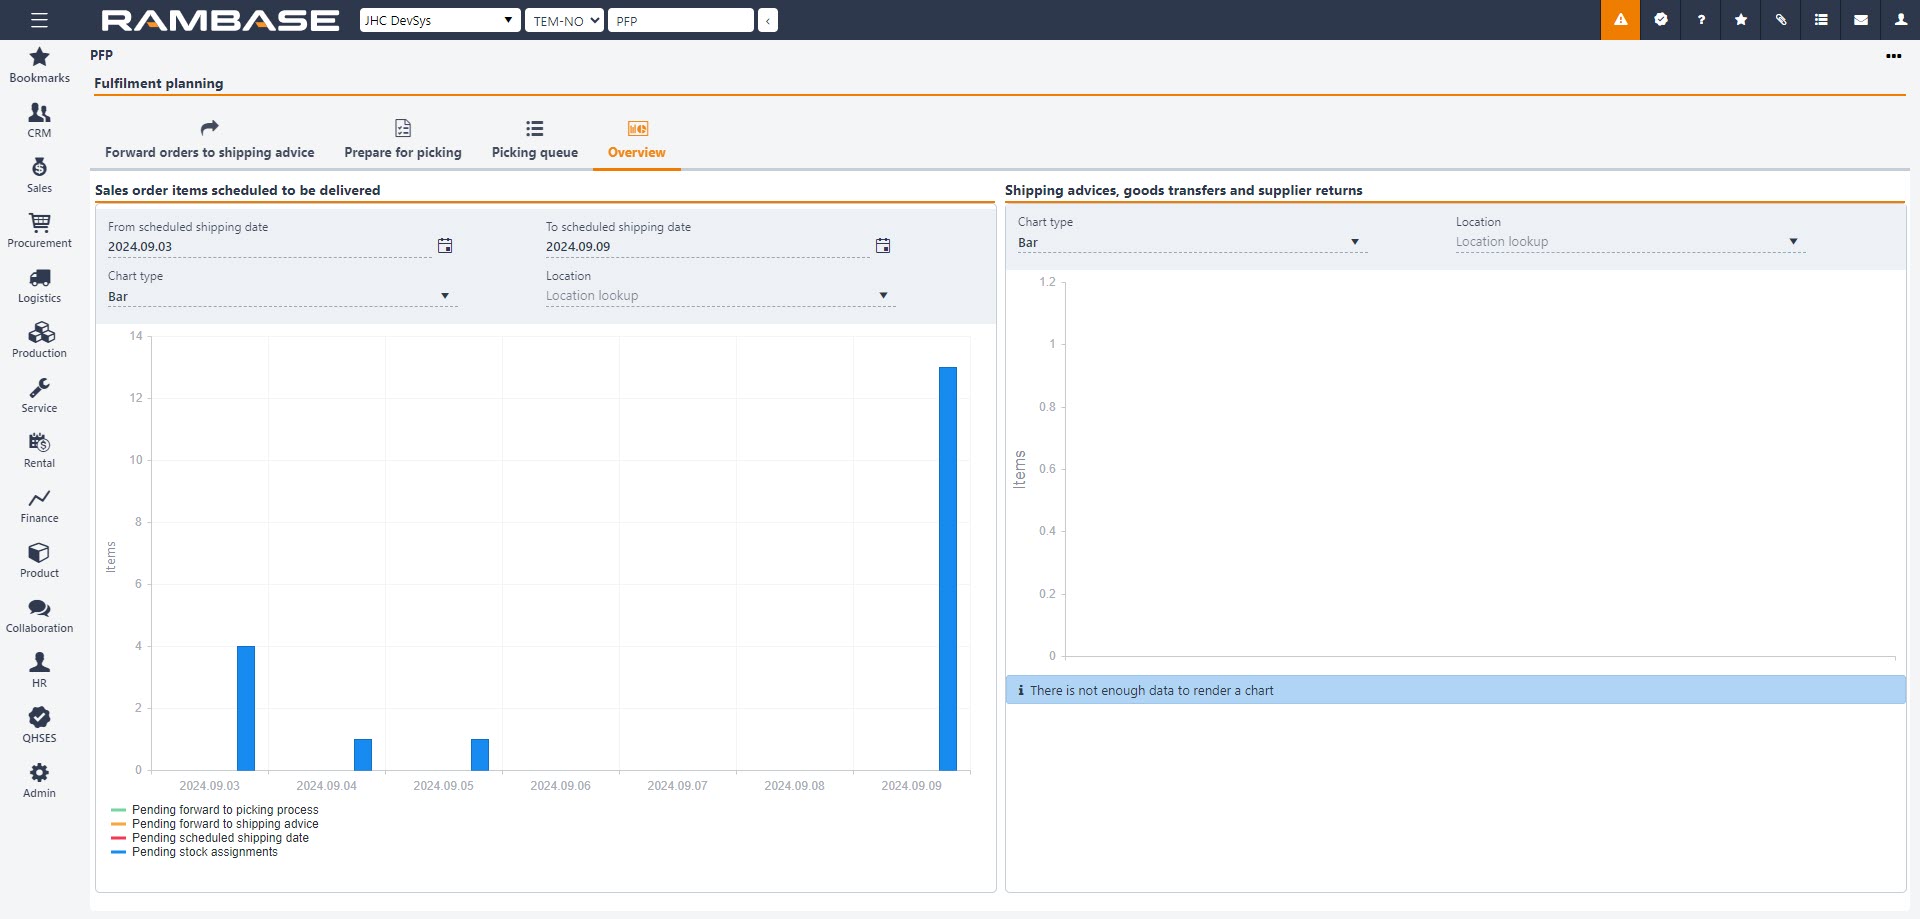
In the left-hand chart, select the From scheduled shipping date and the To scheduled shipping date to view the Sales order items (COAITEM) that are:
Pending forward to picking process. These are items in a Shipping advice (CSA) in status Status 0.
Pending forward to shipping advice. These are items in a Sales order (COA) in status Status 8 - Ready for shipment.
Pending scheduled shipping date. These are Sales order items (COAITEM) that are awaiting the scheduled shipping date.
Pending stock assignments. These are Sales order items (COAITEM) in status Status 6. These items have not yet been produced internally or received from a supplier, meaning that a delay is anticipated.
The default From scheduled shipping date is the current date and the default To scheduled shipping date is one week ahead of the current date.
Select the Chart type to view the chart as:
Bar stacked: In this chart type, all the occurrences of various statuses are displayed as a stack in the same bar.
Bar: In this chart type, the bars representing the occurrences of the status are shown side by side.
Fluctuating line: In this chart type, the occurrences of the various statuses are represented by color-coded lines.
Accumulated line: In this chart type, the occurrences of the various statuses are represented by shaded areas.
In Location, you can select the warehouse location, to view statistics from the specified location, if your PID has multiple locations assigned.
In the right-hand chart, you can select the Chart Type and the Location. The chart shows the following as color-coded bars for Shipping advice (CSA), Supplier return (SRT) and the Goods transfer (STW):
Pending forward to picking process. The documents are in status Status 0.
Pending picking. These documents are further advanced in the process in status Status 2.
Pending shipping. These documents are in status Status 3, and in the picking process. The items are awaiting shipment after picking is complete.
The right-hand chart shows the number of documents in the Y-axis, the left-hand chart shows number of Items in the Y-axis.
Common picking lists allow you to create a picking list for multiple Shipping advices (CSA) and Goods transfers (STW) per customer.
Start in the Fulfillment planning (PFP) application. To open the Fulfillment planning (PFP) application, find Logistics in the Rambase menu and then Picking. Click Prepare for picking to enter the Fulfillment planning (PFP) application.
Click on the Prepare for picking tab. This tab shows all Shipping advices (CSA) that has been forwarded from Sales orders (COA) from the Forward orders to shipping advice tab.
Use the filters to find the Shipping advices (CSA) that you want to add to the common picking list.
Click on the Add all filtered lines to picking process button.
Select the Start picking option in the dropdown menu.
Choose Group by.
There is also an option to assign a person to the task, though this is entirely optional. This is optional.
Select Priority.
Click on the Ok button to create the common picking list.
The Pick (PICK) application is used to confirm pick of goods.
The easiest and most effective method is using a hand held device to perform the pick, but it is also possible from this application.
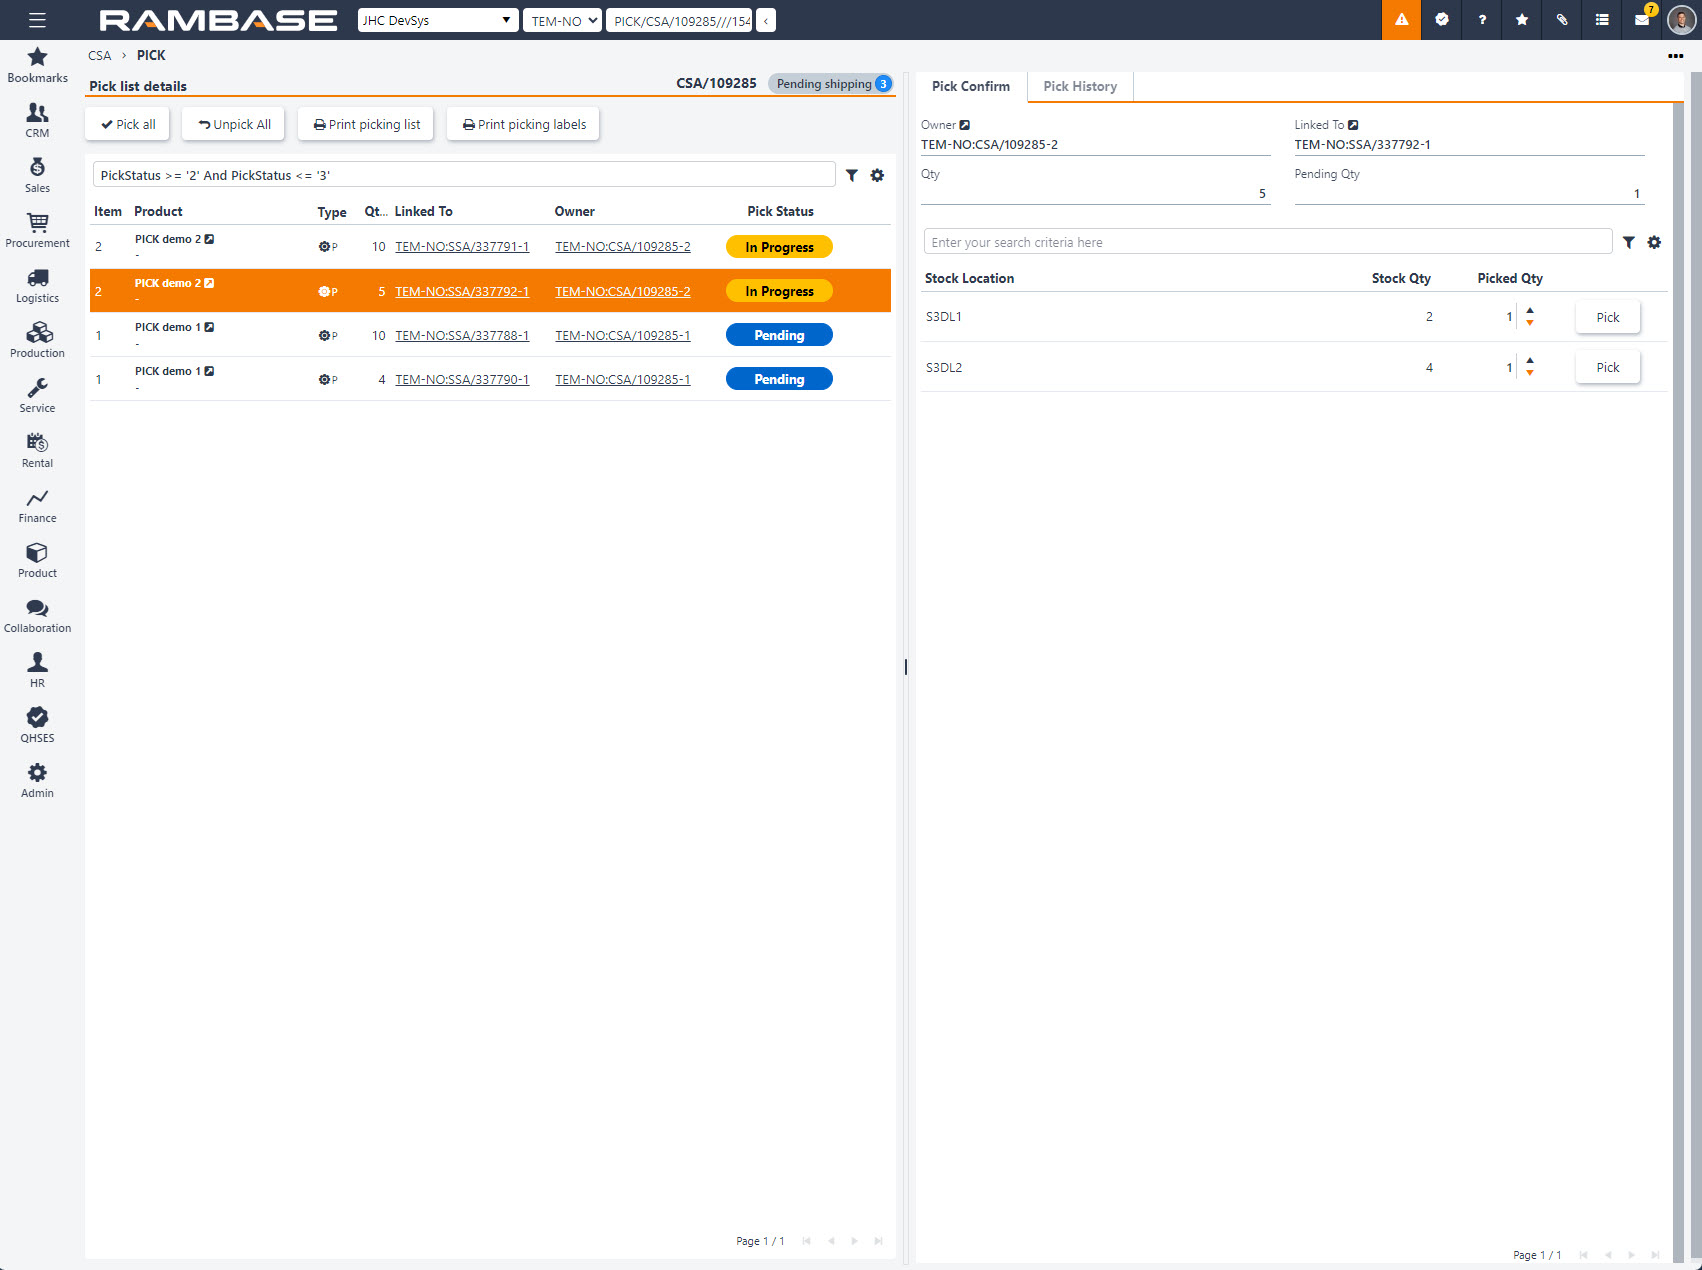
The list in the Pick list details area shows the Stock assignments (SAR) ready to be picked, with the Pick Status column detailing In Progress, Pending or Completed.
The actual picking registration is performed in the Pick Confirm area. Which is done by choosing a Stock location and then using the Arrow icons to adjust the picked quantity, or type the quantity picked in the Picked Qty field. Confirm the picking by clicking the Pick button.
If there is an error, click the Pick History column and then click the Unpick button to reverse the action.
Note
The Picked Qty column will have suggested values, based on the Pending Qty field in the header.
Too low or too high quantity
If the values in the Picked Qty field is lower or higher than the minimum or maximum quantity to pick, a Warning icon will be displayed next to the Picked Qty field. Inspect the Pending Qty field in the header, and adjust the Picked Qty field accordingly.
When a Shipping Advice (CSA / SRT / STW) has reached Status 3 - Pending shipping, it is ready for picking.
To open the Shipping advices (CSA) from the RamBase menu, select Logistics followed by Shipping and then Shipping advices.
Note
Using the navigation path above, the Shipping advices (CSA) application will be opened with the applied filter "legacyFilter('ST:3'), filtering the application on Shipping advices (CSA) in Status 3 - Pending shipping.
In the Shipping advices (CSA) application, select or search for the shipping advice to be picked.
Once the shipping advice has been selected, click the Pick shipping advice (1) option in the context menu.

This will open the Pick goods (PICK) application. Start by clicking one assignment, which is listed in the application as Pending.

Available Stock Qty for each Stock Location is listed in the Pick Confirm tab, on the right.

Select the quantity to be picked from each Stock Location by either typing a value in the Picked Qty field, or increasing/decreasing the quantity by one, by clicking the Arrow icons.
Suggested values
Based on the Pending Qty in the header, Picked Qty will be suggested for the Stock Locations.
Minimum and maximum picked quantity
If the Picked Qty is set either below the minimum or above the maximum, quantity to pick, a Warning icon will be displayed next to the Picked Qty field
To confirm, click the Pick button. When the Pending Qty has been Picked, the picking will be completed.

Unpick
To view the picking history or to perform an Unpick, click the Pick history tab.
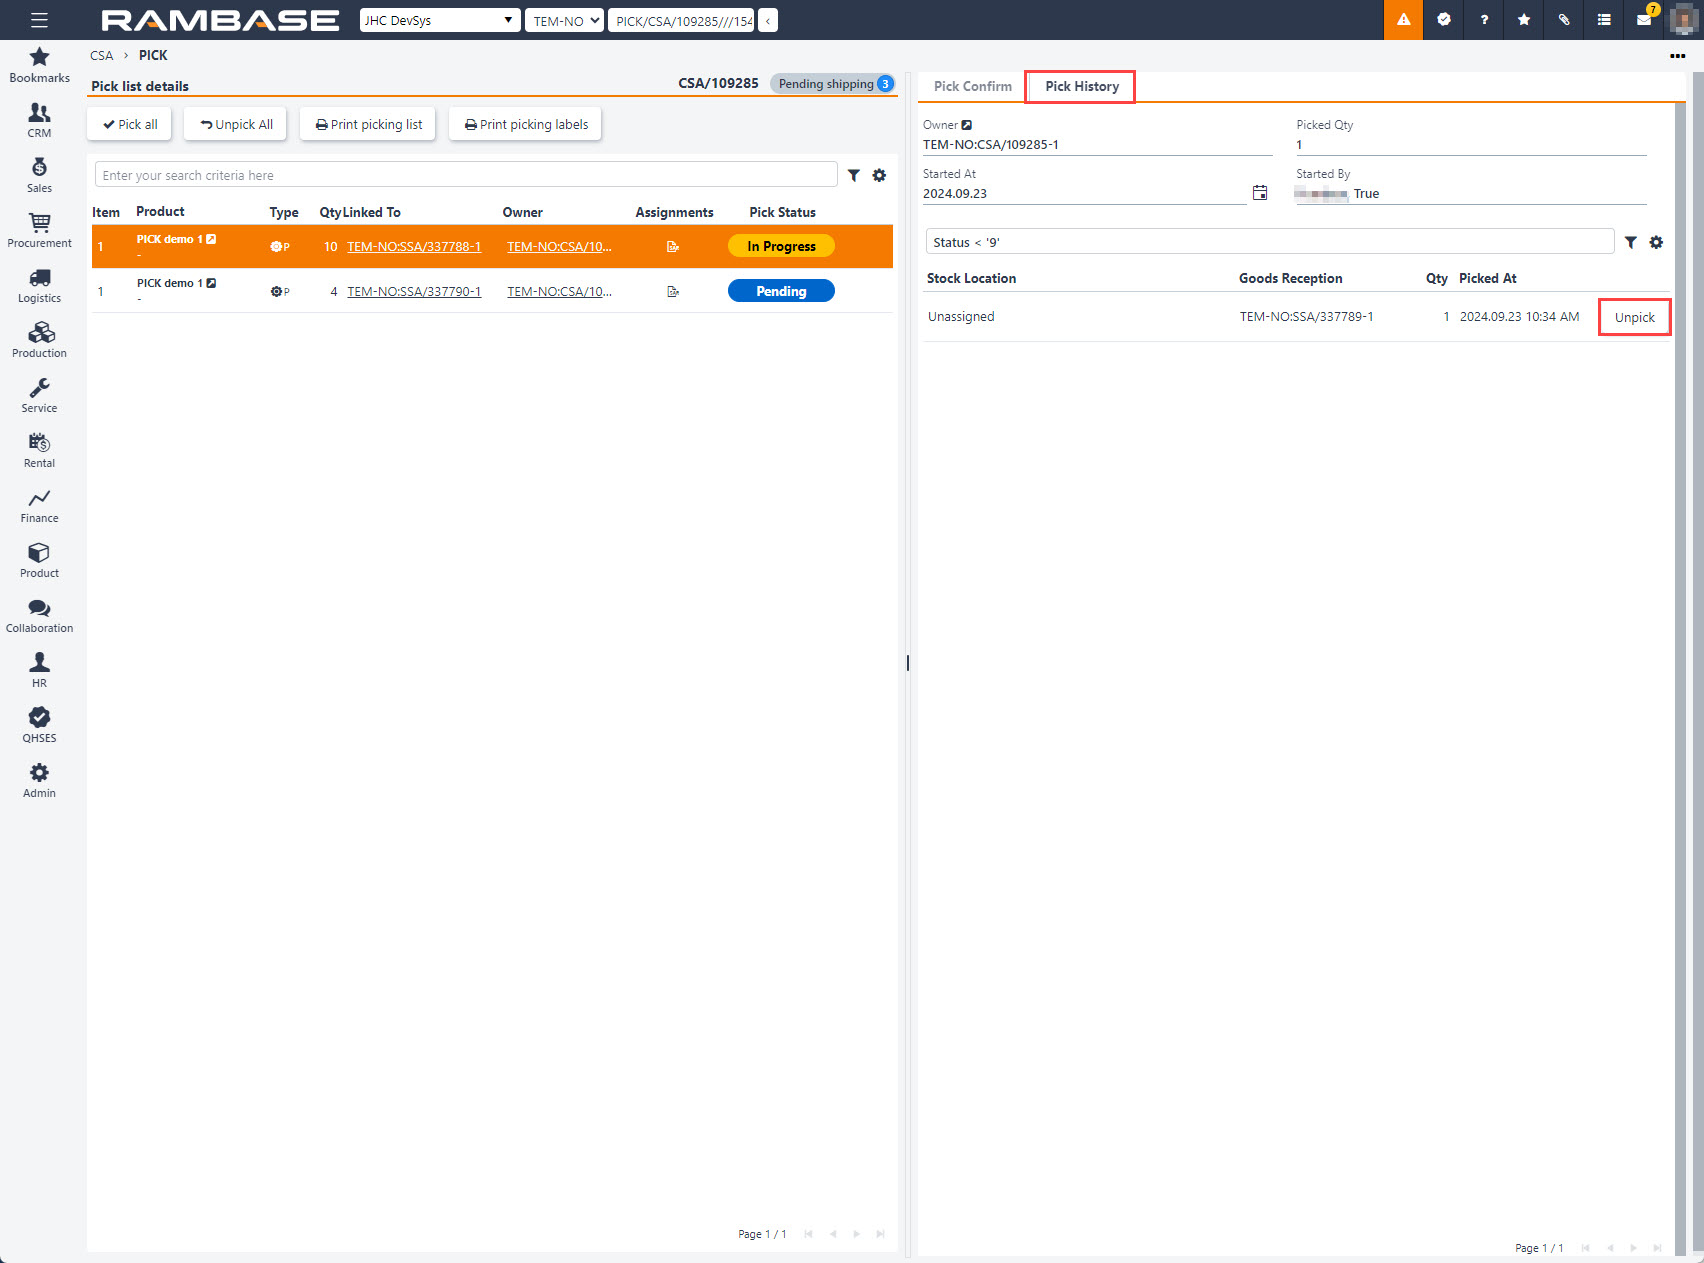
To pick goods using handheld terminals, you will need to use the Pick with handheld terminal (SCANPICK) application.
To open the Pick with handheld terminal (SCANPICK) application, find Logistics in the RamBase menu and then Picking. Click Confirm pick by handheld device to open the Pick with handheld terminal (SCANPICK) application.
Pick with handheld terminal (SCANPICK) can also be opened from the Picking list (PIL) application.
To open the Picking list (PIL) application, find Logistics in the RamBase menu and then Picking. Click Picking list for handheld device to open the Picking list (PIL) application.
From the Picking list (PIL) application, select a list and then click the Start picking icon to start Picking with handheld terminal (SCANPICK).
Regarding Picking list (PIL) application
Picking lists will only be displayed for Shipping advice (CSA), Supplier returns (SRT) and Goods transfers (STW).
Picking lists for Production work orders (PWO) will not be included.
The Picking list (PIL) application can also be used for printing picking lists by enabling the hidden column Print and clicking the Print picking list icon.
Documents that can be picked:
Shipping advice (CSA)
Supplier return (SRT)
Goods transfer (STW)
Production work order (PWO)
It is possible to scan the Goods reception (SSA) ID or the product ID.
Enable the following settings in the Company setting (CSV) application to pick Shipping advices (CSA) and Production work orders (PWO) by scanning the product ID rather than Goods reception (SSA) ID:
Relevant Company settings (CSV)
Allow to pick shipping advice (CSA) from another goods reception (SSA).
Allow to scan product id at pick of shipping advice.
Allow to pick production work order (PWO) from another goods reception (SSA).
Allow to scan product id at pick of production work order.
Picking with the Picking with handheld terminal (SCANPICK) application
Scan the document id or open the Picking list (PIL) as explained above. Alternatively click the Switch to keyboard and type the document id.
If you are picking for a Production work order (PWO), operation number must be included. In example: "OPR/123456".
Note
The first pick in the list will be the highest Stock location (STL) alphanumeric value, regardless of the document number. The application will suggest a pick route through the warehouse based on the alphanumeric sorting. Read more about Alphanumeric Stock locations (STL) here.
It is possible to change the sorting order for a specific picking list. A menu option in SCANPICK allows the user to sort the list by item instead of stock location. For example, when picking a Shipping advice (CSA), the list can be sorted according to the CSA items rather than warehouse locations.
This setting is only available in the user interface and must be selected manually for each individual picking list. The default sorting by stock location remains unchanged unless the user actively selects item-based sorting.
Relevant actions and information regarding the item(s) will be displayed.

The SSA link at the top shows the Goods reception (SSA) to be picked.
Use the arrows to navigate to the next pick.
Scan the SSA ID or the product ID.
If company is configured for picking by product or from another Goods reception (SSA) than what is assigned, it maybe helpful to switch the toggle to All receptions for product. This will allow the user to see where other Goods receptions (SSA) than the assigned one, is stored.
Suggested Stock Location: The system will suggest the highest alphanumeric value stock location to start, but this is just a suggestion.
You can click the pen icon next to the quantity to choose the desired quantity you want to pick.
Scan the stock location in the Pick From Stock Location field.
The application is now ready for the next Picking operation.
If there is an active serial number claim on an item, you will be routed to the SERIALNO application. Scan the serial number when the Scan Serial Number field is active.
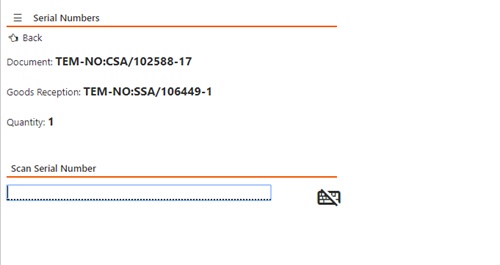
The Swap Assignments function is useful when picking to production work orders and shipping advices. The functionality is available in applications for hand-held devices used by picking operators.
When picking to a production work order or shipping advice, the goods needs to be assigned to a goodsreception item in stock. The picking operator can choose to pick from a different goodsreception item in stock when using the hand-held device. The Swap Assignment functionality will automatically reassign so that the production work order or shipping advice is linked to the goods that were picked.
Is assigned to stock
Must be a physical part
Goods not owned by another customer
Must be initialized for picking or partly picked
Same part
Same location
Must be assigned to stock
Must be a physical part
Goods not owned by another customer
Not locked
Not initialized for picking
The setting Allowance for Production Operator to pick from another Goods Reception must be activated for production work orders.
The setting Allowance for Shipping Operator to pick from another Goods Reception must be activated for shipping advices.
The setting Allowance for Production Operator to pick from another Goods Reception where pick is initialized will make links that are initialized for picking available for swapping.
To access the Rental pick (RENTALPICK) application from a handheld terminal/device, choose Logistics_picking and select Confirm pick for rental orders by handheld device. Then scan the ID of the rental Shipping advice (CSA).
The pick may be confirmed either by scanning the Goods reception item (SSAITEM) ID or scanning the serial number. The picking process may be traced continually, as RamBase will show how many of the total picks have been picked at any point.
When in the Rental pick (RENTALPICK) application, RamBase will suggest a picking order by default. Users may override this in two ways, either by:
Tapping the arrows to navigate between different items to scan, or
Turn on the Custom pick option to scan independently of which item is on the screen of the handheld terminal/device
Stock location is the default RamBase sorting. However, it is possible to change the default sorting in the Company setting (CSV) Default sorting for pick of Rental shipping advice (CSA). The two other default sorting options are Shipping advice item and Product id.
When entering the Rental pick (RENTALPICK) application, a user may choose his/her preferred sorting for each picking. This is done by tapping the Sorting icon and selecting the preferred sorting for the specific picking. The options are the same as in the Company setting (CSV) described above: Stock location, Shipping advice item and Product id:
Stock location: Presented in rising alpha numerical order. (Starting with any blank stock locations, presented as Unassigned.)
Shipping advice item: Presented in the same order as the items in the Rental shipping advice (CSA).
Product id: Presented in rising numerical order.
Note
Sorting is only active when Custom pick is turned OFF.
When Custom Pick is ON, the user may scan any Goods reception item (SSAITEM) ID or serial number to be picked. (It does not have to match the item on the screen of the handheld device.) RamBase will then try to find the right Shipping advice item (CSAITEM) to pick based on product in the Goods reception item (SSAITEM) ID.
Turning OFF Custom pick does not reset the picking, so the setting may be turned ON/OFF according to preferences at any point during the picking.
If Custom Pick is first set to ON and then OFF, the screen will always show the first pick in the original picking order suggested by RamBase.
If the Company setting (CSV) Allow to pick from goods reception (SSA) which is assigned to Shipping advice (CSA) is switched on, it is possible to swap like for like during picking. If the user scan a different Goods reception item (SSAITEM) ID or serial number than RamBase suggest, the program will attempt to swap links with the Goods reception (SSA) that is assigned to the Shipping advice (CSA). The conditions for a successful swap are:
The Goods reception item (SSAITEM) have the same product and location as the original Goods reception item (SSAITEM) ID assigned to the specific Shipping advice item (CSAITEM) and
The goods have not already been picked.
To access the Service pick (SERVICEPICK) application, find Logistics in the RamBase menu and then Picking. Click Confirm pick for service order by handheld device to enter the Service pick (SERVICEPICK) application.
The pick may be confirmed either by scanning the Goods reception item (SSAITEM) ID or scanning the serial number. The picking process may be traced continually, as RamBase will show how many of the total picks have been picked at any point.
When in the Service pick (SERVICEPICK) application, RamBase will suggest a picking order by default. Users may override this in two ways, either by:
Tapping the arrows to navigate between different items to scan, or
Turn on the Custom pick option to scan independently of which item is on the screen of the handheld terminal/device
Stock location is the default RamBase sorting. However, it is possible to change the default sorting in the Company setting (CSV) Default sorting for pick of Service shipping advice (CSA). The two other default sorting options are Shipping advice item and Product id.
When entering the Service pick (SERVICEPICK) application, a user may choose his/her preferred sorting for each picking. This is done by tapping the Sorting icon and selecting the preferred sorting for the specific picking. The options are the same as in the Company setting (CSV) described above: Stock location, Shipping advice item and Product id:
Stock location: Presented in rising alphanumerical order. (Starting with any blank stock locations, presented as Unassigned.)
Shipping advice item: Presented in the same order as the items in the Rental shipping advice (CSA).
Product id: Presented in rising numerical order.
Note
Sorting is only active when Custom pick is turned OFF.
When Custom Pick is ON, the user may scan any Goods reception item (SSAITEM) ID or serial number to be picked. (It does not have to match the item on the screen of the handheld device.) RamBase will then try to find the right Shipping advice item (CSAITEM) to pick based on product in the Goods reception item (SSAITEM) ID.
Turning OFF Custom pick does not reset the picking, so the setting may be turned ON/OFF according to preferences at any point during the picking.
If Custom Pick is first set to ON and then OFF, the screen will always show the first pick in the original picking order suggested by RamBase.
Warehouse management may be defined as the process of supporting, organizing, optimizing and controlling the flow and storing of goods within a warehouse.
By continuously informing the system about the stock locations of goods within the warehouse, many warehouse processes such as planning, staffing, directing, and controlling are made more efficient. By using hand held devices in the physical processes, these processes become even more efficient.
Stocking of goods
Received goods must be stocked at internal stock locations
Moving goods between stock locations
To optimize the physical stock, goods can be moved between stock locations
Picking to project orders, sales orders and production work orders
The goods must be physically picked.
Stock taking
Stock must be counted either periodically or continuously
Stock deviation handling
When deviations in stock counts occur, these stock counts must be corrected by using Stock deviation handling.
Setting name | Description |
Create Stock Correction (SAW) from Count Application | If this setting is ON, you will see an icon in the COUNT application (HHT) that will lead you to the STS application. In STS, you can create a stock correction (SAW) by scanning a given goods reception item at a given stock location. |
Create Stock Correction (SAW) if Deviation at Stock Taking | If this setting is ON, a stock correction (SAW) will automatically be attempted to be created if a user register a counted stock quantity different from expected stock quantity in COUNT application during a stock taking. If counted quantity is changed in COUNT or STTGOODS afterwards, the SAW will be deleted as long as it is still not registered, and a new SAW will be created based on new counted quantity. This setting should be used in combination with setting "Register stock correction (SAW) "to 'Off' |
External Warehouse Management System | This setting is used to state that the company uses an external warehouse management system that has an interface towards RamBase. Select from the drop-down menu:
|
Show all Goods Receptions (SSA) at use of Relocate | If setting is 'ON' - Stock Location Assignments for all Goods Receptions (SSA) of same product and location will show initially in the Relocate application for handheld device. Otherwise, only Stock Location Assignments for the selected Goods Reception will show initially |
Sort COUNT application by Product and GoodsReception | If this setting is ON, goods to be counted in the COUNT application will be sorted by StockLocation, Product, GoodsReceptionId and GoodsReceptionItemId. If the setting is OFF, standard sorting applies, meaning that the goods will just be sorted by StockLocation |
Note
The Warehouse management module must be added in the Module (MODULE) application for it to be available.
A warehouse operator group is a group of employees who are responsible for managing specific products within a specific warehouse. This includes handling the put-away process upon receiving goods. To open the Warehouse operators group (WAG) application from the RamBase menu, select Logistics followed by Reception, then finally Warehouse operators groups.
The Warehouse operators groups list lists all Warehouse operators group (WAG).
Tip
The Search field, Filter builder and Column settings uses the standard RamBase functionality.
The header contains multiple options to filter the list.
The available columns are described in the table below:
Column | Description |
|---|---|
St | The status icon indicates whether the Warehouse operators group (WAG) is active or deactivated. |
Name | Name of warehouse operators group. |
Description | Description of warehouse operators group. For example 'Group of operators who are Certified for handling electronic components'. |
To create a new warehouse group, click the Create new warehouse operators group button. In the following popup, provide the following information: Name and Description. To create then click the Create button.
New operators can be added from the list of employees by clicking the Add operator button in the bottom left. A popup opens, where operators can be chosen from the Employee lookup drop down menu. When a new operator is chosen, the Create button gets active, and by clicking on this, a new operator is created in the list, in Status 4. The operator can be removed from the list (set to Status 9) by clicking on the X in the last column. The operator can not be reactivated, but they can be added once more.
Column | Description |
|---|---|
St | The status icon indicates whether the operator is active or deactivated. |
Employee | Name and PID of operator. |
Added at | When the operator was added to the list. |
Added by | Who added this operator. |
Removed at | If an operator is removed from the group (set to Status 9), the date and time will be updated with information about when the operator was removed from the group. |
Removed by | If an operator is removed from the group (set to Status 9), the Removed by will be updated with information about who removed the operator. |
The Products tab list all products which this group is responsible for. A responsible Warehouse operators group can be assigned to a product and specific warehouse from the Product (ART) application, in Properties.Main data.Logistics component. It can also be removed from here, or directly from the Products tab in the Warehouse operators group (WAG) application. In addition can Products (ART) be updated from the Bulk update products (BUP) application.
The Location (LOC) application is used to create and maintain warehouse locations. To open the Location (LOC) application, find Logistics in the RamBase menu and then Warehouse management. Click Locations to enter the application.

The locations list area displays all available locations along with their associated information. To create a new location, simply click the Create location button and fill in the required details
Search field - The Search field can be used to search for specific locations. Click the Search field and press SPACEBAR to list all the available parameters to search on.
Filter builder icon - Click the filter builder to list the available standard filters. The user can also Create custom filters by selecting Field + Operator + Value and clicking the Save filter button. The saved filter will be save in the My saved filters area in the Filter builder popup.
Column settings icon - To select which information is displayed, click on the Column settings icon and hover over Columns. Then select the intended columns. The selection of data can be exported to Excel via the Export to excel option in the Column settings. The Reset to default view is also useful in resetting column width and placement, since columns can be dragged and dropped to suit the user.
Click on the Create location button in lower left corner in the Locations area. A pop-up where you fill in Short name, Name, Address name, Attention, Phone, Address line 1, Email, Address line 2, Postal code, City, State and Country will appear. All the mandatory field must be filled before the Create button gets active.
Note that State is only present if you have chosen a Country that has States. Also note that value in LOC can only have three characters, you will get a warning if you add less or more.
The table below describes the columns/fields available in the Edit general data pop-up.
Columns | Description |
|---|---|
Short name | Unique abbreviation/short name of the location. |
Name | Name of warehouse location. |
Address name | Address Name, typically a company name. |
Attention | Attention. |
Phone | Phone number for the location |
Address line 1 | First address line. |
Email address for the location. | |
Address line 2 | Second address line. |
Postal code | Postalcode/Postcode/ZIP. |
City | Location city. |
Country | Location country. |
State | If present, Location state. |
Type field - Type of location.
Shipment length unit field - Default measurement unit for length to store on shipments.
Shipment weight unit field - Default measurement unit for weight to store on shipments.
Auto confirm pick checkbox - If this box is ticked, the system should automatically confirm pick on shipping advices from this location.
Require package registration to ship checkbox - If this box is ticked, there must be packages registered to be able to ship goods.
Allow goods transfer to this location - If this box is ticked, you can transfer goods to this location from another location by using the STW application. If box is ticked, a Supplier special for goods transfer to this location is created, with Supplier classification = ‘S – Stocktransfer’. When STW is created for goods transfer to this location, it will be created for this supplier.
Use for invoice address checkbox - Used to indicate that this location is used as invoice address for the company.
When a company is registered for VAT purposes in another country than its main country, the VAT information from the second country should be added in VAT data. E.g if a Norwegian company is buying/selling to/from a company in another country from a Norwegian warehouse (Location), this is handled by standard VAT configurations. On the other hand, if the company is selling from a warehouse (Location) in another country than Norway, the company needs to be VAT registered in this country to be allowed to ship from/to this warehouse. This set-up has to be done in VAT data.
Information in VAT data in Location (LOC) is also used for handling direct shipments in RamBase. A company's VAT number(s) in another country than its main country, is to be set up in VAT data in Location (LOC) of type Direct shipment. The corresponding setup of VAT codes in the VAT register and the corresponding set up of default general ledger accounts must be made in the General account default register (ACD). A SCV for Direct shipment should also be set up, determining when the local VAT number(s) should be used.
Here you can add service partners from your supplier and contact list. This is just for information and triggers no functionality.
Clicking the Services button opens a pop-up in full screen, allowing you to select supplier and contacts.
Show on web – Can be used as a flag for integration against custom made website for service partners.
When a new Location (LOC) is created, the address that is entered will also be put in the Shipping addresses list, as the main and default address.
Shipping addresses are added by clicking the Create shipping address button, then a pop-up for adding addresses will open.
Mandatory fields to fill inn are Short name, Name, Postal code, (City and Country).
City will be set when Postal code is chosen, if Country is a country with a postal code (POC) register. If there is no POC register, City must be entered manually.
Note also that if a Country which have States is selected, State is also mandatory.
A newly created shipping address will get Status 4.
Default filter when opening a Location (LOC) is Active addresses. This will list shipping addresses in Status 4. If this is deactivated, discontinued shipping addresses will also show in the list (Status 9).
A shipping address can be discontinued by clicking on the X in the last column. A main or default address can not be discontinued, and a discontinued address can not be edited.
Shipping address can be edited in Status 4 by clicking on the edit icon in the second last column. Country can not be edited, this is set in the location and must be the same for all shipping addresses for this location.
Global location number (GLN) can be added in the Edit shipping addresses pop-up. When adding an illegal number, you will get a warning about this, and the Save button will be inactive value is removed or a legal Global location number (GLN) is entered.
Both Phone and Email are validated before the Save button becomes active.
The Stock location (STL) application is used to create stock locations in a tree structure, in addition to managing your existing warehouses. To open the Stock location (STL) application, click on Logistics in the RamBase menu and then click on Warehouse management. Click on the Stock location to enter the Stock location (STL) application.
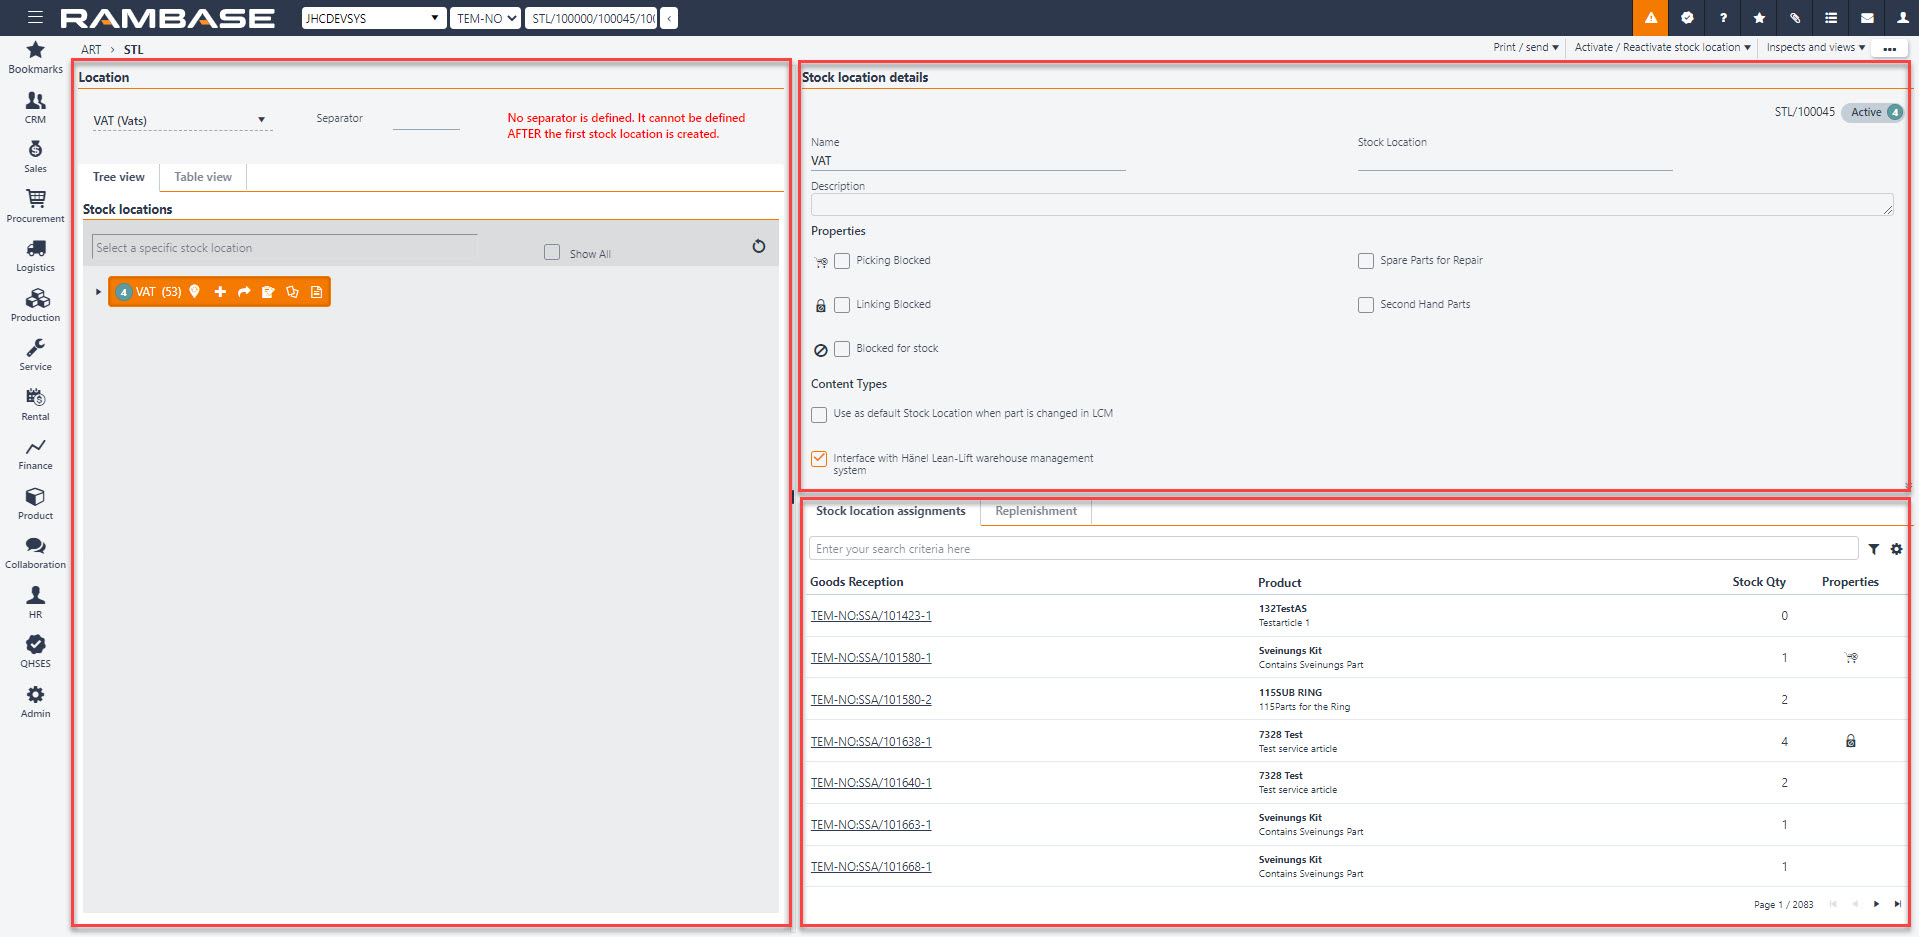
There are three main areas in the Stock location (STL) application:
Location area
The Location field shows the warehouse location, which is the top level. The level below is shown in the Stock location field, which is the location within the warehouse. The item lines below these fields show the contents of the Stock location (STL). These results can be filtered using the filter. The Separator field is used to define the symbol or character that separates the identifiers in the location name.
Note
It is important to define the separator before starting creating stock locations, because afterwards it will not be allowed.
Stock location details area
This area displays several fields related to the Stock location (STL) and any description added. Including these check boxes:
Picking Blocked
If this is checked, all products which are moved in to the Stock location (STL) are locked by default and cannot be picked.
Linking Blocked
If this is checked, all products which are moved to this Stock location (STL) are blocked from being assigned in the Assignment Register (SAR).
The only exception is Stock correction (SAW).
A Stock correction (SAW) can always be created for goods placed on a Stock location assignment (SAP), which is blocked for linking.
Blocked for stock
If this is checked, goods cannot be moved to the selected Stock location (STL).
Spare parts for repair
This checkbox is used to indicate that the goods in this Stock location (STL) can only be used as spare parts to be used in repairs. This option automatically blocks linking.
Second hand parts
Second hand parts are parts which are returned or blocked from being sold or used in productions for any reason. Choosing this option for the stock location blocks the items for linking and picking.
Content Types
Use as default Stock Location (STL) when part is changed in Life cycle (LCM): Will be used as suggested Stock location (STL when part is changed in Life cycle (LCM).
Tabs
Stock Location Assignments tab
This area gives you an overview over all Stock assignment (SAP) documents in this Stock location (STL).
Replenishments tab
This area is used for setting a reorder point (required minimum stock level) for a product at a specific stock location. This is designed for cases where the replenishment should take place by an ordinary move of goods between Stock locations (STL) within one Location (LOC). It is not designed for refill by goods transfer from other locations, nor by purchase of products.
Read more about setting a Reorder point for a product in a specific stock location here.
By clicking on the context menu, you will get two different choices to print stock labels for warehouse shelves and areas.
Print stock location label
Prints the highlighted stock location label
Print Stock location label branch
Prints the full amount of stock location labels
RamBase sorts all ) Stock locations (STL) alphanumerically. This sorting is used in all applications where Stock locations (STL) are displayed, and/or used in various processes.
An example is in the picking process where the Confirm pick by handheld device (SCANPICK) application can be used to pick goods. The application will suggest a pick route through the warehouse based on the alphanumeric sorting. The alphanumeric route suggestion will also be given when using the Count (COUNT) application to take stock.
The alphanumeric sorting is also the basis when creating a Stock taking (STT) by selecting Stock locations (STL) to be counted, with the Stock taking create (STTC) application. A count will be generated based on the physical goods in the Stock location (STL) from the FromStockLoc to the ToStockLoc, in alphanumeric order.
RamBase sorts all Stock locations (STL) alphanumerically.
In practical terms, creating a Stock taking create (STTC) from "A1" to "A20", will not generate a stock taking of "A3", "A4", "A5", "A6", "A7", "A8" or "A9".
Therefore it will be beneficial naming Stock locations (STL) with a numerical "0", in example "A02", instead of "A2".
To open the Stock Location (STL) application, find Logistics in the RamBase menu and then Warehouse management. Click Stock locations to enter the STL application.
Find the Location (LOC) you want to work with in the location field in the upper left corner by using the drop down menu.

The Separator field is used to specify the separator character between each named stock location.
Note
If you are going to use separators, this needs to be defined at this point. You will also be reminded of this if separator is not chosen when creating child stock locations.
The upper level of the stock location will be visible in the Stock Locations area. Click the plus-sign in the stock location to create branch stock locations. There are no limits to the number of branch levels.
Choose between creating a single stock location, or a range of stock locations.
Single
Enter the name for the stock location. The Description field is used for a further description of the stock location. Choose if picking/linking should be blocked for this location using the checkboxes at the bottom of the popup.
Range
Enter the prefix name in the PrefixName field, same as in the Name field of the Single stock location. Enter the start and end-node of the range and a description of the stock locations to be created. If you enter R as the prefix name and 1-3 in the start-end nodes, you will end up with three children stock locations called R1, R2 and R3.

Click the context menu option Activate/Reactivate stock location. This gives you two option, either to activate only the stock location you have highlighted, or to activate the highlighted stock location and all the child stock locations below the parent stock location. This sets the stock location(s) to ST:4 and is ready for use.
NOTE: Blocking for picking and linking can be performed at all times in the Stock Location Details area, it will not have any influence on goods which are already stored in the Stock location (STL), only goods that are moved in afterwards. You can also set the actual Stock Location as a default stock location for part change in LCM.
The Stock Location (STL) application enables you to print stock labels to keep complete control of your warehouse. There are four different choices in the Print / Send drop-down menu:
Print stock labels
This option opens a popup where you can define the range of stock labels you want to print, with the From stock location field as the starting point, and the To stock location as the last. This option will include stock labels for all the stock locations that can be found on these stock locations. The number in the Parcels field indicates how many labels will be printed per SSA-ITM.
Print stock location label
This option prints the labels for the chosen stock location.
Print stock location label branch
This option is much the same as the one above, but will print stock location labels for the whole hierarchy chosen, not just the specific stock location.
The feature of having a Reorder point (required minimum stock level) for a product at a specific stock location is designed for cases where the replenishment should take place by ordinary move of goods between Stock locations (STL) within one Location (LOC). It is not designed for refill by goods transfer from other locations, nor by purchase of products.
Reorder quantity is the suggested replenishment quantity when the stock level has reached the Reorder point.
Highlight the stock location where you want to set a Reorder point in the Stock locations area and click on the Replenishment tab.
Click the Add product button.
Select the Product (ART) in the Product field, set the Reorder point (mandatory) and Reorder quantity (optional).
Click the Create button to set the selected Reorder point for the product in the selected stock location.
It is possible to add/update the Reorder point and Reorder quantity directly in the Replenishment tab, and remove the product.
Enter the Product (ART) you want to set a Reorder point to.
Click on the Stock location replenishment tab in the Properties area.
Click the Add stock location button.
Select the Stock location (STL) in the Stock location field, set the Reorder point (mandatory) and Reorder quantity (optional).
Click the Create button to set the selected Reorder point for the product in the selected stock location.
It is possible to add/update the Reorder point and Reorder quantity directly in the Stock location replenishment tab, and remove the Stock location (STL).
You can export the file from any level of the Stock location (STL) tree with the Export replenishment file option in the context menu. This will send a excel file (csv) to the user.
This file shows all cases where stock level has reached Reorder point and replenishment should take place. Stock level is calculated based on stock at all stock locations which are "children" of the stock location where Reorder point is defined. In practice for an area.
For example:
Stock location A1 has been set up with Reorder point 100.
At stock location A1B1 there are 10 pcs in stock.
At stock location A1B2 there are 15 pcs in stock.
At stock location A1C3 there are 20 pcs in stock.
Stock level is calculated at 45 pcs. Since this is below Reorder point at the "parent" stock location, the file will show that there is a need for replenishment to stock location A1.
The Stock Location Assignments (SAP) document displays information about the quantity of each Goods Reception item located in the various stock locations. SAP is used to maintain control and traceability.
To open the Stock Location Assignments (SAP) application, find Logistics in the RamBase menu and then Warehouse management. Click Stock location assignments to enter the SAP application. You can also see the Stock location assignments for the selected SSAITEM as a folder in the SSAITEM window.
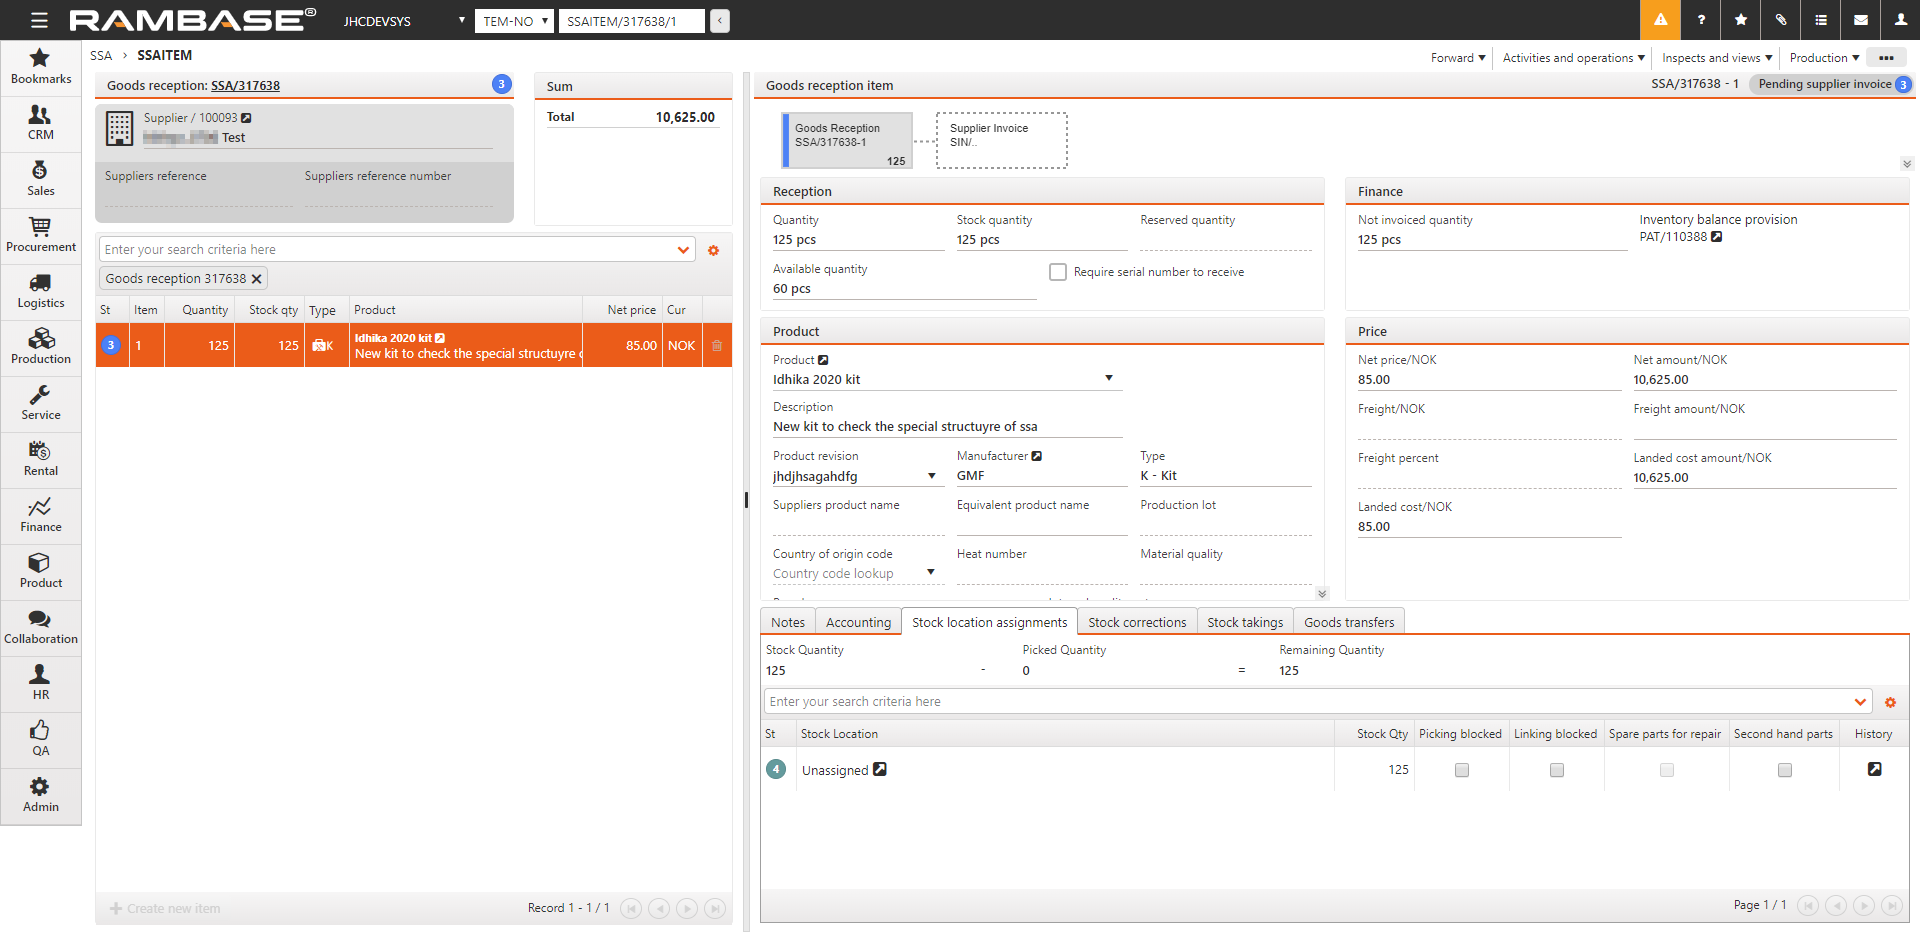
The most natural method of using this application is to start from the context menu from the Product (ART) or Stock Location (STL) document to show where the item is located. You can also see the Stock location assignments for the selected SSAITEM as an folder in the SSAITEM window.
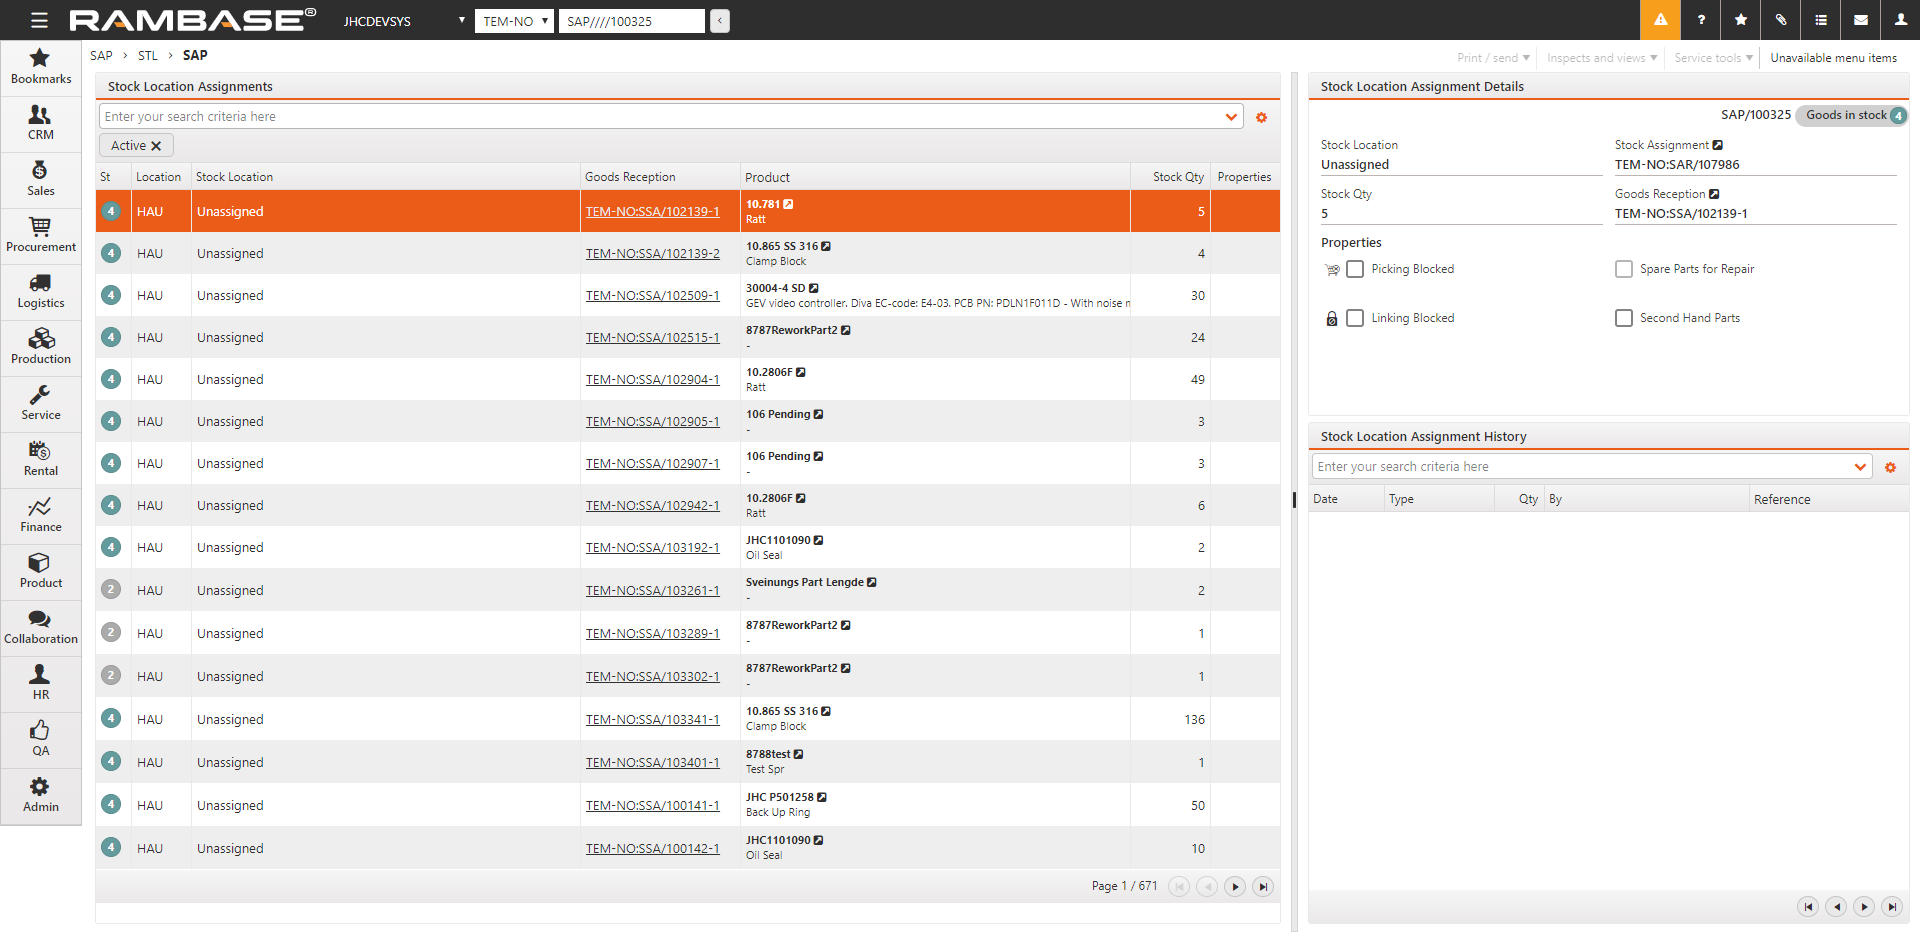
Stock Location Assignments (SAP)
This area shows the chosen warehouse in the location field, the specific stock location in the Stock Location field and the stock is shown in the item lines below.
Stock Location Assignment Details
This area shows all relevant information regarding the SAP item, including checkbox options to block linking and picking. This will overrule the properties set in Stock Location (STL).
Stock Location Assignment History
The history shows the changes that goods have been subjected to since reception at the warehouse.
The Putaway (PUTAWAY) application is used on a hand-held device to add a Stock Location (STL) when the Goods reception item (SSAITM) is moved from an unassigned area to the warehouse. If you do not have a handheld device, it is preferable to use the Stock Move (STM) application.
Scan the goods reception ID while the Scan the goods reception id text field is highlighted.
Scan the shelf while the Stock Location text field is highlighted.

You will now get the confirmation that the quantity of the SSA-ITM is registered to the correct stock location.

If there has been an error, use the Undo Operation button at the bottom which will reverse the registration of the goods reception.
The Move Goods (STM) application is used to move goods from one stock location to another.
To open the Move Goods (STM) application, find Logistics in the RamBase menu and then Warehouse management. Click Move goods to enter the STM application, or enter it from the related Stock Location (STL) / Goods Reception (SSA) item / Product (ART).
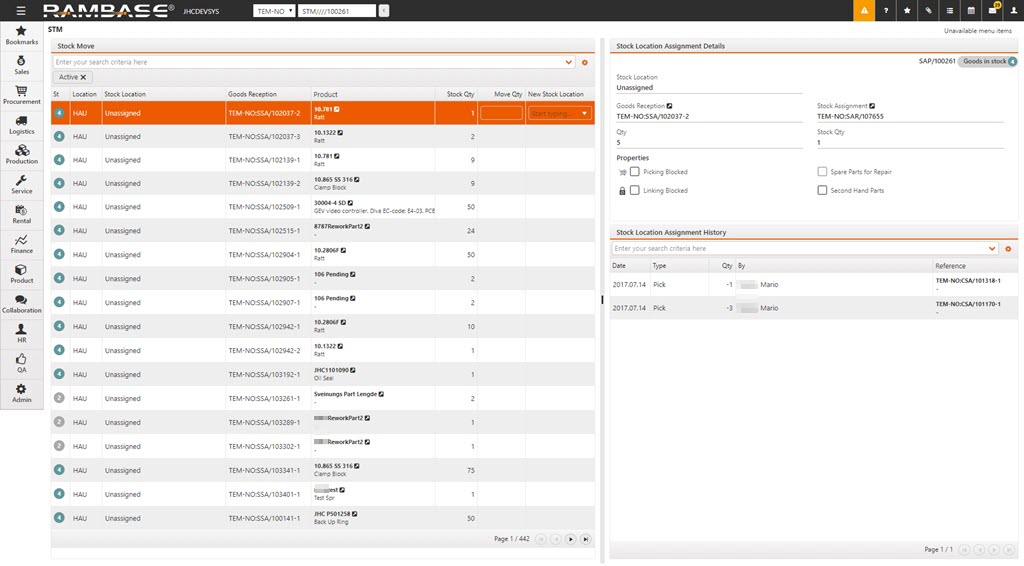
Choose which location you want to use in the Location drop down menu. Then choose the specific stock location in the Stock Location drop-down menu below.
The goods in that specific stock location will be listed in the menu below.
Highlight the desired item line to open the move-fields.
Enter the desired quantity in the Move Qty, and choose the target stock location in the Move to Stock Location dropdown.
The goods will then be moved, and the history of moves can be seen in the Stock Location Assignment History area in the lower right corner.
The Moving Goods by Drag & Drop (MULTISTM) application is used to easily move goods internally between stock locations using drag & drop. To open the application, find Logistics in the RamBase menu and then Warehouse Management. Click Moving Goods by Drag & Drop to enter the MULTISTM application. You can also type MULTISTM in the program field and press ENTER.
Choose the desired location in the Location dropdown menu.
The source stock location is shown in the Source area, and the destination stock location is shown in the Destination area.
Click and drag the source stock location and drag it to the destination stock location.
The Stock Location Assignments (SAPs) in the source stock location will be listed in the menu below. Go through each line to confirm the quantity you want to move on each line.
The Stock move (RELOCATE) application is an application used with hand held terminals (HHT). The functions are similar to the Stock Move (STM) application, but with a portable handset.
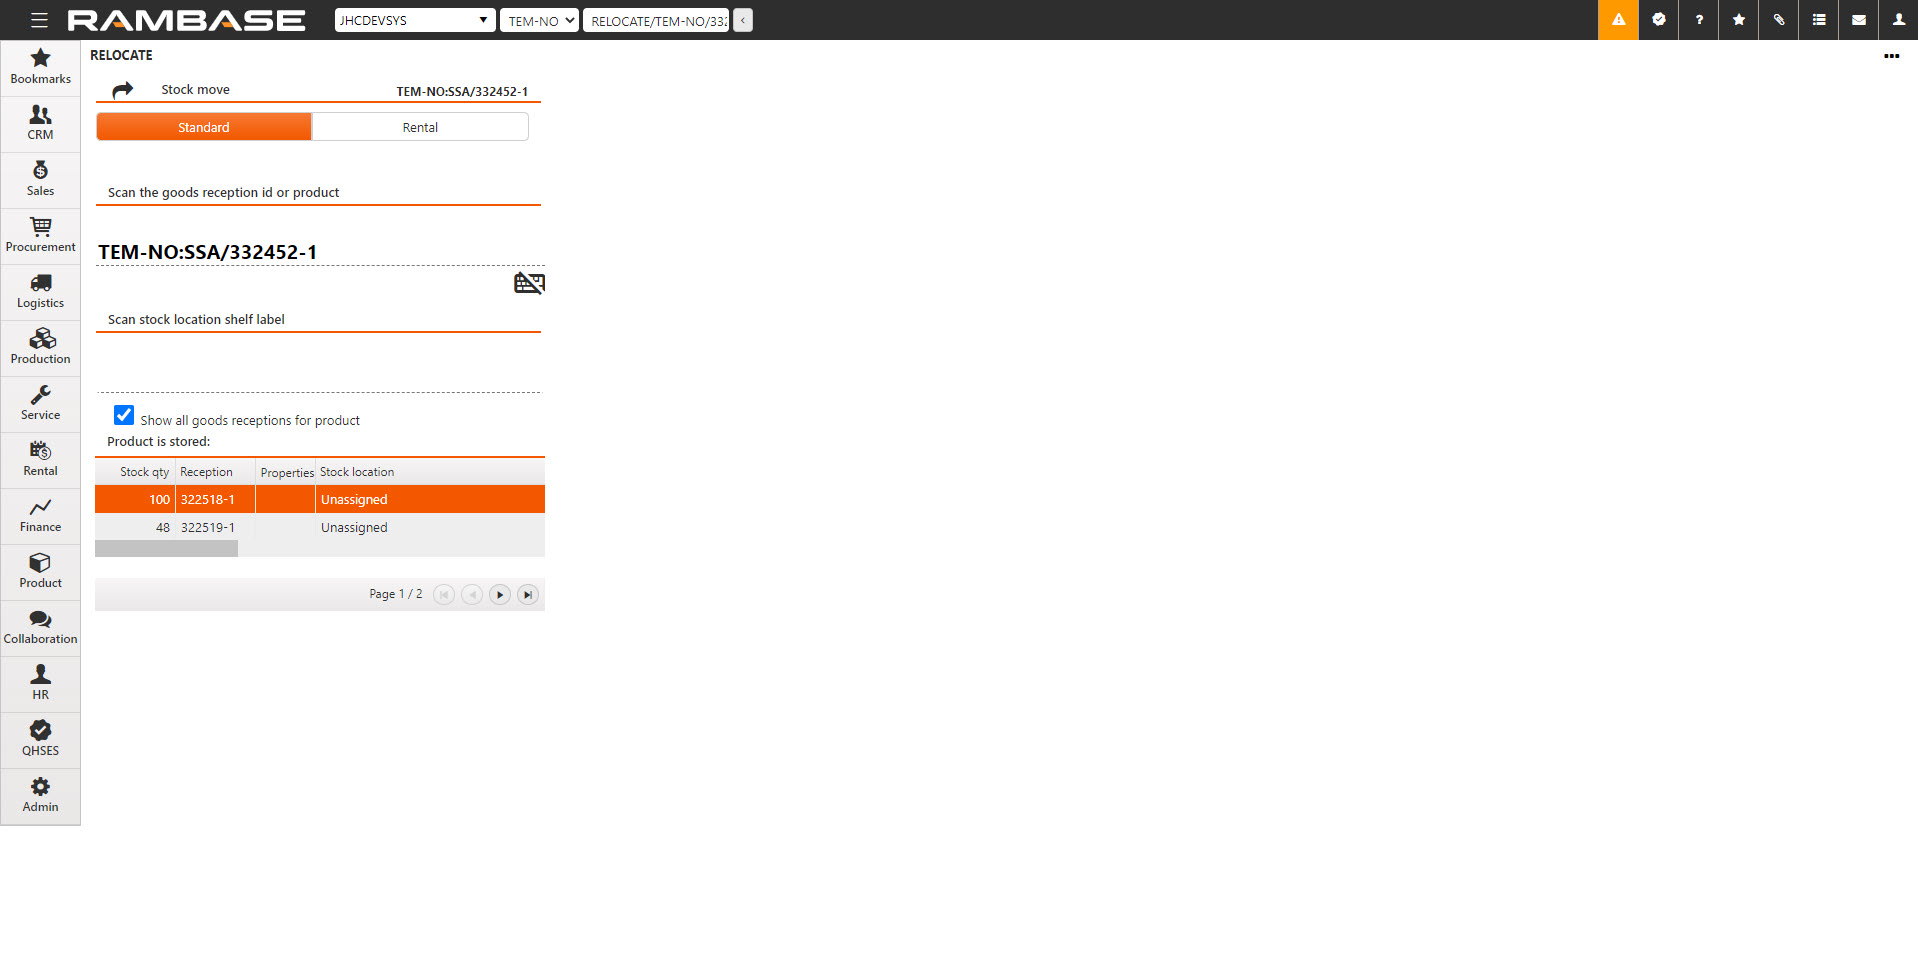
To open the Stock move (RELOCATE) application, find Logistics in the RamBase menu and then Warehouse management. Find Move goods and then click on Move goods by handheld device to enter the Stock move (RELOCATE) application.
Scan the goods reception ID (the SSA stock label) of the goods you want to move.
Scan the stock location shelf label in the next field.
Choose the desired quantity you want to move in the Move Quantity field.
Choose where to move it in the Move to Stock Location by scanning the stock location shelf label at the destination.
The Stock taking create (STTC) application is used to create a Stock taking (STT) document.
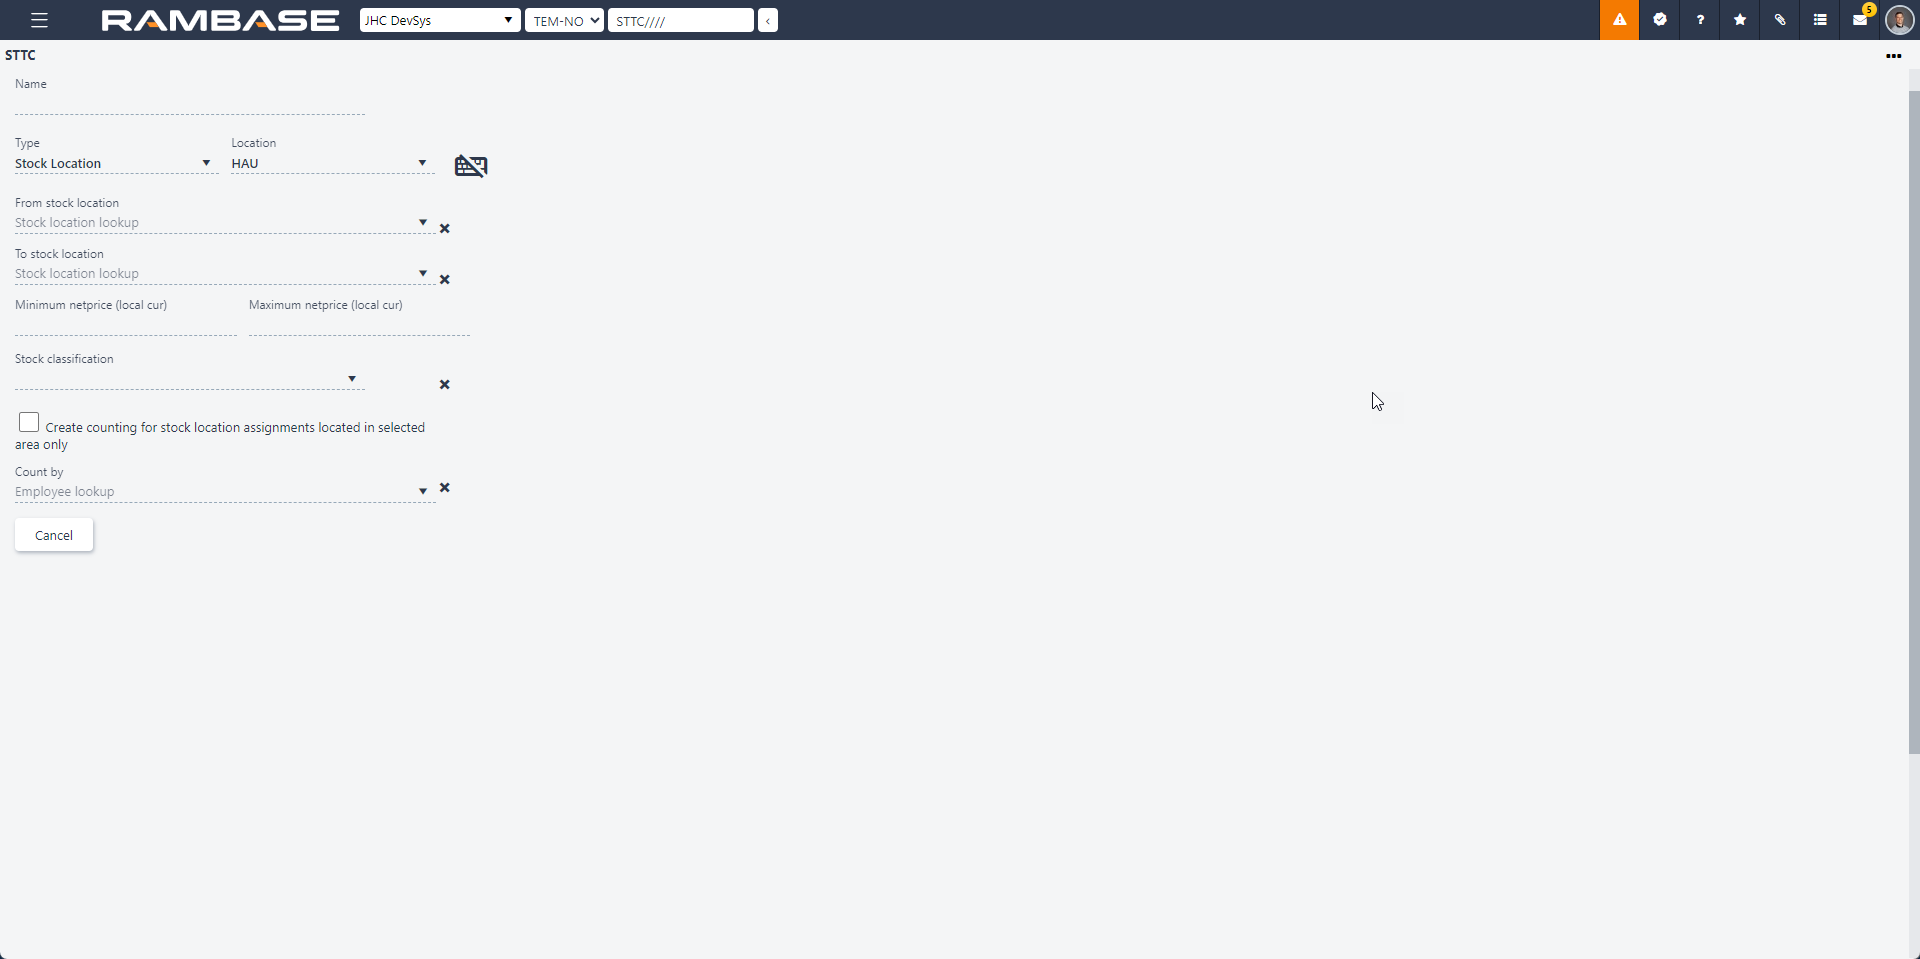
This application is also available in the Scanpick (SCANPICK) application. The application can be opened by clicking the Document icon from either the Goods reception (SSA) line or the Stock location (STL) line.
Create Stock taking (STTC) procedure
Type a name for the document in the Name field.
In the Type dropdown menu, choose between Stock location, Goods reception or Product.
Goods reception
This option creates a stock taking for a single Goods reception item (SSAITEM).
Type the Goods reception (SSA) identification in the Goods Reception field.
Choose the responsible employee in the Count By dropdown menu.
Product
This option is used to count a specific product.
Choose the stock location in the Location field.
Choose the responsible employee in the Count By field.
Stock location
This option is used to count an area of a warehouse.
Choose the location in the Location dropdown menu.
Choose the start Stock location (STL) in the From Stock Location drop-down menu and the end Stock location (STL) in the To Stock Location dropdown menu.
Stock taking will be created for all the Stock locations (STL) that are defined between FromStockLocation to ToStockLocation according to sorting in alphanumeric order.
Choose the responsible employee in the Count By dropdown menu.
Additional options for Stock location
The checkbox Create counting for stock location assignments located in selected area only will limit the counting to the selected stock location only. If it is checked, you will only count stock within your defined range. If it is unchecked, you will be prompted to count stock outside of the specified stock location range, if a Goods reception item (SSAITEM) that exists within the specified range, also has stock on another stock location.
The Minimum netprice (local cur) and Maximum netprice (local cur) can be used to limit that Stock takings (STT) are only to be created for Goods reception items (SSAITEM) with a price lower or higher than a certain value.
The Stock classification dropdown menu can be used to limit that there are only created Stock takings (STT), for Goods reception items (SSAITEM) for products, with the selected stock classification.
Note
If a Goods reception (SSA) is moved into an area for which a Stock taking (STT) has already been created, it will not be added to the existing Stock taking (STT). Even if it has not been counted yet.
The stock takings will only apply for the Goods receptions (SSA) located in the area at the moment the Stock takings (STT) were created.
The Stock taking (COUNT) application is used to perform stock takings using a hand held terminal.
To open the Countmenu (COUNTMENU) application, find Logistics in the RamBase menu and then Warehouse management. Find Stock takings and then click Count by handheld device to enter the COUNTMENU application.

Open the Stock taking (COUNT) application from the COUNTMENU, by highlighting the applicable stock taking document and press Enter.

The item lines to be counted are listed at the top. Below you will see the Goods reception (SSA) document reference, together with the Product (ART) reference below.
The expected quantity can be seen in the Expected field. If there is a mismatch between the Expected Qty and the Counted Qty, users can edit the Counted field by clicking the View counted button and then the Open for edit button.
After each counted item, click the Confirm button to move to the next item.
If the user want to skip an item, or several, use the arrow keys at the top of the document to navigate.
The user is also able to search for a specific count during a stock taking when using the Stock taking (COUNT) application, in both the To be counted and the View counted lists. Clicking the Magnifier icon will open a popup where the user can search by scanning the Goods reception id (SSA) and Stock location (STL).
If a count is already in Status 9 - Completed, the user will be allowed to re-open it to Status 3 - Counting in progress, by clicking the View to be counted and then the Open for edit button. This will enable the update of already counted quantities.
Use the View Counted button to see the last counted item, and users can also use the arrow keys to navigate here.
To manually create a Stock correction (SAW) by scanning, click the View icon to open the Scan stock corrections (STS) application.
Refer to Create a stock correction (SAW) using the handheld Terminal (HHT) for more information.
To display the View icon in the Stock taking (COUNT) application, enable the Create Stock Correction (SAW) from Count Application setting in the Company settings (CSV) application.

It is possible to turn a setting on so that a Stock correction (SAW) will automatically be attempted to be created if a user register a counted stock quantity different from expected stock quantity in COUNT application during a stock taking. Read more about it here.
The stock which is prepared for stock taking will by default show in the COUNT application sorted alphanumerically according to the name of the stock location where it is located. This option works well within most stock takings, but there may be situations where it is not the most optimal method of sorting the counts. There is an alternative method of using COUNT where the sorting starts with the stock location, sorted by alphanumerical value, then the oldest goods reception document first and then within the items on the goods reception document.
This alternative is controlled by the setting Sort COUNT application by Product and Goods reception which needs to be active for this alternative to be used.
The Stock Taking (STT) application is used to keep an overview over all the stock takings performed. This is mainly used for following up stock takings.
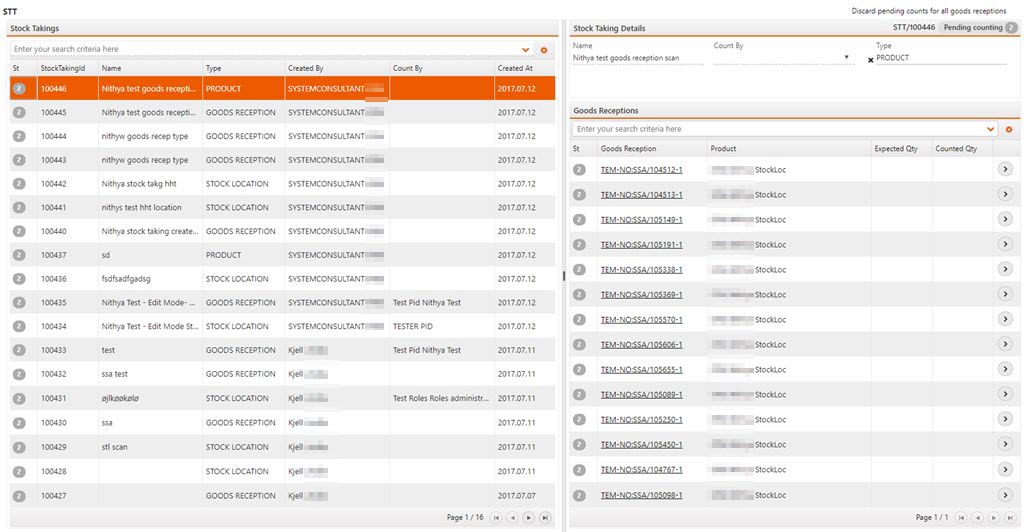
If there are discrepancies in the stock taking you can correct these by using the Stock Takings (STT) application.
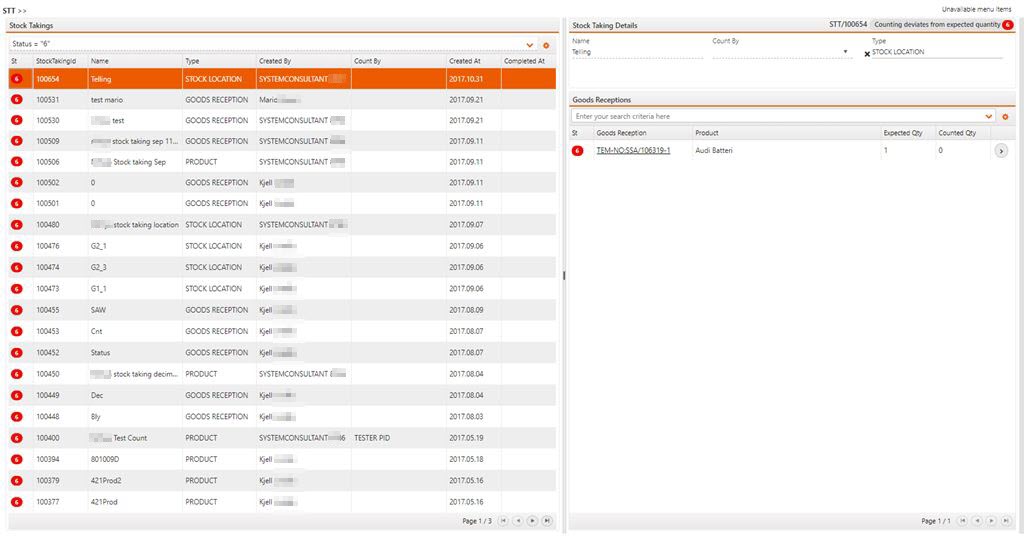
Use the filter line to filter out the STT with status 6.
Highlight the desired STT. The Goods Receptions area to the right shows the items. Click one of the item lines to enter STTGOODS.
Find the status 6 items using the filter field. Highlight the item line.
Highlighting the item line will show all the stock locations for the items on the Goods Reception (SSA). This list is used to correct stock.

Click the Correct Stock icon in the Correct Stock column to create a Stock Adjustment (SAW).
Note
You must switch on one setting for the Stock adjustment (SAW) to go to be registered. If not, the Stock adjustment (SAW) will have to be manually registered in the Stock adjustment (SAW) application.
StockAdjustmentWarehouseFromStockTakingAutoRegister
Register Stock Correction (SAW) from Stock Takings (STT) - Logistics.DeviationHandling
If this setting is "ON" - Stock Correction (SAW) will be registered automatically to status=9 when Stock Correction is created from Stock Takings (STT). If setting is "OFF" - Stock Correction will be created in status=0, and must be manually registered to status 9.
You can discard the pending counts for one Goods Reception (SSA), this is done from the Stock Taking Details (STTGOODS) application.
In the STT application, highlight the Stock Taking where you want to delete the pending counts.
Highlight an SSA in the Goods Receptions area and press ENTER to open the STTGOODS application.
Highlight the SSA where you want to delete the pending counts.
In the context menu, click the Discard count for goods reception option.
In the popup, click the Yes button.
The pending counts for this SSA have now been successfully discarded.
Youc can discard the pending counts for all Goods Receptions (SSA) belonging to one Stock Taking in Stock Taking (STT) application.
In the Stock Takings area, highlight the Stock Taking where you want to delete pending counts.
In the context menu, click the Discard pending counts for all goods receptions option.
In the popup, click the Yes button.
Pending counts for this Stock Taking have now been successfully discarded.
All lines in Status 6 will be changed to Status 9 when you use this option in the Stock taking (STT) applicaion.
Enter the Stock taking (STT) application.
Click on the Complete counts for all lines with deviations option in the context menu.
Click the Yes button in the popup.
The Correct stock (STC) application is used to manually correct the stock quantity. To open the application, find Logistics in the RamBase menu and then Warehouse Management. Click Correct Stock to open the Correct stock (STC) application.
This application is also available from both the Goods reception item (SSAITEM) application, Stock locations (STL) and the Product (ART) application using the Context menu.
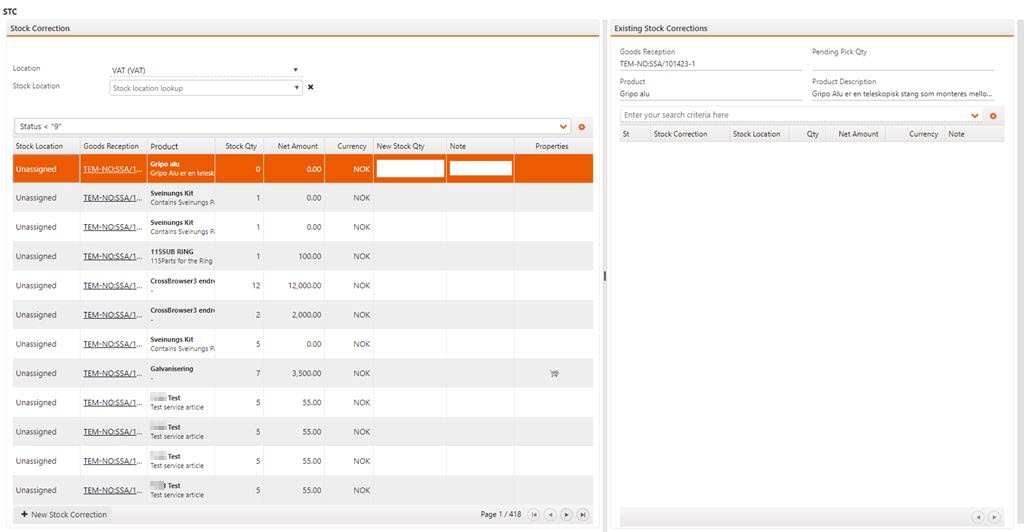
There are two main areas in the Correct stock (STC) application:
Stock Correction
This area shows the chosen warehouse in the Location field, the specific stock location in the Stock Location field and the stock is shown in the item lines below.
Existing Stock Corrections
This area shows the complete history of stock corrections for the highlighted stock correction item.
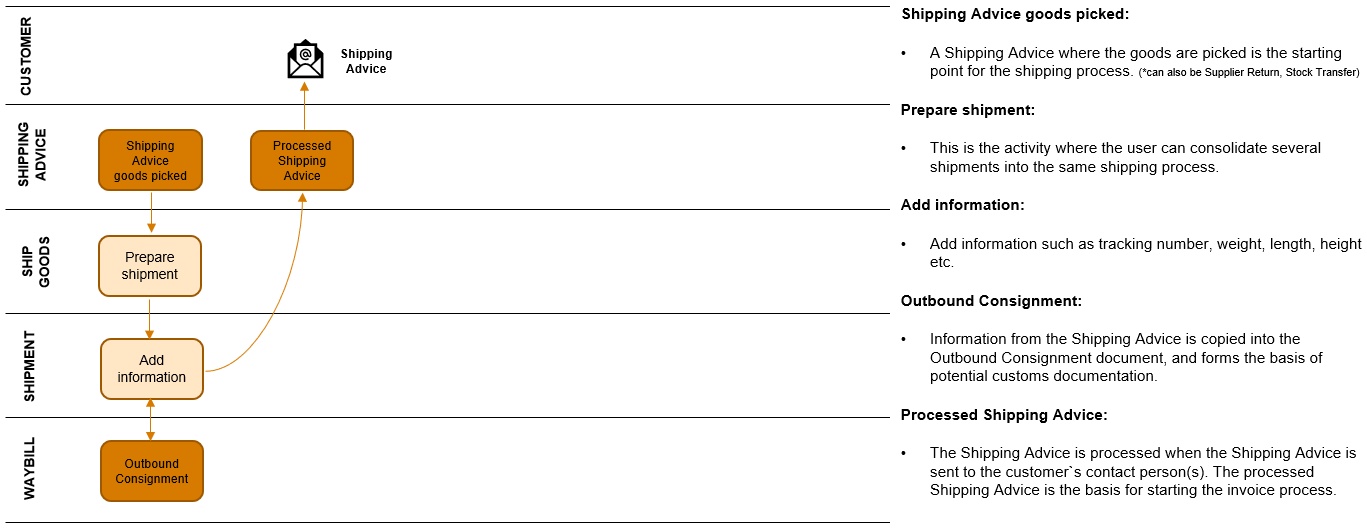
The shipping process can be defined as the process where the goods are sent out of the warehouse to the customer.
The shipment of an order.
The shipment of several combined orders.
The process of shipping goods is like the process of finishing an order; it involves packing, printing documents and registrations. If you have one or more customers who place orders several times a week on a regular basis, you will need the option of combining orders to save freight and administrative costs. This method allows the goods to be packed together and registered as one shipping unit. If the shipping amount is very large, this method will save resources for all parties involved.
Finishing shipping documents
Documents which specify the contents and value need to be printed from the ERP system.
Measuring and weighing the shipment
Shipments over a certain size should be measured and weighed to inform the transport company and calculate shipping costs.
Register shipping information
If the shipment needs to be tracked, the forwarder’s tracking number can be allocated.
Setting name | Description |
Allow ship without package registration | Allow to ship without going through the steps of registering packages |
Assignment Register (SAR) Optimization | If this setting is "ON" - The scheduled batchjob 'Logistics: SAR: Optimize' will start for the company. The job is optimazing the Assignment Register (SAR) links. |
Assignment Register (SAR) Verification | If this setting is "ON" - Scheduled batchjobs that reconcile transactions in Assignment Register (SAR) to all involved transaction documents is activated. In addition a verification setup must be updated when configuration of the database is done |
Attach files when sending Documents by email | Decide if emails sent from documents should attach the attached files or not. If value is "ON" - Only selected attachment will be sent. If value is "OFF" - Send automatically all attached files. If settings has no value - Attachments will not be sent. |
Copy Freight on documents | If this setting is "ON" - FreightAmount and/or FeeAmount on document or FeeAmount from Customer, will always be copied when forwarding a document to a new document. If there are several shipments from one Sales Order (COA), there will be FreightAmount and/or FeeAmount on all of them. If currency is changed on the new document, FreightAmount and FeeAmount is also calculated. If setting is "OFF" - FreightAmount and/or FeeAmount will only be copied once when forwarding a document to a new document. If there are several shipments from one Sales Order (COA), the customer will only be charged with FreightAmount and/or FeeAmount once. |
Customer Reference Number on Shipping Advice (CSA) set to MixOrder | If the setting is "ON" - If Shipping Advice (CSA) contains items from different Sales Orders (COA), and the Customer Refence Number is different from the Shipping Advice (CSA) and the source of the Shipping Advice, -Customer Reference Number will be set to 'MIXORDER'. But if all Sales Orders have the same Customer Reference Number as the destination Shipping Advice, the Customer Reference Number will stay as it is. Recommended value: ON |
Deactivate automatic close of Departing Waybill (WBO) for Direct Shipment | If this setting in 'ON' - Disable functionality that automatically closes Departing Waybills (WBO) to Status=9 when using F12 Forward WBO on Departing Waybill in Status=2. The Departing Waybill will get Status=5. If setting in 'OFF' - The Departing Waybill will go directly to Status=9. NOTE: This setting is only working for Direct Shipments |
Grouping on Departing Waybill (WBO) | If this setting is "ON" - no grouping of Departing Waybill (WBO) will be done, and there will be created one Departing Waybill in status 2 per shipment. If this setting is "OFF" - grouping of Departing Waybill will be done according to the setup in the field 'WBOGroupBy' on Shipping Service (SHP). If this field is empty, there is a default setup for grouping Departing Waybill in the code. For more information: https://help.rambase.net about Shipby |
Print/Email of Serialnumber on Shipping Advice (CSA) | If this setting is "ON" - Print or email of SerialNumber will be done automatically after Shipping Advice (CSA) has been forwarded. |
SerialNumber automatically copied from Goods Reception (SSA) | If this setting is "ON" - SerialNumber will be copied from Goods Reception (SSA) to Shipping Advice (CSA) when Shipping Advice is forwardet to Picking, if the quantity on Shipping Advice/Goods Reception match. If the quantity doesn't match, the option "Select from SSA" can be used manually from Shipping Advice. If the setting is "OFF" - The option "Select from SSA" must be used to add serialnumbers. |
Make shipping phone, email and attention mandatory for all external shipments | Turn this setting on if you want to make the phone, email and attention in shipping address mandatory when using an external transport management system. This will be checked when attempting to forward to picking queue and in the process of shipping the shipment. |
Use the Shipping services (SHP) application to define the shipping services that are available for shipments into or out of the warehouse.
To open SHP, select Logistics > Shipping > Shipping services from the Main menu.
Select Create new shipping service.

Enter a name for the shipping service in Shipping service name.
The Direction menu gives you the following options.
Incoming. Shipping service for shipments into your warehouse.
Outgoing. Shipping service for shipments out of the warehouse. If the direction is Outgoing, The group departing waybills field is enabled and visible.
Select the direction and select OK, the new shipping service is created with Status ST:1.
In Group departing waybill by, you can control how shipments, such as Shipping Advices (CSA), are grouped on the same Waybill Out (WBO). All shipping services with same consolidation tag will be consolidated when creating departing waybills for shipping advices, supplier returns and goods transfers. An example of a consolidation tag is UPSNORDIC.
You can specify a default shipping service in the Customer (CUS) application that is automatically added to a Sales Order. You can change this shipping service in the Sales Order COA application.
Enter a description of the shipping service in Description.
Select
 in Customer to lookup and specify the customer. If you specify a customer here, the shipping service can only be used by or for that specific customer. If you do not specify a customer, this SHP becomes available for all customers.
Select Available externally if you want to make this shipping service available externally, to your webshop customers, for example.
Select
in Carrier to lookup and specify the carrier if this shipping service is a service from a specific carrier.Select the shipping product of the carrier in Product. This links the shipping service to the specified product.
Payers account, the customer account id with the carrier, which should pay the freight.
Senders account, the customer account id with the carrier, which sends the shipment. If for example integration with TMS system nShift is active, agreements for this account will be used as base for freight prices.
In Return, if you want to use the shipping service to enable a customer to return goods, for example, select
, lookup and select the shipping service.In Account, specify the customer's account ID assigned by the carrier, if the customer should pay for the return.
In Locations, you can select those locations to which the shipping service applies. the shipping servce cannot be used to or from a location that is not specified in Locations. This field finds information from the Location (LOC) application and restricts the SHP to the specified location(s).
In Countries, select All countries and select the required countries. Select Only selected countries to filter the list to only the selected countries.
Select Register shipping service in the context menu to set the shipping service to Status ST:4.
Select Discard shipping service to discard the shipping service information or Close shipping service to set the shipping service to Status ST:9.
The Carrier (CAR) application contains information about the various carriers, or shipping service providers used to transport goods.
To open the Carrier (CAR) application, select Logistics > Shipping > Carriers in the RamBase menu.
Select
 .
.
Enter the name of the carrier and select OK.
In Supplier, select
 to look up and select the supplier. Select
  to open the Supplier (SUP) application, where you can view more information about the supplier.
In External transport management, if you are using an external Transport management service (TMS), select the TMS provider in the list.
In Tracking uri you can add url to carriers tracking site. This will allow the users to navigate directly to this site from the Tracking number field in Arriving waybill (WBI). The uri has to be set up on a format as where %TRACKNO% will be a parameter from tracking number in Arriving waybill (WBI). E.g of url for tracking site: https://www.dhl.com/no-no/home/sporing.html?tracking-id=%TRACKNO%
Select Automated confirmation of waybill handover if you want the departing waybill for this carrier to be closed automatically.
Select Register carrier in the context menu to activate the CAR.
To add a new shipping product from a carrier, select
 .
.
Enter the Product Id. This is provided by the carrier. If you use a Transport Management System, (TMS), then the Product Id is automatically imported. Refer to Integrate Rambase with an external Transport Management System (TMS) for more information on the TMS.
Enter the Description of the product.
Select OK. The products are available in the Shipping services (SHP) application to assign to your shipping services.
The Tracking Number Series (TRN) application contains tracking numbers allocated to your company by the Carrier (CAR).
To open the TRN application, select Logistics > Shipping > Tracking number series in the Main menu.
Select Create new tracking number series.
Enter the following information.
Type. Choose the type of shipment the tracking number is associated with. You can choose the following.
Package, the tracking number used for packages in a shipment.
Shipment (the tracking number for the whole shipment.
URL (used when tracking number is generated from an external system, and you store the carrier's URL for package tracking in RamBase).
Incremental Method. The available options are Doc (same tracking number for all packages in shipment) and Package (new tracking number for every package).
Start Number. Enter the first number in the number series.
End Number. Enter the last number in the number series.
Select OK. The TRN document is created in Status ST:1. You can edit the mandatory fields, in which you had already entered information, and add more information in the other fields given below.
Description. Enter a description for the TRN in this free text field.
Current Number. The current generated tracking number is displayed here. This field cannot be edited manually.
Warning Number. Choose the tracking number that, when reached, gives a warning via the Internal Messaging System (IMS). The message is sent to the users that are assigned the ROLE associated with this TRN.
ROLE. Select
to open the ROLE application where you can specify the role to associate with the TRN. You can also select to lookup and specify the role.Modulus. This field allows you to add a pre-defined security number to the tracking number.
Prefix and Suffix. These fields allow you to add a prefix or suffix to the tracking number.
Next Number/End Number/Warning Number. These fields indicate which number series will be the next. If you have a new number series specified in these fields, no warning will be given when the previous series ends.
Shipping services. specify the shipping service (SHP) to be associated with this tracking number series. You can select multiple SHP by selecting the checkboxes. Some SHP are unavailable due to being associated with other TRN.
Locations. Select the warehouse locations (LOC) that will use this TRN.
Select F12 to open the action menu and select Register (ST=4) to register the TRN.
The Freight Cost (FGT) application contains freight cost claims from various forwarders concerning various shipping methods and services.
To open the Freight Cost Archive (FGT) application, find Logistics in the RamBase menu and then Shipping. Click Freight rates to enter the FGT application.
While in the FGT, highlight the item line and press ENTER to inspect details.
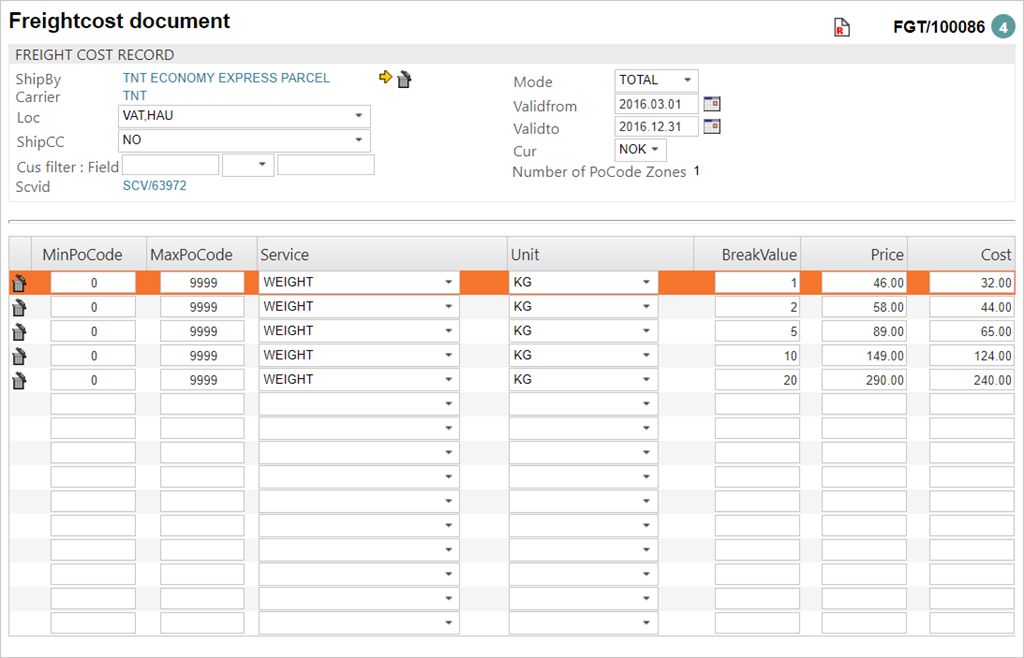
A Shipping Advice (CSA) is a document that contains a list of order items that have been, or are ready, to be delivered.
To open the Shipping Advice (CSA) application, find Logistics in the RamBase menu and then Shipping. Click Shipping advices to enter the CSA application.
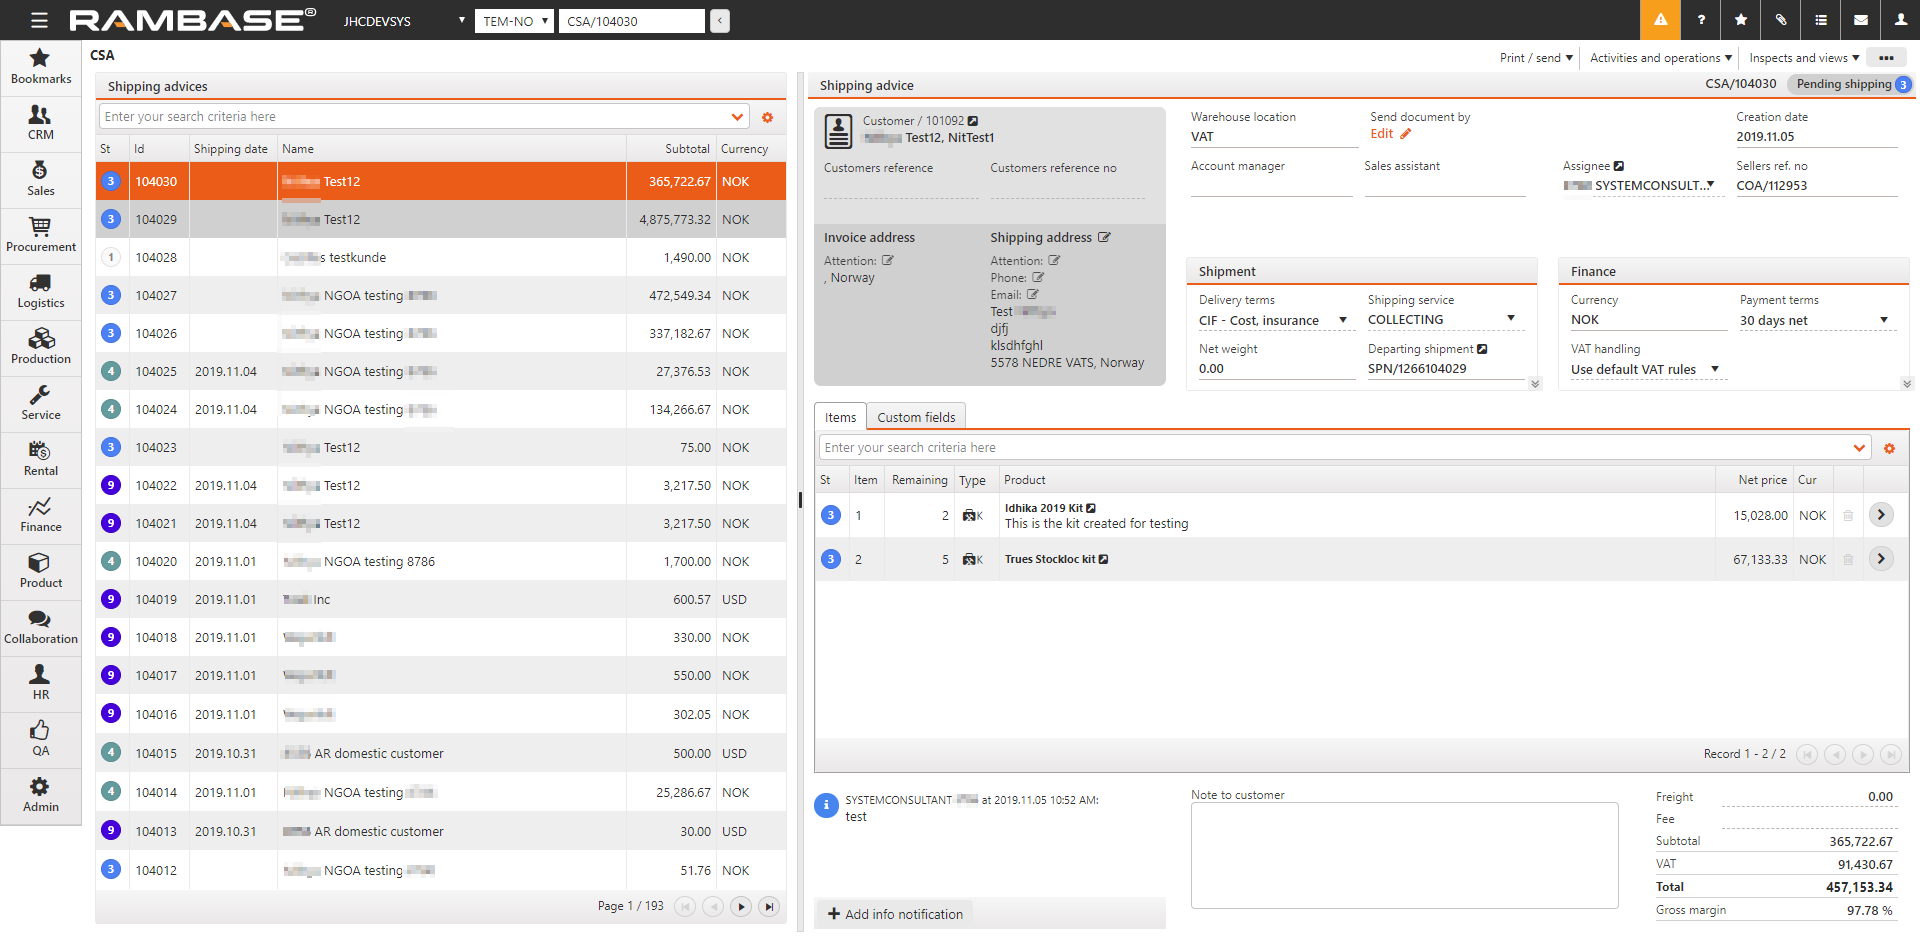
Important
Customer deviation (CDV) can only be created for Shipping advice items (CSAITEM) higher than Status 3.
Navigate to the Shipping advice (CSA) application.
Navigate to the Shipping advice (CSA) application
Option 1: RamBase menu → Logistics → Shipping → Shipping advices
Option 2: Click the Program field and type "CSA" and press ENTER.
Click here to read more about the user interface.
In the Shipping advices (CSA) application, select the Shipping advice (CSA) which has the item with a deviation.
In the Items tab, double-click, or click the Right arrow icon of the item to open the Shipping advice item (CSAITEM) application.
In the Shipping advice item (CSAITEM) application, click the Context menu option icon and select the Create deviation option.
Context menu options
Result: The Create deviation document (CREATECDV) application is opened.
At a minimum, provide the mandatory information in the Select source area. The fields in the Source area will be populated with the information from the Shipping advice (CSA).
Tip
Using the Clear button will remove all auto-filled information from the Shipping advice item (CSAITEM).
Providing information in one field will limit the options in the remaining empty fields, as the potential variables are narrowed down.
Customer field: If not already auto-filled in the Source area, click and type the Customer (CUS) name, or click the Yellow arrow icon to browse the list of Customers (CUS). Required
Shipment field: If not already auto-filled in the Source area, click and type the Shipping advice identifier (CSA), or click the Yellow arrow icon to browse the list of the Shipping advice items (CSAITEM).
Note
If the quantity is one (1), Serial No field will be replaced with the LCM field, detailing the identifier of the single potential Product unit (LCM).
Serial No field: If the quantity is more than one (1), and information is provided on the Customer and Shipment, click and type the serial number of the Product unit (LCM) with the deviation, or click the Yellow arrow icon and select the Product unit (LCM) with the deviation.
Product field: If not already auto-filled in the Source area, click and type the Product (ART) name, or click the Yellow arrow icon to browse the list of the Products (ART). - Required
When the minimum of information is provided, the Next button will be available.
To proceed, click the Next button.
Provide the Qty and the Deviation type.
Note that the selection of Deviation type will limit the Caused by option.
Click the Create Document button to create and navigate to the newly created Customer deviation (CDV) document.
Optionally, provide additional information in the now available options.
To register the deviation, press F12 and select the option Forward to Register.
This will set the Customer deviation (CDV) document to Status 2.
Depending on the Correspondence settings, a notification will be sent out to the recipient(s).
Depending on the deviation type, the different actions to take next will be defined in the Actions and Calculations tab. Press F12 to open the Context menu and choose the appropriate option for your desired next action.
Depending on the deviation type and deviation codes chosen, a new document will be created, either a Goods reception (SSA) for the Customer (CUS) to return the goods, a credit note if the price needs adjustment or other documents based on the previous chosen options.
Click the Document link and proceed with the document you have created.
Based on the alternatives chosen earlier, to complete the process, proceed within the documents which has been created during the Customer deviation (CDV) process.
Navigate to the Shipping advice (CSA) application.
Navigate to the Shipping advice (CSA) application
Option 1: RamBase menu → Logistics → Shipping → Shipping advices
Option 2: Click the Program field and type "CSA" and press ENTER.
Click here to read more about the user interface.
In the Shipping advices (CSA) application, select the Shipping advice (CSA) which has the item with a deviation.
In the Items tab, double-click, or click the Right arrow icon of the item to open the Shipping advice item (CSAITEM) application.
In the Shipping advice item (CSAITEM) application, click the Context menu option icon and select the Create deviation for repair option.
Context menu options
Result: The Create deviation for repair popup is opened.
At a minimum, provide the mandatory information in the Deviation Data area.
DevType drop-down menu: Click to select a deviation type from the list. - Required
CausedBy drop-down menu: Click to select a cause from the list. - Required
CDC drop-down menu: Click to select a cause from the list. - Required
ErrorCat: Click to select a an error category.
When the minimum of information is provided, click the line with a deviation to highlight, then press ENTER to create a Customer deviation (CSV) for repair in Status 2.
To further handle the repair, proceed with the information provided here:
A Shipping advice item (CSA) will get Country of origin according to Country of origin in the Goods reception item (SSA) it has assignments from. If the Goods reception item (SSA) does not have Country of origin specified, the shipping advice will get its value from the Product (ART) If there are assignments from several Goods reception items (SSA), and they have different Country of origin, the Shipping advice item (CSA) will not get any Country of origin at all.
The Shipping (SPN) application displays Shipping Advices (CSA / SRT / STW) which have been picked and packed and are ready to ship.
To open the Shipping (SPN) application, select Logistics > Shipping > Ship goods in the RamBase menu.

Several shipping advices can be linked to the same tracking number and sent as one shipment in the SPN application.
Choose a shipping advice and select the Contents tab. You can see the applicable documents to add to the shipping advice to simplify the shipment.
Select Move to another departing waybill in the context menu to move a shipment from one Departing waybill (WBO) to another.
If you are using an external Transport Management System (TMS), follow the instructions given below.
Open SPN from the main menu. If a shipment (SPN) uses a shipping advice linked to an external TMS, an open shipment is created in the TMS when you select Ship in the context menu.
The shipment is available in the TMS. Sign into the TMS website and complete the shipment by using the menu options available for new shipments.

Import the freight, tracking number and print labels by selecting Import external shipment info from TMS in SPN.
Select Finalize shipment to complete the shipment.
To open the Shipping Advice (CSA) application, find Logistics in the RamBase menu and then Shipping. Click Shipping advices to enter the CSA application.
In the right pane, highlight the CSA you want to inspect and select ENTER.
Select the arrow icon in the Departing Shipment field, in the Shipment area.

This will open a window where you can see details regarding the shipment.
The Packages folder shows the different packages in the given document, with the necessary information for shipment.
The link icon in the Package tracking number column is a direct link to the freight forwarders Track and Trace application to trace the package after shipping.
The Edit Item link icon in the right-most column, near the trash can icon, is a quick link to edit the package information.
The Contents folder shows both the contents of the specific shipping advice and the candidates for combining shipments.
To move a candidate shipment over to your shipment, highlight the candidate and press enter, double click or use the arrow icons.
The icon next to the document name in the document column is a direct link to the actual document.
It is possible to add serial numbers belonging to product units (LCM) to specific packages.
Shipment (SPN) is divided into different packages. The Assign serial numbers icon in the item line will start an application where serial numbers can be scanned before the shipment is shipped. To print a label with a list of the serial numbers belonging to a specific package, click the Print serial numbers icon.
A Departing waybill (WBO) is a document for a specific outbound consignment.
To open the Departing waybills (WBO) application, find Logistics in the RamBase menu and then Shipping. Click Departing waybills to enter the WBO application.
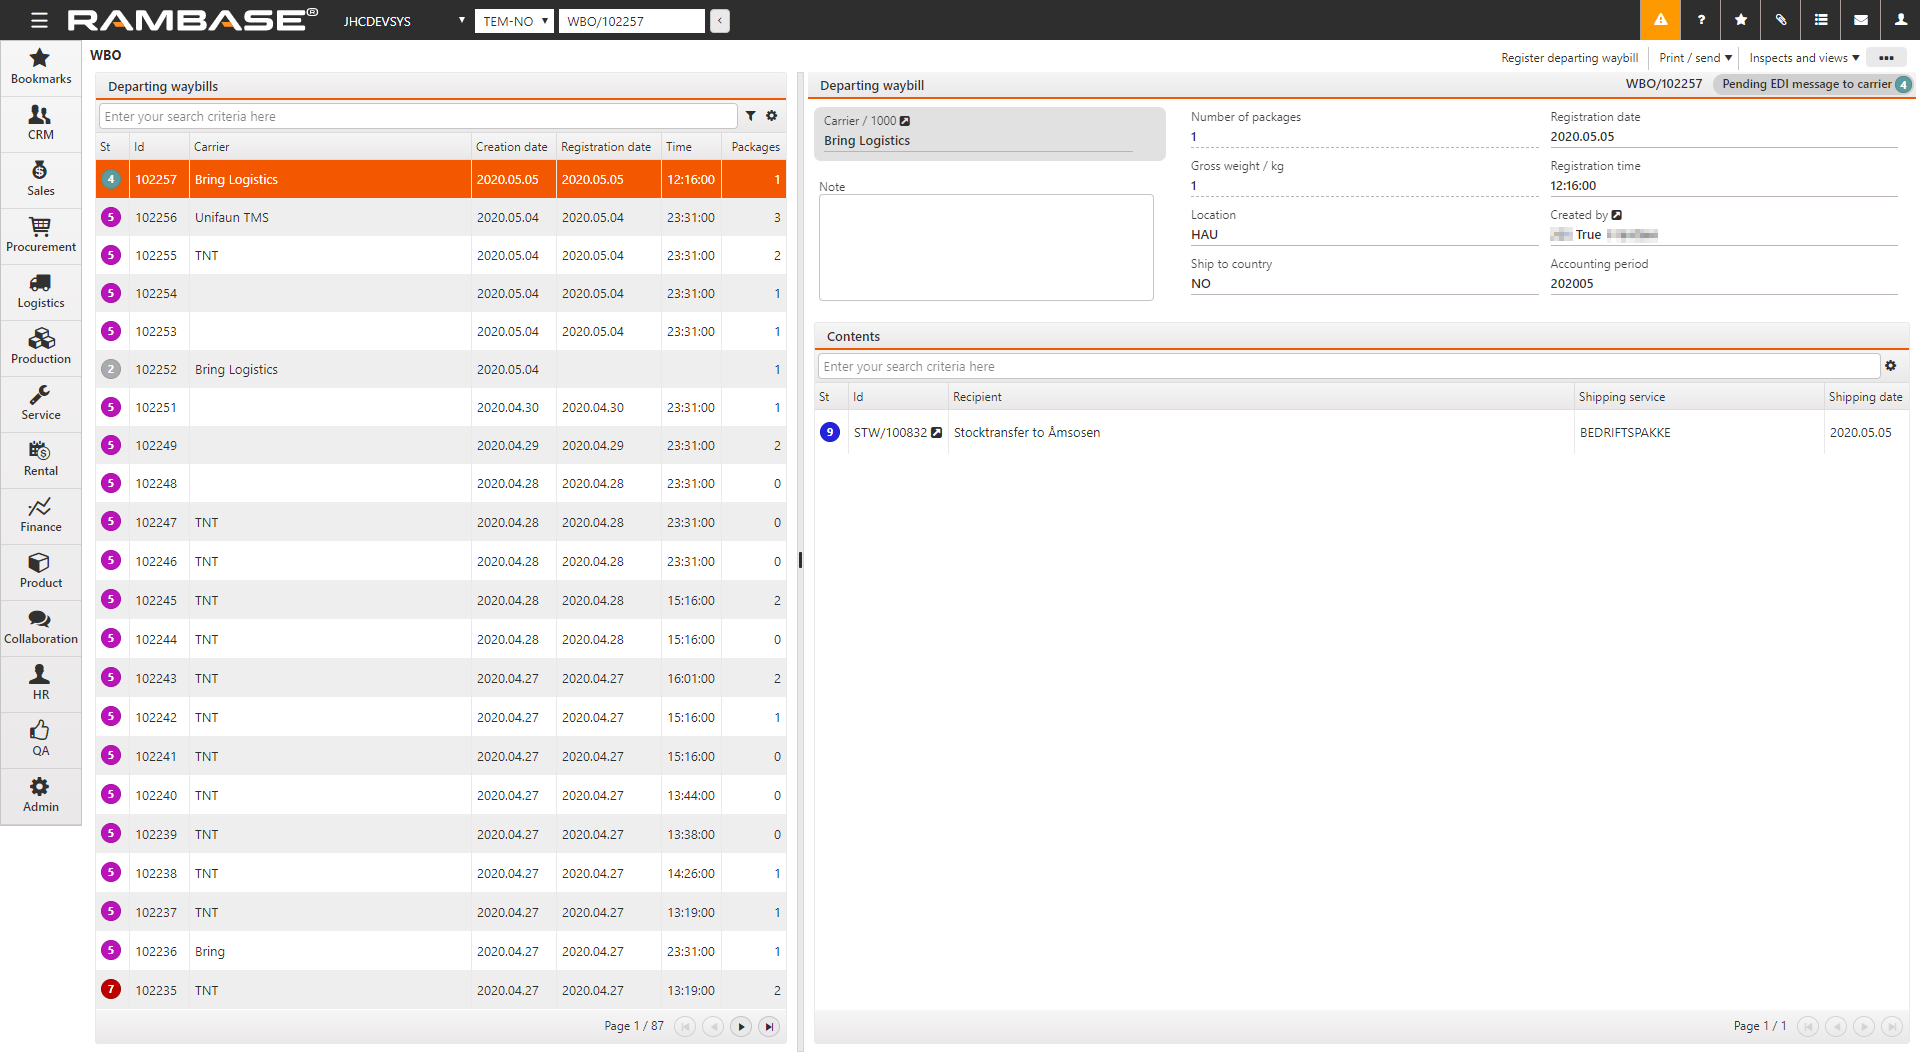
When a Shipping Advice (CSA), Goods transfer (STW) or Supplier return (SRT) is shipped and set to ST:4, it will be linked to a WBO document.
Use the Grouping on Departing Waybill (WBO) setting in the Company settings (CSV) application to set grouping on Departing waybill (WBO).
If this setting is ON - No grouping of Departing Waybill (WBO) will be done, and there will be created one Departing Waybill in status 2 per shipment (CSA, STW or SRT).
If this setting is OFF - Grouping of Departing Waybill will be done according to the setup in the field WBOGroupBy on Shipping Service (SHP). If this field is empty, there is a default setup for grouping Departing Waybill. The Location (LOC), Ship to country, Carrier (CAR) and Accounting period fields on the WBO must match the document. If no matching WBO is found, the system will create a new WBO in status 2 and link the CSA, STW or SRT to it. The Scheduled registration time field will by default be set to 23:30.
It is possible to set up exception rules for different Shipping services (SHP). If a new shipment (CSA, STW or SRT) does not match any exception rules, the standard rules will be used. Contact RamBase support to set up exception rules.
With these exception rules, it is possible to set up that other fields on the WBO must match the document. For example, the WBOGroupBy field in the Shipping service (SHP) application can be used to group documents on the same WBO. If the Grouping on Departing Waybill (WBO) setting in the Company settings (CSV) application is OFF, the program will search for WBO in status 2 with the same WBOGroupBy as the document. In addition, the Location (LOC), Ship to country, Carrier (CAR) and Accounting period fields on the WBO must match the document.
For each of the locations selected in a SHP, it is possible to set up to four different scheduled registration times. When a WBO is created, the Scheduled registration time field in the WBO will be set to closest time set in the SHP application for the selected location. In case no scheduled registration time is set in the SHP application, or current time is later than the latest scheduled registration time, the Scheduled registration time field in the WBO will be left empty.
The WBOGroupBy field in the SHP application can only be set when the Direction field is set to OutGoing, and to set multiple scheduled registration time, the WBOGroupBy field must be given a value. This means that scheduled registration times set in the SHP application, only affects WBOs where WBOGroupBy is set.
The auto registration will register the WBOs in status 2 when the Creation date and Scheduled registration time has been reached. If the Scheduled registration time field is empty, the WBO will not be registered. To erase the time in the Scheduled registration time field in the WBO, choose the Disable auto registration option in the context menu. To set a time in the Scheduled registration time field, select the Enable auto registration option in the context menu. The system time will automatically be set when this option is selected.
The WBO may also be closed manually using the Register departing waybill option in the context menu.
If the AutocloseWBO field is set to No on the selected Carrier (CAR), The auto registration will not register the WBO.
If any documents in status between 1 and 4 is linked to the WBO when the WBO is registered, these documents will be removed.
It is possible to change the shipment measurement units both on warehouse location level, and also down on the shipment level.
The Location (LOC) archive lists all the warehouse locations, with all related information.
The dropdown menus on the right side of the screen concerning shipment length and weight units defines which units are to be used as default for this location. The choice made here regarding the units measurement will affect how the calculation of total volume is displayed. If centimeter is chosen, the volume will be shown as cm3, and if meter is chosen the volume will be displayed as m3.
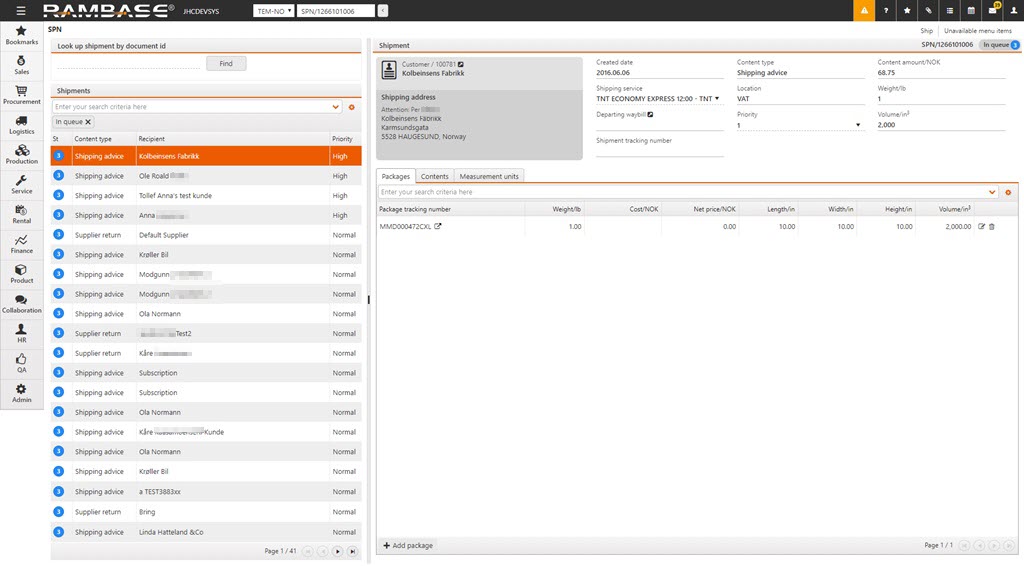
These volume units chosen as default on LOC will then be used in the shipping documents related to this LOC. They can be changed on the specific documents. Volume is calculated based on the measurements, but can also be changed if needed (for example in situations where a package is cylindrical or otherwise difficult to automatically calculate the volume of).
The customs process may be defined as the process where goods are prepared for shipping (export) to another country.
Goods prepared for export.
Goods can be exported for consumption in another country, or to be further processed. Export regulations can make international trade complicated and demanding, with certificates, customs declarations and other strict requirements. In many cases all details (value, weight, dimensions, usage) must be displayed, and some country's import regulations are stricter than others.
Creating export documents
Trade invoice, export declaration, certificate of origin and freight documents need to follow export shipments.
Setting name | Description |
Create Customs Export Declaration (EXP) | If this setting is "ON" - One Customs Export Declaration (EXP) is created for Shipping Advice Items (CSA-ITMs), Supplier Return Items (SRT-ITMs) and Goods Transfer Items (STW-ITMs) that are linked to a Goods Reception (SSA) that is linked to an Arriving Waybill (WBI) with BWCODE (Bonded Warehouse Code) filled. One Customs Export Declaration is also created for Shipping Advice Items, Supplier Return Items and Goods Transfer Items that are linked to a Goods Reception linked to an Arriving Waybill without BWCODE filled, or to a Goods Reception that doesn't have link to an Arriving Waybill at all. |
Customs Bonded Warehouse Code | Value in this setting should be the bounded warehouse code for the company. If value is filled with e.g. 1234, the field Stockowner-BWCode on Arriving Waybill (WBI) will be filled with 20171234051002. 2017=Year, 1234=Customs Bonded Warehouse Code, 051=The day goods are received and 002=Number of shipment of goods received that day. |
Declare Customs Export ( EXP ) as from non-bonded warehouse | If this setting is turned on, when creating export declaration ( EXP), all the goods are declared as non bonded, regardless of the category of the goods. |
Export Code for passing border | This setting has default value 40 - Air, and will be added to the field Cmbcode on Customs Export Declaration (EXP) documents automatically. The value in the setting could be changed to 50 - Post. This value explain how the goods pass the border. In the Customs Export Declaration there are several options in the Cmbcode field to select. |
Print TVINN Declarant Name | Value in this setting should be the Company name to use in TVINN - The Electronic system for exchange of customs declarations. Here you enter the name of the declarant of your exports that will show on the TVINN customs export form. This value can be "Hatteland". |
Show desimals for customs proforma invoice outputs | If this setting is 'ON' - Show desimals for customs proforma invoice outputs. Custom Export Declaration (EXP) show the field PRICE and not AMOUNT from Custom Export Declaration |
Storing of Customs Export Declaration (EXP) documents | Value in this setting is where to store Customs Export Declaration (EXP) documents, in which database if it's a Group. This company can be responsible for Customs clearance for several companies within the same Group. Format to be used in this setting is a database: LLL-LL (L for letters). |
TVINN Company name | Value in this setting should be the Company name to use in TVINN - The Electronic system for exchange of customs declarations. The value could be "Hatteland AS", and this will appear in the customs documents. |
TVINN Id | The value in this setting should be the Company Id in TVINN. Format to be used is: NN NN NN NN (N for numbers) |
Unique Carrier-BwCode (Shipmentno) on Arriving Waybill (WBI) | If this setting is "ON" - When adding a code in Carrier-BwCode (Shipmentno) field on an Arriving Waybill (WBI), - a check will be done if this code already exist on an Arriving Waybill in this Company database. If the setting in addition has a value with another database(s), the same check will be done on Arriving Waybill in this/these database(s). If the Carrier-BwCode exist on other Arriving Waybills, you are not allowed to use it again. The setting is also used to update the field StockOwner-BwCode with a serial number on the Arriving Waybill. A check for the last used serial number in this Company database or in the database(s) added as value in the setting is done, and the next serial number is added in the field StockOwner-BwCode. Format to be used as a value in the setting is one or several databases: LLL-LL or LLL-LL,LLL-LL (L for letters) |
Update KitCost table when changing Tariff | If this setting is "ON" - When changing Dutypct or Environmenttax on Taric (TAR), the scheduled batchjob 'Product: Batch: KitUpdate' will run for this company. In addition the value field in the setting must be DUTY-EU if the Union field on Taric contains 'EU'. If the Union field doesn't contain 'EU', the value on the setting must be DUTY-NO |
Use TVINN for customs declarations | If this setting is "ON" - company use TVINN - The Electronic system for exchange of customs declarations. |
All shipments going abroad must have customs declaration documents attached. A Shipping Advice (CSA) document in status above ST:3 will have a related WayBill out (WBO) document that may be accessed from the document. From the WBO you will be able to create custom documents.
The Export Handling (EXPORT) application is designed to send electronic customs reports to TVINN (customs office in Norway). In that format, there is nothing called freight, it is only the value of what is to be exported and the freight costs must be added to the declared value. The total freight on the selected CSAs is divided on each item on the EXP document, weighted according to the CSA items value.
When creating a CSA, you will receive a WBO reference when you set the CSA to ST:4. To open the Export Handling (EXPORT) application, find Logistics in the RamBase menu and then Customs. Click Export handling to enter the EXPORT application.

This will open the EXPORT application showing all WBOs to be sent abroad from the country in which your country is registered.
Click the Make export declaration on the relevant WBO line.
In the Generate Export Declaration, choose the correct procedure code in the Select Procedure Code in the drop down menu. The most common of these in Norway will be selection number 10. Click OK to proceed.
Click the Inspect EXP declaration icon in the WBO line to open the Export declarations (EXP) application. Find the related export document, highlight the document and press ENTER.

Click the Main Info folder. Several of the fields are prefilled with default information. Inspect and change the information as needed.
Choose the origin bonded warehouse in the Loccode drop down menu.
The CmTransType field sets the price that is stated in the export documents as the current value.
The CMExpcode field shows where the export is going and the nature of the transport (temporary/ordinary).
The Shipcc field indicates target country.
The Cmunit/Cmloc fields indicated the custom declaration recipients. It is important that the numbers here are correct, or the documents may not be acceptable to the customs authority.
Several of the values in the remaining fields are imported from the COM application, which is predefined.
Click the Item folder. If any of the columns in the item line is missing a value, the EXP will receive ST:7, which means there is a major error.
To fix this, click the CSA link in the item line. Then click the item line with the missing information. You may inspect and correct the information in the Misc folder.
It is also possible to use the F12 option Regenerate Declarations to fix this problem.
Redo the steps 1 to 5 to overwrite the former EXP document.
If no weight is registered on the EXP document, the default setting will be 1kg. Pressing ENTER while the item line is highlighted will open a popup where this may be added, together with other information.
Note: The Origin will be inherited from the Product (ART). If there are several items with different origins, they will be sorted into separate item lines.

Press F12 to open the action menu. Here you are presented with several options.
Print Copy of Declaration gives you the opportunity to print a copy of the customs declaration.
There are also several special invoice options depending on the shipment. The most used is Print Invoice for Customs clearance. Here you may add information for the recipient or the transport company you are using. There are also two checkboxes:
EXP price is adjusted: If you have adjusted the currency.
Use prices from EXP: If price is set manually on the EXP document.
Send FU to TVINN: This option sends the customs declaration to the customs authority electronically.
Send MA to TVINN: This the same as above, but the field CmExpcode is set to EU2/3. This will prompt manual processing of the declaration at the customs authority.
Choose the F12 option Send FU to TVINN to send the EDI and set the document to ST:9.
If you are using a third party transport company, you can print a copy of the customs declaration.
Reconciliation of bonded warehouse is performed in the Customs Validations Menu (CUV). Here you may choose any period you wish to control. CUV will then gather all WBI documents with a value in the StockOwner - BWCode field and related SSA documents, where export declaration is missing.
These documents with discrepancies will be available in the CUV archive for further processing.
Write CUV in the program field and press ENTER.
A goods transfer process can be defined as the process where stock is transferred from one warehouse to another.
Goods moved from one warehouse to another, but the financial stock value will not be changed during the process.
Structured products transferred from one warehouse to another, will be treated by the system as they are purchased and not manufactured inhouse.
If a company has several warehouse locations spread over several geographical locations, there will most likely be regular logistical transactions between these. It is normal in distribution to have one central warehouse where the goods can be distributed between several smaller warehouses strategically located near large key customers. No matter which model the company uses, the need for sending goods between warehouse locations will be apparent.
When "Allow goods transfer to this location" is flagged on a Location (LOC), the system will generate a Supplier (SUP) with the same name as the Location (LOC). This will be an internal supplier to be used when transferring goods from one location to another. If one should remove the flag on the location, the supplier will be closed to Status 9. The Supplier (SUP) created will have Supplier Classification: S. The specific suppliers for this can be found using the following restriction: SUP;ACCOUNTCL:S
Create goods transfer
The need for stock transfer must be created and registered.
Ship goods
The goods need to be prepared and shipped from the warehouse.
Register reception
Goods reception at the receiving warehouse has to be done.
Setting name | Description |
Forward Goods Transfer (STW) to pending pick | If this setting is "ON" - Goods Transfer (STW) will be automatically added to picking queue (status 2). If the setting is "OFF" - Goods Transfer will remain in status 0 and must be manually added to the picking queue. |
SerialNumber on Goods Transfer (STW) | If this setting is "ON" - Goods Transfer (STW) can be shipped without SerialNumber registration, even if the Product is defined with 'RequireSnoToShip' = Yes. If the setting is "OFF" - Goods Transfer can not be shipped without Serialnumber if the Product is defined with 'RequireSnoToShip' = Yes. |
In addition you will have to activate the submodule Logistics_stocktransfer, and also activate the Allow goods transfer to this location option in the LOC application to be able to transfer to the given destination.
Use the Create goods transfer (CGT) application to create Goods transfer (STW). The CGT application shows all Goods reception (SSA) items in stock at all the different Locations (LOC). It is also possible to start the CGT application directly from a Goods reception item (SSAITEM) or a Product (ART) by the Initiate goods transfer… option in the context menu. The application will then be started with a filter for this specific SSAITEM or ART.
The user must select a LOC in the Transfer to field. The Transfer to field has a filter and will only show the locations that it is possible to transfer goods to. Make sure that the Allow goods transfer to this location checkbox in the LOC application is checked on the location you want to transfer the goods to. Use the filter fields Location, Product, Manufacturer and Supplier to filter the search.
There are three ways to create goods transfer from the CGT application:
You can look in the Bulk entry menu (BEN) application if you receive an error message when the STW is created to find out the reason.
Find the item you want to create a STW for in the CGT application.
Add quantity in the Transfer qty field. If you click on + icon, all available quantity will be added.
Click on the arrow icon to create goods transfer for transfer quantity.
Select the items you want to transfer in the CGT application. Click on the status icon on the item lines to select them.
When all the wanted items are selected you have two choices in the context menu:
Click on the Create for transfer quantity for selected items option to transfer the quantity written in the Transfer qty column.
Click on the Create for available quantity for selected items option to transfer the quantity in the Available qty column.
Click Yes in the popup to create the STWs.
Use the filters to find the items you want to create STWs for.
If you want to transfer all the filtered lines you have two choices:
Click on the Create for transfer quantity for filtered lines button to transfer the quantity written in the Transfer qty column.
Click on the Create for available quantity for filtered lines button to transfer the quantity written in the Available qty column.
Click Yes in the popup to create the STWs.
To transfer stock between warehouses, you may perform this either from the Goods Reception (SSA) document or from the Product (ART) document related to the article being moved.
The first time you perform a goods transfer to a new location you must specify the shipping service manually. Subsequent transfer to/from the same location will always inherit the shipping service details fromt he previous transfer to/from these locations.
To open the Goods Reception (SSA) application, find Logistics in the RamBase menu and then Reception. Click Goods receptions to enter the SSA application.
Open the relevant SSA document and highlight the item you wish to transfer. Press ENTER to open the item.
Choose the Initiate goods transfer option in the context menu.

This will open a popup where to and from locations are defined in drop-down menus. Choose the source warehouse in the Source LOC field and the destination in the Dest LOC.

Choose the quantity you wish to move in the Qty field and click the OK button. This action will generate a Goods Transfer (STW) document. A Purchase Order Response (SOA) with location set to destination location is also created, waiting for reception of the goods.
The STW document will be picked, packed and sent using the standard prepare shipment, picking and shipping processes.
To open the Product (ART) application, find Product in the RamBase menu and then Product management. Click Products to enter the ART application.
Highlight the relevant ART and press ENTER.

Press F12 to open the action menu and choose the option Initiate goods transfer.
Follow the steps in From SSA from step number 3.
The goods have now been transferred out of the warehouse and the inbound transfer process may begin at the destination location when the stock transfer goods are received.
The Goods Transfer (STW) document is used to transfer goods within a company from one location to another, for example from a warehouse in Stavanger to a warehouse in Bergen.
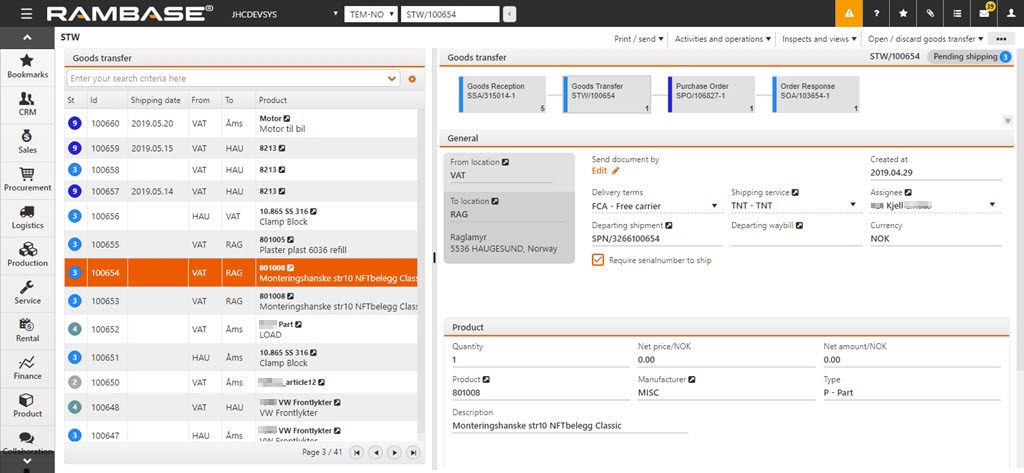
Enter the Goods Reception (SSA) document. Highlight the desired item line and press ENTER.
From the item view, choose the Initiate goods transfer option in the context menu.
Choose the destination location in the Dest LOC field.
Enter the desired quantity you want to transfer in the Qty field and click OK.
This will create a STW document. Depending on the settings for your company, the STW document will either go to ST:0 or to ST:2. If the document goes to ST:2, the process continues as a standard picking/shipping process. If the document goes to ST:0, please continue with this list.
Use the RamBase menu and go to Logistics, then to Goods Transfer, where the link to Goods Transfer is located. Click this.
You will find the newly system created STW document in the left hand menu. From here you can add to picking queue and the process continues as a standard picking/shipping process.
The registration of inbound goods transfer is done in the Receive goods (RPP) application. To open the application, start in the RamBase menu, find Logistics , then Reception and finally select Receive goods. It is also possible to type "RPP" in the Program field to enter the application directly.
Instructions for the Receive goods (RPP) application may be found here....
The deviation process can be defined as the process where deviations in the warehouse are detected and/or reported.
Defective goods are reported.
Defective goods are returned to supplier.
Deviations in stock are reported.
Deviations in stock position are reported.
Deviations in the stock can be discovered and reported in many settings, for example during picking of goods, inventory or goods reception. These deviations may be caused by several reasons, for example defective goods, goods located incorrectly or deviations in type of goods. The course of action to correct the stock depends on the type of deviation. The course of action may be to send the defective goods back to the supplier or correct faulty inventory.
Register stock correction
The actual stock count can be corrected and registered as a document which can be used as the base for deviation in the financial stock value.
Create supplier return document
If there are any deviations in goods sent by the supplier, who you have a return agreement with, these will be the basis for a supplier return document.
Sending confirmation on supplier return
Setting name | Description |
Automatically remove assignments to create stock correction if not enough available quantity | Automatically remove assignments to create Stock correction (SAW) if there is not enough available quantity. Assignments to Sales order (COA) and Production work order (PWO) will be removed, and rather assigned as PENDING. The assignments will only be removed if no picking has been confirmed and if they are not locked in any way. Assignments to Sales order (COA) in Status 1 - Pending registration, will not be removed. The priority of which assignments that will be removed, will be according to the scheduled shipping date (LINKDELDATE) sorted in descending order. This means that assignments to Sales orders (COA) / Production work orders (PWO) that need the goods most far out in time, will be removed first. |
Automatically remove assignments to create supplier return if not enough available quantity | Automatically remove assignments to create supplier return (SRT) if not enough available quantity. Assignments to Sales order (COA) and Production work order (PWO) will be removed, and rather assigned as PENDING. The assignments will only be removed if no picking has been confirmed and if they are not locked in any way. Assignments to COA in Status 1 will anyway not be removed. Priority of which assignments that will be removed, will be according to scheduled shipping date (LINKDELDATE) sorted in descending order. Means assignments to COA / PWO that need the goods most far out in time, will be removed first. |
Register Stock Correction (SAW) | If this setting is "ON" - Stock Correction (SAW) is automatically registered to status 9. If this setting is "OFF" - Stock Correction will just be created in status 0 and must be registered manually. (this setting has no impact on PaterNoster or Stock Taking) |
Register Stock Correction (SAW) from Stock Takings (STT) | If this setting is "ON" - Stock Correction (SAW) will be registered automatically to status=9 when Stock Correction is created from Stock Takings (STT). If setting is "OFF" - Stock Correction will be created in status=0, and must be manually registered to status 9. |
Register Stock Correction (SAW) if Deviation | Stock Correction (SAW) will be created if quantity in the stock adjustment file from WMS mismatch with RamBase quantity. If value in this setting is ST0, the Stock Correction will be created in status=0 and must be registered to status=9 manually. If the value is ST9, the Stock Correction will registered to status 9 automatically. |
SerialNumber on Supplier Return (SRT) | If this setting is "ON" - Supplier Return (SRT) can be shipped without SerialNumber registered, even if the Product is defined with 'RequireSnoToShip' = Yes. If the setting is "OFF" - Supplier Return can not be shipped without Serialnumber if the Product is defined with 'RequireSnoToShip' = Yes. |
Supplier Return (SRT) linked to Goods Reception (SSA) with another Supplier Id | If this setting is "ON" - Supplier Return (SRT) can not be linked in Assignment Register (SAR) to a Goods Reception (SSA) registered on another Supplier. If the setting is "OFF" - Supplier Return can be linked in Assignment Register to a Goods Reception registered on another Supplier, even if the Supplier Id between Supplier Return and Goods Reception is mismatching. Recommended value: ON |
Supplier used on Goods Reception (SSA) for repair | If the Company doesn't load their sales history from Shipping Advice (CSA) with associated Goods Reception (SSA) into RamBase, a Supplier must be created and set as value in this setting. The Supplier will be used when Goods Reception are created from Deviations (CDV) with no Source information. The format to be used is: NNNNNN (N for numbers) |
The Stock Correction transaction (SAW) is used for manual stock adjustments. These corrections are stored in the Stock correction (SAW) application and may be inspected using the application. Manual adjustments are required when the physical stock does not match the registered stock in the system.
To open the Stock correction (SAW) application, find Logistics in the RamBase menu and then Deviations. Click Stock corrections to enter the Stock correction (SAW) application. You can also open the application from the Goods receptions (SSA) application by entering through item level and then click Create stock correction in the context menu.
This view gives you the opportunity to have a complete overview over all stock corrections, both registered, under processing and closed.
Examples of situations where you may need to manually correct the stock is when the actual quantity in the warehouse deviates from the registered quantity in RamBase. Reasons for this may be incorrect inventory count, wastage or damaged goods.
To create a stock correction you must open the related Goods Reception (SSA) document. This is also available from the Product (ART) application using the action menu.
In the SSA document, you will need to highlight the desired item line and press ENTER, or double click, to enter the SSA Item view.
If you are working in a SSA generated from a Production Work Order (PWO), you will need to click the ITM-view button in the upper right corner to enter the SSA-ITM.
In this view you will need to choose the Create stock correction option in the context menu.

This will open the Stock Corrections (STC) application where you can choose to either add or subtract from stock.

You may also add a note in the note field. This is useful to see why the stock correction was made for other users.
Enter the new stock into the New Stock Qty field and press ENTER.
Note: You will need to switch on one setting for the SAW to go to ST:9 immediately after registration. If not, the SAW will remain in ST:0 until it is manually registered in the SAW application.
StockAdjustmentWarehouseAutoRegister
Register Stock Correction (SAW) - Logistics.DeviationHandling
If this setting is "ON" - Stock Correction (SAW) will automatically be registered to status 9. If setting is "OFF" - Stock Correction will just be created in status 0 and must be registered manually. (this setting has no impact on PaterNoster or Stock Taking)
You can use the STS application to create stock corrections (SAW) when stock taking using the Handheld Terminal (HHT).
To open the STS application, enter STS in the Program field and select the Enter key.

You can also select
 in the COUNT application to open STS. To do this, the Create stock correction (SAW) from Count application setting must be enabled.
Using the HHT, scan the Goods Reception Id on the label affixed to the stock item. You can also enter the Goods Reception Id manually by selecting
 . The details of the stock item such as the part number and description are displayed.
Enter the new stock quantity in New Stock Qty.
Scan the stock location label. The SAW document is created.
It is possible to register multiple Stock Corrections (SAW) from a Stocktaking (STT), as some counts are expected to show discrepancies (such as nuts and bolts). To quickly go through this count, without having to confirm each one, you can use the option Register all stock correction for this stock taking. This will register all the belonging SAWs from ST:0 to ST:9.
Status | Meaning |
 | Stock Correction document is created, freeqty in stock reduced. |
 | Stock Correction document registered, warehouse stock adjusted. |
If the Create Stock Correction (SAW) if Deviation at Stock Taking Company setting (CSV) is set to ON, RamBase will create a SAW when a deviation (expected quantity different from counted quantity) occurs in the stock taking process via the COUNT application. The quantity in SAW will reflect the deviation quantity.
In case there is not enough available quantity in the SSAITEM to create a SAW, the program will remove assignments to Sales order (COA) and Production work order (PWO), and rather assign these to PENDING instead. The assignments will only be removed if no picking has been confirmed and if they are not locked in any way. Assignments to COA in Status 1 will anyway not be removed.
Priority of which assignments that will be removed, will be according to LINKDELDATE, sorted in descending order. Means assignments to COA / PWO that need the goods most far out in time, will be removed first.
In case it is in anyway not possible to remove enough assignments to allow the creation of SAW, the user will receive an error message and no SAW will be created.
If counted quantity is changed afterwards, in either the COUNT or Stock taking details (STTGOODS) application, the SAW will be deleted if it is still not registered (Status = 0) and a new SAW will be created if there is still a deviation between the expected quantity and counted quantity.
To provide a reason for why a Stock correction (SAW) is created can either be mandatory or optional.
If the Reason as mandatory for stock correction (SAW) setting is switched ON in the Company settings (CSV) application, the reason will be mandatory to provide when a Stock correction (SAW) is created.
The options in the Reason field must be set up locally by RamBase service desk. Contact your RamBase partner to initiate updates.
If it is mandatory, the user must choose between the options in the Reason.
If the Reason as mandatory for stock correction (SAW) setting is OFF, it is optional to state the reason.
Stock corrections (SAW) are in some processes created by background processes and not manually. When this is the case they will automatically get Stock taking deviation as the reason.
The Stock taking deviation reason will appear if Stock correction (SAW) is created from the Stock taking details (SSTGOODS) application (started from the Stock taking (STT) application).
The Stock taking deviation reason will also appear if Stock correction (SAW) is automatically created in the Stock taking (STT) process, because the Create Stock Correction (SAW) if Deviation at Stock Taking setting is turned ON.
The reason will be displayed in the Reason field in the Stock correction (SAW) application.
Note
Reason for change is also available in the application used for part change in a Product unit (LCM), and it is only in this application that users can potentially write a free text.
To return a Product (ART) to the supplier you must use a Supplier Return (SRT).
To open the Supplier Return (SRT) application, find Logistics in the RamBase menu and then Deviations. Click Supplier returns to enter the SRT application.
A Supplier return (SRT) can be automatically created from the Customer deviation (CDV) part change in the production or repair process, or by manually creating a Supplier return (SRT) for Products (ART) you want to return. When creating a Supplier return (SRT) manually, you will need to define the Return type from the drop-down menu.
You will then add the part to the Supplier return (SRT), and link it the appropriate Goods reception (SSA).
Supplier returns (SRT) are then handled similar to Shipping advice (CSA) documents, and shipped with the PICK and SHIP applications.
To open the Supplier Return (SRT) application, find Logistics in the RamBase menu and then Deviations. Click Supplier returns to enter the SRT application.
Click the Create new supplier return button.

Choose Supplier (SUP) in the Supplier field by typing the full, or parts of the Supplier (SUP) name.
Select the wanted currency in the Currency field. This is only available if the Supplier (SUP) uses more than one currency.
Only a Goods reception (SSA) item with the same currency as the Supplier return (SRT) can be assigned to the Supplier return (SRT) item.
Choose the type of return in the Return type field.
Scrap - The goods are broken or discontinued and thus removed from stock.
Scrap and credit - Goods which are broken or discontinued are returned to supplier for credit.
Supplier return - Goods are returned to supplier.
Click the Create button to create a new Supplier return (SRT) in Status 1.
Click the Create new item button to add items to the Supplier return (SRT).
Choose quantity in the Qty field.
Find the Product (ART) in the Product field.
Click the Create button.
Use the Create another checkbox to add more items.
Choose the Add to picking queue option in the context menu. This will set the document to Status 2.
Follow the same procedure as described in the Shipping advice (CSA) documentation.
NOTE: It is also possible to use the multi-select option to forward several items, where you click on the status icon of the item to select.
There are three different possible outcomes from creating a Supplier Return (SRT):
New goods delivered.
Goods repaired and returned.
Credit note issued.
If a replacement is to be issued, a Sales Order (COA) will be created to fulfill the need of the part in question. If there are no replacements in stock, the COA will create a purchase need. This will result in additional unnecessary purchase as the replacement/repaired part will be delivered.
There are two options related to this situation in the action menu to avoid this:
Create SPO waiting for Repaired goods.
Create SPO waiting for Replacement.
These options will create a Purchase Order (SPO) for the part which will be replaced and returned. The SRT will receive ST:8 after either of these choices have been made.
An alternative to this is to skip the SPO stage and create a Goods Reception (SSA) directly from the SRT using the F12 option Repaired Goods Received or Replacement Goods Received.
A stock quantity can be moved from one given product to another, for example from product A to product B. E.g. if a deviation occurs on product A, causing it not to fulfill certain requirements, a specified stock quantity can be moved from product A to product B due to more lenient requirements. It will then be used as product B.
The move process is initiated from Goods reception item (SSAITEM) and can only be done for stock of type Part or Material. To move a product to another product, click Move to another product in the context menu in the Goods receptions item (SSAITEM).
When the move process is initiated, the user will be able to select product, quantity, specify information related to material quality, heat number, best before date etc. Additionally, the user will also have the option of copying attachments from the Goods reception (SSA) document the move process is initiated from. The system will automatically create a Stock correction (SAW) for the product that the move process has been initiated from. Additionally, a Goods reception (SSA) document is created for the product that the move process is initiated to. A Stock correction (SAW) is created for product A and a Goods reception (SSA) is created for product B.
The created Goods reception (SSA) document will by default be created in Status 1, but the user has an option to automatically register the Goods reception (SSA) if the Register new goods reception to stock checkbox is checked off. This creates and register the Goods reception (SSA) to Status 9. This will also enable the option to specify a stock location for the Goods reception (SSA). If the checkbox is not checked off, the stock location option will not be visible/greyed out.
Flowchart in the new Goods reception item (SSAITEM) will show which Goods reception (SSA) this goods have been moved from.
Setting name | Description |
Import of Corrections using PaterNoster | If this setting is "ON" - files for corrections of stock in RamBase will be imported from PaterNoster |
Send Departing Waybill by EDI - Electonic Data Interchange | If this setting is "ON" - the Company can send Departing Waybill (WBO) to forwarders by EDI - Electronic Data Interchange |
Send Norwegian Custom Declaration by EDI - Electonic Data Interchange | If this setting is "ON" - the Company can send Custom Declaration to Norwegian Custom Authorities by EDI |
Send Picking list to PaterNoster | If this setting is "ON" - Picking list of goods will be sent from RamBase to PaterNoster |
Send Reception of goods to PaterNoster | If this setting is "ON" - Reception of goods will be sent from RamBase to PaterNoster |
Use of EDI - Electonic Data Interchange | If this setting is "ON" - indicates the company is using EDI - Electronic Data Interchange. More informations on kind of messages that could be triggered, is explained under the child settings |
Use of PaterNoster interface | If this setting is "ON" - indicates that the company is interfacing PaterNoster. Which level of communication there is between RamBase and PaterNoster, is explained under the child settings for this setting. |
Use Third Part Logistics Interface | If this setting is "ON" - indicates that this company is running functionality for ThirdPartLogistics. Batchjobs for polling and importing files for Products and Sales Orders (COA) will be triggered. |
Not following up the logistics side of your business may badly affect the core business.
The stock list is followed up.
The stock adjustments are followed up.
The goods receptions are followed up.
The supplier returns are followed up.
It is wise to spend a good amount of time and resources on following up routines concerning all business areas your company is involved in. Focus on improvement will in most cases result in raised profits or larger market share. Clear routines on handling the stock lists and supplier returns will benefit the company.
Honeywell Dolphin CT45 is the supported and tested unit for use with RamBase.
BarCom is the recommended supplier. Units ordered from BarCom will have the necessary licenses from Honeywell installed, and the delivered units will be ready for use.
Inform the supplier that the unit will be used with RamBase.
Order License for Honeywell SDK.
Use of a product specific pen will improve touch when inputting data.
Make sure the unit is connected to WI-FI.
Login to RamBase in Google Chrome.
Use your Username (PID) + password or create a new user for the unit for your company. In example for the warehouse operators.
Tip: Bookmark all relevant RamBase applications from the computer login.
Applications can also be opened directly from the RamBase program field.
If you receive the message “Failed to create BarcodeReader, Web service not responding", go to settings – web applications – enable web interface settings.

A barcode scanner can be used in RamBase for the applications to be performed on a PC or a tablet.