Service can be defined as a process which is executed, either on a regular basis or as a single occurrence, to maintain and repair physical products.
Executed maintenance service for one or several products.
Executed service in relation with sales order.
Executed service in relation to rental order.
A service order is most often initiated through a customer order, for example if someone needs service performed on their car. In other situations service needs are initiated from the the customers own warehouse, for example if the warehouse manager, or product manager, wants to perform maintenance on products or goods on a regular basis over a long period of time. Some goods or products also require regular service to keep certifications. We can again look to the vehicle rental business to see an example of this, with the annual service and certification rental vehicles need to keep EU certification.
Create service order
Requests and orders from customers and/or warehouse needs to be handled and registered.
Plan service
The service needs to be planned in relation to the time of service, use of time and resources. Confirmation is sent to customer.
Perform service
The service job itself is performed
Handle service documentation
After the service has been performed, documentation may be included with the invoice.
Reporting
Statistics and key figures.
An order handling process may be defined as the process where one order goods or service and sets price, delivery time, payment terms, articles and quantity.
Service order for goods in stock.
Service order for goods pending reception.
Regular service order.
An order process, which requires an order confirmation, can be said to be legally binding. It is at this point you may include the order in the companys financial records for expected future income.
When creating a service order one have to register the product which should undergo a service together with the service job(s).
It may be more difficult to estimate a price for a complete service order compared to a sales order as it depends on what parts and operations which is set to be included. The service job could have a fixed price, but operations and parts in addition makes the invoices.
In addition to the several other tasks in the order process, it is important to mention the tasks where you should follow up the acknowledged, but not delivered orders. You are handling the customer backlog, which could be defined as what the customer is owed by the seller. Within this task you could follow up the customer backlog based on requests or in internal routines. For instance, getting confirmed dates from supplier/production, control that orders are delivered according to confirmed date or attempt to expedite purchase orders/productions if customers requested date is not fulfilled.
Good internal routines for following up the customer backlog is vital. If the company seldom delivers in time, or may offer reduced delivery times for certain customers, this may be rectified by closely following up the backlog to avoid discrepancies.
An order may, as all other processes, be cancelled until a certain threshold has been reached.
Receiving an order
Creating an order where products, quantity, pricing and delivery terms are included.
Allocating goods
Ensuring the goods and service parts are actually in stock or pending reception.
Acknowledging the order
Sending a sales order to one or several recipients.
Follow up on the customer backlog
Even if the order is already acknowledged it may still be cancelled or partially delivered.
Change an order
After request and agreement with the customer, create a new version of the sales order.
Setting name | Description |
Default KM Product (ART) for Service | Value in this setting is a Product Id that is used as a default for KM Products (ART with Type=KM-Service) on Service Orders (CSO), -if given KM Product is not found. Format to be used: ART/#123456 |
Default Product (ART) for Service | Value in this setting is a Product Id that is used as a default for Products (ART with Type=K-Kit) on Sales Orders (COA), -if given Product is not found. Format to be used: ART/#123456 |
Default Repair days for Service | Value in this setting is a number of days from Deviation (CDV) Receive date until the Repair should be done. This estimated date the Repair should be done is added to ESTEND field on Deviation |
Default Requested Delivery Date on Service Order (CSO) | Value in this setting is how many days ahead the Requested Delivery date is set, according to create date for Service Order item (CSO-ITM). If value=0 is added, the Request Delivery date will be todays date. If value=2 is added, the Requested Delivery date will be two days ahead according to create date for Service Order item. If no value is added, the Requested Delivery date will be blank. |
Default Supplier Id for Deviation Service | Default value of SERVICESUPID, to be used in CDV. It's DOCID of a valid LOC (Location). Format to be used: LOC/1234 |
Default Supplier Id for Service | Value in this setting is a Supplier Id that is used for creating Purchase Order (SPO) and Goods Reception (SSA) with Type=Service*, -for Product to be serviced. Format to be used: SUP/123456 |
ReConfirm Service Order (CSO) | If this setting is "ON" - Confirmed delivery date will automatically be updated on Service Order Item (CSO-ITM), -if there is a change in Confirmed delivery date on the Purchase Order Response Item (SOA-ITM) the Service Order is linked to. This update will be logged in revision history on the Service Order. A batch job will each night search through revision on Service Order and sent out re-confirmations according to the rules and set-up explained below. Rules: Customers (CUS) must have Send document by=Email and status higher than 1 and less than 9. Set-up: Setup on Customer/Handling on must be: Document to send=COA, Sendby= Email and Send To=Email addr. to the customer |
ServiceDefaultRepairDays | Value in this setting is a Customer Id to be used for creating Service Order (CSO) from Rental Sales Order (COA) that is not CusOwned. Format to be used: CUS/123456 |
Use Standard Salesprice on Service Order (CSO) | The setting is used for calculating Service Order Item2 (CSO-ITM2) Price. If the setting is “ON” - Price in Service Order (CSO) is calculated based on Standard Price for the job (Sales Price of the KM Product (ART). If the setting is “OFF” – Price in Service Order (CSO) is calculated based on KitSalesPrice, if that's seted in Kit Structure for the job (Kit structure of the KM article) |
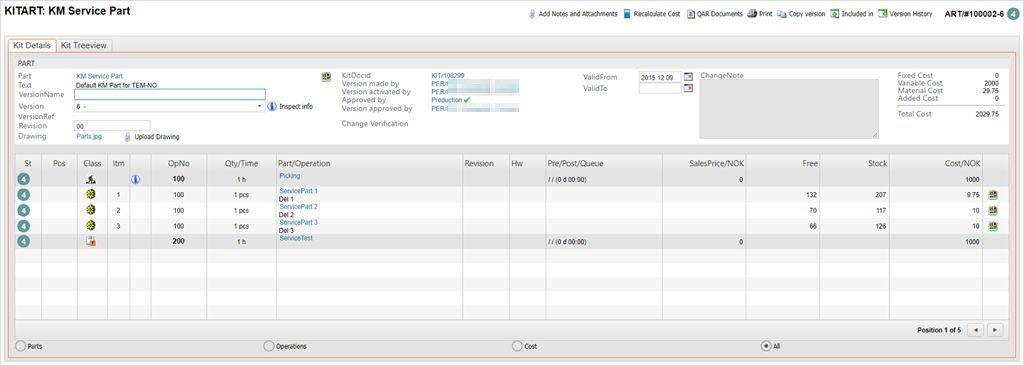
Service Products (ART) are structures with Class=KM and contain both the parts (optional) and operations used during the service.
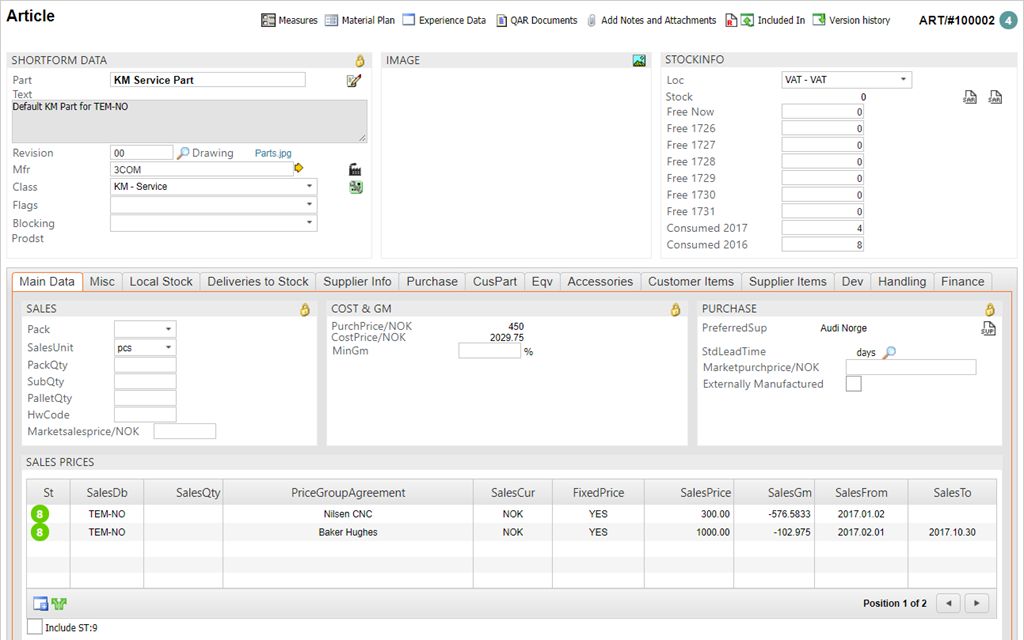
Clicking the green KIT icon next to the class field gives you an overview over all the components in the structure.
The parts in the service article are retrieved from the structure and added to the Service Order (CSO) as the third item line and below (depending on the number of parts) before the actual service is started.
Remember to choose a suitable value in the ProdLine field in the Misc folder. This is a mandatory field and the process will be halted if this is empty.
Service Orders (CSO) are the documents that register the details concerning scheduled service to be performed on an article.
To open the Service Order (CSO) application, find Service in the RamBase menu and then Order handling. Click Service orders to enter the CSO application.
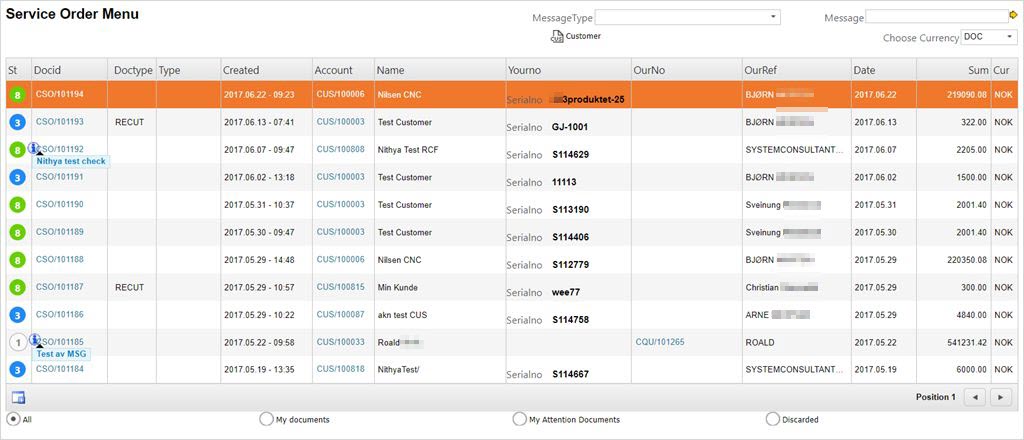
Click the Create CSO icon to open a new CSO.

Choose the customer who have ordered the service by entering the name, or parts of it, in the Name field. This will open a popup where you can choose the customer.
Click the Create New icon to add the product which needs service. This opens a popup where you need to add information.

Click the magnifying glass next to the LcmDocid field to search for the desired LCM document. The part which is the object of the service order will most likely have a serial number. Find the desired LCM, highlight the item line and press ENTER.
If there is no LCM document, you can click the Create New icon while in the LCM document list to create a new LCM.
The Reception field indicates if the goods are in stock, or if they are pending stock.
Click the yellow arrow next to the Service field to add a service operation. The service operation(s) listed in the Service Parts folder are the service operations defined on the Article. You may find other service operations to add using the Parts folder, which lists all the service operations.
Add the service date in the Req Date field.
Choose if this is an external service, or an in-house service in the External Service drop down menu. If External service is chosen, the user will get the option to Receive from Supplier on the product (Service order item 2) when the external service is done. (This option will be available in the menu that appears when using the right-click on the computer mouse.)
Click Confirm when you are done.

The part is now added as the first item line, with the service operation as the second line.
You can now click the Inspect Sales Calculator on the operations item line to assure the prices are correct.

Adjust any price or margin, and then click the Save this price icon in the Sales Price Per Piece box.
Press F12 to open the action menu and choose the option Forward to Customer. This will set the CSO to ST:3 and a service Production Work Order (PWO) document will be created. If there are parts in the structure, they will appear in the third line and below.
Highlight the service item line (always item line 2) and press ENTER to view the Service Order Item.

Click the Inspect Production icon in the top middle part of the screen to enter the related PWO. Press ENTER on the PWO line.

Click the Release for Production button to start the service. The Service PWO will now be set to ST:5.
If you need to change parts in the structure, click the Product LCM link next to the ProductLcm field.
Use the Change Parts icon (two overlapping sheets) to change the parts. Add a serial number if needed.
Click the Inspect links to Stock and Purchase Orders icon to confirm picking of the changed part(s).
Click the Part change complete, waiting to be picked icon in the picked column of the changed part.
Complete the production in a normal fashion.
If you have changed a part without confirming the pick, you will not be able to complete the service.
When the production is completed, click the Complete Service button in the PWO document.
Copying notes in service items
If the CSV setting WriteProductUnitInformationToServiceOrderNote is enabled, the NOTE field displays the Product and Description as text and the part information from the Article (ART), Serial number as the Serialno from the LCM (the part on which we are performing the service). This information is displayed in addition to the regular description for KM class article, which is always item 2 in CSO.
 |  |
If the custom fields are defined for the Service order and Service order items, they can be accessed through the context menu:
The values of these fields are stored separately for the main Service order (CSO) document and each of the Service order item (CITM).
If you need to add extra cost to a Service Order (CSO), such as transport cost or service time that is not included in the service-PWO, you may do this directly on the CSO.
To open the Service Order (CSO) application, find Service in the RamBase menu and then Order handling. Click Service orders to enter the CSO application.
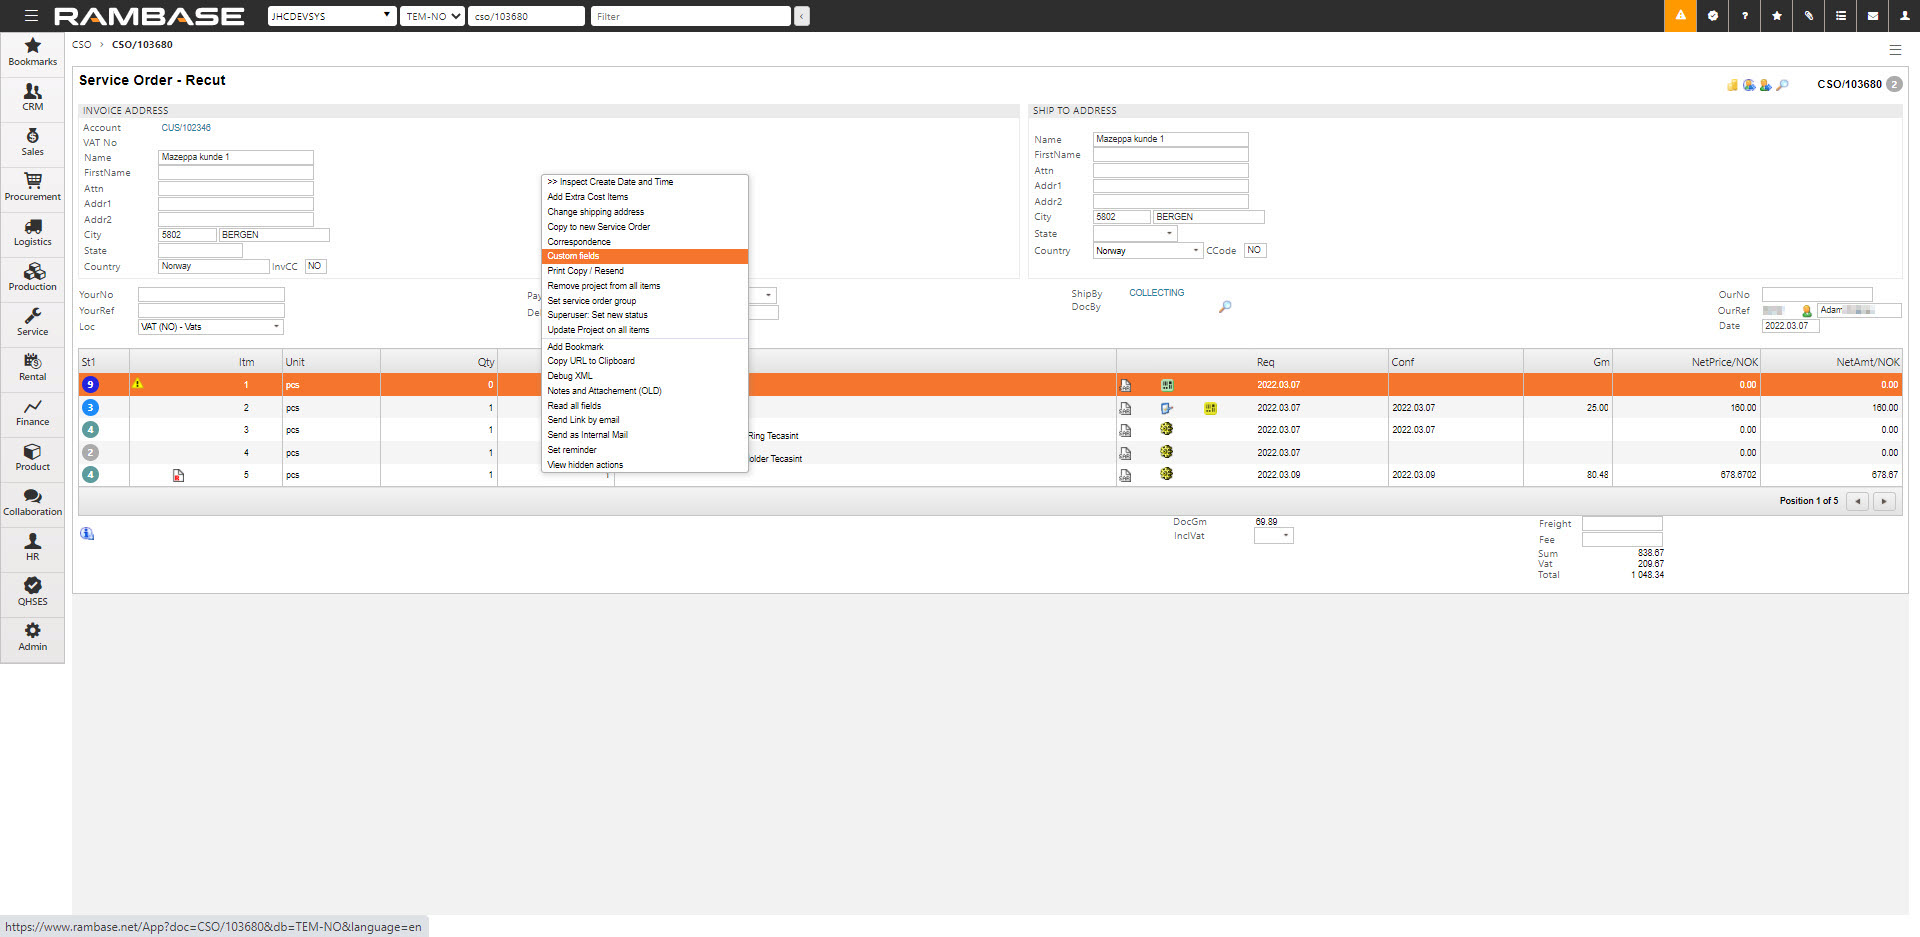
Highlight the desired CSO you want to add cost on and press ENTER.
Press F12 to open the action menu and choose the option Add Extra Cost Items. This opens a popup where you can add, modify or delete the extra cost items. This function is available in CSOs with status >1 and status <9.
Click the Create new item button in the left corner. This opens a popup where you can choose between available service articles (Class = V), or you can use the Create ART button in the left corner and create a new service article.
Press ENTER on the desired item line, and it will be added to the Extra Cost Items list. Here you may edit the quantity and cost of each item.
Repeat the process for each item you wish to add.
Press ESC or click the corner X to return to the CSO.
A Service Order (CSO) is used in situations where a customer needs work performed on a product or property. The job to be done may consist of purely operations, or it may include parts to be changed. The parts can be delivered by customer, purchased or produced. Some of these jobs requires a quote before the service job proceeds and a Sales Quote Request (CRQ) is needed.
Nothing new is to be produced. Service is going to be performed on an existing product and the work and parts are invoiced.
The product to be serviced already exists in RamBase as a Part with LCM (serial number) or to be created as such if non-existing.
A suitable service job in Product (ART) (Class=KM, Kit Maintenance) need to be available, or created. It needs to be defined with the minimum of a validated basic structure and one operation.
If a request is registered by a person/department/role who can not or is not able to register the details and find the correct product and service job, they need to perform following actions at a minimum:
Create a CRQ, choose customer, add YourNo. If the project is named, it can be added as an internal message on the document.
Add received attachments/files/drawings and choose the correct filetype according to the company routines.
If the product is registered as an article in the ART-registry it can be added to position 1, or a dummy-article can be added and changed with the real article later in the process.
The creator may transfer the document to the next step in the process by using the Transfer Document to Other User-icon, or by sending an IMS from the CRQ.
The next step in the process is to change the position 1 item with the correct item and add the service job to position 2, if this is to be done in the request.
Another alternative is if you decide to create an quote on the request, then it is set to ST:4 using the F12 option Register Sales Quotes Request (ST:4) as a signal that this request is ready for quote.
If the CRQ on the job is registered, the CRQ needs to be transported to an CQU using the F12 option Transport all Items.
The next step will be to set up the positions on the CRQ according to following structure:
A service job needs a specific structure to be processed on to a CSO:
Position 1 on the CQU is the product awaiting service. Quantity = 1 and Price = 0.00. A service order can only be performed on a single product which is the property of the customer. This article can be classified as Class = P / KA / K.
The second position on the CQU is reserved for the service job to be performed (ART with Class = KM).
Note: If a CRQ has been created with just the KM-article on position 1, perform the following actions:
Register the CRQ to ST=4.
Use the F12 Option Transport all Items to CQU.
Enter the position on CQU.
Press F12 and choose the option Insert Item.
The KM article will move to position 2 and position 1 will become empty where you can insert the proper item. The quote can now be completed with the correct structure for it to be transported to a CSO.
Both of the articles need to be in ST=4 and the job (the KM article) needs a validated KIT. It is not possible to add positions beyond the two on a service job quote.
if the job to be done (position 2) is to be run according to standard setup (article KIT), a cost estimate can be set up and sent to the customer.
If you are going to modify (change operations/add parts to be changed) and set up a cost estimate, you need to go into position 2 (highlight the item line and press ENTER) and set up a special structure. Permission and calculator to add/remove/change/calculate is given on special structure.
The price you want to quote for the job is entered manually in position 2. The calculator can also set the price by summing all the lines, but in cases with multiple lines, it is easiest to add the full price manually.
When the structure (KIT) is set up with work operations to be performed, parts to be changed and the final price quote, you can also add documents (PDF) which also gets sent to the customer with other attachments:
On the CQU footer
The green R-icon inserts footer-text on output.
The blue I-icon inserts an internal message, not visible on output.
View Notes and Attachments
On the document (main level)
Add a Note and choose Category = Print. The text entered here will show above the positions on the output.
In a position (click ENTER on the item line)
Add a Note and choose Category = Print. The text entered here will show below the positions on the output.
You can inspect the result using the Preview of Document function.
When the quote is sent to the customer, it will receive ST=3/4.
Received service job order - send Sales Quote (CQU) to Service Order (CSO)
As previously mentioned, a quote for a service job needs two positions, where the first represents the product and the second represents the job (Class=KM). These are the only positions on the document.
This is the only functional setup to transport a Sales Quote (CQU) to a Service Order (CSO) and the option is found using the Transport-icon on the CQU-header and the F12 option Transport All items.
Then choose CSO / New Service Order to transfer the CQU to a CSO in ST=1.
When a CSO has been created from a CQU, the Product (ART) to be serviced is set in position 1. but not the unit (LCM/Serial number) of the product. This needs to be chosen or created before the CSO can be registered (Forward to Customer).
Follow the steps to completion:
Enter position 1 on the CSO and click the yellow arrow behind the Part field. This will open the popup where you choose LCM.
Click the magnifying glass icon to enter the LCM application. You can see the chosen product and the application shows LCMs related to this. To change the product, click the red X behind the product to search for a serial number unrelated to the product. The SerialNo field is the best place to search for the serial number for the product. If you cannot find the LCM, you can create a new one using the +/- icon at the bottom.
When the LCM is chosen/created, choose it and return to the main document. Perform any necessary changes, such as if the product is to be received / is in stock / no shipment, change of finishing date and then click Confirm.
The CSO can then be registered using the F12 option Forward to Customer and a Production Work Order (PWO) is created for the job and purchase-/production for the part(s).
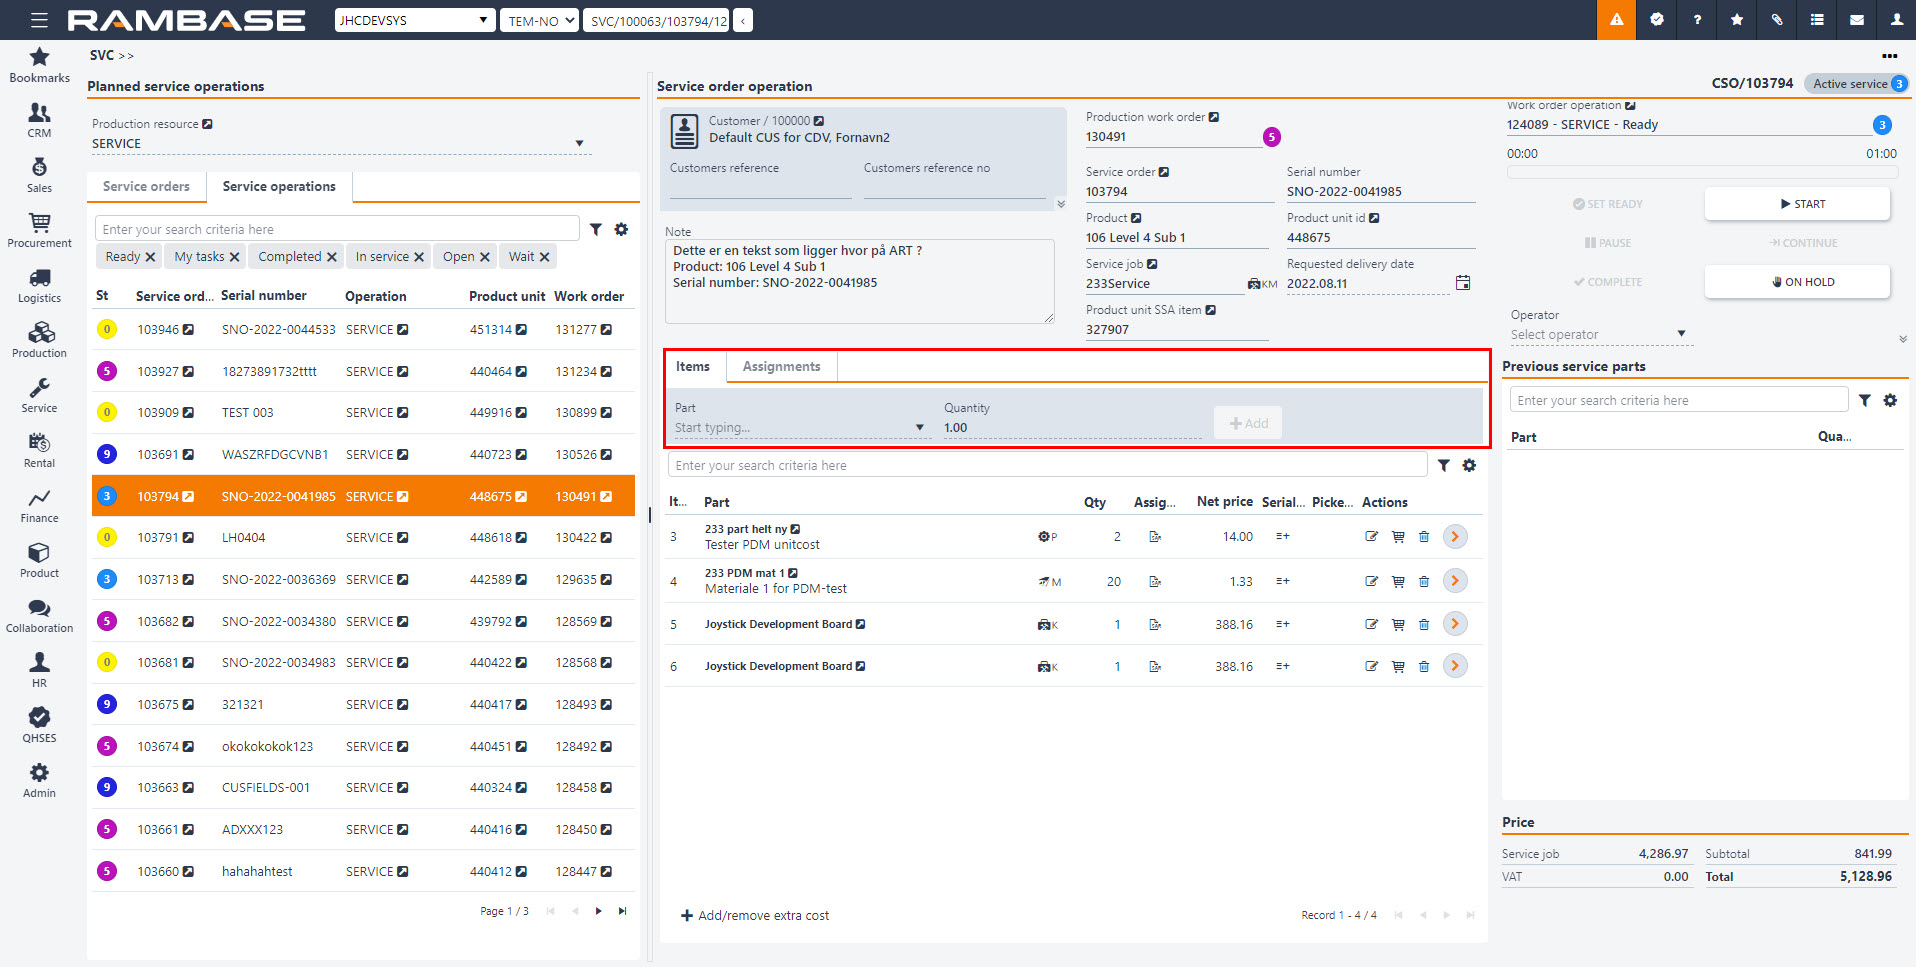
The Planned service operations (SVC) supports the process of handling service orders and changing parts on product units during service jobs. It allows operators to view a list of jobs and work order operations with all the relevant information and perform various actions on the service operations without changing the context. This application is dedicated to service managers and operators.
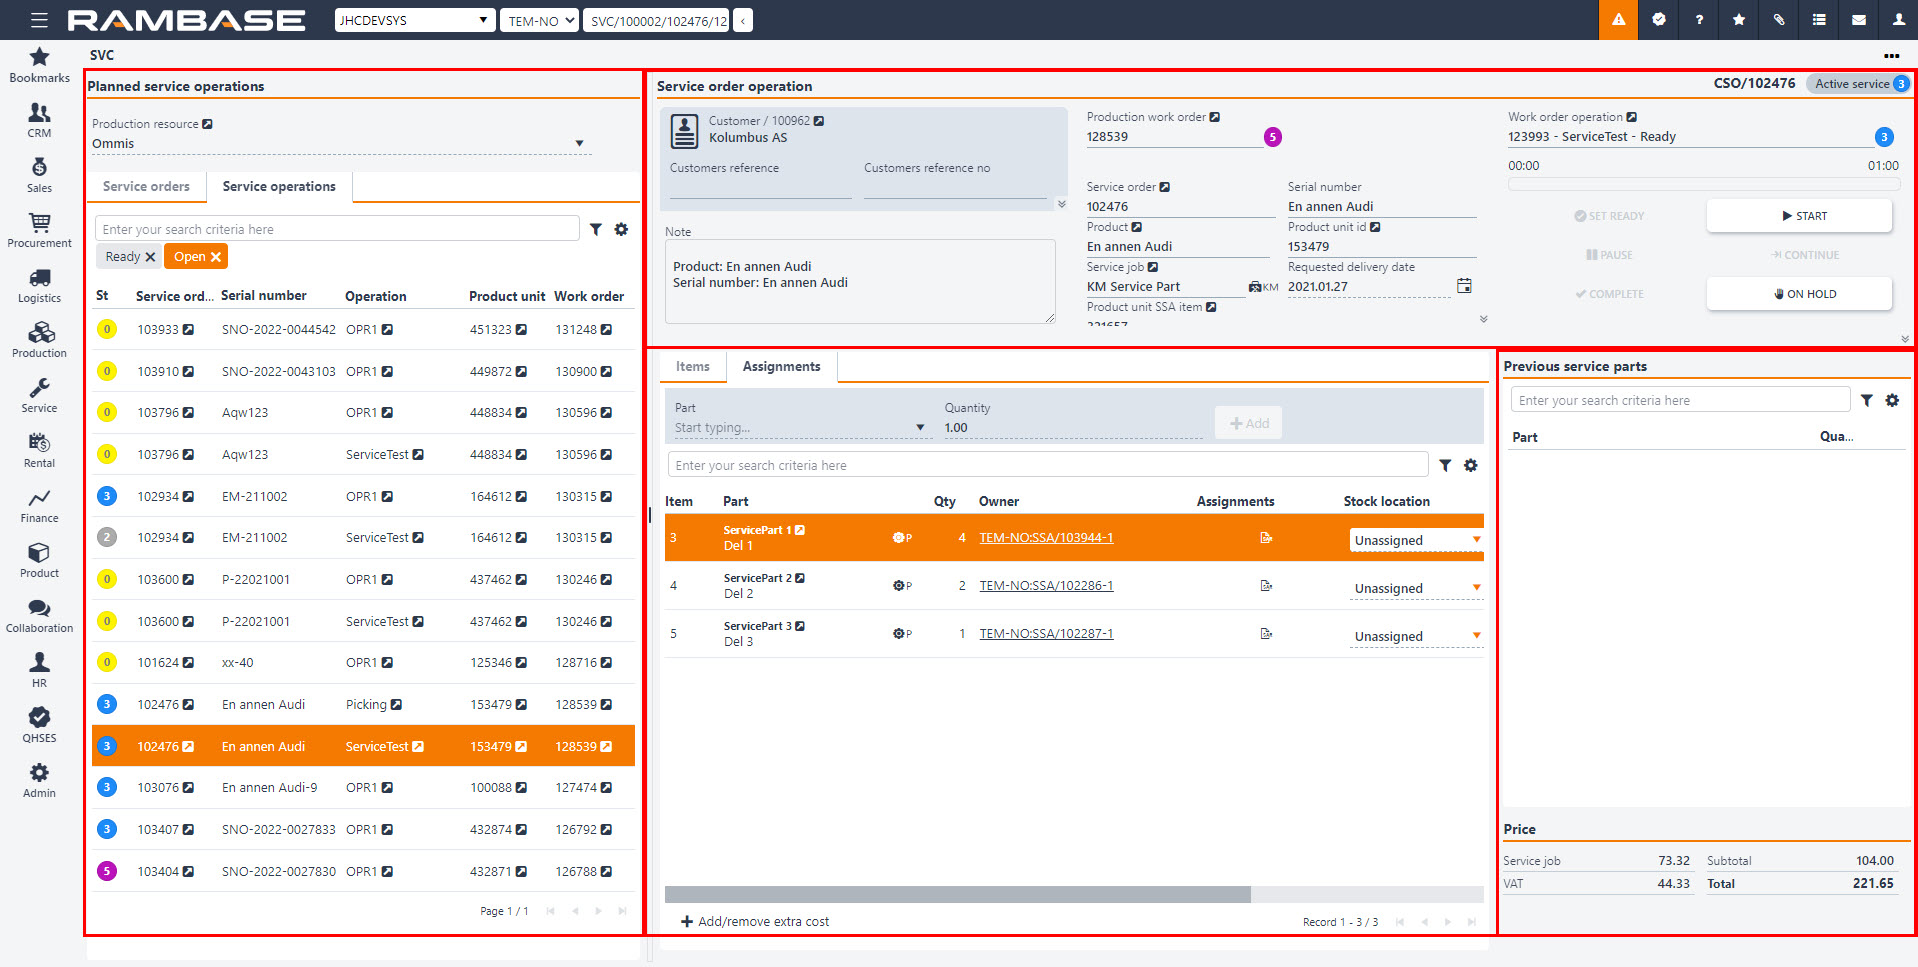
The application is divided into four main areas;
Planned service operations area
Service order operation area
Items, Assignments and Custom fields tabs
Previous service parts area
The Planned service operations area includes the Production resource field, the Service orders tab and Service operations tab.
Production resource drop-down menu - An input field where the user can search for or look up production resources. Production resources (RESCONFIG) can be filtered on by clicking the Filter builder icon and selecting from the following list:
Active resources - Filters on Production resources (RESCONFIG) in Status 4 (Active).
New resources - Filters on Production resources (RESCONFIG) in Status 1 (Pending registration). See note.
New and active resources - Filters on Production resources (RESCONFIG) in Status 4 (Active) and Status 1 (Pending registration). See note.
Note
The Planned service operations (SVC) application displays only Production resources in Status 4 (Active). Selecting the filter New resources will therefore not display any Production resources (RESONFIG).
The displayed columns can also be edited by clicking the Column settings icon and selecting from the following list:
Status - Display status and corresponding icon.
Resource id - The document identifier number. In this column only the number is displayed. In the program field the application abbreviation is displayed with the number. I.e. RESCONFIG/100003.
Name - The name of the Production resource (RESONFIG). The field is derived and editable from the Production resources (RESCONFIG) application.
Group name - The name of the Production resource group (REGCONFIG) the Production resource (RESCONFIG) is a member of. The field is derived from the Production resource group (REGCONFIG) application.
Category name - The name of the Production resource category (REC) the Production resource (RESCONFIG) is categorized as. The field is derived from the Production resource category (REC) application.
If a Production resource has been selected, clicking the View icon will open the Production resource details (RESCONFIG) application to view and edit details on the selected Production resource (RESCONFIG).
If a Production resource (RESCONFIG) has not been selected, clicking the View icon will open the Production resources (RESCONFIG) application and list all Production resources (RESCONFIG).
The Service orders tab contains Service orders (CSO) that are imported from a file or still pending registration.
The following columns are available, click the Column settings icon to limit which columns are displayed.
Icon | Column | Description |
|---|---|---|
St | An icon indicating the status of the Service order (CSO). | |
Service order | An informational field that is derived from the Service order (CSO) application, displaying the Service order (CSO) identifier. Clicking the View icon will open the Service order (CSO) application. Relevant information for the Service order (CSO) can be viewed and edited here; Invoice address, ship to address etc. | |
Serial number | An informational field that is derived from the Product unit (LCM) application, displaying the serial number of the Product unit (LCM). | |
Operation | An informational field displaying the name of the Production operation (OPR). Clicking the View icon will open the Production operation (OPR) application. Relevant information can be found and edited from the Production operation (OPR) application; Type, resource, service interval etc. | |
Product unit | An informational field that is derived from the Product unit (LCM) application, displaying the identifier of the Product unit (LCM) document. Clicking the View icon will open the Product unit (LCM) application. | |
Service order group | An informational field that is derived from the Service order group (SRO) identifier. This identifier can be searched for in the search field in in the Service orders tab with the field ServiceOrderGroupId. I.e. ServiceOrderGroupId = 100135. The list will then return all Service orders (CSO) in that Service order group (SRO). |


The Service operation tab contains all the Work order operations (WOO) linked to the service jobs that have been forwarded to the customer. Each operation is displayed in a separate row and may be filtered using search criteria or one of the predefined filters. Columns can also be selected by clicking the Column settings icon.
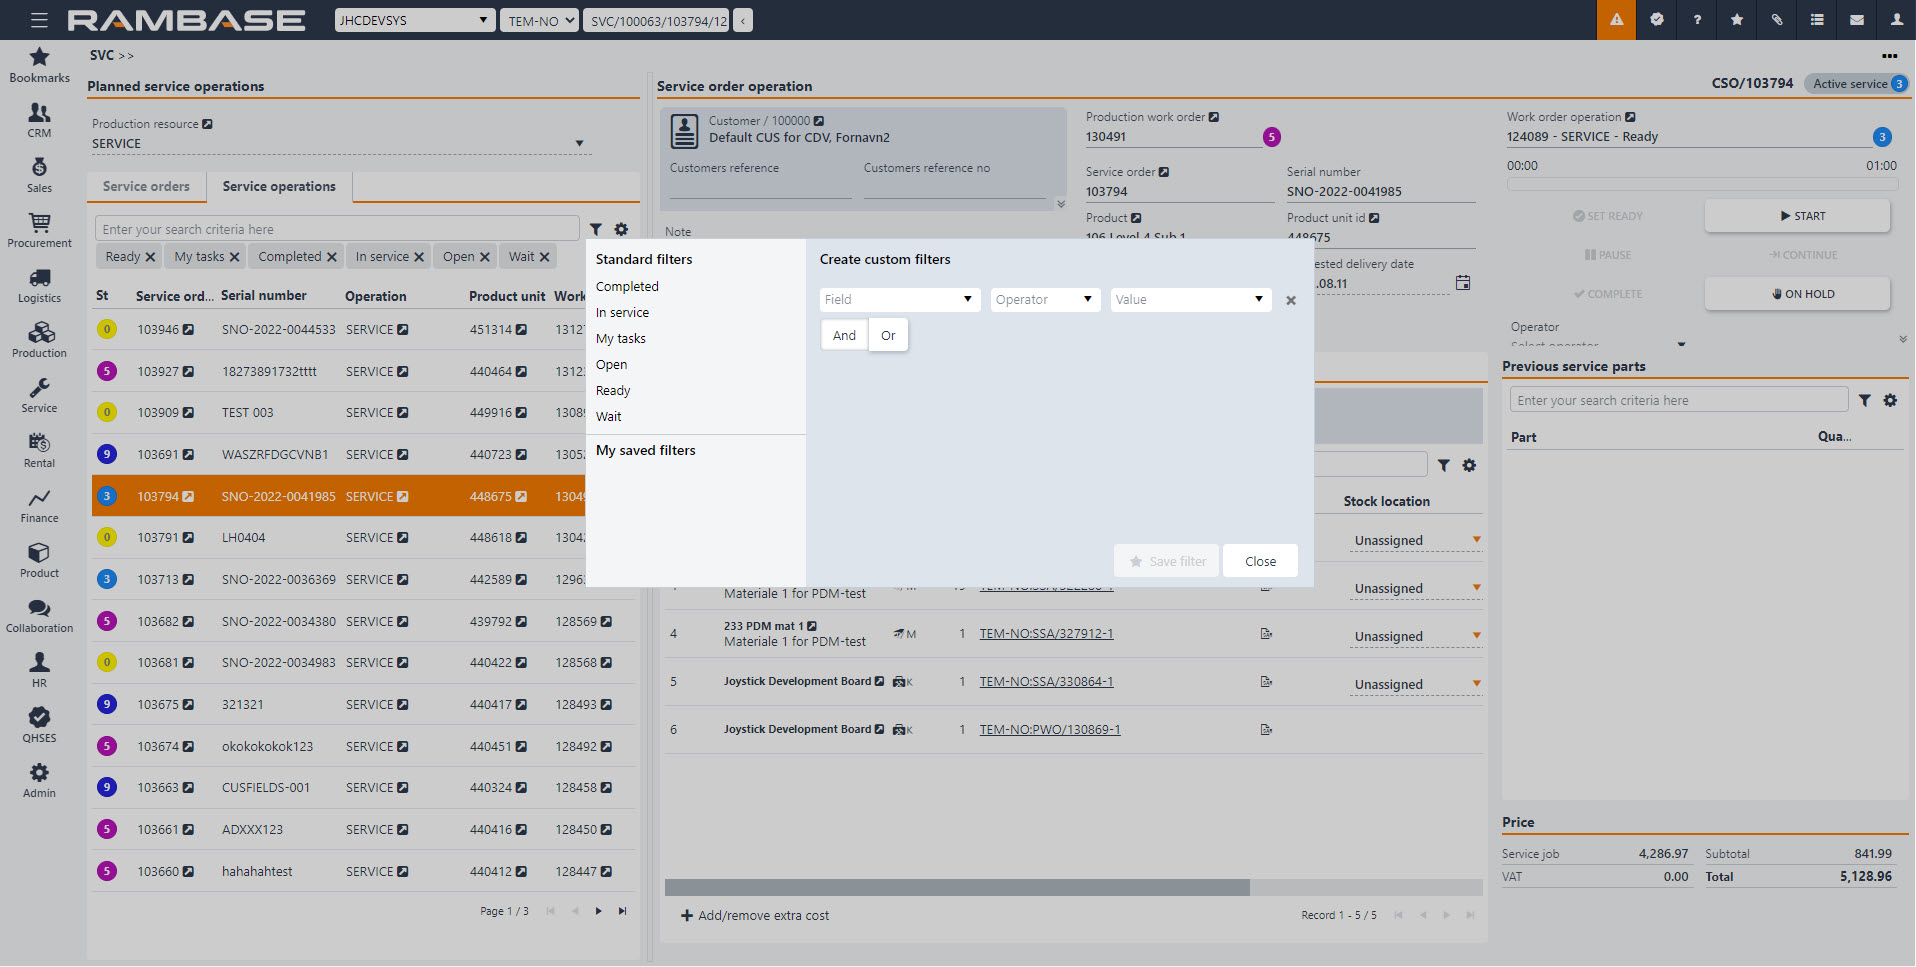
Filter builder
Next to the search field, the Filter builder icon can be clicked to select the following Standard filters:
Completed - Filters on Service orders (CSO) with the Work order operation (WOO) in Status 9 (Completed).
In service - Filters on Service orders (CSO) with the Work order operation (WOO) in Status 5 (In production).
My tasks - Filters on Service orders (CSO) with the logged in Personnel id number (PID) as operator.
Open - Filters on Service orders (CSO) with the Work order operation (WOO) in Status 0 (Not released), Status 2 (Pending purchase or production), Status 3 (Ready for start) and Status 5 (Processing).
Ready - Filters on Service orders (CSO) with the Work order operation (WOO) in Status 3 (Ready for start).
Wait - Filters on Service orders (CSO) with the Work order operation (WOO) in Status 2 (Pending purchase or production).
Column settings
Icon | Column | Description |
|---|---|---|
| Status | An icon indicating the status of the Service order (CSO). |
Service order | An informational field that is derived from the Service order (CSO) application, displaying the Service order (CSO) identifier. Clicking the View icon will open the Service order (CSO) application. Relevant information for the Service order (CSO) can be viewed and edited here; Invoice address, ship to address etc. | |
Serial number | An informational field that is derived from the Product unit (LCM) application, displaying the serial number of the Product unit (LCM). | |
Operation | An informational field displaying the name of the Production operation (OPR). Clicking the View icon will open the Production operation (OPR) application. Relevant information can be found and edited from the Production operation (OPR) application; Type, resource, service interval etc. | |
Product unit | An informational field that is derived from the Product unit (LCM) application, displaying the identifier of the Product unit (LCM) document. Clicking the View icon will open the Product unit (LCM) application. This is the Product unit (LCM) being serviced. | |
Work order | An informational field that is derived from the Production work order (PWOD) application, displaying the identifier for the Production work order (PWO) document. Clicking the View icon will open the Production work order (PWOD) application. | |
Customer reference | An informational field derived from the Sales order (COA) application. The field can be set or edited by the owner of the Service order (CSO) document in the Planned service operations (SVC) application, or in the Sales order (COA) application. | |
Customer reference number | An informational field derived from the Sales order (COA) application. The field can be set or edited by the owner of the Service order (CSO) document in the Planned service operations (SVC) application, or in the Sales order (COA) application. | |
Planned start at | An informational field derived from the Production work order (PWO) application, displaying the planned start of the Service order operation (SVC). This can be edited by changing the Scheduled start in the Production work order (PWOD) application. | |
Planned finished at | An informational field derived from the Production work order (PWO) application, displaying the planned start of the Service order operation (SVC). This can be edited by changing the Scheduled completion in the Production work order (PWOD) application. | |
Operator | An information field derived from the Production work order (PWOD) application, displaying the name of the operator for the Planned service operation (SVC). This can be edited in the Production work order (PWOD) application in the Planner drop-down menu. Clicking the View icon will open the Personnel (PER) application where user information can be viewed and edited. | |
Service job | Lists the name of the service job being performed. This is the Service product selected when clicking the New service button in the Service orders tab. Service jobs are Product (ART) structures with type KM. |

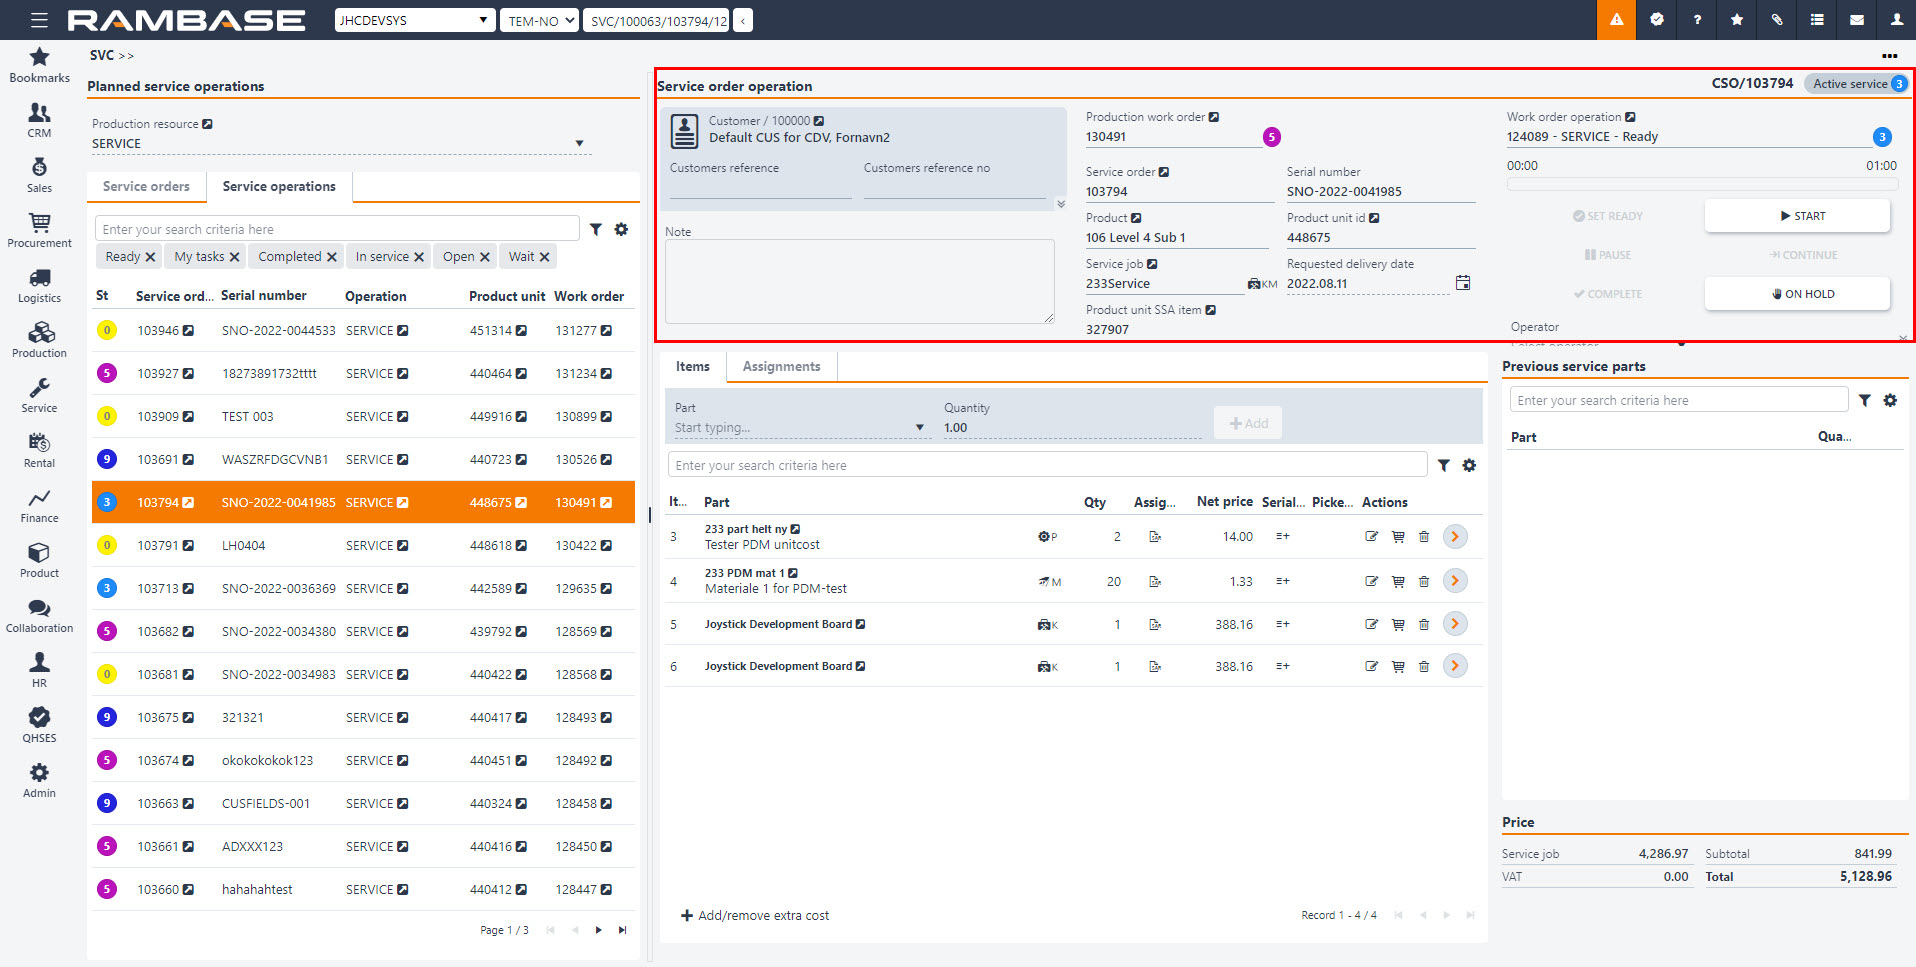
The Service order operation (SVC) area contains key information about the associated objects:
The Customer section contains a Customer identifier, Customers reference (typically a contact person) and a Reference number to a sales order in the external system used by the customer. Click either of the fields or the related Edit icon to edit the information. This area can be expanded by clicking the arrow in the lower left corner of the area to display Invoice address and Shipping address.
The Note can be filled automatically with a serviced product name, description, and a serial number, if the Company setting (CSV) setting WriteProductUnitInformationToServiceOrderNote is active. Otherwise, the fields can be edited by the owner of the document.
The Production work order field is supplied when the service order is forwarded to the customer. It contains a link to a Production work order (PWO) on which the service will be performed. Users can track the status of the Production work order (PWO) and release it for production. The process is described in detail in the Perform the service operation section.
The Service order details section provides crucial information about the serviced item, such as associated Service order (CSO) and the product unit that will be serviced, along with its serial number, product that the unit is based on, and the requested delivery date for the service (which can be changed by the users). If the Service operation (CSO) requires delivery of the unit, the link to product unit goods reception item is provided as well.
Users can also perform actions on the Work order operation (WOO) linked to the service order.
The table below contains descriptions on the fields and buttons for the area.
Fields and buttons | Description |
|---|---|
Customer name and identifier | An informational field listing the customer name and identifier, click the View icon to open the Customer (CUS) application. |
Customers reference | An informational field listing the customers reference. The field is derived from the Sales order (COA) application. Typically a contact person. |
Customers reference no | The reference number for the Sales order (COA) used in the customers external system. The owner of the Service order (CSO) can change the reference number manually. |
Invoice address | An informational field derived from the Customer (CUS) application or set on the Sales order (COA). |
Shipping address | An informational field derived from the Customer (CUS) application or set on the Sales order (COA). |
Note | The Note can be filled automatically with a serviced product name, description, and a serial number, if the WriteProductUnitInformationToServiceOrderNote setting is active in the Company settings (CSV). Otherwise, the fields can be edited by the owner of the document. |
Production work order | The Production work order field is supplied when the service order is forwarded to the customer. It contains a link to a Production work order (PWO) on which the service will be performed. Users can track the status of the Production work order (PWO) and release it for production. To view details and open the Production work order (PWOD) application, click the related View details icon. |
Service order | An informational field listing the Service order number. Click on the View icon to open the Service order (CSO) application and view details. |
Serial number | An informational field that is derived from the Product unit (LCM) application, displaying the serial number of the Product unit (LCM). |
Product | An informational field that is derived from the Product (ART) application, displaying the product name. Click the View icon to open the Product (ART) application. |
Product unit id | An informational field listing the Product unit (LCM) number. Used to identify Product unit (LCM). This is the Product unit (LCM) being serviced. |
Service job | An informational field listing the name of the Product (ART) structure with type KM . |
Requested delivery date | An informational field listing the requested delivery date of the service job. Click the Calender icon change the date. |
Product unit SSA item | An informational field listing the Goods reception (SSA) number of the Product unit (LCM). Click the View icon to open the Goods reception (SSAITEM) item application. |
Work order operation | An informational field with the name and number of the Work order operation (WOO). A status icon will state the current status of the Work order operation (WOO). Click the View icon to open the Work order operation (WOO) application. |
Work time progress bar | An informational progress bar indicating the used work time on the Work order operation (WOO). |
Set ready | The Set ready button is used when external work is involved in the Work order operation (WOO). When the external work has been completed, click the Set ready button. Read more about external work here. |
Start | Clicking the Start button will set the Work order operation (WOO) from Status 3 (ready to start) to Status 4 (Setup), or directly to Status 5 (Processing). The following functions will be available:
The work time will also start counting as evident in the Work time area in the lower right corner. |
Pause | Clicking the Pause button will momentarily stop the Work order operation (WOO), including stopping counting of work time. This function is useful in case of machine breakdown or pending other unforeseen event or even a break. |
Continue | Clicking the Continue button will continue the counting of work time and allow the same actions as starting the Work order operation (WOO). |
Complete | Clicking the Complete button will set the Work order operation (WOO) in Status 9 (Completed). |
On hold | Clicking the On hold button will halt the Work order operation (WOO) and notify the planner via Production work order (PWOD) application. The Work order operation (WOO) must first be paused, before it can be put On hold. The following fields will be available to detail the halt:
|
Operator | An informational field derived from the Production work order (PWOD) application, displaying the name of the operator for the Planned service operation (SVC). This can be edited in the Production work order (PWOD) application in the Planner drop-down menu. |
The Items and Assignments tabs provide the users with the list of parts and costs that can be used during the service process, allowing the operator to pick or add new items and costs to the list. The Custom fields tab can be activated in the Custom fields (CUSTOMFIELDS) application. While the Previous service parts list contains all items used during the previous service on the Product unit (LCM), enabling the operator to quickly add the same parts to the current order.
Icon | Column | Description |
|---|---|---|
Item | The item number for the part. The number applies to both the Assignments tab and Items tab. | |
Part | An informational field listing the name and description of the Product(ART). Click the View icon to open the Product (ART) application. | |
Qty | The default part quantity set on the Product unit (LCM) part list. Click the Change quantity icon in the Actions column to change quantity. | |
Assignments | Click the SAR icon to open the Stock assignment (Read more about the Stock assignment (SAR) application here. | |
Net price | Final price per unit converted to company currency. | |
Net amt. | Total net amount converted to company currency. | |
Cur | The currency used on the net price and net amount. | |
Serial numbers | Add serial numbers. Opens the Serial number registration popup. | |
Picked Qty | Displays the picked part quantity. | |
Actions | Change quantity of parts. Click the Change quantity icon to make the Qty field editable. | |
Actions | Confirm picking. Click the Confirm picking icon to pick the part. | |
Actions | Remove part. Click the Remove part icon to open a popup to either confirm or cancel the removal of part. Click OK to confirm. | |
Actions | Undo picking. Click the Undo picking icon to undo the picking of part. | |
| Actions | Click the Radio button to open the Service order item (CSO) application. Alternatively press ENTER after clicking on the intended part. |


Users can add, pick, remove and adjust the quantity of the parts used in the service job. Furthermore, it is possible to view the linked Goods reception (SSA) item documents and select a specific stock location from which the service part is picked. Note that the same part, with different Goods reception (SSA) will have the same item number.
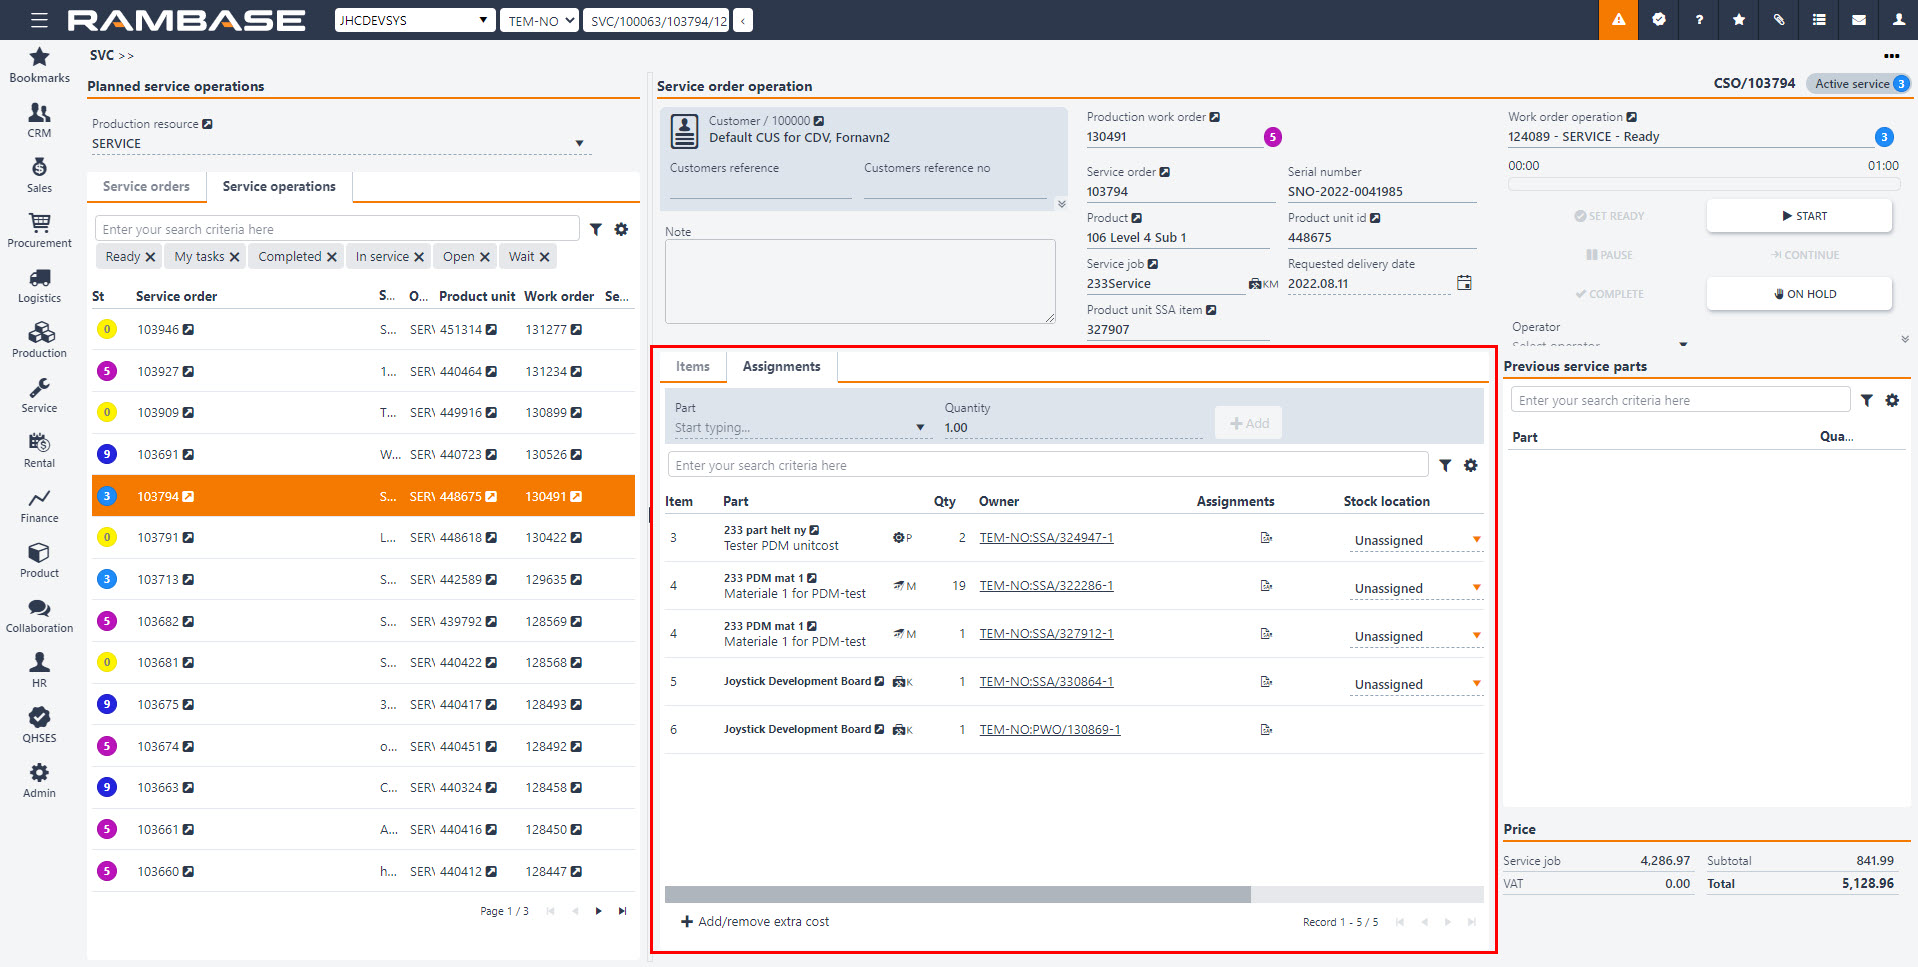
Icons | Column/Icon name | Description |
|---|---|---|
| Item | The item number for the part. The number applies to both the Assignments tab and Items tab. |
| Part | An informational field listing the name and description of the Product(ART). Click on the View icon to open the Product (ART) application. |
Qty | The default part quantity set on the Product unit (LCM) part list. Click the Change quantity icon in the Actions column to change quantity. | |
Owner | Displays the Goods reception (SSA) or the Production work order (PWO) of the part. Click to attached link to open the relevant application to view details. | |
| Assignments | Click the SAR icon to open the Stock assignment (SAR) application. |
Stock location | Select a Location (STL) to pick the part from. | |
Net price | Displays the net price of the part. | |
Net amt. | Displays the net amount of the part. | |
Cur | Displays the currency selected in the Customer (CUS) application. | |
| Serial number | Add serial numbers. Opens the Serial number registration popup. |
| Actions | Change quantity. Makes the Qty column editable. Used to change the item quantity. |
| Actions | Confirm picking. Will pick the part from the selected Location (STL) in the Stock location column. |
| Actions | Remove part. Will open a popup to confirm or cancel the removal of the part. Click OK to confirm. |
| Actions | Undo picking. |
Note
In both the Items and Assignments tab:
To add a note describing in example the reason for why a part has been changed, click the Radio button on the intended part or select the intended part and press ENTER to open the Service order (CSO) item application. Type the reason in the Note field in the Notes area.
A note describing the reason for change will now be added.
RamBase will remember the changed parts on a Product unit (LCM) by a previously performed Service order (CSO) and list the previously changed service parts as suggestion for easy picking.

The Planned service operations (SVC) application allows the users to create new Service orders (CSO). This section will follow you through the process, from supplying all the necessary data for the new document and to forwarding it to the customer.
From the Planned service operations area, select a production resource from the Production resource drop-down menu.
The Planned service operations (SVC) application does not display resources which are used to perform operations on Grouped worked orders (GWOO).

Click on the New service button in the bottom left corner of the Service orders tab to open the popup containing all the needed fields for creating a service order.
In the popup, you can provide information for the new document.

Customer drop-down menu – The mandatory identifier of the customer for which the service order will be created.
Product unit drop-down menu – The mandatory identifier of the product unit on which the service will be performed. It is possible to create a new Product unit (LCM) instead of selecting an already existing one.
Serial number – This informational field is supplied automatically after the Product unit is selected.
Requested delivery date – The requested delivery date for the serviced item.
Service product drop-down menu – The Product (ART) with type KM that will be used to perform the service. Remember, that this operation might not be linked to the production resource that was selected in the beginning of the process.
Click on the Create button to generate a new document. If the Product (ART) type KM is linked to the selected production resource, then the new Service order (CSO) will be listed in the Service orders tab. If not, search for the correct resource. Otherwise, you need to search for the correct resource first.

The list contains service orders that are imported from a file or still pending registration. At this point there are no Production work orders (PWO) or Operations (OPR) linked to the Service order (CSO).
To proceed with the operation, use the Forward to Customer option in the context menu to send the document to the customer.
In case a document already exists for the selected Product unit (LCM), an error message will be prompted when forwarding.
You can complete the ongoing service to register a new one or delete the duplicate while it is not yet registered.
The Service operation tab contains all the Work order operations (WOO) linked to the service jobs. Each operation is displayed in a separate row and may be filtered using the search criteria or one of the predefined filters.
Forwarded Service orders (CSO) may require picking a Goods reception (SSA) item before the actual job is initialized. This is indicated by the Status 2 (Pending purchase or production) in the Service job (CSO) application and is displayed in the upper right corner of the Service job detail view in the Planned service operation (SVC) application.
If the serviced product unit is picked, then the service job is set as in Status 3 (Active). You can now release the linked Production work order (PWO). This process will generate all the planned operations.
The Work order operation view contains all the relevant actions and buttons. Depending on the operation status, you can manipulate the operation by clicking ready, start, pause, or complete . The planned time is visible below the operation label.
Multiple operators can work on the same operation in parallel, depending on the production resource settings.

When the last operation on the list is finished, it is possible to complete the entire Work order operation (WOO).
During an active service operation, users may be inquired to pick certain consumables, parts, or additional costs for the given job.
To add parts, you need to select an active service, select the consumable from the list in the desired quantity and click the Add button. Each new item will be visible in the linked service order item list.
Alternatively, it is possible to add parts that were picked during previous services for the same Product unit (LCM) in the Previous service parts area.
To change the quantity of the items that require picking, click the Change quantity icon in the Actions column for the desired part.

When the quantity is adjusted according to the order requirements, you can confirm picking. This will link the quantity from the Goods reception (SSA) document to the current Service order (CSO).
Each part that will not be used during the service job can be removed from the list by clicking on the Remove part icon in the Actions column.
The picking process can also be undone by clicking on the Undo picking icon for the given part.
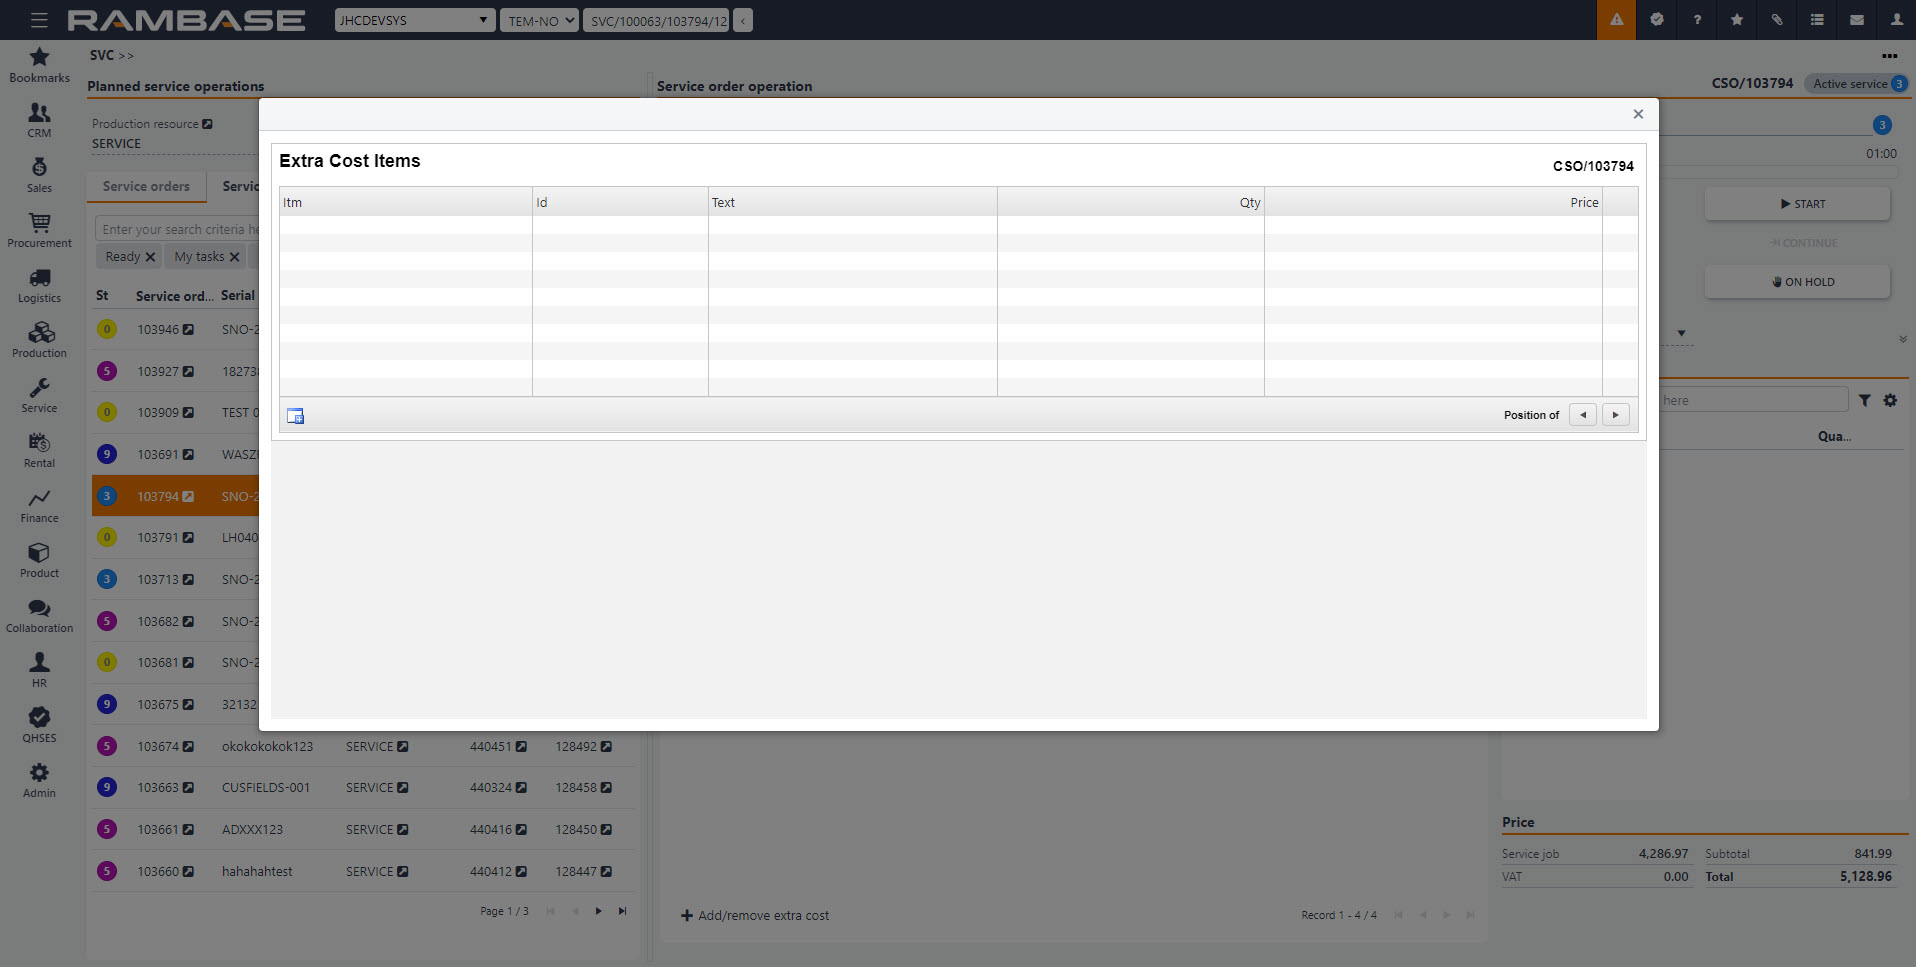
Certain parts, type V, that affect the total cost of the service, are not linked to any Goods receptions (SSA). These cost elements can be added to the part list by clicking on the Add/remove extra cost button.
Clicking on the Add/remove extra cost button opens a separate popup where users can see the list of extra cost items, adjust their quantity, price, and add new items.
In service, the planning process may be defined as the period where you plan the service job.
The service job starts at the agreed time and date.
The service job is delayed due to missing resources or goods.
The service job is rushed due to changes in the service order.
An inquiry for service usually requires a desired date for completion. This depends on the complexity of the service job, in addition to the availability of the needed resources. With these factors, it is possible to calculate and confirm the the date directly from the planning process. During the planning process the confirmed date will then be available, and the service job can be ordered from the service operators.
Change time for service job
The service job is usually created on the base of a service order with a desired completion date. This must be allocated and confirmed.
Ordering service job
When the service job considered ready for registration, it must be made available for the service operators.
After the Service Order (CSO) has been registered, a Production Work Order (PWO) is automatically generated for the service job. This needs to be released for production for the operators to work on.
To open the Service Order (CSO) application, find Service in the RamBase menu and then Order handling. Click Service orders to enter the CSO application.
Highlight the desired CSO and press ENTER.
Highlight the service product (the second item line in the CSO) and press ENTER.
Click the magnifying glass icon called Inspect Production.
Enter the related PWO from the Production Inspect application.
At this point you may also adjust the dates in the ProdStart/ProdEnd fields if needed.
Click the Release for Production button at the bottom.
The service job is now released and visible for the operator who will perform the service.
If you need to change any details after you have clicked Release for Production, it is possible to press F12 and choose the option Undo Release to return the PWO to ST:4. This is only available as long as no operations has been started.
Service, or a service job, is the actual execution of the service task.
The service job is performed by desired conditions.
The service job is cancelled.
The service job is aborted.
After the service job has been ordered by order reception or production planner, and the product which is to receive the service has been received, work may start at the planned time. The service work will most likely include inspection, changing parts and other operations. For a vehicle, a service job regarding oil would first include quality inspection of the existing oil before it is changed.
Materials such as oil filters and similar would also be changed in this process.
If the part is unique, or unique parts are to be changed, the service operator will have to consult the technical documentation, either for the machine that will perform the work, or for the parts to be changed. When the service job is completed, documentation regarding the work, the parts changed, time used and any approvals/measurements will be required.
Logging work
Hourly price for resources and the work done forms the base of the service invoice, together with parts used.
Pick parts
Parts included in the service needs to be picked.
Change parts
Parts which are to be changed as a part of the service needs to be registered for the service specification and invoice base.
Add parts
The parts that are to be added as a part of the service needs to be registered for the service specification and invoice base.
Inspect instructions
Instructional documentation for the parts needs to be available.
Finishing the service job
Before the service job is finished, all documentation needs to be available and a quality control has to be performed.
The main tool for operators is the job queue in the Resource (RES) application. Here they will find the jobs required for picking. To open the Resources (RES) application, find Service in the RamBase menu and then Services. Click Resources to enter the RES application.
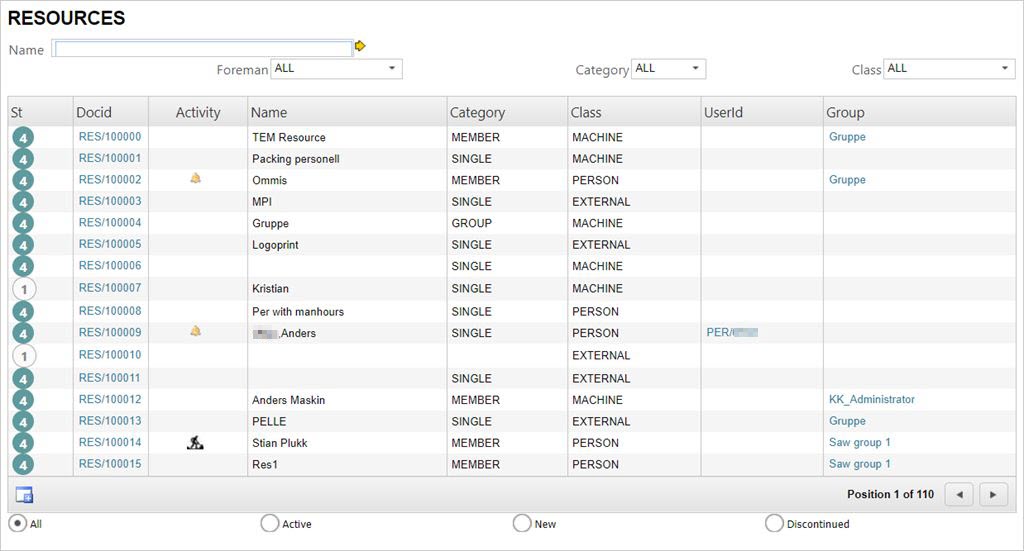
From here the operator may enter his own resource by highlighting the item line and pressing ENTER.
This will open the resource window which lists all work orders registered on himself.
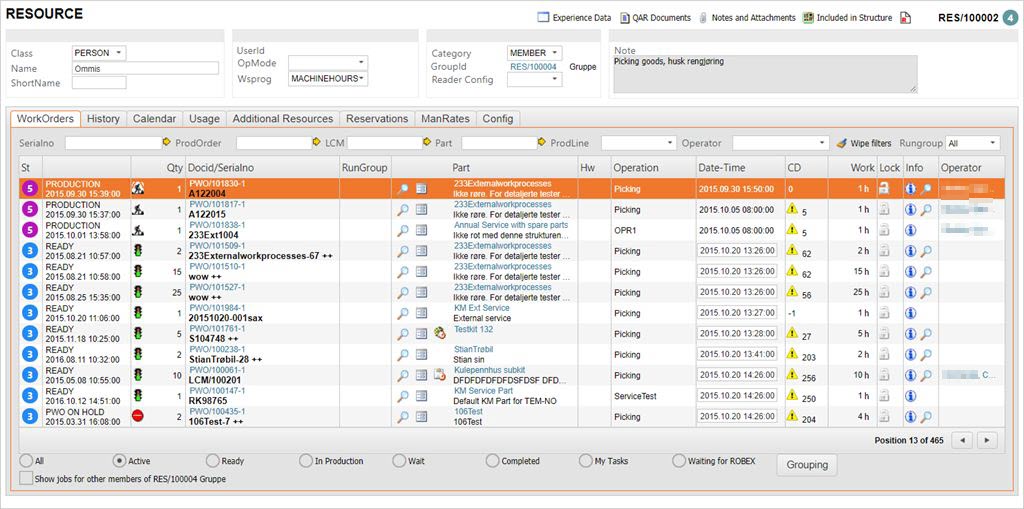
The folder WorkOrders lists all open work orders which the operator may start. The oldest work order will be listed at the top of the lines, and the status of the work can be seen in the status column. It may be ready to start, in progress, paused or finished.
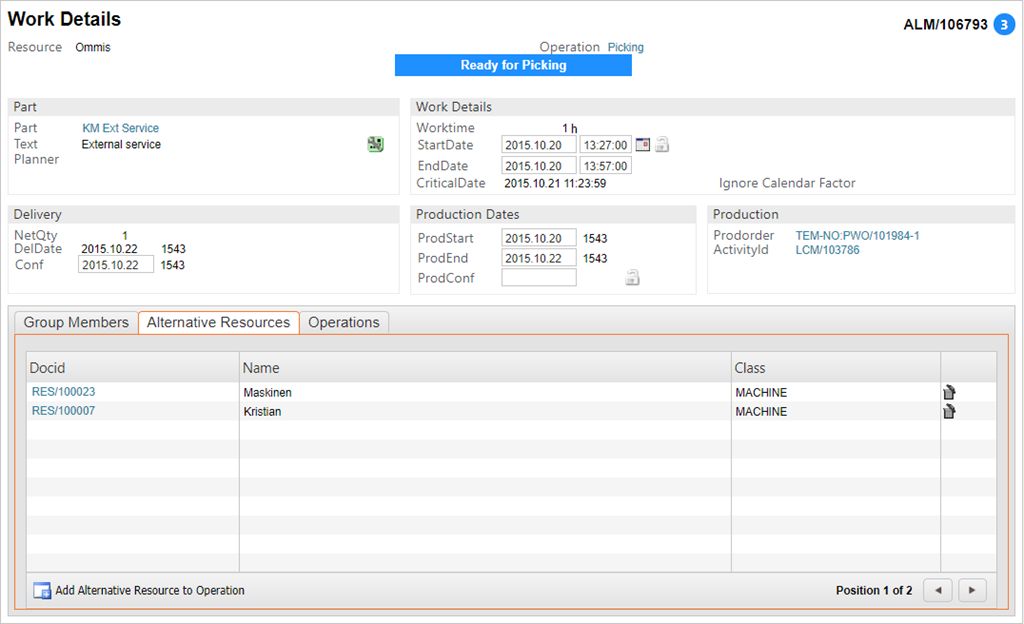
An operator may be member of a group with their own work orders. If you are in a resource and would like to view the other members work orders, you can check the box at the bottom called Show jobs for other members of RES/X group. To view work details, press F12 to open the action menu and choose the option Work Details. Here you may inspect the group members, transfer resources and add additional resources to the work order.
You may use the radio buttons to filter the results.
All
Shows all the operations on the resource.
Active
Shows all the active operations (ST:3-8) on the resource.
Ready
Shows all the ready operations (ST:3) on the resource.
In production
Shows all the operations in production (ST:4-5) on the resource.
Wait
Shows all the operations waiting (ST:2) on the resource.
Completed
Shows all the completed operations (ST:9) on the resource.
My tasks
Shows all the operations registered with the logged in PID as operator.
To pick a work order to start, highlight the desired work order and press ENTER.
It is possible to undo picking of parts in a service Production Work Order (PWO).
The criteria for undo picking of parts is that the part has been set for picking in the product LCM and has been picked in the operations window.
To undo the picking, click the Parts for operation link.
This will open the Stock Assignment Links popup. Here you will see the Part change complete, waiting to be picked icon in the Picked column. Clicking this will confirm the pick.
If you wish to undo this picking, click the green conformation icon which has appeared to undo the picking.
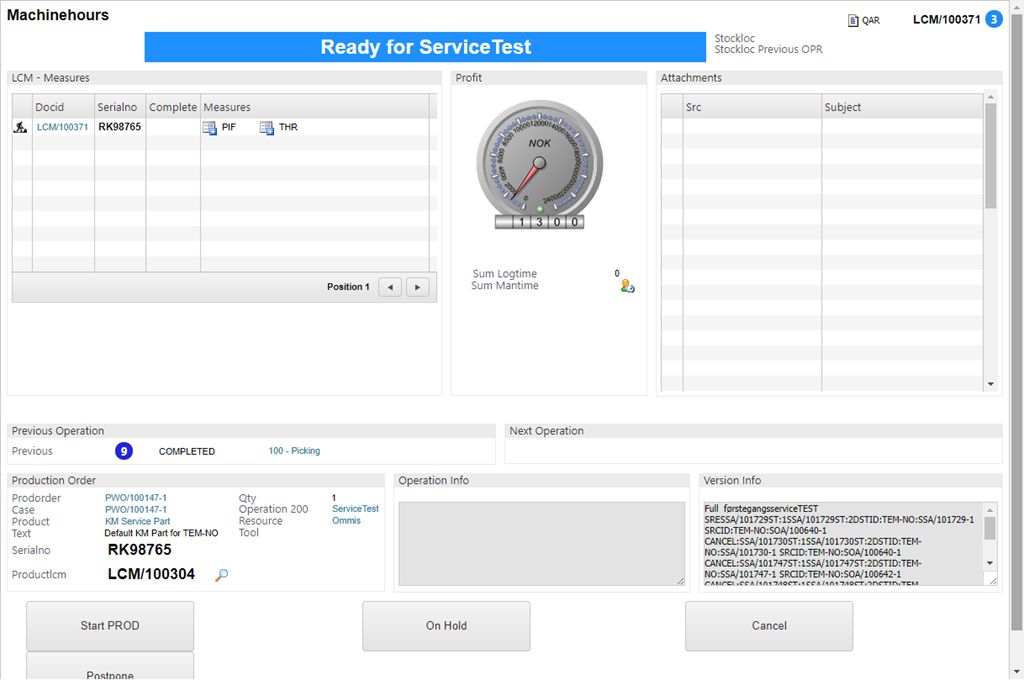
When you have chosen the desired job, and pressed ENTER, you will enter the work window.
It is from this window all logging of hours are performed.
To start the job, click the button Start PROD. This will set the production as active, and a new set of buttons will appear at the bottom.

To pause the production, in case of breaktime or similar, click the Pause PROD button.
If the production needs to be put on hold for any reason, click the button On Hold. You must state a reason for the delay in the popup. The difference between this and Pause is that On Hold closes the PWO for editing, whereas putting it on hold usually means a change must be made.
All hours worked logged may be viewed and edited from the Worklog folder in the Production Work Order (PWO) window.
Highlight the desired item line, and press ENTER to edit. The criteria for editing worked hours is that the process has ended.
Service parts are changed from the Product Life Cycle Management (LCM) document.
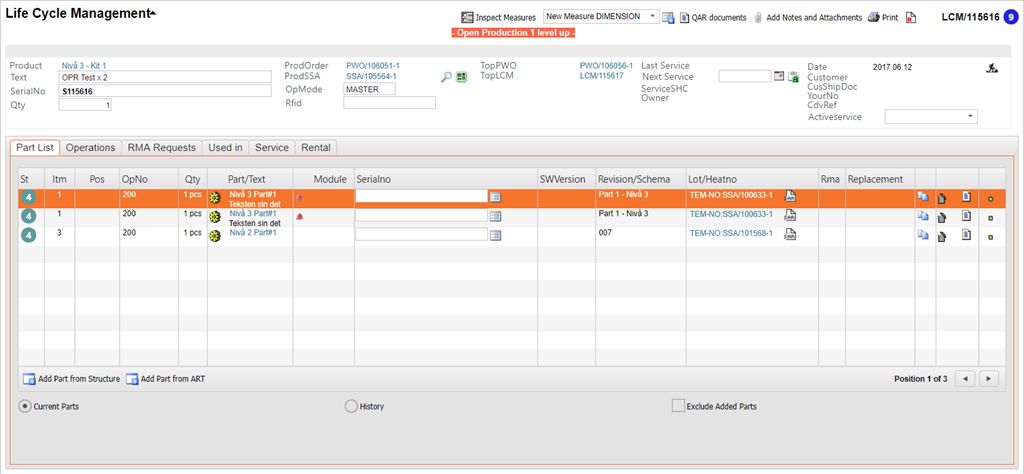
On the item line you can see the two overlapping paper icon called Change Service Part. Click this.

This will open a popup where you can choose which Goods Reception (SSA) you wish to pick the part from. Highlight the desired item line and press ENTER.
Add a serial number if necessary. You may also use the link Select serialNo from SSA to retrieve serial number from SSA.
Click Confirm when finished.

To add a service part, open the related Product Life Cycle Management (LCM) document.
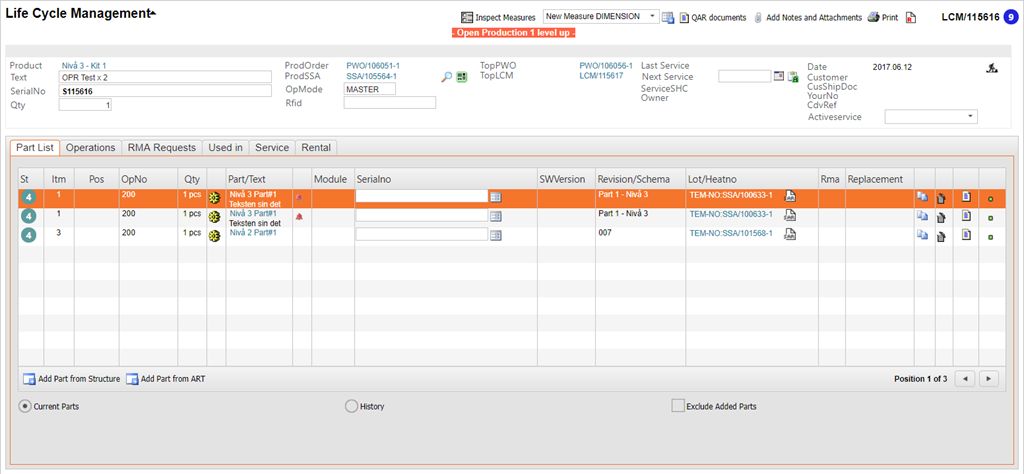
Click the Add Part from ART icon in the bottom left corner.

Locate the desired part, highlight the item line and press ENTER.
The part is now added to the LCM.
You may see attachments regarding the production item on the operator screen. These may be pictures, drawings or other instructions related to the production, the parts or the kit. These are located to the right in the screen in the Attachments box.
After all the operations have been performed by the operator, it is time to complete the service job.
Open the service Production Work Order (PWO) related to the Service order (CSO) you wish to complete.
The PWO will have ST:8, which enables you to click the Complete Production button at the bottom.
In the left hand corner a new button will appear, called Complete Service PWO. Click this button to complete the service job.
Recurring services are meant for products which require service and follow up on a regular basis. The product needs to be returned and serviced before it can be rented out again.
Completed service for returned rental goods.
Completed service for rental goods approaching a new rental period.
Completed service for goods in stock.
Completed service for customer owned goods.
Some types of goods are required to undergo service at certain intervals for certification purposes. One example of this situation may be seen for vehicles, where EU controls and kilometer based services may be seen as recurring services necessary to keep the certifications needed. This is service for customer owned goods, but is also valid for the vehicle rental business. When a rental car is returned after a rental period, it will need inspection and perhaps service before a new customer rents the car.
Following up goods in stock
Goods in stock may have been in stock for so long that it needs service before it can be rented out again.
Following up returned goods
Goods returned from a rental period need inspection or service before it can be rented out again.
Following up customer owned goods
Goods which has been serviced before, or sold to customer, needs new service after a given time.
Setting name | Description |
Warning days for Service | Value in this setting is a number of days. When less days than the value to next Service on a LifeCycle (LCM), a warning icon will show in the LifeCycle menu |
To inspect the service needs on rental products, open the Life Cycle Management (LCM) application. Find Service in the RamBase menu and then Recurring services. Click Recurring services overview to enter the LCM application.

Filter out the relevant Rental products using the SerialNo field, or the Product field.
Use the Service Within field to filter out the products which needs service within a given period.
This will enable you to easily see the details concerning the service on the given products in the Next Service column.
The yellow icon with the exclamation point indicates the service is due in a short period of time (this period may be set per the needs of the company).
The red circle indicates that the service date has passed without service being initiated.
Service Intervals (SVT) is the application where the frequency of a routine service is defined and connected to Products (ART).
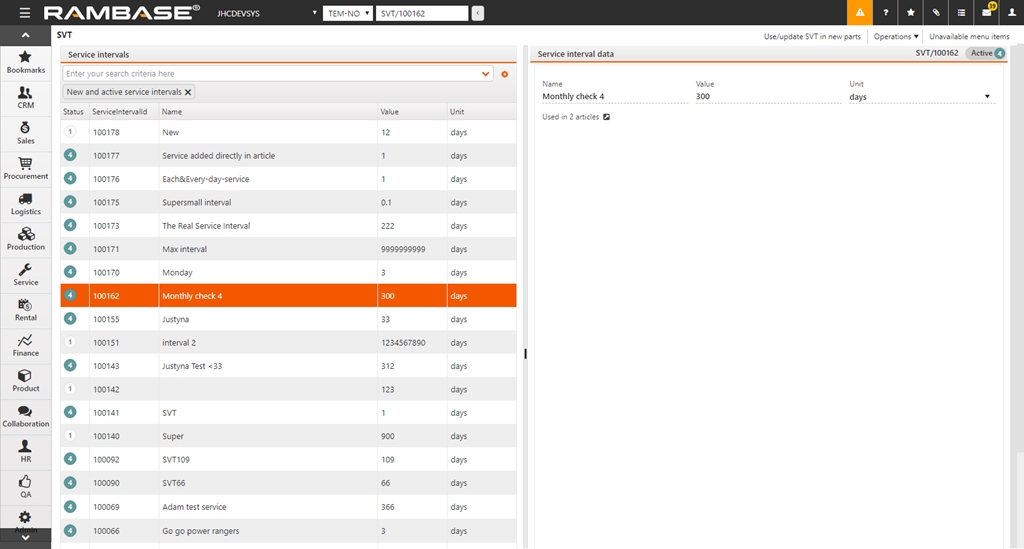
The menu to the left lists all the SVTs based on the search criteria. New and active SVTs are displayed by default.
The area to the right displays the details of the service interval:
Name
The name of the service interval.
Value
The time between each interval.
Unit
The time unit used.
Used in
This field shows how many products the SVT is used for. The arrow icon to the right also links directly to the articles where this SVT is active.
Click the Create new service interval.
This opens a new popup where you will need to add information:
Name
Give the SVT a descriptive name.
Value
Set the variable interval you need between each service.
Unit
Choose the variable unit.
Click OK when you are finished. The SVT is now is ST:1.
Click the Operations folder in the top right menu and choose Activate. This will set the SVT to ST:4.
Click the Use/update SVT in new parts button from the top menu. This will open the ART update application where you can add this SVT to products.
Note: If you need to delete this SVT, click the Operations folder in the top right menu and choose Delete.
A management process may be defined as the process where large orders and projects are managed.
Several service orders created.
Several service orders confirmed.
Several service orders printed.
Several service orders updated.
In addition to the several other tasks in the order process, it is important to mention the tasks where you should follow up the acknowledged, but not delivered orders. You are handling the customer backlog, which could be defined as what the customer is owed by the seller. Within this task you could follow up the customer backlog based on requests or in internal routines. For instance, getting confirmed dates from supplier/production, control that orders are delivered according to confirmed date or attempt to expedite purchase orders/productions if customers requested date is not fulfilled.
Good internal routines for following up the customer backlog are vital. If the company seldom delivers on time, or may offer reduced delivery times for certain customers, this may be rectified by closely following up the backlog to avoid discrepancies.
An order may, as all other processes, be cancelled until a certain threshold has been reached.
Receiving orders
Creating orders where products, quantity, pricing and delivery terms are included.
Acknowledging orders
Sending sales orders to one or several recipients.
Updating orders
Updating orders with changed terms or cancellation.
Customer Service management (CSM) is used to manage the service plans for customers. If you need to mass register, or mass update, orders, CSM is the best place to do this.
To open the Customer Service Management (CSM) application, find Service in the RamBase menu and then Order handling. Click Service order management to enter the CSM application.
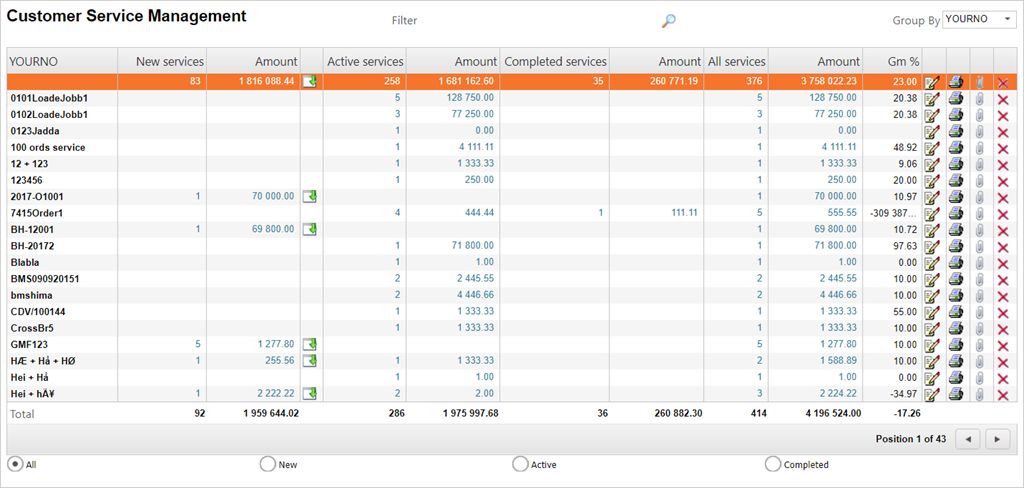
The application shows all open Service Orders (CSO) documents (ST<9). The information you see in the application are based of the service article, which is item 2 (the service job) in the CSO documents.
You can the drop down menu field called Group By in the upper right corner to group the results. The alternatives are:
YOURNO
The given reference number from where the CSO originated.
ACCOUNT
The Customer (CUS) reference in RamBase.
CITY
The city registered on the CSO.
CONF
The confirmation date.
COUNTRY
The country registered on the CSO.
CUR
The currency registered on the CSO.
DATE
The date the CSO was created.
DISTRICT
LOC
The warehouse location.
PART
The part registered on the CSO.
PID
The personal identification number of the CSO creator.
REQ
SHIPBY
The shipping method.
ST1
USERID
The Personnel (PER) reference.
It is also possible to use the radio buttons at the bottom to filter the results. The radio buttons are:
AllItems with ST:1<=1
NewItems with ST:1<=1
ActiveItems with ST:>1 and ST:1<8
CompletedItems with ST:1=8
To further filter the results, you may use the magnifying glass at the top, next to where it says Filter. The filter alternatives are:
Account
The customers RamBase ID.
City
The city registered on the CSO.
Part
The service article used on the CSO.
Country
The country where the invoice is sent.
Cur
The currency used on the CSO.
Date
The date from the Date field on the CSO.
The results from the filters are shown in the item lines in CSM, divided by several columns:
*Chosen grouping*
This field is decided from the chosen category in the Group By field.
Name
This field reflects the chosen category from the Group By field.
New Services
Amount of services with ST:1<=1 for the given category.
Active Services
Amount of services with ST:1>1 for the given category.
Completed services
Amount of services with ST:1=8 for the given category.
All services
Sum of New, Active and Completed services.
Amount
The sum from CNETAMT from services.
GM%
The Gross Margin.
If you highlight any of the item lines and press ENTER, you will receive a report with the information from item 2 on the respective CSOs, based on the filters in the Group By field. The report will contain following columns:
St,Document, Part, GM%, Amount, LandedCost, Req, Conf, Account, Name, It, Yourno.
To upload Service Orders (CSO) electronically you will first need access to the RamBase FTP server where the files are to be uploaded.
Make sure you upload the files to the correct folder. The files from the customer needs to be located in a folder called ServiceOrders.
ftp://ftp.rambase.net/TAA-NO/CUS/100023/ServiceOrders/
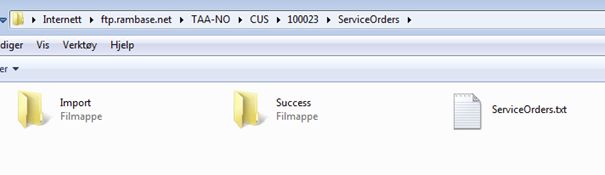
After the folder, with the file, has been uploaded, the system will recognize the file name and place it in the Import folder.
If the import job is successful, a new file will be created in the Success folder.
If the import job fails, a log will be created where the error may be inspected. After necessary correction to the file, it may be re uploaded.
After the batch has been run, CSO documents will be created based on the information in the uploaded file.
Customer Service management (CSM) can be used to mass register Service Orders (CSO).
To open the Customer Service Management (CSM) application, find Service in the RamBase menu and then Order handling. Click Service order management to enter the CSM application.
Press F12 to open the action menu and choose the option Upload Service Order - CSO.

Click the Select File button. This will open a new popup where you can locate the CSV file which contains the details regarding the CSOs.
Enter a description if needed in the Descr field. Click OK and the upload will run.

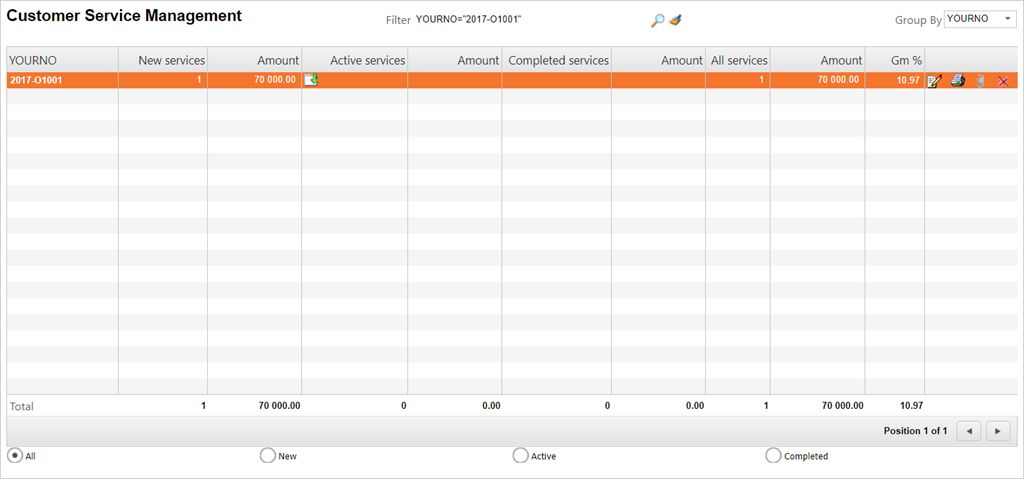
To register the documents, use the filter field to filter out the desired documents.
Press F12 to open the action menu and choose the option Register document.
Inspect the popup for correct information and click OK when finished.
The services which have been set as active can be seen in the Active column.
From the Customer Service Management (CSM) application, it is possible to mass update several orders.
To open the Customer Service Management (CSM) application, find Service in the RamBase menu and then Order handling. Click Service order management to enter the CSM application.
If you need to make changes concerning YourNo or ReqDate concerning the CSOs, you can fix this in CSM.
Filter the desired CSOs by using the whole, or parts of, the YourNo you wish to edit using the RamBase filter field in the format YOURNO:XXXXX.
Click the Update Documents icon on the item line(s) to open the Update Documents popup.

The result may contain several orders, which you may update or edit at once. The document count is listed on the bottom.
Change the details in YourNo and Req as needed. If you want to update the YourItm, be sure to check the Update YourItm checkbox.
Click OK when finished.
From the Customer Service Management (CSM) application, it is possible to mass update several orders.
To open the Customer Service Management (CSM) application, find Service in the RamBase menu and then Order handling. Click Service order management to enter the CSM application.
If there are any errors, or if you need to make changes, concerning YourNo or ReqDate in the CSV file concerning the CSOs, you can fix this in CSM.
Press F12 to open the action menu and choose the option Update Documents.

Use the filter field to filter out the desired documents. The result may contain several orders, which you may update or edit at once. The document count is listed on the bottom.
Change the details in YourNo and Req as needed. Click OK when finished.
The Update Documents icon, or the F12 option Update Documents, enables you to change the YourNo on all orders.
The Print icon gives you the opportunity to send or print all orders.
Using the paper clip icon enables you to add attachments to all the orders.
The red X gives you the opportunity to cancel all unfinished (ST<8) orders.
A documentation process is the process where the documentation needed for the service is retrieved.
Instruction manual for operations.
Instruction manual for machines.
Raw material certificate registered.
Measurement certificate registered.
Specified service job cards.
If the part is unique, or unique parts are to be changed, the service operator will have to consult the technical documentation, either for the machine that will perform the work, or for the parts to be changed. When the service job is completed, documentation regarding the work, the parts changed, time used and any approvals/measurements will be required.
Retrieved instruction manual
The instruction manual is retrieved on screen or printed, to assist the service operator.
Documentation package registered
After the service job has been performed, all relevant documentation needs to be retrieved and follow the shipment, or by e-mail. This may be measurement certificates, material certificates, specified job cards and similar.
To the left in the operator screen you can see the LCM Measures box. Here you may view and add measures related to the kit.
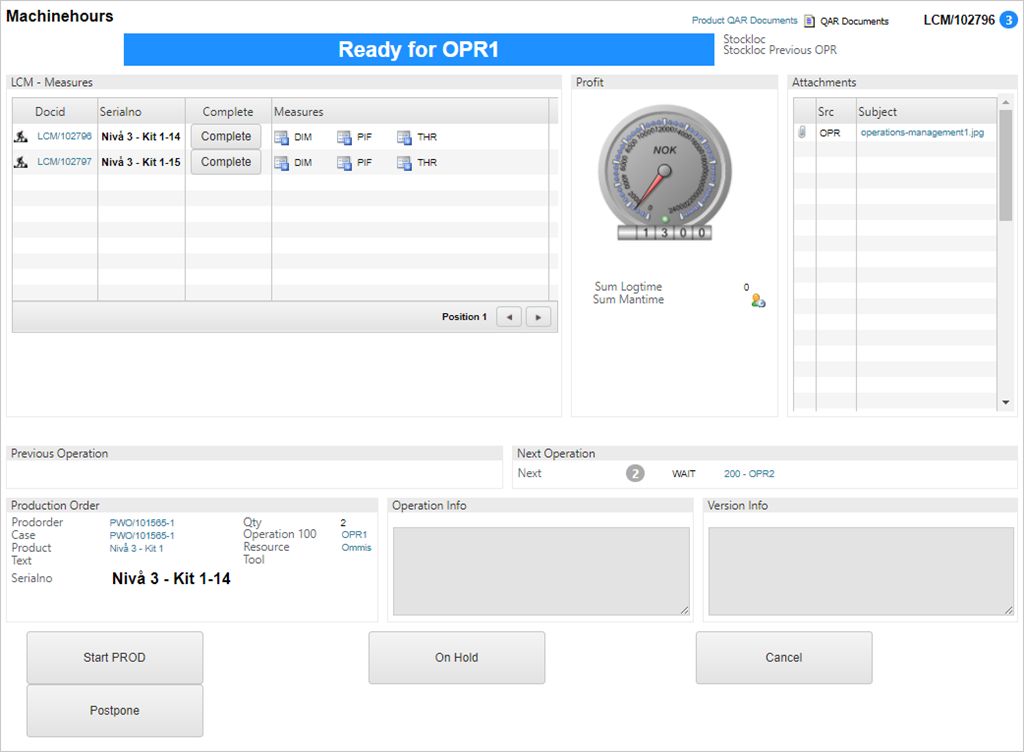
DIM: Dimensions.
PIF: Product Inspection Form.
THR: Thread.
To add a measure for the kit, for example the dimensions, click the icon in the measures column.

This takes you to the Article Inspection window. Here you may add relevant information related to the dimensions of the product, tolerance class and the tool used.
Note: Upper and lower tolerance variables are the specific tolerance, NOT the total measures.
When the information has been added, your Personal Identification Number (PID) is set as the creator in the UserId column.
Click the CONFIRM button to finish.
In Shipping advice item (CSAITEM), service shipping advices can be managed more efficiently using the CMI/Close Without Invoice option.
This functionality allows Shipping advice item (CSAITEM) to be closed directly to Status 9 – Processed, without the need to forward them to a Sales invoice (CIN). Cost and material related to the service can still be invoiced through the Customer invoice management (CIM) application. However, if invoicing is not required, the associated Shipping advice item (CSAITEM) can be closed directly using the CMI/Close Without Invoice feature.