Setting name | Description | Submodule/ archive |
Default Character set for prints | Used to tell the default characther set to use for the current database. NODK means norwegian and danish charathers while SEFI means swedish / finish. Default if not set is other. PS: This setting is not in use (2018.07.02) | Defaults |
Default Customer as WebUser | Default customer to be used on Sales Order Request (CPO) when a web user add products to the shopchart, without beeing logget in. Format to be used: CUS/NNNNNN (N for numbers) | Defaults |
Default Service Customer as WebUser | Default Service customer to be used on Sales documents when a web user add products to the shopchart, without beeing logget in. Format to be used: CUS/NNNNNN (N for numbers) | Defaults |
DefaultWebPageDomain | Domain of the default webpage. Probably obsolete | Defaults |
Fax is used for company | If this setting is "ON" - Fax can be used for this company | Defaults |
Footer1 on prints | The value is this setting will show as a text at the bottom of most standard prints | Defaults |
Footer2 on prints | The value is this setting will show as a text at the bottom of most standard prints | Defaults |
Footer3 on prints | The value is this setting will show as a text at the bottom of most standard prints | Defaults |
Footer4 on prints | The value is this setting will show as a text at the bottom of most standard prints | Defaults |
Footer5 on prints | The value is this setting will show as a text at the bottom of most standard prints | Defaults |
From Email address to be used as default on Mailing (MAI) | The value in this setting must be the 'from Email address' that should be used as default when creating Mailing (MAI). Format to be used: LLLLLL@LLLL.LL (L for letters) | Defaults |
Hide Personell information on prints | If this setting is "ON" - Personell information - Personell ID (PID), name and mailadr from Rambase documents) will be hidden on prints. If the setting is "OFF" - Personell information will show on prints | Defaults |
Minutes inactivity before logged out when logged in using onetime password | The value in this setting must be number of minutes you can stay logged in in Rambase without any activity, before you get logged out. This is when you are logged in from insecure location using onetime password | Defaults |
Minutes inactivity before logget out when loggen in from secure location | The value in this setting must be a number of minutes you can stay logged in in Rambase without any activity, before you get logget out. This is when you are logged in from secure location | Defaults |
Output theme | Value in this setting is a reference for selected output theme for this company. Changes in Company logs (COS) application will also update the setting with a new reference as value, e.g. 102233. Setting can be updated by JHC or partner. | Defaults |
Output logo | This is the output logo for this company which will show on prints and emails. | Defaults |
Send email automatically from documents by forward | If this setting is "ON" - Emails will be sent automatically when documents are forwarded. If the setting is "OFF" - Emails will be sent, and copies can be sent | Defaults |
View All PDF Links | If setting is ON - users are be able to see/open all pdf links in the Correspondance popup. JHC employes are able to see/open all pdf links even if the setting is not activated. | Defaults |
Web Shop Database | Value in this setting should be the database name for the company there should be a link to. Format to be used is : LLL-LL (L for letters) | Defaults |
Deactivate Approval message - Agreement Expiration Date | If this setting is "ON" - The document message is not activated. If the setting is "OFF" - The document message is activated for Sales Quote Item (CQU-ITM) | DocumentMessages |
Deactivate Approval message - Approval of Amount | If this setting is "ON" - The document message is not activated. If the setting is "OFF" - The document message is activated for Purchase Order Item (SPO-ITM), Purchase Order Response Item (SOA-ITM) and Supplier Invoice Item (SIN-ITM) | DocumentMessages |
Deactivate Approval message - Buffer Quantity | If this setting is "ON" - The document message is not activated. If the setting is "OFF" - The document message is activated for Sales Quote Item (CQU-ITM). There is a check against CSV/CusQuoteBufferQuantityApprovalLimitPct (Item buffer quantity / Item remaining quantity * 100) | DocumentMessages |
Deactivate Approval message - Cancellation limit | If this setting is "ON" - The document message is not activated. If the setting is "OFF" - The document message is activated for Sales Order Item (COA-ITM) and Shipping Advice Item (CSA-ITM) | DocumentMessages |
Deactivate Approval message - Cancellation limit for period exceeded for Person (PID) | If this setting is "ON" - The document message is not activated. If the setting is "OFF" - The document message is activated for Sales Order Item (COA-ITM) and Shipping Advice Item (CSA-ITM) | DocumentMessages |
Deactivate Approval message - Check Gross Margin | If this setting is "ON" - The document message is not activated. If the setting is "OFF" - The document message is activated for Sales Quote Item (CQU-ITM), Sales Order Item (COA-ITM), Shipping Advice Item (CSA-ITM) and Sales Invoice Item (CIN-ITM) | DocumentMessages |
Deactivate Approval message - Credit Insurance Exceeded | If this setting is "ON" - The document message is not activated. If the setting is "OFF" - The document message is activated for Shipping Advice (CSA) | DocumentMessages |
Deactivate Approval message - Credit Limit Exceeded | If this setting is "ON" - The document message is not activated. If the setting is "OFF" - The document message is activated for Shipping Advice (CSA) | DocumentMessages |
Deactivate Approval message - Expiration date 'later than' on Sales Quote (CQU) | If this setting is "ON" - The document message is not activated. If the setting is "OFF" - The document message is activated for Sales Quote (CQU) | DocumentMessages |
Deactivate Approval message - KIT version | If this setting is "ON" - The document message is not activated. If the setting is "OFF" - The document message is activated on KITART, when you make new version on a Product (ART) with TYPE=K | DocumentMessages |
Deactivate Approval message - Minimum Resale Price | If this setting is "ON" - The document message is not activated. If the setting is "OFF" - The document message is activated for Sales Quote Item (CQU-ITM), Sales Order Item (COA-ITM), Shipping Advice Item (CSA-ITM) and Sales Order Request Item (CPO-ITM) | DocumentMessages |
Deactivate Approval message - Payments (PAY) | If this setting is "ON" - The document message is not activated. If the setting is "OFF" - The document message is activated for Payment (PAY) | DocumentMessages |
Deactivate Approval message - Picking blocked | If this setting is "ON" - The document message is not activated. If the setting is "OFF" - The document message is activated for Shipping Advice (CSA) | DocumentMessages |
Deactivate Approval message - Punch List | If this setting is "ON" - The document message is not activated. If the setting is "OFF" - The document message is activated for Shipping Advice Item (CSA-ITM) | DocumentMessages |
Deactivate Approval message - Required Documentation | If this setting is "ON" - The document message is not activated. If the setting is "OFF" - The document message is activated for Shipping Advice (CSA), Shipping Advice Item (CSA-ITM) and Goods Reception Item (SSA-ITM) | DocumentMessages |
Deactivate Approval message - Sales Order Credit Limit Exceeded | If this setting is "ON" - The document message is not activated. If the setting is "OFF" - The document message is activated for Sales Order (COA) | DocumentMessages |
Deactivate Approval message - Total Cancellation limit for Person (PID) | If this setting is "ON" - The document message is not activated. If the setting is "OFF" - The document message is activated for Sales Order Item (COA-ITM) and Shipping Advice Item (CSA-ITM) | DocumentMessages |
Deactivate Info message - Assignment changed to another Product | If this setting is "ON" - The document message is not activated. If the setting is "OFF" - The document message is activated for Sales Order Item (COA-ITM) | DocumentMessages |
Deactivate Info message - Cancellation of Purchase Order Response (SOA) from Supplier via file upload | If this setting is "ON" - The document message is not activated. If the setting is "OFF" - The document message is activated for Purchase Order Response (SOA) and Purchase Order Response Item (SOA-ITM) | DocumentMessages |
Deactivate Info message - Cancellation of Sales Forecast Item (CFC-ITM)) | If this setting is "ON" - The document message is not activated. If the setting is "OFF" - The document message is activated for Sales Forecast Item (CFC-ITM) | DocumentMessages |
Deactivate Info message - Checking requested date on Purchase Order Change Request (SRC) | If this setting is "ON" - The document message is not activated. If the setting is "OFF" - The document message is activated for Purchase Order Response (SOA) and Purchase Order Response Item (SOA-ITM) | DocumentMessages |
Deactivate Info message - Confirmed Product has changed | If this setting is "ON" - The document message is not activated. If the setting is "OFF" - The document message is activated for Purchase Order Response (SOA) and Purchase Order Response Item (SOA-ITM) | DocumentMessages |
Deactivate Info message - Customer merged | If this setting is "ON" - The document message is not activated. If the setting is "OFF" - The document message is activated for most of the documents (CCN,CIN,COA,CPO,CSA,CQU,CRQ,SCN,SIN,SOA,SPO,SRC,SRT,SRQ,SSA,SQU) | DocumentMessages |
Deactivate Info message - Customer requested change | If this setting is "ON" - The document message is not activated. If the setting is "OFF" - The document message is activated for Sales Order (COA), Sales Order Item (COA-ITM), Sales Order Change Request (CRC) and Sales Order Change Request (CRC-ITM) | DocumentMessages |
Deactivate Info message - Documentation is not required | If this setting is "ON" - The document message is not activated. If the setting is "OFF" - The document message is activated for Shipping Advice (CSA), Production Work Order (PWO) and Goods Reception (SSA) | DocumentMessages |
Deactivate Info message - Documentation reminder | If this setting is "ON" - The document message is not activated. If the setting is "OFF" - The document message is activated for Goods Reception (SSA) and Goods Reception Item (SSA-ITM) | DocumentMessages |
Deactivate Info message - Free Text | If this setting is "ON" - The document message is not activated. If the setting is "OFF" - The document message is activated for all documents except Sales Forecast (CFC) | DocumentMessages |
Deactivate Info message - Goods In confirmed | If this setting is "ON" - The document message is not activated. If the setting is "OFF" - The document message is activated for Goods Reception Item (SSA-ITM) | DocumentMessages |
Deactivate Info message - Gross Price mismatch on Purchase Order Response (SOA) from Purchase Order (SPO) | If this setting is "ON" - The document message is not activated. If the setting is "OFF" - The document message is activated for Purchase Order Response (SOA) and Purchase Order Response Item (SOA-ITM) | DocumentMessages |
Deactivate Info message - Item linked to Goods Reception Item (SSA-ITM) | If this setting is "ON" - The document message is not activated. If the setting is "OFF" - The document message is activated for Goods Reception Item (SSA-ITM) | DocumentMessages |
Deactivate Info message - Location (LOC) changed when Purchase Order Response (SOA) received for another location | If this setting is "ON" - The document message is not activated. If the setting is "OFF" - The document message is activated for Sales Order Item (COA-ITM) and Sales Quote Item (CQU-ITM) | DocumentMessages |
Deactivate Info message - Message from Customer/Supplier | If this setting is "ON" - The document message is not activated. If the setting is "OFF" - The document message is activated for all documents | DocumentMessages |
Deactivate Info message - New Version | If this setting is "ON" - The document message is not activated. If the setting is "OFF" - The document message is activated for Purchase Order Item (SPO-ITM) and Purchase Order Response Item (SOA-ITM) | DocumentMessages |
Deactivate Info message - No version upgrade from Product performed | If this setting is "ON" - The document message is not activated. If the setting is "OFF" - The document message is activated for Production Work Order Item (PWO-ITM) | DocumentMessages |
Deactivate Info message - Pick Completed | If this setting is "ON" - The document message is not activated. If the setting is "OFF" - The document message is activated for Production Work Order Item (PWO-ITM), Shipping Advice Item (CSA-ITM) and Supplier Return Item (SRT-ITM) | DocumentMessages |
Deactivate Info message - Production cancelled | If this setting is "ON" - The document message is not activated. If the setting is "OFF" - The document message is activated for Production Work Order Item (PWO-ITM) | DocumentMessages |
Deactivate Info message - Production completed | If this setting is "ON" - The document message is not activated. If the setting is "OFF" - The document message is activated for Purchase Order Item (SPO-ITM) and Purchase Order Response Item (SOA-ITM) | DocumentMessages |
Deactivate Info message - Production on Hold | If this setting is "ON" - The document message is not activated. If the setting is "OFF" - The document message is activated for Production Work Order Item (PWO-ITM) | DocumentMessages |
Deactivate Info message - Production Split | If this setting is "ON" - The document message is not activated. If the setting is "OFF" - The document message is activated for Production Work Order Item (PWO-ITM) | DocumentMessages |
Deactivate Info message - Production started | If this setting is "ON" - The document message is not activated. If the setting is "OFF" - The document message is activated for Purchase Order Item (SPO-ITM) and Purchase Order Response Item (SOA-ITM) | DocumentMessages |
Deactivate Info message - Production Undo Release | If this setting is "ON" - The document message is not activated. If the setting is "OFF" - The document message is activated for Production Work Order Item (PWO-ITM) | DocumentMessages |
Deactivate Info message - Production Work Order (PWO) has been delinked by | If this setting is "ON" - The document message is not activated. If the setting is "OFF" - The document message is activated for Production Work Order Item (PWO-ITM) | DocumentMessages |
Deactivate Info message - Production Work Order (PWO) on hold off | If this setting is "ON" - The document message is not activated. If the setting is "OFF" - The document message is activated for Production Work Order Item (PWO-ITM) | DocumentMessages |
Deactivate Info message - Purchase Order (SPO) not found | If this setting is "ON" - The document message is not activated. If the setting is "OFF" - The document message is activated for Purchase Order Response (SOA) and Purchase Order Response Item (SOA-ITM) | DocumentMessages |
Deactivate Info message - Purchase Order Response (SOA) has been Gross Price protected | If this setting is "ON" - The document message is not activated. If the setting is "OFF" - The document message is activated for Purchase Order Response (SOA) | DocumentMessages |
Deactivate Info message - Purchase Quote (SQU) received from Supplier | If this setting is "ON" - The document message is not activated. If the setting is "OFF" - The document message is activated for Sales Quote (CQU) | DocumentMessages |
Deactivate Info message - Purchase Quote Request (SRQ) is closed | If this setting is "ON" - The document message is not activated. If the setting is "OFF" - The document message is activated for Purchase Quote Request Item (SRQ-ITM) | DocumentMessages |
Deactivate Info message - Quantity mismatch with Purchase Order (SPO) | If this setting is "ON" - The document message is not activated. If the setting is "OFF" - The document message is activated for Purchase Order Response (SOA) and Purchase Order Response Item (SOA-ITM) | DocumentMessages |
Deactivate Info message - Received Confirmation from Production - Shipday: V or W | If this setting is "ON" - The document message is not activated. If the setting is "OFF" - The document message is activated for Sales Order Item (COA-ITM) | DocumentMessages |
Deactivate Info message - Received Confirmation from Production - Shipday:D | If this setting is "ON" - The document message is not activated. If the setting is "OFF" - The document message is activated for Sales Order Item (COA-ITM) | DocumentMessages |
Deactivate Info message - Received Confirmation from Supplier | If this setting is "ON" - The document message is not activated. If the setting is "OFF" - The document message is activated for Sales Order Item (COA-ITM) | DocumentMessages |
Deactivate Info message - Released for Production | If this setting is "ON" - The document message is not activated. If the setting is "OFF" - The document message is activated for Production Work Order Item (PWO-ITM) | DocumentMessages |
Deactivate Info message - Scrapping Completed | If this setting is "ON" - The document message is not activated. If the setting is "OFF" - The document message is activated for Production Work Order (PWO) | DocumentMessages |
Deactivate Info message - Scrapping process started | If this setting is "ON" - The document message is not activated. If the setting is "OFF" - The document message is activated for Production Work Order Item (PWO-ITM) | DocumentMessages |
Deactivate Info message - Scrapping Undone | If this setting is "ON" - The document message is not activated. If the setting is "OFF" - The document message is activated for Production Work Order Item (PWO-ITM) | DocumentMessages |
Deactivate Info message - Serialnumber could not be registrated | If this setting is "ON" - The document message is not activated. If the setting is "OFF" - The document message is activated for Shipping Advice Item (CSA-ITM) and Supplier Return Item (SRT-ITM) | DocumentMessages |
Deactivate Info message - Set Operation (OPR) to Ready | If this setting is "ON" - The document message is not activated. If the setting is "OFF" - The document message is activated for Production Work Order Item (PWO-ITM) | DocumentMessages |
Deactivate Info message - Stock assignment cancelled | If this setting is "ON" - The document message is not activated. If the setting is "OFF" - The document message is activated for Sales Order Item (COA-ITM) | DocumentMessages |
Deactivate Info message - Supplier Part does not match Part at source item | If this setting is "ON" - The document message is not activated. If the setting is "OFF" - The document message is activated for Purchase Order Response (SOA) and Purchase Order Response Item (SOA-ITM) | DocumentMessages |
Deactivate Info message - Undo Operation | If this setting is "ON" - The document message is not activated. If the setting is "OFF" - The document message is activated for Production Work Order Item (PWO-ITM) | DocumentMessages |
Deactivate Info message - Undo Picking | If this setting is "ON" - The document message is not activated. If the setting is "OFF" - The document message is activated for Production Work Order Item (PWO-ITM) | DocumentMessages |
Deactivate Info message - Valid Purchase Quote (SQU) exist | If this setting is "ON" - The document message is not activated. If the setting is "OFF" - The document message is activated for Sales Order Item (COA-ITM) | DocumentMessages |
Deactivate message - Circuit control | If this setting is "ON" - The document message is not activated. If the setting is "OFF" - The document message is activated for Goods Reception (SSA) and Goods Reception Item (SSA-ITM) | DocumentMessages |
Deactivate message - Item can't be transported to Shipping Advice (CSA) until payment is registrated | If this setting is "ON" - The document message is not activated. If the setting is "OFF" - The document message is activated for Sales Order Item (COA-ITM) | DocumentMessages |
Deactivate message - Remember LOT/HEAT number | If this setting is "ON" - The document message is not activated. If the setting is "OFF" - The document message is activated for Goods Reception (SSA) and Goods Reception Item (SSA-ITM) | DocumentMessages |
Deactivate message - Visual control according to procedure | If this setting is "ON" - The document message is not activated. If the setting is "OFF" - The document message is activated for Goods Reception (SSA) and Goods Reception Item (SSA-ITM) | DocumentMessages |
Deactivate Stop message - A valid shippingservice is required | If this setting is "ON" - The document message is not activated. If the setting is "OFF" - The document message is activated for Sales Quote (CQU), Sales Order (COA), Shipping Advice (CSA), Supplier Return (SRT), Goods Transfer (STW), Purchase Order (SPO), Purchase Order Response (SOA) and Purchase Quote Request (SRQ) | DocumentMessages |
Deactivate Stop message - Missing information in fields (Weight, Contry of Origin Code and Customs Tariff Code in Product (ART) | If the setting is "ON" - Document message is not activated. If the setting is "OFF - The document message is activated for Goods Reception Item (SSA-ITM) | DocumentMessages |
Deactivate Stop message - Number of Serial numbers does not match Quantity in item | If this setting is "ON" - The document message is not activated. If the setting is "OFF" - The document message is activated for Goods Reception Item (SSA-ITM) and Shipping Advice Item (CSA-ITM) | DocumentMessages |
Deactivate Stop message - Product Blocking | If this setting is "ON" - The document message is not activated. If the setting is "OFF" - The document message is activated for Sales Invoice Item (CIN-ITM), Sales Order Item (COA-ITM), Purchase Order Item (SPO-ITM), Goods Reception Item (SSA-ITM) and Sales Quote Item (CQU-ITM) | DocumentMessages |
Deactivate Stop message - Purchase Quote (SQU) is expired, check Purchase quote item field (BREF) for new Purchase Quote | If this setting is "ON" - The document message is not activated. If the setting is "OFF" - The document message is activated for Sales Quote Item (CQU-ITM), Sales Order Item (COA-ITM) and Shipping Advice Item (CSA-ITM) | DocumentMessages |
Deactivate Stop message - Purchase Quote (SQU) is not valid for this customer | If this setting is "ON" - The document message is not activated. If the setting is "OFF" - The document message is activated for Sales Quote Item (CQU-ITM), Sales Order Item (COA-ITM) and Shipping Advice Item (CSA-ITM) | DocumentMessages |
Deactivate Stop message - Purchase Quote (SQU) is not valid for this document | If this setting is "ON" - The document message is not activated. If the setting is "OFF" - The document message is activated for Sales Invoice Item (CIN-ITM) and Shipping Advice Item (CSA-ITM) | DocumentMessages |
Deactivate Stop message - Purchase Quote (SQU) needs to be activated | If this setting is "ON" - The document message is not activated. If the setting is "OFF" - The document message is activated for Sales Order Item (COA-ITM) and Shipping Advice Item (CSA-ITM) | DocumentMessages |
Deactivate Stop message - Sales Quote Request (CRQ) has been changed | If this setting is "ON" - The document message is not activated. If the setting is "OFF" - The document message is activated for Purchase Quote Request Item (SRQ-ITM) | DocumentMessages |
Deactivate Stop message - This Type (class) is not accepted in actual document type | If the setting is "ON" - Document message is not activated. If the setting is "OFF - The document message is activated for Sales Order Item (COA-ITM), Sales Quote Item (CQU-ITM) and Sales Quote Request (CRQ-ITM) | DocumentMessages |
Deactivate Stop message - Waiting for Tollpass | If this setting is "ON" - The document message is not activated. If the setting is "OFF" - The document message is activated for Goods Reception (SSA) | DocumentMessages |
Deactivate Warning message - ASWM: Missing Quantity on | If this setting is "ON" - The document message is not activated. If the setting is "OFF" - The document message is activated for Production Work Order Item (PWO-ITM) and Shipping Advice Item (CSA-ITM) | DocumentMessages |
Deactivate Warning message - Customer Reference Number (Yourno) already exist | If this setting is "ON" - The document message is not activated. If the setting is "OFF" - The document message is activated for Supplier Invoice (SIN) and Supplier Credit Note (SCN) | DocumentMessages |
Deactivate Warning message - Free text | f this setting is "ON" - The document message is not activated. If the setting is "OFF" - The document message is activated for all documents except Sales Forecast (CFC) | DocumentMessages |
Deactivate Warning message - Invalid KID | If this setting is "ON" - The document message is not activated. If the setting is "OFF" - The document message is activated for Supplier Invoice (SIN) | DocumentMessages |
Deactivate Warning message - Location (LOC) mismatch | If this setting is "ON" - The document message is not activated. If the setting is "OFF" - The document message is activated for Supplier Invoice (SIN) | DocumentMessages |
Deactivate Warning message - Member - on Sales Order (COA) or Sales Order Request (CPO) | If this setting is "ON" - The document message is not activated. If the setting is "OFF" - The document message is activated for Sales Order (COA) and Sales Order Request (CPO) | DocumentMessages |
Deactivate Warning message - Message from Product | f this setting is "ON" - The document message is not activated. If the setting is "OFF" - The document message is activated | DocumentMessages |
Deactivate Warning message - Message to Shipping Operator | If this setting is "ON" - The document message is not activated. If the setting is "OFF" - The document message is activated for Sales Order (COA) and Shipping Advice (CSA) | DocumentMessages |
Deactivate Warning message - Missing country of origin code on material | If this setting is "ON" - The document message is not activated. If the setting is "OFF" - The document message is activated for Shipping Advice Item (CSA-ITM) | DocumentMessages |
Deactivate Warning message - Missing quantity on | If this setting is "ON" - The document message is not activated. If the setting is "OFF" - The document message is activated for Shipping Advice Item (CSA-ITM), Supplier Return Item (SRT-ITM) and Goods Transfer Item (STW-ITM) | DocumentMessages |
Deactivate Warning message - Next Service Date | If this setting is "ON" - The document message is not activated. If the setting is "OFF" - The document message is activated for Recurring Invoice Plan Item (COP-ITM) | DocumentMessages |
Deactivate Warning message - Picking Blocked | If the setting is "ON" - Document message is not activated. If the setting is "OFF - The document message is activated for Goods Reception Item (SSA-ITM) | DocumentMessages |
Deactivate Warning message - Price Difference between Supplier Invoice (SIN) and Goods Reception (SSA) | If the setting is "ON" - Document message is not activated. If the setting is "OFF - The document message is activated for Supplier Invoice (SIN) | DocumentMessages |
Deactivate Warning message - Sales Order (COA) cancelled | If this setting is "ON" - The document message is not activated. If the setting is "OFF" - The document message is activated for Production Work Order Item (PWO-ITM) | DocumentMessages |
Deactivate Warning message - Sales Order (COA) deleted | If this setting is "ON" - The document message is not activated. If the setting is "OFF" - The document message is activated for Production Work Order Item (PWO-ITM) | DocumentMessages |
Deactivate Warning message - Service Order (CSO) cancelled | If this setting is "ON" - The document message is not activated. If the setting is "OFF" - The document message is activated for Production Work Order Item (PWO-ITM) | DocumentMessages |
Deactivate Warning message - Service overdue | If this setting is "ON" - The document message is not activated. If the setting is "OFF" - The document message is activated for Recurring Invoice Plan Item (COP-ITM) | DocumentMessages |
Deactivate Warning message - Source quantity is less that quantity | If this setting is "ON" - The document message is not activated. If the setting is "OFF" - The document message is activated for Sales Order Item (COA-ITM) | DocumentMessages |
Deactive Approval message - Overdue Exceeded | If this setting is "ON" - The document message is not activated. If the setting is "OFF" - The document message is activated for Shipping Advice (CSA) | DocumentMessages |
Deactive Info message - Picking list printed | If this setting is "ON" - The document message is not activated. If the setting is "OFF" - The document message is activated for Production Work Order Item (PWO-ITM), Shipping Advice Item (CSA-ITM) and Supplier Return Item (SRT-ITM) | DocumentMessages |
DocumentMessageDeactivateInfoExpectedAndNetPriceMismatch | Shows if the document message is deactivated. ON = Document message is not active OFF = Document message is active <empty> = Document message is active | DocumentMessages |
DocumentMessageDeactivateInfoTargetAndNetPriceMismatch | Shows if the document message is deactivated. ON = Document message is not active OFF = Document message is active <empty> = Document message is active | DocumentMessages |
Report 1000 Separator | This is the default 1000-separator for report fields of type Number or Quantity. Possible values: Space, Comma or Point. If this setting is not used, the default will be no 1000 separator. This value will be overridden if the column is formatted in the Report Definition. NOTE: This functionallity will not work as described until further development is done | Reports |
Report Decimal Separator | This is the default decimal separator for report fields of type Number or Quantity. Possible values: Comma or Point. If this setting is not used, the default will be point. This value will be overridden if the column is formatted in the Report Definition. NOTE: This functionallity will not work as described until further development is done | Reports |
Access based subscription fee for RamBase users | If this setting is 'ON' - Used to toggle if the system is running access based subscription fee for RamBase users, where access points on duties are accumulated for each user giving a subscription price category (UPC) for each user. The price category for a user decides the RamBase subscription fee for that user. This setting should only be activated in JHC-NO, and only by JHC | Roles |
Calculate user subscription price category per company | If this setting is 'ON' - Users will get one subscription price category (UPC) for each database they have roles in. Access points will be accumulated by unique duties the user has on roles within a database. If a user has the same duty in two roles, it will be considered as one duty in the accumulation. If setting is 'OFF' - the access points are calculated across all companies in the system by unique duties the user has acrosss all databases in the systems. This setting should typically be on if the owner of this RamBase system has seperate contracts for each company in the system. This setting should only be activated in JHC-NO, and only by JHC | Roles |
Notify PIDs when system changes subscription price category for users | Comma list of users (PIDs) that should be notified if system changes subscription price category (UPC) for a user in company. E.g. if a system defined role is updated with a new duty by JHC. Should be set in the databases where notifications should be sent. If company has company group agreement for licensing, all PIDs set up in one or more of the databases will receive notifications of changes in all databases, as user price categories then are valid cross all databases | Roles |
Set Comment Mandatory In Role User Assignment | If this setting is "ON" - It is mandatory to add a information in the Comment field when adding a user to a Role | Roles |
Threshold value for price category Cross functional user | Setting must be set in JHC-NO. The minimum number of access points that will make a user be a in the price category "Cross functional user". These are users with more demanding roles and wide and varied use of the system. Full access to the entire system (limited, of course, by the company's own roles). | Roles |
Threshold value for price category Functional user | Setting must be set in JHC-NO. The minimum number of access points that will make a user be a in the price category "Functional user" (or higher). These are "operator level" users as sales assistants, purchasing assistants, warehouse staff, regular production operators. | Roles |
Threshold value for price category Selfservice user | Setting must be set in JHC-NO. The minimum number of access points that will make a user be a in the price category "Selfservice user" (or higher). These are the most basic users. Typically they only have a PID and a login to RamBase. They report their hours and can report quality deviations. | Roles |
Threshold value for price category Singletask user | Setting must be set in JHC-NO. The minimum number of access points that will make a user be a in the price category "Singletask user" (or higher). These are users with very simple tasks related to relocation and / or very simple, repetitive operations in production. | Roles |
Turn Off Sharp Drivers For This System | If this setting is "ON" in JHC-NO database in the system - All sharp drivers for this system is deactivated. This means that no print, email etc will be sent out from Rambase. In Production environments the setting should be "OFF". IMPORTANT!! Don't turn ON/OFF this setting if you are not 100% sure what it will affect | Settings |
Use Card Reader to create Work Hour Log (WHL) lines | If this setting is "ON" - the company is using a Card Reader (from an external system) to create Work Hour Log (WHL) lines. It this settin is "OFF" - the company use "TimeClocking software" to create Work Hour Log lines or create the lines manually. | Interfaces |
External Planning System | Decide if emails sent from documents should attach the attached files or not. If value is "ON" - Only selected attachment will be sent. If value is "OFF" - Send automatically all attached files. If settings has no value - Attachments will not be sent. | Improvements |
Attach files when sending documents by email | Decide if emails sent from documents should attach the attached files or not. If value is "ON" - Only selected attachment will be sent. If value is "OFF" - Send automatically all attached files. If settings has no value - Attachments will not be sent. | Improvements |
Department on Quality Assurance Event (QAR) | If this setting is "ON" - Default department on Quality Assurance Event (QAR) will be the same as Department from the Personell (PER) that creates the Quality Assurance Event | Improvements |
DueDate on Quality Assurance Event (QAR) | Value in this setting is a number of days that will be added to Quality Assurance Event (QAR) date, to find the DueDate (Deadline) on Quality Assurance Event. The DueDate (Deadline) is the date the Quality Assurance Event should be completed. Default number of days could be 30 | Improvements |
Next Casehandler on Quality Assurance Event (QAR) | Value in this setting is a Group (GRP) that contains Personell (PER) that is available to select as 'Next Casehandler' on Quality Assurance Event. Format to be used: GRP/NNNNNN (N for numbers) | Improvements |
Return Quality Assurance Event (QAR) | If this setting is "ON" - It is possible to add a Message to the previous responsible when select 'Return' on the Quality Assurance Event (QAR) | Improvements |
QualityShowHealthEnvironmentSafetyFields | Setting to show the HES (Health, Environment and Safety) fields. Value for JHC-NO= 11,HES ex value for other companies =21 | Processes |
Print Detail Info Product Declaration | If this setting in 'ON' - Detailed information on the Product Declaration print is turned on. PARTs without KITItem will show | Documentation |
Product File Import Default ManufacturerId | Value in this setting is a ManufacturerId. The ManufacturerId will be used if a file with Productstructure is loaded into Rambase, and the file doesn't contain ManufacturerId, - value from this setting will be used as default on the products. Format to be used: MFR/NNNN (N for numbers) | Manufactures |
Procurement By Intercompany on Forward | If this setting is 'ON - The company is allowed to forward purchase object into sales objects in another database and vice versa. To use this also functionality, - local DOV's (domain values)are required to specify method of sending | Interfaces |
Purchase Order Send By Intercompany on Forward | If setting is 'ON' - The company can forward a Purchase Order (SPO) to a Sales Order (COA) in another database. It also requires that a local DOV (domain values) is setup to specify method of sending | Interfaces |
Sales Order Send By Intercompany on Forward | If setting is 'ON' - The company can forward a Sales Order (COA) to a Purchase Order Response ( SOA) in another database. It also requires that a local DOV (domain values) is setup to specify method of sending | Interfaces |
Supplier Purchase Order (SPO) can be sent via EDI - Electronic Data Ingerchange | If this setting is "ON" - Supplier Purchase Order (SPO) can be sent via EDI - Electronic Data Interchange | Interfaces |
Use of EDI - Electronic Data Interchange from Procurement Module | If this setting is "ON" - The Company can use EDI - Electronic Data Interchange from Procurement Module. More informations on kind of messages that could be triggered, is explained under the child settings | Interfaces |
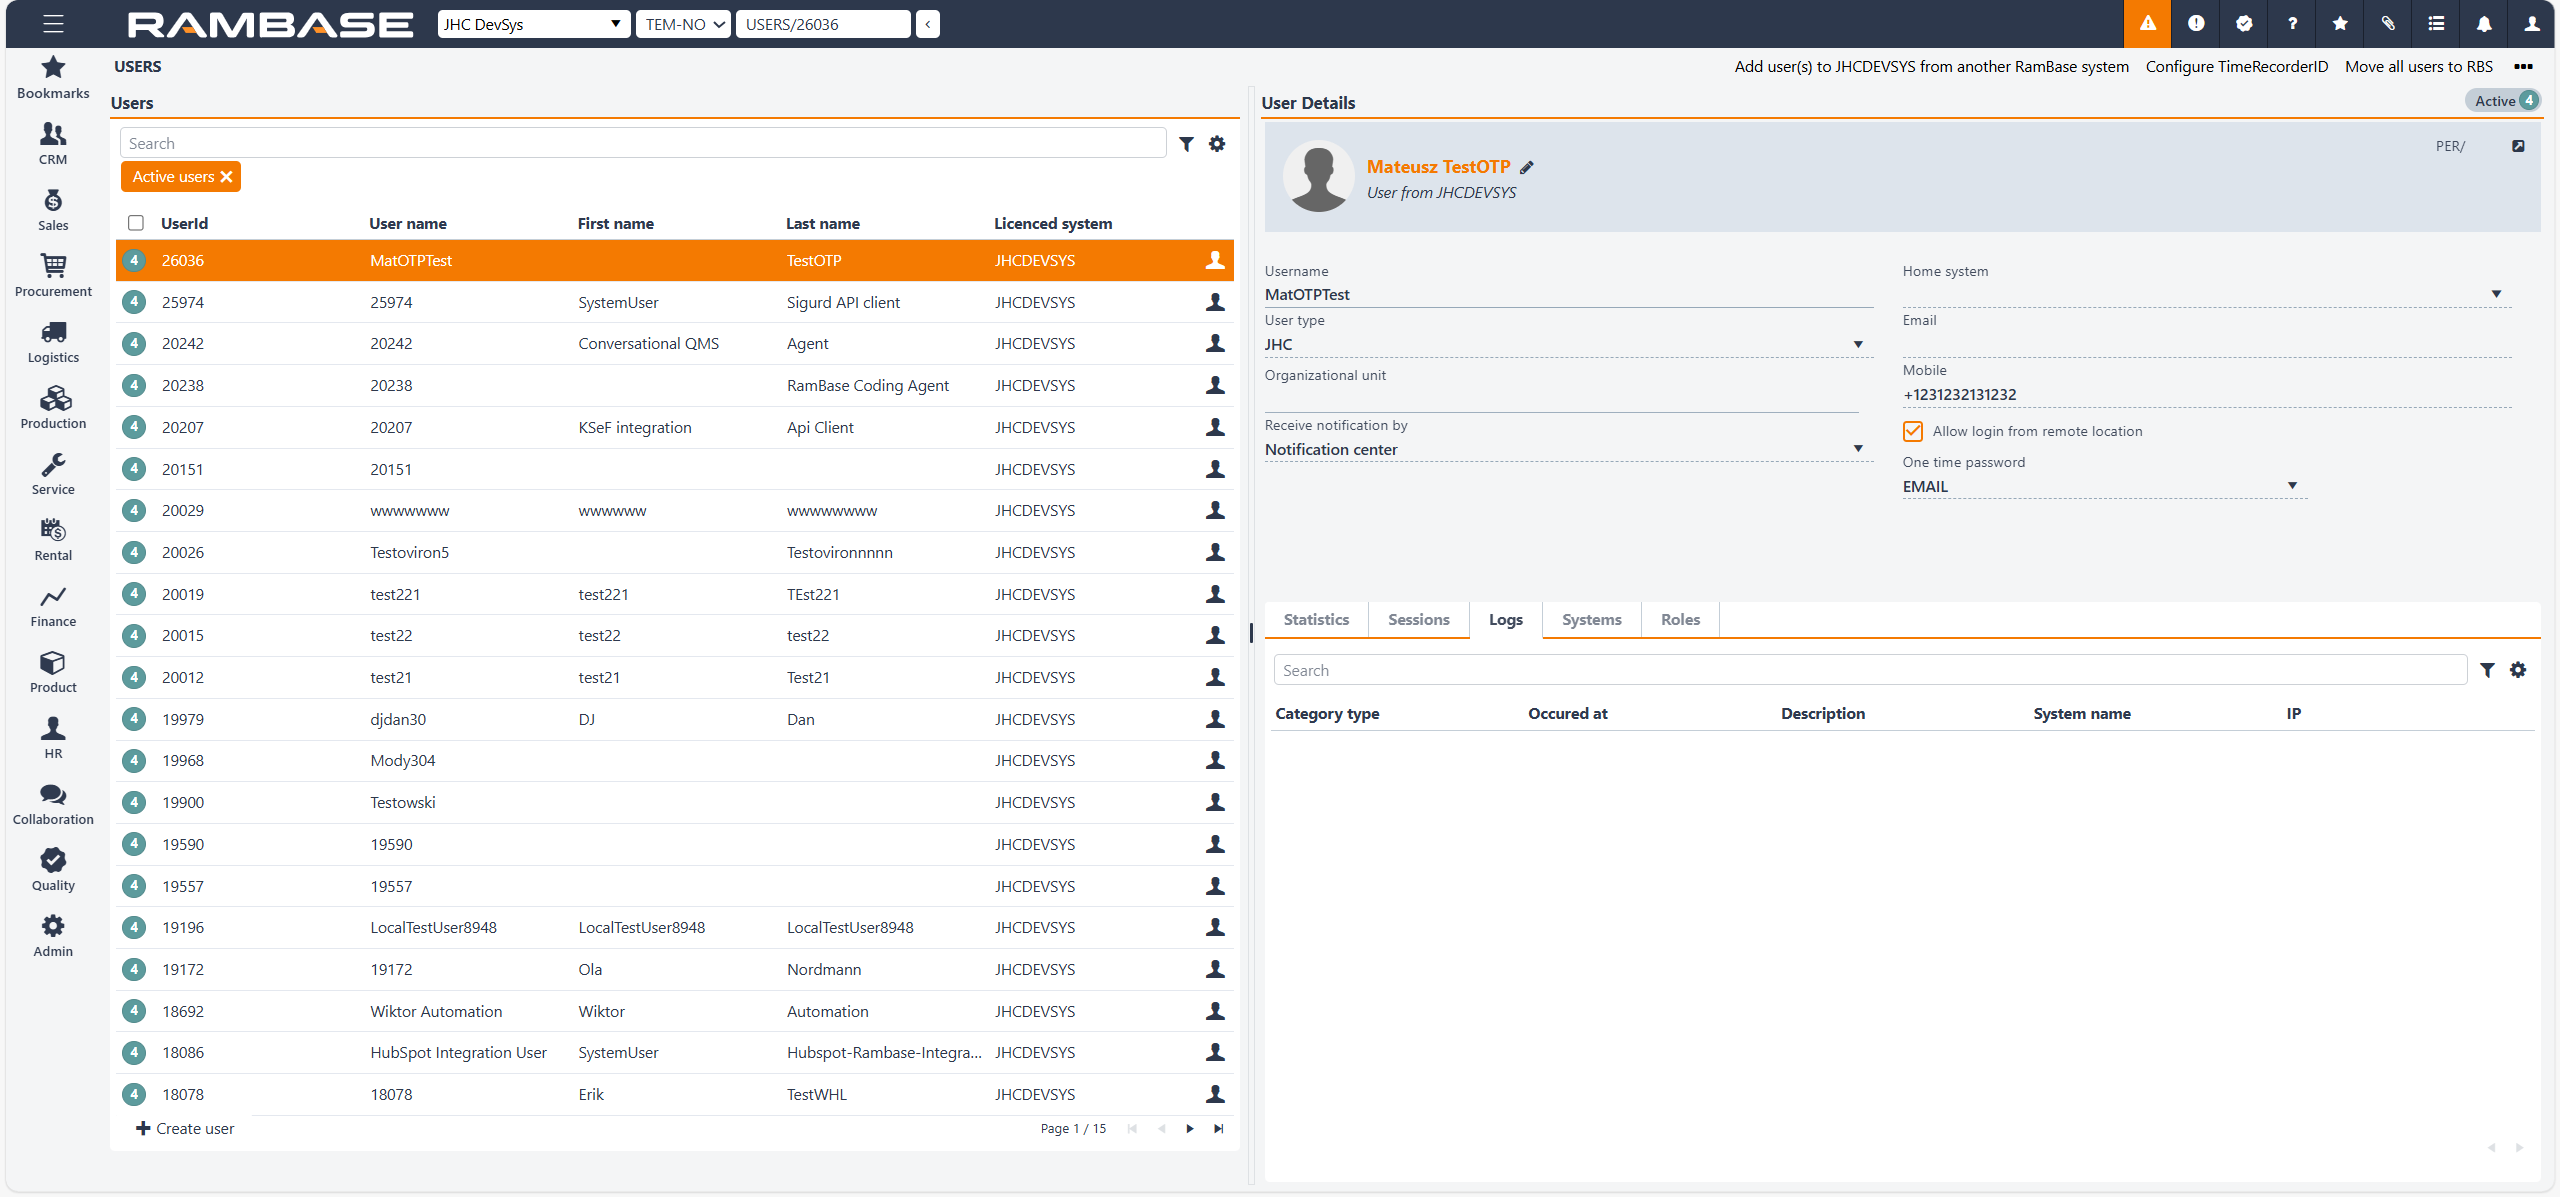
Manage user accounts across organizational units, including internal, external, and system users. Supports user creation, role assignment, login management, and system access control.
Navigate to the application
Option 1: RamBase menu → Admin → User administration → Users
Option 2: Click the Program field and type "USERS" and press ENTER.
Click here to read more about the user interface.
This section allows filtering and managing users based on their assigned organizational units. Users can be dragged and dropped from the Users list to the Organizational units.
The Organizational Units section presents a comprehensive list of all units within the system, including both internal and external ones. Users can filter the list using a search field and choose to include underlying units in the results. This section helps administrators understand the structure of the organization and manage user assignments across different units.
Features
Displays a list of all organizational units within the system.
Includes both internal and external units.
Allows filtering and searching, including an option to include underlying units.
Toggle/Icon | Name | Description |
|---|---|---|
| Include underlying toggle | By toggling it to 'ON', all users included in a selected organizational unit will be listed in the Users list. |
| 3 dots (vertical) | Opens a context menu with additional options for managing organizational units. Options
|


In the Users list, you’ll find a searchable list of all users registered in the system. Each entry includes the user ID, first name, last name, and current status, such as active or invited. Administrators can create users from other RamBase systems or invite them via Microsoft Active Directory. This section also supports filtering for users who have been created but not yet invited, and includes options to reset user status or manage external consultants.
Features
Shows a searchable list of all users in the system.
Includes user ID, first name, last name, and status (e.g., active).
Users can be added from other RamBase systems or invited via Microsoft AD.
Includes both system users and external consultants.
Search field, filter builder and column settings
The header contains multiple options to filter the list:
Standard filters in the Users list
Standard filters are quick and ways of filtering the list on a set of requested criteria.
Active users
Invited users
Created and not invited
Users on leave
Partners
Resigned users
Column | Description |
|---|---|
| Displays a status icon indicating the status of the user. The status icon can be clicked to select individual users, or the empty checkbox in the header of the column can be clicked to select all. Selected users may be handled via the options in the Context menu. For example, Invite user to Microsoft AD login. Potential statuses are:
|
UserId | Displays the identifier of the User (USERS). |
First name | Displays the first name of the User (USERS). |
Last name | Displays the last name of the User (USERS). |
| There are various types of users which can be listed. Hover over to verify the user type. Potential user types
|


The User Details section provides in-depth information about a selected user. It includes the username, user type (such as standard or consultant), and the organizational unit to which the user belongs. Notification preferences are also shown, along with indicators for whether the user is external or internal. Additional details include the user’s home system, email address, mobile number, and whether remote login is permitted.
The users name and home system is displayed in the header, along with a reference to the Personnel (PER) identifier.
Features
Displays detailed information for a selected user, including Username, User type, Organizational unit and Notification preferences.
Indicates if the user is external or internal.
Shows contact details like email and mobile number.
Specifies whether remote login is allowed.
Banners/Flags
The User details area can potentially display various banners to inform the administrator(s). Listed below is a selection of these.
The login from unsecure zone settings has been disabled for users with SSO login. -
This user has been invited from *Name of home system* and operates as an external user or consultant user in undefined.
The login from unsecure zone settings has been disabled for users with SSO login.
User has been invited to RamBase by email Pending activation from email link.
Field/Drop-down menu/Checkbox | Description |
|---|---|
Username | Displays the user's login name. |
Organizational unit | Displays the name of the organizational unit of the User (USERS). |
Receive notification by | Displays the currently selected way of receiving notifications. Available options:
|
Home system | Displays the name of the System where the user was created. |
Displays the user's email. Used to send change notifications and one time passwords | |
Mobile | Users mobile number. Used to send one time passwords to user. Requires contry prefix. |
Allow login from remote location | Decide if the user should be allowed to login to RamBase from other locations than the main office by two factor authentication. |
One time password |
|
The Statistics tab displays usage metrics for the selected user, such as login frequency and activity levels. This information helps administrators monitor user engagement and identify patterns in system usage.
Error logins - Displays the number of failed login attempts for the user. This helps administrators identify potential access issues or security concerns.
Last successful login - Shows the timestamp of the user's most recent successful login. Useful for tracking user activity and verifying access patterns.
Last log entry - Indicates the most recent system log entry related to the user. This provides insight into the latest recorded action or event.
Last log message - Displays the content of the last log message associated with the user. Helps in understanding the context of the last recorded activity.
The Sessions tab lists the user’s session history, including the date and time of each session, the IP address used, and the actions performed. This is particularly useful for tracking user activity and diagnosing potential issues.
Search field, filter builder and column settings
The header contains multiple options to filter the list:
Column | Description | |
|---|---|---|
Sessions id | Unique identifier for the user session. | |
Date | Date and time when the session occurred. | |
System name | Name of the system where the session took place. | |
Used OTP | Indicates if a one-time password was used for this session and authenticated. | |
IP | The IP address associated with the log event. It is useful for tracing the origin of the activity. | |
Actions | Available actions for the session, such as viewing details or terminating the session. |
In the Logs tab, administrators can view system logs related to the user. These logs contain technical information and error messages that can assist in troubleshooting and understanding system behavior.
Column | Description |
|---|---|
Log id | Displays a unique identifier for the log entry. |
Category type | Displays the category of the log entry. Used for grouping and sorting different kind of loggings. |
Occurred at | Displays the date and time when the log entry was created. |
Description | Displays the logged text, message or event information. |
System name | Displays the name of the RamBase system the event, text or message occured. |
IP | Displays the user's IP address. |
The Systems tab shows which systems the user has access to, including any external systems integrated with RamBase. This overview helps ensure that users have the correct access rights across platforms.
Column | Icon | Description |
|---|---|---|
St | Displays the status of the permission for RamBase access. Potential statuses:
| |
System name | The name of the RamBase system. | |
Description | Description of the RamBase system. | |
Created | The user who created it and the date and time of creation. | |
Company | User main company name in database format. | |
Is test system | A boolean that indicates if the system is a test-system. | |
Representing | The customer or supplier represented by the portal user. | |
Contact of | Contact identifier |
The Roles tab lists all roles assigned to the user. Each role defines specific access rights and permissions within RamBase, making this section essential for managing user privileges and responsibilities.
Column | Description |
|---|---|
St | Status for the user assignment. |
Role id | Role identifier. |
Role name | Name of the role. |
Description | Description of the role. |
Valid from | Valid from date. |
Valid to | Valid to date. |
The Competence Profiles tab provides an overview of the competence profiles assigned to a user. Competence profiles define the documents or document collections the user is required to read and/or complete training on in order to perform their work.
Column | Description |
|---|---|
Competence profile id | Competence profile identifier |
Name | Name of competence profile |
AssignedAt | Automatically generated timestamp when creating a competence profile |
Description | Description of competence profile |
Option | Description |
|---|---|
Temporary leave | Use this option if the user will be on temporary leave. This will set the selected user in Status 7 - Inactive - Temporary leave, and the user's access will be inactive until the user is activated again. When the user is activated again all roles and system accesses will be activated for the user. |
Resign user | Use this option to set the selected used in Status 9 - Inactive - Disabled. This will delete all roles and system accesses. It is possible to activate the user again, but roles and system accesses must be added from scratch. |
Write USERS in the program field and press ENTER to open the Users application.
Click the Create user button.
In the popup, choose between three options:
Create RamBase user.
Add RamBase consultant.
Add user(s) from other RamBase systems.
Create RamBase user
Click the Create RamBase user option in the popup.
Select an existing employee in the search field or leave the field empty to create a new user.
Click the Next button.
Fill in the fields. The Lastname/Name and Email fields are mandatory.
Use the Send email notification check box to alert the user by email.
Click the Create button to create the new user.
User(s) created have received an invite mail (if you opted to send an email) with a link to the activation page.
The new user will be prompted to create a new password. The password selected must be minimum 15 characters in length. No other requirements needed.
Users created, but not invited by email will be in status 1. Users created and invited by email will be in status 2. The user will remain in status 2 (invited) until the invitation procedures are followed.
Add RamBase consultant
Select the Add RamBase consultant to give a consultant access to the system.
Click the Add RamBase consultant option in the popup.
The available consultants can be found in the Consultants user field. Select the consultant in the Consultant user field.
Select which database the consultant will get access to, in the Company field.
Write the reason the consultant will get access in the Reason field.
Click the Invite button to send an invite to the consultant.
Add user(s) from other RamBase systems
Click the Add user(s) from other RamBase systems option in the popup.
Select the system the user is from in System field.
Select the user in the User field.
Select which database the user will get access to, in the Company field.
Write the reason the user will get access in the Reason field.
Click the Invite button to send an invite to the user.
The Trusted user networks (OTPADMIN) application displays the IP addresses with exception for using one time password to login to RamBase.
The Search field is a free text filter.
To open the Trusted user networks (OTPADMIN) application, find Admin in the RamBase menu and then User administration. Click Trusted user networks to enter the application.
It is possible to create OTP exception from the Users (USERS) application or directly in the OTPADMIN application.
Create OTP exception in the Users application
The user must have logged in from the IP address at least one time with a one time password.
Open the USERS application.
In the Users area, find and click on the user.
Click the Sessions folder.
Find the IP address and click the Verify this IP address to disable two-factor authentication icon in the Actions column to create an OTP exception for the selected IP address.
Create OTP exception in the OTPADMIN application
Click the Create OTP exception button.
Write the IP address in the IP address field.
Write a reason in the Description field.
Click the Create button to create an OTP exception.
Delete an OTP exception
Enter the OTPADMIN application.
Find the OTP exception you want to delete.
Click the Trash can icon in the Actions column to delete the OTP exception for the selected IP address.
Edit an OTP exception
Enter the OTPADMIN application.
Find the OTP exception you want to edit.
Click the Edit icon in the Actions column.
It is possible to change the IpAddress, Description and SystemName fields.
Click the check-mark icon in the Actions column to save the changes.
Use the Portal users (PORTALUSER) application to create users that will only have access to the portal. Write PORTALUSER in the program field and press ENTER to open the Portal users application.
Highlight a portal user in the Portal users area to view details about the selected portal user.
It is possible to add predefined filters for more efficient navigation. Click on the Predefined filters icon next to the Search field to see the predefined filters. The selected filters will be available below the Search field.
The Search field is a free text filter. Write name, user name, userid or email and press ENTER to use the Search field.
The Portal user details area displays details about the portal user. It is only possible to edit details about the portal user in the portal users home system.
If the user should be allowed to login from a remote location, click the check-box Allow login from remote location. Select if the user should receive password on SMS or EMAIL in the One time password field.
Click the Assign/Edit portal access button to give the selected portal user access to the portal.
The Search field in the folders is a free text filter.
Statistics - The Statistics folder provides login information as well as the possibility to unblock a portal user.
Sessions - The Sessions folder displays all sessions in this system from various IP addresses. It is also possible to make an IP address secure, click the Verify this IP address to disable two-factor authentication icon in the Actions column. Then the portal user does not need to use a one time password next time the portal user logs in from the IP address. The IP address will be put in the One time password administration (OTPADMIN) application as an exception.
Logs - Log history is stored in the Logs folder.
Roles - It is possible to give the portal user the Customer portal user or the Supplier portal user role in the Roles folder.
Write PORTALUSERS in the program field and press ENTER to open the Portal users application.
Click the Create user button.
In the popup, choose between two options:
Create RamBase user from customer.
Create RamBase user from supplier.
Select customer/supplier in the Customer/Supplier field.
Optional, select contact for the customer/supplier in the Contact field.
Fill in the rest of the fields. Last name / Name and Email is mandatory.
If you did not select a Contact in the Contact field, a new contact will be created and connected to the customer/supplier.
Click the Create button.
New portal user created in the Portal user application, will automatically have access to the portal.
The System permission log (SYSLOG) application lists all users' system permissions by a unique system permission identifier. In short, this allows system administrators to keep track of the system permission status of all internal and external users, the duration of the permission and if data extraction was possible at the time of access.
The System permission log list includes a Search field, the Filter builder, the Column settings and all system permissions which are filtered on. The elements of the list are described below, including the description of the available columns, which can added in the Column settings.
Header
Search field - The search field can be used to quickly filter the list on the a required field. Click the Search field and press SPACEBAR to list all available field to filter on. An example can be "HasGlobalDataExtractionAccess = True".
Filter builder icon - The Filter builder includes a set of predefined filters, listed below. A selected and active predefined filter will be placed underneath the search field and marked with color orange. A selected and inactive field will still be placed underneath the search field, but marked with color gray. Click the Remove icon to remove the predefined filter.
Active - Lists all system permissions in Status 4 - Active
Archived - Lists all system permissions which has been archived. Archived system permissions will be in Status 8 - Archived
Deactivated - Lists all system permissions which has been deactivated. Deactivated system permissions will be in Status 9 - Deactivated
Invited - Lists all system permissions in Status 2 - Invited
On leave - Lists all system permissions in Status 7 - Temporary leave
Resigned - Lists all system permissions which are linked to users who have resigned. Resigned system permissions will be in Status 9 - Deactivated.
Column settings icon - Click the Column settings icon to open the Column settings. Here the user can add and remove columns from the list, Export to excel and Reset to default view.
Column | Description |
|---|---|
St | Displays an icon indicating the status of the system permission. Available statuses are:
|
System permission id | Displays the identifier for the the system permission instance. |
Created at | Displays the date and time when the system permission was granted in a YYYY.MM.DD 00:00 AM/PM format. |
Created by user id | Displays the Personnel identifier, PID, of the user who granted the system permission. |
Created by | Displays the name of user who granted the system permission. |
User id | Displays the personnel identifier, PID, of the user who was granted the system permission. |
User name | Displays the name of user who was granted the system permission. |
User level | Displays the user level or type; JHC-, Partner-, Standard or Portal. Note that only JHC-users will have Data extraction and Developer access. |
Effective at | Displays the date and time when the system permission was granted in a YYYY.MM.DD 00:00 AM/PM format. |
Expire at | Displays the date and time when the system permission has or will expire in a YYYY.MM.DD 00:00 AM/PM format. |
Data extraction access | Provides information on the users' level of access to perform data extraction, during the time of access (Effective at to Expire at). |
Developer access | Provides information on the users' level of developer access. Developer access grants permission to read, write and delete. |
Roles | To display the roles assigned during the time of access, click the Roles icon. |
Reason | Displays the reason for why the system permission granted. |

All RamBase users must be assigned to a role in order to perform tasks in the system. RamBase provides a set of system defined roles. If the system defined roles do not fit your company, it is possible to create company defined roles.
Users with admittance to the relevant functionality in the system through assigned roles.
To protect RamBase from unauthorized access, functionality is protected by permissions. E.g. to view a sales order requires one permission, to create a sales order requires another permission.
All functionality in the system is grouped to enable the user to perform different work tasks e.g. to maintain the sales order backlog. In RamBase, a work task is defined as a duty. Permissions will be assigned to the relevant duties. These assignments are referred to as privileges. A duty can consist of one or more privileges that cover the permissions the user needs to perform this work task.
A role is a group of related duties. When a user is assigned to a role, this person will automatically have access to relevant functionality in RamBase.
Sales Assistant is one of the system defined roles provided by RamBase. This role contains duties that cover all the work tasks a sales assistant has to perform.
In order to use RamBase, the system requires all users to be assigned to at least one role.

View details about a role - Name, description, users, and duties added to the role.
Assign users to a role - All users must be assigned to a role.
Create company defined roles - If the standard roles do not meet your company's demand, it is possible to create a company defined role. This can be done by making a copy of a standard role and making changes, or by creating a new role.
Reactivate role - If a role is deactivated in your system, it is possible to reactivate it.
View details about a duty - Description, module, submodule, permissions and permission details.
RamBase provides a set of predefined roles. If new functionality is added to the system, the relevant system defined role will be updated with the necessary duties with permissions for using the new functionality.
The customers get new functionality with new, related permissions, automatically.
The system defined roles cover all roles needed to utilize RamBase in the best possible way. If they do not fit your company, it is possible to create company defined roles.
In a company defined role you can select between the provided duties, and add the duties that are needed to perform the work tasks this role is supposed to cover.
Duties added to a company defined role will be updated automatically.
Note that new duties that are automatically added to system defined roles, must be added to company defined roles manually.
The duties not currently used by your company will be listed in the Unused duties application.
A role can be deactivated if it is not relevant for your company. If a deactivated role is needed again, it can be reactivated.
In the RamBase menu, click Admin > User administration > Roles, or write ROLE in the program field and press ENTER to open the Role application.
Click on the relevant role in the list to view details.
Select the User folder to view the user assignments.
Select the Duties folder to view the duties added to this role.
In the Duties-tree, hover over a duty to view the duty description.
Click the Inspect icon next to the duty to view details.
In the RamBase menu, click Admin > User administration > Roles, or write ROLE in the program field and press ENTER to open the Role application.
Click on the relevant role in the list to view details.
Click on the Competency expectations tab to view the competency expectations for the selected role.

To view details about a competence, click the arrow icon next to the competence name. This will open the Competences (CMP) application.
In the RamBase menu, click HR > Qualifications administration > Competences, or write CMP in the program field and press ENTER to open the Competence application.
Select the competence in the Competence administration area.
Click the Add role expectation button.

Select the role you want to add the competence to in the Role field.
Select the expected score for the competence in the Expected score field.
Click the Create button to add the competence to the selected role.
In the RamBase menu, click Admin > User administration > Roles, or write ROLE in the program field and press ENTER to open the Role application.
Click on the relevant role in the list to view details.
Select the Users folder.
Click the Add user button.
Search for a user by name or user id.
Click on the relevant user.
Click on the confirm button in the User popup to assign the user. By default, the user will have the admittance from the current date.
Add a description. A company setting defines if this is mandatory or optional.
To assign the user to the role for a specified period, set the From-/To-date.
To activate the changes, click on the context menu item Activate admittance changes.
In the RamBase menu, click Admin > User administration > Roles, or write ROLE in the program field and press ENTER to open the Role application.
Click the Add role button under the list of roles.
Select New.
Add a name.
Click the Confirm button to create the role.
Add a detailed description.
Select the Duties folder.
To add duties, set the radio button to All duties.
The duties listed are based on which modules and sub-modules the company has activated.
Click on the duty name to view details.
Use the check boxes to select duties.
Set the radio button to Selected duties to view the duties added to the role.
When all duties are added, click on the context menu option Activate role.
If you add/remove duties or users from the role, you must click on the context action menu option Activate admittance changes to apply the changes.
In the RamBase menu, click Admin > User administration > Roles, or write ROLE in the program field and press ENTER to open the Role application.
Click on the relevant role in the list of roles.
Click on the context menu item Deactivate role for company to deactivate the role for this company.
Only available to RamBase consultants
The Role templates (ROT) application is designed to streamline and centralize the management of user roles and permissions. By providing a robust, scaleable, and flexible framework, Role templates (ROT) enables RamBase to define, manage, and deploy reusable sets of Permissions (PRM) and Duties (DUTY) across complex organizational structures.
A standout feature of Role templates (ROT) is its ability to pass on updates from templates to all derived roles, ensuring consistency and reducing administrative overhead. Integration with the Roles (ROL) application and other RamBase modules ensures that roles created in Roles (ROL) inherit permissions and duties from the Role templates (ROT), supporting a cohesive and scaleable approach to access management.
Navigate to the Role templates (ROT) application
Option 1: Click the Program field and type "ROT" and press ENTER.
Click here to read more about the user interface.
The interface is divided into four key areas:
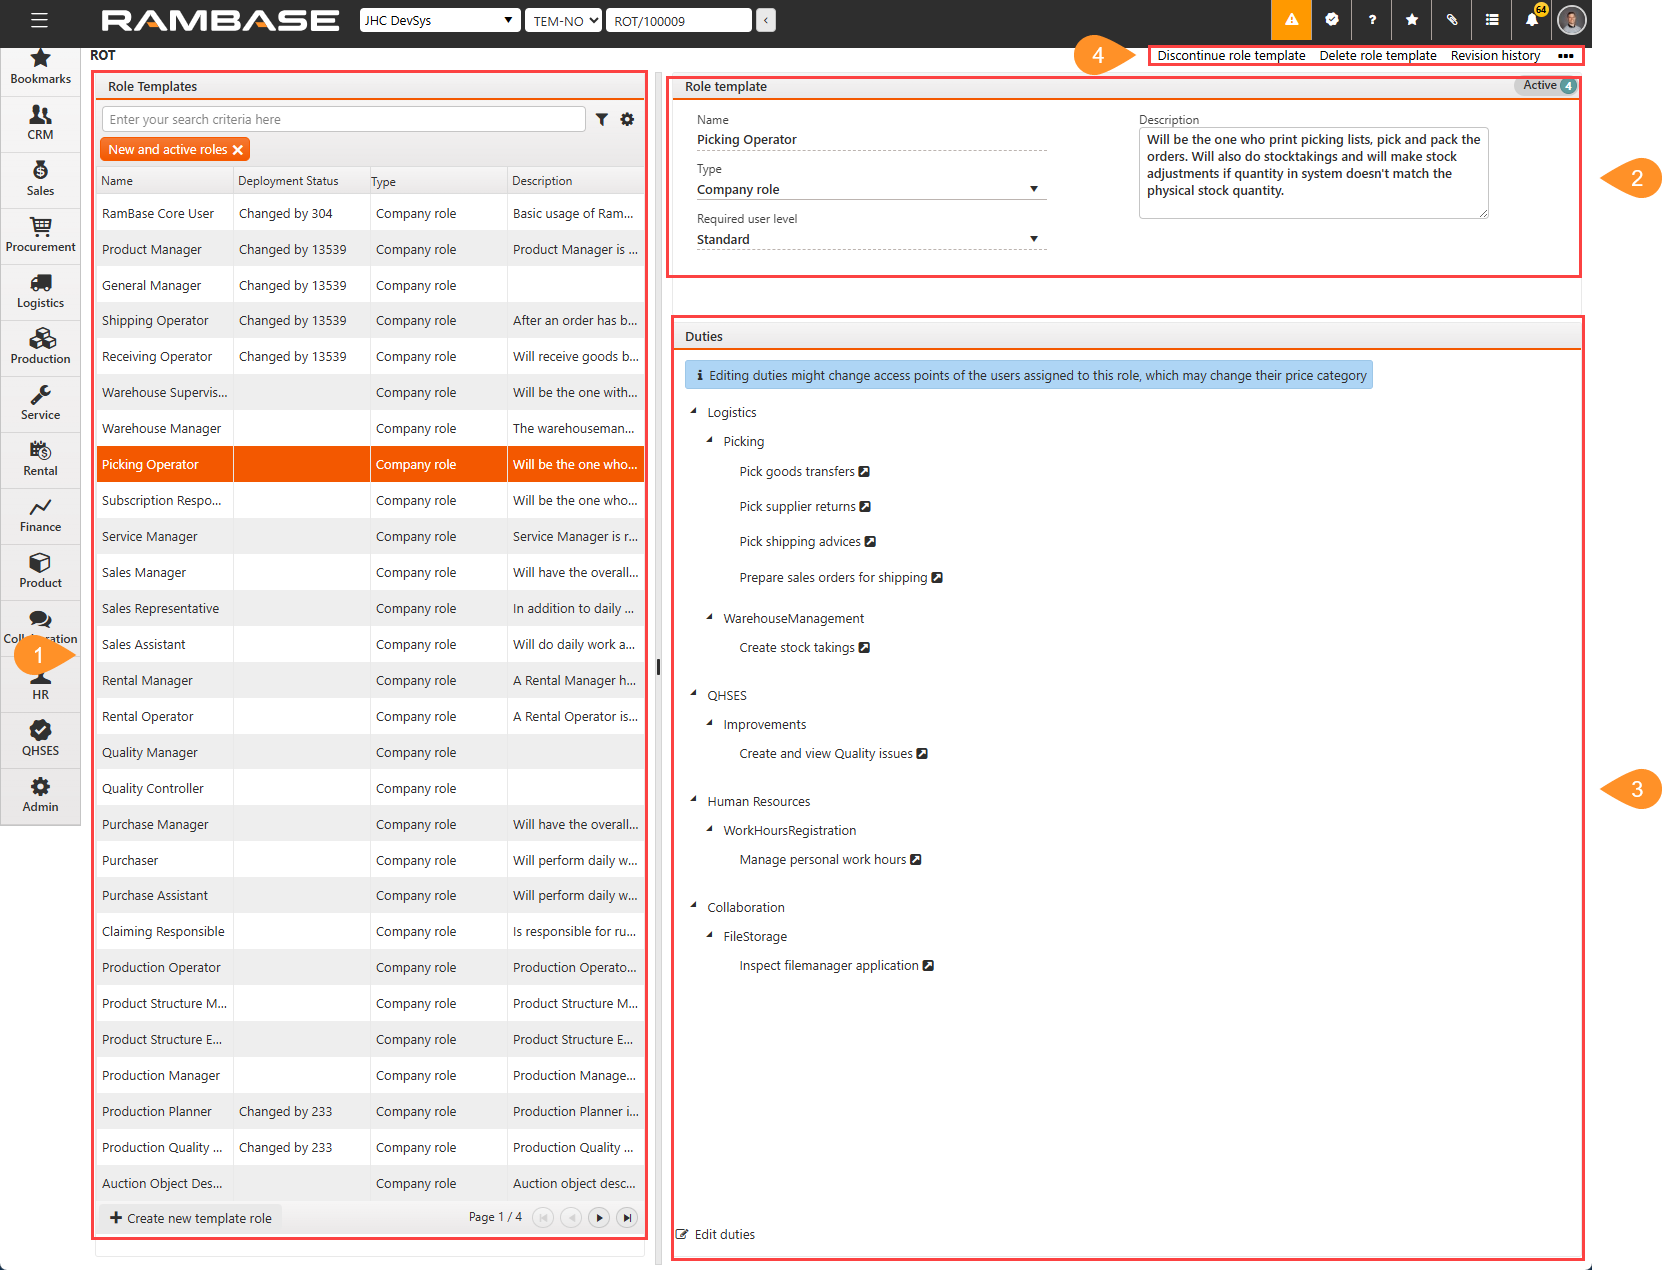
Located on the left side, this panel displays a searchable and filterable list of existing role templates.
Found at the top center, this section allows users to view and edit metadata for the selected role template.
This is the middle-right section, showing a hierarchical view of duties linked to the selected role. Users can expand/collapse categories and manage duties directly from this view.
Located in the top-right corner.
Displays all available role templates in a searchable and filterable list. This panel allows users to quickly locate and select a role template for further editing or review.
Search field, filter builder and column settings
The header contains multiple options to filter the list:
Column | Icon | Description |
|---|---|---|
St |
| Displays an icon indicating the status of the Role template (ROT). Potential statuses:
|
Role template id | Displays the identifier of the Role template (ROT). | |
Name | Displays the name of the Role template (ROT). The name is set when creating the Role template (ROT) and can be changed in the Name field found in the Header area. | |
Deployment status | Describes if the object has been changed locally and is ready to be deployed from the Repository. | |
Type | Role by company level (DB) or organizational unit (ORG) Displays the Type of the Role template (ROT): Potential types are:
| |
Description | Displays the description set in the Description field in the Header area. |

Function: To create a new Role template (ROT) in Status 1 - Pending registration.
Button | Description |
|---|---|
| To create a new Role template (ROT) in Status 1 - Pending registration, click the Create new template role button. |

The procedure can be found here.
Provides metadata and configuration options for the selected role template. This section is essential for defining the scope and purpose of each role template.
Banner
A banner will indicate who made the last changes to the Role template (ROT).
Banner | Description |
|---|---|
| Example of a banner to inform on who made the last changes to the Role template (ROT). |

Field/Drop-down menu | Description |
|---|---|
Name | Name of the Role template (ROT) |
Type | Role by company level (DB) or organizational unit (ORG) |
Required user level | The user level required to have this role. Only user having the same level or higher can be assigned. This field also controls which duties can be added to the role. Only duties with the same level or lower can be added. User levels (highest level first): Administrator, Partner, User, Portal user. |
Description | A description of the role, which can be updated in Status 1 - Pending registration and Status 4 - Active. With the purpose of being able to efficiently differentiate the roles. |
Displays and manages the duties associated with the selected role template in a hierarchical tree format.
Tip
Hover over a Duty (DUTY) to view the description.
Users can expand categories to view and assign specific duties, which are built from underlying permissions (privileges).
Icon | Description |
|---|---|
| To expand or collapse a module, click the Expand/Collapse icons. |
| To open the Duty (DUTY) application, click the View icon to inspect and edit details. |
| To remove a Duty (DUTY) from a Role template (ROT), click the duty to highlight it, and then click the Delete icon. |


Context menu | Description |
|---|---|
Activate role template | To activate (set in Status 4 - Active) a Role template (ROT) in Status 1 - Pending registration, select the Activate role template option. |
Discontinue role template | To deactivate (set in Status 9 - Deactivated) a Role template (ROT) in Status 4 - Active, select the Discontinue role template option. |
To create a new role template in Status 1 - Pending registration, click the Create new template role button located in the footer in the Role templates list.
Navigate to the Roles templates (ROT) application.
Navigate to the Role templates (ROT) application
Option 1: Click the Program field and type "ROT" and press ENTER.
Click here to read more about the user interface.
To create a new role template in Status 1 - Pending registration, click the Create new template role button located in the footer in the Role templates list.
In the popup, provide a Name.
When the name is provided, click the Create button.
Once a Role templates (ROT) in Status 1 - Pending registration, the template can be specified in the Role template header area. Duties for the template can then be specified in the Duties tree list.
Provide the details in the Role template header area; Type and Required user level.
About Type - Role by company level (DB) or organizational unit (ORG).
About Required user level - The user level required to have this role. Only a user, having the same level or higher, can be assigned. This field also controls which duties can be added to the role. Only duties with the same level or lower can be added.
User levels (highest level first): JHC, Partner, Standard, Portal user.
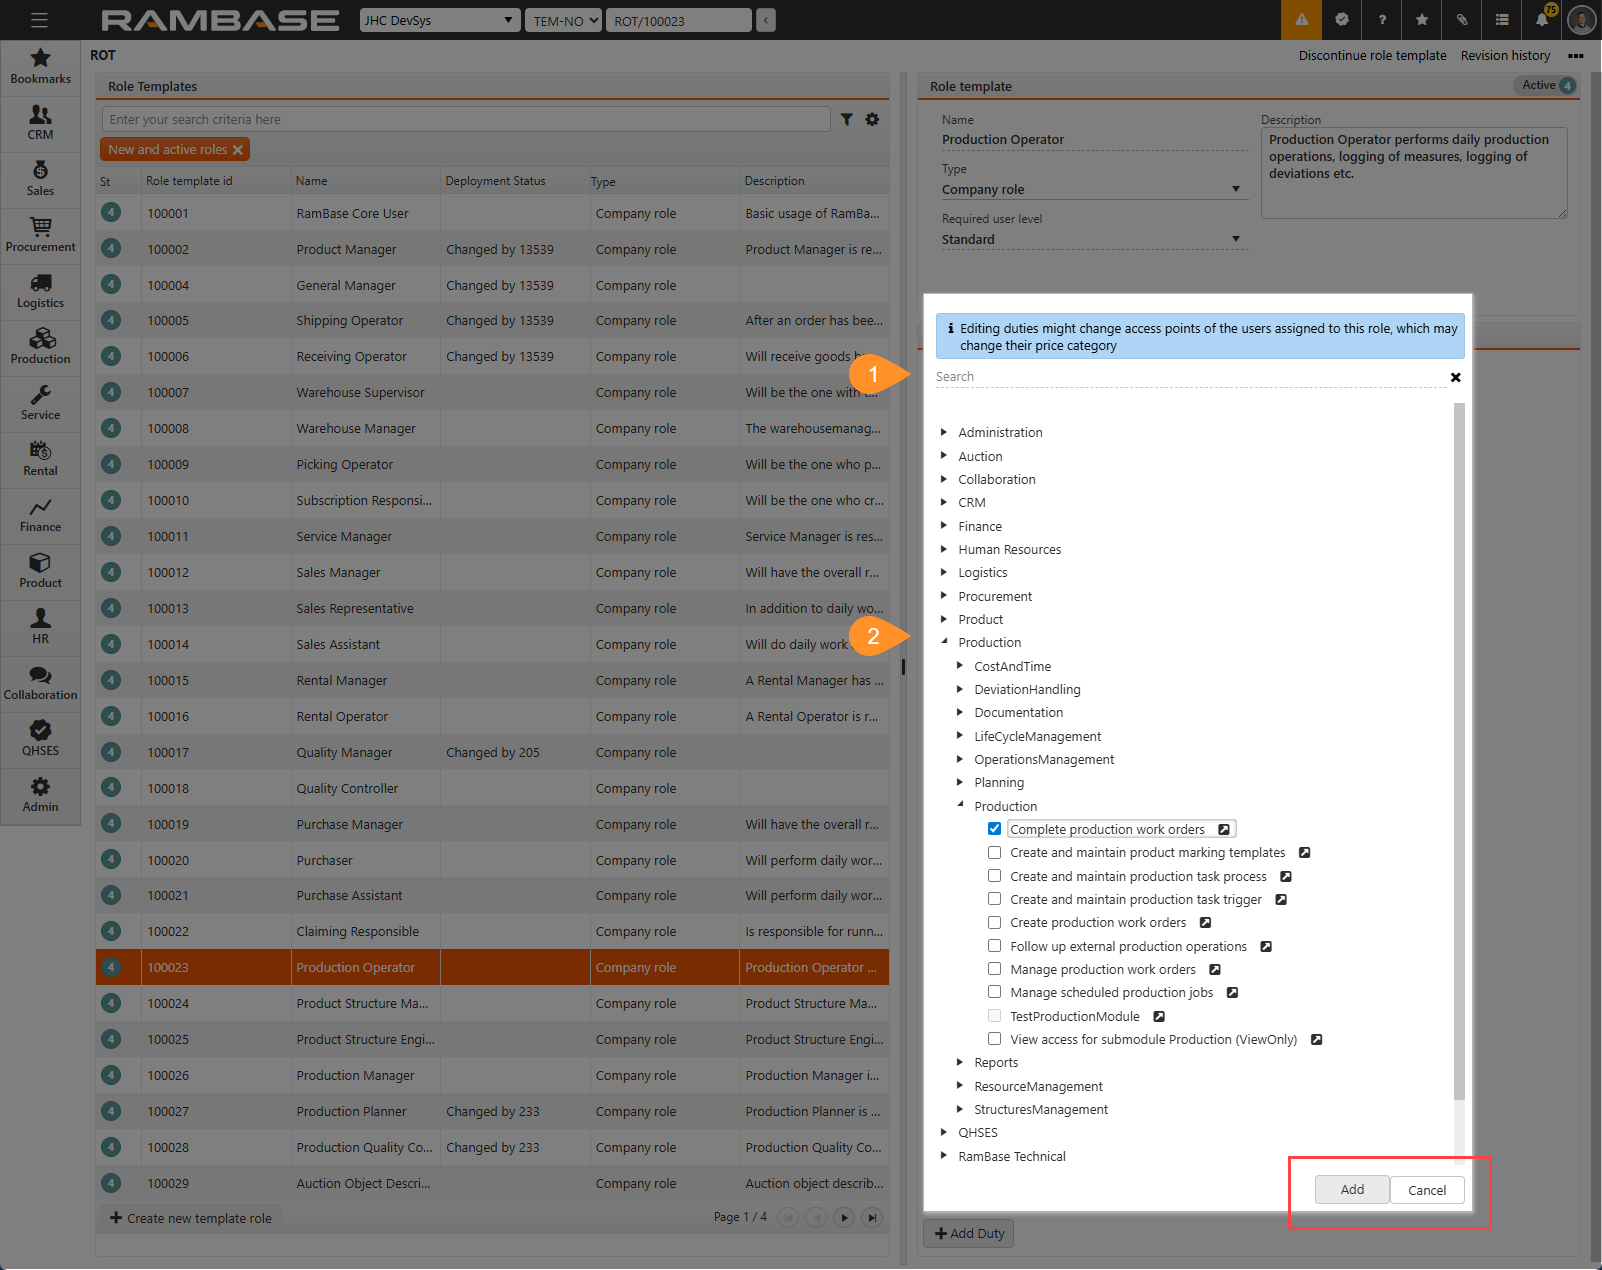
Start selecting the duties of the Role template (ROT) by clicking the Add Duty button found in the Duties tree list area.
Note
Duties are created and built up with Permissions (PRM), which in the context of a duty, is called privileges, in the Duty (DUTY) application.
Read more about user admittance.
To add a Duty (DUTY) to the Role template (ROT) you can either Search(a) or Select(b):
Not able to select Duty (DUTY)?
Depending on the user's level, some duties might not be available (grayed out) due to the required user level for the Duty (DUTY).
Tip
If selecting multiple by searching for one, enabling it and then searching for another, the enabled Duty (DUTY) is added and will be listed after clicking the Add button.
To add a duty via search, click the Search field and type the name of the Duty (DUTY).
The results will be categorized by module; CRM, Collaboration, Product etc.
To select a Duty (DUTY) for the Role template (ROT), click the empty Checkbox, and then in the footer of the Duties tree list area, click the Add button.
To add a Duty (DUTY) by selection, single-click the Expand icon of the module where the duty is located, or double-click the Module; Finance, CRM, Production etc. to also expand.
Continue expanding the module until the Duty (DUTY) is located.
To select a Duty (DUTY) for the Role template (ROT), click the empty Checkbox, and then in the footer of the Duties tree list area, click the Add button.
To activate a Role template (ROT) in Status 1- Pending registration, click the Context menu and select the Activate role template option to set it in Status 4 - Active
RamBase provides a set of duties. Duties are work tasks that can be performed in RamBase. When new functionality will be added to the system, the relevant duties will be updated with the necessary permissions for using the new functionality. New duties will be automatically be added to system defined roles.
Duties not currently used by your company will be listed in the Unused duties application.
In the RamBase menu, click Admin > User administration > Duties, or write DUTY in the program field and press ENTER to open the Duty application.
Click on relevant duty in the list of duties.
A list of privileges, with permission names and descriptions, will be displayed.
To view more details about the privilege, click on the Item details button.
In the RamBase menu, click Admin > User administration > Unused duties, or write UNUSEDDUT in the program field and press ENTER to open the Unused duties application.A list of duties and descriptions appears.
Use the information from this list when you add duties to a company defined role in the Role application.
The Permissions (PRM) application can be used to identify which duties and roles grant a certain permission.

To open the Permissions (PRM) application from the RamBase menu, select Admin > User administration > Permissions.
Locate the permission by selecting or searching for it.
Select the View usage on duties and roles for company option in the Context menu.
This related popup will list the permission description, duties granting the permission and roles granting the permission.
If the user is unable to perform a required action some applications have the View hidden actions option in the Context menu.
The following popup will display the permission required to perform the action.
The user can select the listed permission and press ENTER to open the Permissions (PRM) application on the required permission.
Follow the procedure above to identify the required duty or role.
If the required action returns an error message stating that a certain permission is required. The user can follow the procedure above by searching for the permission name listed in the error message.
RamBase supports Single Sign On (SSO) with Microsoft Azure AD. If your organisation uses Microsoft Azure AD you can set up SSO for your users to allow them to sign in to RamBase with the same credentials they use for Microsoft Azure AD.
For users that have been set up with Microsoft Azure AD sign in the following security measures will now be handled by policies in Microsoft Azure AD instead of in RamBase:
Two Factor Authentication (2FA)
Trusted networks/locations
Users that are not using Microsoft Azure AD will still use the policies configured here.
To activate SSO, the CSV setting Enable users to use single sign on with Microsoft AD must be enabled.

When the setting is enabled, a new menu option Invite user to Microsoft AD login becomes available in the USERS application.
Select Invite user to Microsoft AD login to send an email to your user with instructions on setting up SSO. Select OK in the prompt that appears. This needs to be done for every user that you want to enable to sign in with Azure AD. After set up, users will be able to select Sign in with Microsoft in the RamBase sign in page. The pid/password sign in method is disabled for the user.


To disable the Azure AD sign in for your user, select Reset single-sign-on AD user and Move to invite status. This sends out a new email to the user allowing them to set up the pid/password authentication.
The first time a user enters the Opportunity application, the system will create six default opportunity stages. These stages can be edited, deleted or ordered in a different way.

Open the Opportunity Stages (OPPS) application, find Admin in the RamBase menu and then CRM. Click Opportunity stages to enter the OPPS application.
Click the Add new stage button in the lower left hand corner.
Add the necessary information:
Name: The name of the stage as it will be seen.
Probability: The default probability of a successful deal in percentage for this stage.
Process template: Here we can add a task template which will be triggered each time an opportunity is added to this stage. Task templates are maintained under Collaboration - Task Process Template.
Click the OK button when finished.
Note: If you need to change the order of the stages, click and drag the stage to its intended position.
Loading data is used when we want to create or update multiple documents.
Loading data into RamBase is done via an import process, through the Input menu (INP) or the Import/export WIZARD (IOQWIZ) applications. The Input menu (INP) application lists all the import processes available in RamBase, and is the basis for the procedure. All import processes have their own file structure that needs to be used when loading data. Descriptions for the different load procedures are listed below.
Loading of data is done by using files in .CSV format which are uploaded to RamBase, and processed asynchronously.
To find a Input menu (INP) program, enter INP in the program field, to enter the Input menu (INP) application.
Find the intended item by navigating the list and press ENTER to open the Import/export Wizard popup. Alternatively, use the search function to find items by Name or Description containing output. If the relevant Input menu (INP) program is not activated for your company, contact RamBase Support for activation.
Click the Documentation button to open the Input documentation application.
Click the Send me example CSV file icon, envelope, to trigger an example file as template for the loading of data.
Create the file using the template, and click the Start import icon.
Click the Select file button and upload the .CSV file.
Note
Documentation will list which fields can be loaded, are mandatory and display examples of how the values should be defined. It is recommended loading a line or two as test to verify that the loading is working as expected.
After a load has been carried out, it is recommended to do some random samples to verify that the load has been carried out successfully. It is also possible to see the status of completed loading in RamBase via the In/out log view (IOL) application. Some import processes are more demanding than others. In example Loading products (ARTUPLOAD - INP/14542). To diagnose a faulty upload, inspect the In/out log view (IOL) application.
If a load fails to complete, there will be a notice in the In/out log view (IOL).
Note
If a load fails to complete, there will be a notice in the In/out log view (IOL) referring to a row number. If the data log refers to row number 27, it is actually row 28 or 29 in the .CSV file that has failed. The reason for this is that the load job starts counting at zero (0) or one (1), and the first row in the file is the header line.
The structure of the load file is always a table with column names and data for each row. There is no order requirement for the columns in the file, and all columns do not need to be present in the load file. A general advice is to only have columns which are to be updated or added, present.
As a default rule, all columns should be in text format to avoid deformatting. Files that are to be imported into RamBase must have comma separated value - CSV format. The first row of the file is the header information. These values must be in upper case letters. The rest of the file consists of records that will be imported. Semicolon (;) must be used as data separator in both the header row and in the data rows. There are no requirements regarding the order of the columns.
Each individual load has one or more columns that must be included. The remaining columns are optional, based on the data which is to be imported.
The load file needs to be in a .CSV format. The file structure needs to be according to the specific load procedure, and in addition, all import files need to have correct value formatting (date, decimal, etc.).
This includes:
Make sure that all dates are written in the format yyyy.mm.dd (Example: 2015.04.29)
Use full stop (.) as a decimal separator (Example: 3.14)
Do not use a thousand separator (1000, not 1 000)
Phone numbers can only contain numbers and +, no parentheses
The fields within a load file must be separated with semicolons.
E-mail addresses must be valid.
EXTID (former identification) must be unique within one archive.
If the text in a field contains a semicolon, the text must be a quoted string (Example: "Nut;101")
There must not be any blank spaces before or after a value in a field.
There must not be any line breaks in the file (can be detected by pressing CTRL+F and CTRL+J)
When loading custom fields, "UDF_" must be added at the beginning of the values. (Example: For a custom field called TestField, UDF_TestField must be used as column header.)
IT;SALESCUR;SALESQTY;SALESPRICE;SALESGM;EXTID;PART;SALESFROM;MFR;PLINO;PLINAME
#100000;NOK;1;750;10;99;Servicetime 232333;2015.03.181512;AUDI;100000;
Excel has some behavior that you must be aware of when loading data. What can happen is that Excel automatically changes data values for some conditional values. This means that values can be changed when working in one Excel sheet, but it also means that any received Excel sheets may also contain these kinds of errors. Therefore, we strongly recommended that the following is reviewed before starting a data load:
When a value has more than 12 digits, Excel will convert the number to scientific notation. For example, 123456789112 will be converted to 1.23457E+11. This can occur for EAN codes, serial numbers or other larger values that only contain numbers.
For Scandinavian users, with a regional setting that sets a comma (,) as the decimal separator, numbers like 1.2 will be converted to 01.feb, which is a date. This is particularly dangerous in cases where a date field is specified back to a number, because then Excel will convert 01.feb to 44593, which is the number of days since 01.01.1900. This can occur for all decimal numbers. It is therefore recommended to open .CSV files in a program like Textpad which does not automatically convert the date fields.
Excel removes leading zeros for number values. 000123 is converted to 123. This can typically happen with postal codes, EAN numbers and possibly part number.
EXTID is a field in RamBase which is used for previous system's reference number. This reference number can be used as a lookup between imports, which makes the import process significantly easier.
When transferring data from a previous system, EXTID can be used as a primary key, or lookup between data, so that you do not need to retrieve the RamBase ID for the associated data. A good practice is to always include EXTID where possible. EXTID can also be used as the common denominator when loading data in different loads that are in some way connected. An example is when you are loading customers. Here it is beneficial to use EXTID as it will be used later when loading account transactions.
Create a load file - If multiple documents should be created or updated, a load file must be created.
Process the load file with a relevant load program - A load file has been created and must be processed by a load program so the documents can be created or updated.
Check the log for loading results - After the load program has been completed the log should be checked to see if any errors were reported.
If necessary, modify the entries that could be loaded and repeat - If the load program reported any errors, the rows that there were reported errors on must be modified and reloaded.
On import of articles from the .CSV file, new articles will be created or existing updated.
Recommended partial load
It is recommended to use the Load article purchase prices - INP/15539 to load purchase prices.
If you still decide to use this load for it, verify which fields are required in Load article purchase prices - INP/15339.
This load includes unique and additional features:
Automatic handling of decimal separators (comma vs. period) and certain date formats to reduce errors.
This load is not upper- or lowercase sensitive.
The following fields can be blanked out by sending in the value
<BLANK>.CustomField1
CustomField2
CustomField3
InternalNote
CountryOfOriginCode
DomesticCustomsTariffCode
EUCustomsTariffCode
PurchaseGroupName
Field names are updated to new conventions:
Example: PUGNO is now updated to PurchaseGroupName
To be able to identify and update an article at a later time, the initial load must contain values in the fields Name, Manufacturer and the field CreateIfnotExisting must be set to 1. It is also recommended to add a value to the field EXTID.
Important
The initial load should contain values in the fields Name and Manufacturer.
The field CreateIfnotExisting must be set to 1.
It is recommended to add a value to the field EXTID.
To identify the article to be updated, the load file must contain a value in the field ProductId or a combination of the fields Name+Manufacturer. The field EXTID can also be used.
Important
Mandatory fields are ProductId, or Name and Manufacturer.
If the listed setting is turned 'OFF', the field Manufacturer is not required.
Company setting (CSV) | Description |
|---|---|
Require Manufacturer on Products | If this setting is 'ON' - Manufacturer (MFR) is required when creating new Products (ART) |
Possible fields to be loaded into RamBase are listed in the Field-column in the following table.
Field | Required | Length | Example | Description |
|---|---|---|---|---|
AssignInMultipleOf | 4 | Sometimes the products are packed together in a way that makes it preferable to keep them together when selling. When RamBase starts the process of assigning sales to stock or purchase backlog, this field is taken into consideration. If the available quantity is not in this multiple, the rest quantity will be requested for procurement. | ||
AutoCreateProductUnitAtGoodsReception | 1 | When activated, product units are automatically generated when goods are registered to stock | ||
AutoGenerateSerialNumbersForPurchaseOrders | 1 | Serial numbers can be added to all newly created purchase order items. The serial number is specified in the company setting ProductionSerialNumberCounter, which will increase afterwards. If the company setting AutoProductionSerialNumberPrefix is specified, the serial number will be prefixed by this value. | ||
AutomaticallyCreateWorkOrdersForSubstructures | 1 | True if production work orders should be created for sub structures automatically. | ||
BlockedForProduction | 1 | If a product is blocked for production, no production work orders with that product can be registered. | ||
BlockedForPurchase | 1 | If a product is blocked for purchase, no purchase quotes or purchase orders with that product can be registered. | ||
BlockedForSale | 1 | If a product is blocked for sales, no sales quotes, sales order requests, sales order change requests or sales orders with that product can be registered in this location. | ||
BlockedForShipping | 1 | If a product is blocked for shipping, no shipments can be sent to customers from this location. | ||
ClassificationCode | 10100010011002 | Product classification identifier | ||
ClassificationGroup | 10 | Product classification group | ||
ClassificationLevel1 | 1001 | Product classification level 1 | ||
ClassificationLevel2 | 1002 | Product classification level 2 | ||
ClassificationLevel3 | 1000 | Product classification level 3 | ||
ClassificationLevel4 | 1000 | Product classification level 4 | ||
ClassificationLevel5 | 1001 | Product classification level 5 | ||
CountryOfOriginCode | DE | Two-character code (ISO 3166) identifying the default country where the product is produced. This value is inherited from the assigned goods reception(s). If not country of origin is specified for the goods reception(s), country of origin is retrieved from the product. If assigned to multiple goods receptions with different origin, the field will be empty. | ||
CreateIfnotExisting | Y* | 1 | Use the value 1, if product should be created if it does not match existing products Y* Must be set to 1 if creating new products. | |
CustomerExtId | 77597376 | External id, used for migrations to refers to customer in a different system. | ||
CustomerId | 15112 | Products customer identifier | ||
CustomersProductName | X12-GREEN-LASER | Customers/buyers name of the product | ||
CustomField1 | York | Custom field for grouping, sorting, categorizing and other purposes. Obsolete field | ||
CustomField2 | Cosmetics | Custom field for grouping, sorting, categorizing and other purposes. Obsolete field | ||
CustomField3 | Consumer | Custom field for grouping, sorting, categorizing and other purposes. Obsolete field | ||
DaysToExpediteScheduledStartDate | 12 | Number of days the production will start ahead of the scheduled start date. Set this value if you want a buffer to be sure you are ready in time. | ||
DefaultManufacturersProductManufacturer | INTEL | Manufacturer of the MPN | ||
DefaultManufacturersProductName | BX8071513700KE | Manufacturer's name of the product. Also known as Manufacturer Part Number (MPN). | ||
Description | X12 laser | Description of the product | ||
DetailedDescription | X12 laser with 5000 m long beam green light | Detailed description of the product | ||
DomesticCustomsTariffCode | 11.22.33.55 | Domestic customs tariff classification identifier | ||
EUCustomsTariffCode | 2513.20.00.00 | EU customs tariff classification identifier | ||
ExcludeFromSOPProcesses | 1 | Exclude product from sales- and operation (SOP) processes for location. Typically used for products/materials being purchased, but can also be set for products with product structure. | ||
ExclusivelyForCustomer | 102243 | If customer is specified, only this customer can place orders for this product. Customer id | ||
ExclusivelyForCustomerExtId | 77597376 | External customer ID. Used to refer to customer to set ExclusivelyForCustomer if Account is not known (typically during startup-load) | ||
ExpectedWastagePercent | 5.0 | Standard percentage of wastage for product when used in a production work order in this location | ||
ExpectedWastageQuantity | 0 | Standard quantity of wastage for product when used in a production work order in this location | ||
ExternalReference | 776655 | External reference of the product. Typically used for storing product identifier for same product in external system | ||
ExtId | Y*** | 678943 | External reference. Used in migration. Id in external system Y*** When updating an existing product:
| |
FreightPercent | 10.0 | Freight percent. Will, if added, be a part of the cost calculation | ||
GlobalTradeItemNumber | 3 014260 11553 | Global Trade Item Number (GTIN) is a 14 digit identifier for trade items (comprising among others of the former EAN International and Uniform Code Council). Examples of types of GTIN are UPC, EAN, JAN, ISBN | ||
Height | 30 | Height of the product in centimeters | ||
InternalNote | Don't sell this product without talking to the sales manager | Internal note regarding the product. Should not be exposed to customers. | ||
IsExternallyManufactured | 1 | True if product structure is manufactured externally, and not internally | ||
IsManufacturedInBatches | 1 | Products is either manufactured in batch product units, or single product units. When manufactured as single, each production unit of a production work order should result in separate product units. When manufactured in batches, all production units from one production work order should result in one common product unit. | ||
IsNonStock | 1 | True if this is a non-physical product which are no using assignments from the assignment archive | ||
IsTraceableMaterialOfProductUnit | 1 | During production of a product structure, each produced unit generates a list of traceable materials included in the finished unit. When this value is true, this product is included in the list of traceable materials. | ||
Length | 60 | Length of the product in centimeters | ||
LeadTimeBuffer | ||||
LocationShortName | OSL | Unique abbreviation/short name of the location | ||
MainImageId | FIL/201026.100 | Main image of the product | ||
Manufacturer | Y** | PHILIPS | Manufacturer of the product Y** If the Company setting (CSV), Require Manufacturer on Products is set to 'ON when creating new products. | |
ManufacturingAreaName | Area2 | Name of manufacturing area | ||
MaximumStock | ||||
MeasurementUnit | pcs | Measurement unit used for this product, both in sales and purchase. | ||
MeasuringToolGroup | Thread Micrometer | Measuring tools group | ||
MinimumGrossMargin | 7.0 | The minimum gross margin, in percent, for the product | ||
MinimumSalesPrice | ||||
MinimumSalesPriceCurrency | ||||
MinimumWorkOrderQuantity | 2 | Minimum ProductionOrder quantity to a production | ||
MoistureSensitivityLevel | 5A | Moisture sensitivity level is an electronic standard for the time period in which a moisture sensitive device can be exposed to ambient room conditions. | ||
Name | Y* Y** Y*** | X12-5000 | Name of the product Y* If creating new products. Y*** When updating an existing product:
| |
NeedsMaterialReplacementToRelease | 1 | You can add a dummy article in productions which you replace with the actual product before production starts. This function is used in situations where it is undecided which product will be used in the final production. | ||
PackageQuantity | 20 | Total quantity of the product within a package | ||
PackageType | Box | Type of wrapping used for the package | ||
PalletQuantity | 40 | Total quantity of the product that can be on a pallet | ||
PlanningCategory | P33 | Planning category | ||
PreferredStockLocation | B-12 | Preferred stock location in this location for this product | ||
ProduceInMultipleOf | 4 | Quantity to produce in multiple of. Ex. if set to 2, you can only produce 2, 4, 6 etc | ||
ProductId | Y*** | #125778 | Product Id Y*** When updating an existing product:
| |
PublicProductUri | https://www.vg.no/ | Public/external product URI for more information about the product. Will typically be an URL to product details at the manufacturer web site. | ||
PurchaseNote | ||||
PurchaseExpectedLeadTime | 50 | The expected lead time, in number of days, from ordering from supplier to delivery. Used in different purchase processes, typically when supplier is unknown. Note that this might differ from the standard lead times defined on the different suppliers. | ||
PurchaseGroupName | Laser group | Name of purchase group | ||
PurchasePrice | 12.45 | The purchase price of the product for this product supplier | ||
PurchasePriceCurrency | EUR | Three character code following the ISO 4217 standard | ||
PurchasePriceEffectiveDate | 2025.12.01 | The date the purchase price takes effect. The price will be effective from from and including this date. | ||
PurchasePriceExpirationDate | 2026.04.30 | The date the purchase price expires. | ||
PurchasePriceMinimumQuantity | 1 | The minimum quantity for this purchase price to be applied | ||
RENTAL | YES | |||
RENTALCUR | SEK | Currency | ||
RENTALPRICE | 1300.00 | Price | ||
ReorderPoint | 200 | A minimum amount of quantity which a location holds in stock, such that, when stock falls to this amount, the product must be reordered | ||
ReorderQuantity | 10 | Preferred quantity to use when reordering to this location. Is also used as order quantity when stock gets below reorder point. | ||
RequireSerialNumberAtGoodsReception | 1 | If all units of this product should have a serial number in stock, you should require serial number to be required at goods reception. This will ensure that serial number is specified before goods receptions with this product is registered. | ||
RequireSerialNumberBeforeShipping | 1 | If all units of this product should have a serial number before shipping, you should require serial number to be specified before shipping this product. Shipping includes supplier returns, shipping advices and stock transfers. | ||
Revision | A | Revision number | ||
SalesStandardLeadTime | 30 | The standard lead time, in number of days, from customer places order to delivery. | ||
SalesType | Defines if an article is of one of the types: Sales, Sales and rental, Rental, Subscription. | |||
ServiceIntervalId | ||||
SERVICEDELETE | Y | |||
SERVICEID | ART/#224377 | Link from service table to KM article. | ||
SERVICEMAIN | Y | "Y" if main service. | ||
Status | 4 | Status of the product | ||
StockClassification | ||||
SafetyStock | ||||
SupplierExtId | 7788497532 | External id, used for migrations to refers to suppler in a different system. | ||
SupplierId | 23112 | Supplier id. Needed if supplier data or purchase data should be updated | ||
SupplierIsPreferred | 1 | Whether this supplier is preferred or not | ||
SuppliersMinimumOrderQuantity | 100 | A minimum order quantity (MOQ) is the lowest set amount of stock that a supplier is willing to sell. If you can’t purchase the MOQ of a specific product, then the supplier won’t sell it to you. Also note that if purchase quantity exceeds the MOQ, the purchase quantity should always be in multiple of the MOQ. | ||
SuppliersProductName | 22445566 | Supplier/sellers internal product name | ||
SupplierStandardLeadTime | 30 | Standard lead time in days for this product from this supplier | ||
TraceIndividuallyWhenTraceableMaterial | ||||
Type | P | Type of product | ||
UDF_CustomFieldName | What ever | User defined fields. You may have several columns, one for each custom field | ||
UseProductIdAsProductName | 1 | Use the value 1, if product name should be set equal to product id | ||
UseLineProduction | ||||
Volume | 72000 | Volume of the product in cubic centimeters. Volume is calculated automatically as L* W* H (when the volume field is empty and L,W ,H have values). Volume can also be changed manually | ||
WarrantyPeriod | 720 | The time period (in months) in which the product may be returned or exchanged. The warranty period starts at the date of shipment to customer. | ||
Weight | 10 | 1.25 | The weight of the product in kilograms | |
Width | 40 | Width of the product in centimeters |
Possible fields to be loaded into RamBase are listed in the Field column in the following table. The other columns in this table provide additional information about each field.
Field | Required | Length | Example | Description |
|---|---|---|---|---|
IT | Y* | 7 | #100000 | This is the unique product identifier which is assigned by RamBase when a new product is created. Format: #123456. * IT, PART+MFR or EXTID must be present in the file. |
EXTID | Y* | External id to identify products from external system. E.g product identifier from a customers previous ERP system. * IT, PART+MFR or EXTID must be present in the file. | ||
MFR | Y* | ACME | Manufacturer. The manufacturer has to be registered in the Manufacturer archive (MFR) in RamBase prior to the product upload. * IT, PART+MFR or EXTID must be present in the file. | |
PART | Y* | 190-489-A1 | Product name. * IT, PART+MFR or EXTID must be present in the file. | |
DOC | 3 | SSA | Means that this is a notification that is valid for Shipping advice. | |
DOCMSG | DMS/246 | Id for the notiifcation type.. Use the Document message (DMS) application to find the number (DMS/XXX) of the desired message. | ||
DOCST | 1 | 3 | Object status. The CSA will be validated against notificatins triggers by attempt to be registered from this status to a higher status. |
Possible fields to be loaded into RamBase are listed in the Field-column in the following table. The other columns in this table provide additional information about each field.
Field | Required | Length | Example | Description |
IT | Y * | 7 | #100000 | Internal typenumber is a unique ID that identifies the article. This will be assigned by the system when a new article is created. Format: #123456 * IT, PART or EXTID must be present in the file. |
PART | Y * | 35 | 190-489-A1 | Article name. * IT, PART or EXTID must be present in the file. |
EXTID | Y * | External ID to identify Articles from the customer's system. * IT, PART or EXTID must be present in the file. | ||
PURCHSUP | Y ** | Supplier's account number in RamBase. ** PURCHSUPEXTID or PURCHSUP must be present in the file. | ||
PURCHSUPEXTID | Y ** | External ID to identify the supplier from the legacy system. ** PURCHSUPEXTID or PURCHSUP must be present in the file. | ||
PURCHCUR | Y | EUR | Buying currency. | |
PURCHQTY | Y | 1 / 100 / ... | The quantity that the given PURCHPRICE is valid for. | |
PURCHFROM | Y | 2015.10.01 | Purchase price valid from date. It will be set to today's date if it is blank or earlier than today's date. | |
PURCHPRICE | Y *** | 10.20 | Purchase price for the given PURCHQTY. ***Do not load if PURCHCONVERT-fields are used. | |
PURCHCONVERTUNIT | Y *** | Kg | This is used if the purchase price is given in an other unit than the stock keeping unit. Example: Steel has often stock keeping unit mm, and the supplier gives the price in Kg. *** Do not load if PURCHPRICE is loaded. | |
PURCHCONVPRICE | Y *** | 1200.00 | The price per PurchConvertUnit, e.g. the price per kg of the material. *** Do not load if PURCHPRICE is loaded. | |
PURCHUNIT | UNI/103 | Specifies the unit this article is purchased in. For ex: pcs (pieces), box, mm (milimeter) kg (kilogram) | ||
PURCHUNITFACTOR | Y *** | 0.012 | This is the factor used to convert Unit to PurchConvertUnit. E.g. How much does 1 mm of the material weigh? The price per stock keeping unit (PurchPrice) is then calculated based on these inputs. *** Do not load if PURCHPRICE is loaded. | |
PURCHTO | 2015.12.31 | Purchase price valid to date. | ||
PURCHREF | A12345 | Contract number if PURCHCOL = CONTRACT. |
Possible fields to be loaded into RamBase are listed in the Field-column in the following table. The other columns in this table provide additional information about each field.
Field | Required | Length | Example | Description |
IT | Y * | #100000 | Internal typenumber is a unique ID that identifies the article. This will be assigned by the system when a new article is created. Format: #123456 * IT, PART or EXTID must be present in the file. | |
PART | Y * | 35 | 190-489-A1 | Article name. * IT, PART or EXTID must be present in the file. |
EXTID | Y * | External ID to identify Articles from the Customer's system. * IT, PART or EXTID must be present in the file. | ||
MFR | 20 | ACME | Manufacturer. The manufacturers have to be registered in the Manufacturer archive (MFR) in RamBase prior to the Article load. | |
SALESCUR | Y | NOK | Selling currency. | |
SALESQTY | Y** | 5 | Quantity step for sales prices. ** Can not have a value if SALESPRICEGROUPAGREEMENT has a value. | |
SALESPRICE | 8.6 | Salesprice in the currency defined in SALESCUR, and the quantity defined in SALESQTY. | ||
SALESGM | 80 | Sales gross margin in percent (%). Will be calculated if SALESPRICE is set. | ||
SALESFROM | 2005.06.200523 | Sales price valid from set date. | ||
PLINO | 100000 | |||
PLINAME | Price list name. |
Possible fields to be loaded into RamBase are listed in the Field-column in the following table. The other columns in this table provide additional information about each field.
Field | Required | Length | Example | Description |
NO | 100000 | Asset number | ||
NAME | Y | Machine 12A | Asset name | |
TEXT | 50 | This is just a Note | Description or Note / Free text | |
FROMPERIOD | Y | 6 | YYYYMM | First period the Asset could be used. There is a limit of 5 years back in time. From period should reflect first period, for posting to the GL, made in RamBase for this asset (AST). It is possible to load a Fixed assets document (FAR), using this AST, in a previous period then FROMPERIOD. |
Possible fields to be loaded into RamBase are listed in the Field-column in the following table. The other columns in this table provide additional information about each field.
Field | Required | Length | Example | Description |
|---|---|---|---|---|
APR | 10000 | Period amount for April. | ||
AUG | 10000 | Period amount for August. | ||
DEC | 10000 | Period amount for December. | ||
DEPNO | 2040 | Department number. | ||
FEB | 10000 | Period amount for February. | ||
JAN | 10000 | Period amount for January. | ||
JUL | 10000 | Period amount for July. | ||
JUN | 10000 | Period amount for June. | ||
MAR | 10000 | Period amount for March. | ||
MAY | 10000 | Period amount for May. | ||
NAME | Y | Sales | Name of the budget. | |
NO | Y | 2380 | Budget number. | |
NOV | 10000 | Period amount for November. | ||
OCT | 10000 | Period amount for October. | ||
PRJNO | 3879 | Project number. | ||
SEP | 10000 | Period amount for September. | ||
YEAR | Y | 2020 | Budget year. |
Possible fields to be loaded into RamBase are listed in the Field-column in the following table. The other columns in this table provide additional information about each field.
This load may be used to update fields for an existing account (ACC). However, it is not possible to update status with this load.
Field | Required | Length | Example | Description |
ST | 1 | 4 | 1 = Open 4 = Activated 9 = Deactivated If not provided in file, status for the account will be set to 1. | |
ACCCODE | Y | 2380 | General ledger account number. | |
ACCOUNTGROUPCODE | One character for account group code. | |||
ACCSAFTCODE | SAF-T code. | |||
NAME | Y | VAT settlement account | Name of account. | |
CATEGORY | Bank | Bank, Fixedasset, Receivables, Payables or ''. | ||
ISCONTROLACCOUNT | Y | Y (Yes) | ||
PARENTACCCODE | Y | Y (Yes) | ||
TEXT | Round-off | Free text. | ||
BACNO | 2910 | Reference to budget linked to this account. | ||
DEPNO | 2001 | Default Department number. | ||
ACCTYPE | Y | B | Type of Account : R = Result B = Balance | |
VATCODE | Y | 2 | 00 | Default Vatcode |
INCLDEP | N | Should postings to this Account include ref. to Department. N = No Y = Yes X = Can be used If not provided in file, INCLDEP will be set to N. | ||
INCLPRJ | N | Should postings to this Account include ref. to Project. N = No Y = Yes X = Can be used If not provided in file, INCLPRJ will be set to N. | ||
INCLAST | N | Should postings to this Account include ref. to Asset. N = No Y = Yes X = Can be used If not provided in file, INCLAST will be set to N. | ||
INCLDIM4 | N | Should postings to this Account include ref. to Dim4. N = No Y = Yes X = Can be used If not provided in file, INCLDIM4 will be set to N. | ||
INCLDIM5 | N | Should postings to this Account include ref. to Dim5. N = No Y = Yes X = Can be used If not provided in file, INCLDIM5 will be set to N. | ||
INCLDIM6 | N | Should postings to this Account include ref. to Dim6. N = No Y = Yes X = Can be used If not provided in file, INCLDIM6 will be set to N. | ||
INCLDIM7 | N | Should postings to this Account include ref. to Dim7. N = No Y = Yes X = Can be used If not provided in file, INCLDIM7 will be set to N. | ||
INCLDIM8 | N | Should postings to this Account include ref. to Dim8. N = No Y = Yes X = Can be used If not provided in file, INCLDIM8 will be set to N. | ||
INCLDIM9 | N | Should postings to this Account include ref. to Dim9. N = No Y = Yes X = Can be used If not provided in file, INCLDIM9 will be set to N. | ||
INCLDIM10 | N | Should postings to this Account include ref. to Dim10. N = No Y = Yes X = Can be used If not provided in file, INCLDIM10 will be set to N. | ||
INCLLOC | N | Should postings to this Account include ref. to Location. N = No Y = Yes X = Can be used If not provided in file, INCLLOC will be set to N. | ||
INCLICTDB | N | Should postings to this Account include ref. To InterComapnyDataBase. N = No Y = Yes X = Can be used If not provided in file, INCLICTDB will be set to N. | ||
AGIO | Y | N | Agio should be set to Y for balance accounts that should be revaluated to periodic exchange rate (rate at last day of period) as part of period closure. Agio is often used on payables, receivables and bank accounts. If not provided in file, AGIO will be set to N. Y = Yes N = No | |
FROMPERIOD | Y | 201503 | Account is legal from this period. (Format: YYYMM) | |
TOPERIOD | 201512 | Account is legal to this period. (Format: YYYYMM) | ||
MANUALGLBLOCKED | Y | Y = Yes | ||
PAYMENTBLOCKED | Y | Y = Yes | ||
SALESCREDITNOTEBLOCKED | Y | Y = Yes | ||
SALESINVOICEBLOCKED | Y | Y = Yes | ||
SALESPOSTINGADJUSTMENTBLOCKED | Y | Y = Yes | ||
SUPPLIERCREDITNOTEBLOCKED | Y | Y = Yes | ||
SUPPLIERINVOICEBLOCKED | Y | Y = Yes | ||
SUPPLIERPOSTINGADJUSTMENTBLOCKED | Y | Y = Yes | ||
OLDACCNO | OLDACCNO is only used when converting from an old chart of account to a new one. The existing Account number will be displayed in the OLDACCNO-field, and the new Account number in the ACCNO-field. If the same chart of account will be used, this field should be empty. | |||
DEBITCREDITPOSTINGTYPE | BOTH | Possible values are: DEBIT, CREDIT or BOTH (as default). |
Possible fields to be loaded into RamBase are listed in the Field-column in the following table. The other columns in this table provide additional information about each field.
Field | Required | Length | Example | Description |
|---|---|---|---|---|
EXTID | 01018012345 | NO or EXTID must be specified to find Contact. | ||
ADDR1 | Mystery Lane 123 | First address line. | ||
ADDR2 | Post box 9077 | Second address line. | ||
ADDRFIRSTNAME | Jane | |||
ADDRNAME | Doe | Company name, or a person's surname. | ||
ATTN | Jane Doe | Attention. | ||
CCODE | NO | Country code is a two-character code identifying a country. The code follows the ISO 3166 standard. Will be validated against the CON archive in RamBase. | ||
CITY | Nedre Vats | City/town/village. | ||
COMMDETAILS | doe@company.com | Phone number or email - depends on CommDescr. | ||
COMMTYPE | See DOV COMMTYPE for valid values. | |||
COUNTRY | Norway | |||
ISDEFAULT | Y if Email/Phone/address should be set as the default. Blank if not. Y = Yes. | |||
NO | NO or EXTID must be specified to find Contact. | |||
POCODE | 5578 | Postal Code. Will be validated against the POC archive in RamBase. Illegal values will be discarded. | ||
STATE | CA | US or Canadian state. |
Possible fields to be loaded into RamBase are listed in the Field-column in the following table. The other columns in this table provide additional information about each field.
Field | Required | Length | Example | Description |
|---|---|---|---|---|
EXTID | 01018012345 | NO or EXTID must be specified to find Contact. | ||
ISPORTALUSER | Y if reference should be set as PortalUser. Blank if not. Y = Yes | |||
NO | NO or EXTID must be specified to find Contact. | |||
REFNO | REFNO or REFNOEXTID must be specified to find Reference. ACCOUNT (CUS/SUP) or PID (PER). | |||
REFNOEXTID | REFNO or REFNOEXTID must be specified to find Reference. REFNOEXTID is only valid for REFTYPE: CUS or SUP. | |||
REFTYPE | CUS, SUP or PER. |
Possible fields to be loaded into RamBase are listed in the Field-column in the following table. The other columns in this table provide additional information about each field.
Y if PrivacyPolicyAccepted should be set. Blank if not Y = Yes
Field | Required | Length | Example | Description |
NAME | Y* | Doe | Company name, or a person's surname. *Only required if creating a new Contact. | |
EXTID | 01018012345 | NO or EXTID must be specified if existing Contact should be updated. | ||
FIRSTNAME | John | |||
CATEGORY | See DOV DEVELOPMENT for valid values. | |||
LEGALBASIS | See DOV LEGALBASIS for valid values. | |||
MARKETINGCONSENT | Y | Y if MarketingContent should be set. Blank if not. Y = Yes. | ||
NO | NO or EXTID must be specified if existing Contact should be updated. | |||
ST | 1 | 4 | Status. Legal values: 1:New, 2:Pending internal approvement, 4:Active, 9:Inactive. If not specified, new contacts will get st:4. | |
PRIVACYPOLICYACCEPTED | Y | Y if PrivacyPolicyAccepted should be set. Blank if not. Y = Yes | ||
SOURCE | See DOV SOURCE for valid values. | |||
TITLE | Sales manager | Title | ||
LANGUAGE | 3 | ENG | Language. ISO 639.2 |
Possible fields to be loaded into RamBase are listed in the Field-column in the following table. The other columns in this table provide additional information about each field.
Field | Required | Length | Example | Description |
PART | Y * | 35 | 190-489-A1 | Article name. |
MFR | Y * | ACME | Manufacturer. The manufacturers have to be registered in the Manufacturer archive (MFR) in RamBase prior to the article load. | |
CUSPART | Y ** | 24 | 290631 | Customer's internal part number. **If CUSPART has a value, CUS or CUSEXTID must have a value too. |
CUS | Y ** | CUS/123456 | RamBase customer number. **If CUSPART has a value, CUS or CUSEXTID must have a value too. | |
CUSEXTID | Y ** | Legacy system customer identification. **If CUSPART has a value, CUS or CUSEXTID must have a value too. | ||
CREATE | YES | If you want to create a new article you have to set this value to YES. If blank, the system will try to update existing articles. Existing article will be found by exact match on: a) IT (RamBase internal article ID) b) Part + MFR If you put YES in this field, a new PART will be created in St=0 with default settings for MFR and CLASS. This article will be updated with given CUSPART information. |
Possible fields to be loaded into RamBase are listed in the Field-column in the following table. The other columns in this table provide additional information about each field.
Field | Required | Length | Example | Description |
NAME | Y* | Doe | Company name, or a person's surname. *Required, if EXTID is not provided. | |
EXTID | Y* | External customer reference/identifier. *Required if NAME is not provided. | ||
POCODE | Y | 5578 | Postal Code. Will be validated against the POC archive in RamBase. Illegal values will be discarded. | |
CITY | Y | NEDRE VATS | City/town/village. | |
CCODE | Y | 2 | NO | Country code is a two-character code identifying a country. The code follows the ISO 3166 standard. Will be validated against the CON archive in RamBase. |
CUR | 3 | NOK, EUR | Currencies this customer buys in. May contain a comma list if several are used. Is validated against a subset of ISO 4217. | |
ST | Y | 1 | 4 | Status of the customer. 1:New, 2:Pending internal approvement, 4:Active, 9:Obsolete. Defaults to 2 if not provided. |
ACCOUNT | 10000 | Customer Id. Unique number created by RamBase. Provide this value if you want to update an existing customer. | ||
FIRSTNAME | John | A person's first name. | ||
ATTN | Jane Doe | Attention. | ||
ADDR1 | Mystery Lane 123 | First address line. | ||
ADDR2 | Post box 9077 | Second address line. | ||
STATE | Y* | CA | * Required if country (CCODE) is Canada or USA. | |
PHONE | +4752763390 | Customer's main phone number. Can not contain any letters or spaces, but + is OK as prefix. Must be four digits or more. | ||
john.doe@msn.com | Customer's main mail address. Will be validated. | |||
FAX | +34915300164 | Customer's main fax number. Can not contain any letters or spaces, but + is OK as prefix. Must be six digits or more. | ||
ENTERPRISE | 924054832 | Legal entity, a unique enterprise/organization number. The format is different from country to country. | ||
VATNO | DK669248438 | Value Added Tax (VAT) registration number. Unique number assigned by the relevant tax authority. This format is different from country to country. | ||
LANGUAGE | 3 | eng | Preferred language. Value is stored as a three character code, according to ISO 639-2 standard. Will be used to produce output to customer in correct language. | |
SHIPBYNO | 100036 | Preferred shipping method for sales orders. Will typically be a carrier's product. Numbers are references to SHP archive. | ||
DELTERM | FCA, Incoterm 2010 | Delivery terms for shipments to customer. Valid options have to be set up by JHC personnel in advance. | ||
DELTERMPLACE | Oslo | The place of delivery at which you are responsible to deliver goods according to the delivery terms. | ||
PAYTERM | NET,10 | Payment terms. Duedate on invoice documents are calculated based on Payterm. Valid options have to be set up by JHC personnel in advance. Valid options: ADVANCE - Payment in advance NET, X - Day(s) net COD - Cash on delivery COP - Cash on pick up EOCM, X - Net x day(s) EOM | ||
PAYBY | Credit card | Method of payment. Valid options have to be set up by JHC personnel in advance. | ||
PRICEAGR | 100-PR | Quantity Price Agreement. E.g 100-PR means that even if an order line is for less quantity than 100 pieces, it will pick of the volume price of 100 pieces from the product (ART). Valid options have to be set up by JHC personnel in advance. | ||
INDEXAGR | 80/1.5 | Exchange fluctuation rate agreement. When an order is issued, RamBase stores the current exchange rate and the currency the part normally is purchased in. The exchange rate might have changed when the invoice is issued. The exchange rate fluctuation agreement specifies how to handle these differences. The agreement has the format AAA/BBB, where AAA is a percentage of the total invoice, and BBB is the exchange rate fluctuation percentage. E.g. 80/3.0 means that if the rate of exchange on the date a customer order is transported to an invoice has changed more than +/- 3% from the rate of exchange, 80% of the invoice amount will be adjusted. | ||
ACCOUNTCL | C | Classification of customers. Valid options have to be set up by JHC personnel in advance. | ||
DISTRICT | South | A geographic district for which an individual sales person or a sales team hold responsibility. Valid options have to be set up by JHC personnel in advance. | ||
SEGMENT | Military | The market segment the customer operates within. Valid options have to be set up by JHC personnel in advance. | ||
SECTOR | Distributor | The sector the customer belongs to. Valid options have to be set up by JHC in advance. | ||
INCLVAT | NO | Specifies how value added tax (VAT) should be calculated. Either always include VAT, always exclude VAT or use standard/default VAT rules. Valid options are: YES = if the customer always should pay VAT NO = if the customer never should pay VAT ‘blank’ = Std VAT rules will be used. | ||
CREDITLIM | 20000 | Maximum limit for customer credit, in currency given by company currency. | ||
CREDITINS | 400000 | Credit amount insured for the customer, in company currency. | ||
INSCOMPANY | AIG | Insurance company used by the customer for credit insurance. | ||
DUEAPPROVE | NO | "YES" if approval before shipping orders are required when outstanding accounts are overdue. | ||
REMINDER | YES | Set to "NO" if dunning letters for outstanding amounts should not be created for the customer. | ||
INTFEE | 25 | Interest rate used when creating interest invoices for invoices that have past duedate. | ||
SHIPDAY | 2 | D3 | Specifies which day orders will be shipped. Valid options are: V1-V5 = E.g V1 means Monday in the week before orders requested/confirmed date. W1-W5 = E.g W2 means Monday in the week the order is requested confirmed. D0-D9 = E.g D2 means two days before the order is requested/confirmed. If no value is provided, this is understood as D0. If the shippingday is based on requested or confirmed date is depending on set up in SHIPONCONF. | |
SHIPONCONF | YES | If set to YES, orders should be shipped to meet the confirmed date rather than requested. Is used in combination with SHIPDAY. If no value is provided, this is understood as NO. | ||
SHIPCOMPLETEITM | YES | Decides whether the whole quantity in an order item always should be shipped together. If set to YES, the order item should never be splitted into several shipments. If no value is provided, this is understood as NO. | ||
SHIPCOMPLETEDOC | YES | Decides whether all items of an order should be shipped together. If set to YES, the items of an order should never be splitted into several shipments. If no value is provided, this is understood as NO. | ||
SHIPCONS | YES | Decides whether order items will be consolidated into shipping advices in automatic processes. If set to NO, each order will result in separate shipping advice. If set to YES, several orders will be consolidated in to one Shipping Advise. If no value is provided, this is understood as NO. | ||
SHIPGROUPBY | YOURNO | Field to group by if the value YES is set in the SHIPCONS field. | ||
SHIPSORTBY | PART | Field to sort by if the value YES is set in the SHIPCONS field. | ||
SHIPSUBFGT | YES | Decides whether freight should be charged on sub-shipments or not. If no value is provided, this is understood as NO. | ||
SHCODE | SHC/100007 | Refers to special shipping and handling code for orders from this customer. Valid options have to be set up in SHC archive prior to the load. | ||
INVCONS | 1 | M | Specifies whether or how often shipping advise items will be consolidated when creating invoices. Valid options are: N = No consolidation X = Excluded from automatic creation of invoice. D = Daily W = Weekly M = Monthly If no value is provided, this is understood as the value N (No consolidation), which means that the invoice is automatically created when the shipping advise is sent. | |
INVGROUPBY | YOURNO | Field to group by if the values D, W or M are set in the INVCONS field. | ||
INVSORTBY | PART | Field to sort by if the values D, W or M are set in the INVCONS field. | ||
FEEPCT | 5 | Percentage of financial charge to be added to orders. | ||
FEE | 50 | An amount in document currency that will be added to an order. | ||
QUOTEBLOCKED | YES | Sales quotes for this customer will be blocked for registering. | ||
ORDERBLOCKED | YES | Orders for this customer will be blocked for registering. | ||
INVOICEBLOCKED | YES | Invoices for this customer will be blocked for registering. | ||
SHIPPINGADVICEBLOCKED | YES | Shipping advices for this customer will be blocked for registering. | ||
MSG | Customer wants estimates in EURO. | Internal note/notice about the customer. | ||
MINGM | 20 | The minimum accepted gross margin in percentage (%). | ||
ICTDB | JHR-NO | Inter Company Trading DataBase. Used to identify internal customer/suppliers. | ||
PIDEXT | 902 | Account manager, refers to a PER. | ||
PIDINT | 8900 | Account sales assistant, refers to a PER. | ||
EDIACCOUNT | 1234567 | Electronic data interchange account number. | ||
EDIPARTNER | STANDARDEHF | Electronic data interchange partner. | ||
SEMAIL | john.doe@msn.com | Email for the default shipping address for customer. Will be validated. | ||
SPHONE | 4752763390 | Phone for the default shipping address for customer. Can not contain any letters or spaces, but + is OK as prefix. Must be four digits or more. | ||
PLINO | 6 | 100000 | Identification number of Price list (PLI) the customer belongs to. | |
PLINAME | Price list name. |
Possible fields to be loaded into RamBase are listed in the Field-column in the following table. The other columns in this table provide additional information about each field.
Field | Required | Length | Example | Description |
|---|---|---|---|---|
ACCOUNT | Y* | 100168 | Customer identifier. *ACCOUNT or ACCOUNTEXTID must have a value | |
ACCOUNTEXTID | Y* | CUS-9812 | The customer external ID. *ACCOUNT or ACCOUNTEXTID must have a value | |
BUFQTY | 100 | Buffer quantity. | ||
CUR | Y | NOK | Currency. The value must be valid for the given customer. | |
CUSPART | Y* | Electric component A | Customer product name. Must exists as a customer product name associated with the customer on a product. *PART/MFR, CUSPART or PARTEXTID is used to identify the correct product. | |
DELTERM | Delivery terms | |||
DELTERMPLACE | Delivery terms place | |||
DISCPCT | 5.50 | Discount percentage | ||
EXPIRE | Y** | YYYY.MM.DD | Date that a specific item in the quote is valid to. **VALIDFORM or EXPIRE must have a value. | |
LOC | 3 | OSL | Location | |
MFR | Y* | ACME | Manufacturer. *PART/MFR or CUSPART is used to identify the correct product. | |
PART | Y* | EP1K50TC144-1 | Product name. Must exist in the article archive. *PART/MFR, CUSPART or PARTEXTID is used to identify the correct product. | |
PARTEXTID | Y* | External identifier for the part. *PART/MFR, CUSPART or PARTEXTID is used to identify the correct product. | ||
PRICE | Y | 159 | Quoted price in given currency. | |
QTY | Y | 10 | Quoted quantity | |
REMARK | Note to customer | |||
SHIPPINGADDRESSEXTID | Shipping address external ID | |||
SHIPPINGADDRESSID | Shipping address ID | |||
SQUREF | ||||
USERID | Assignee | |||
VALIDFROM | Y** | YYYY.MM.DD | Date that a quote is valid from. **VALIDFORM or EXPIRE must have a value. | |
VALIDTO | YYYY.MM.DD | Date that the quote is valid to. If not defined, it will get a default value configured for the company. | ||
YOURNO | HLD/12345 | Customer quote number. | ||
YOURREF | John Doe | Customer quote reference, typically a person. |
Possible fields to be loaded into RamBase are listed in the Field-column in the following table. The other columns in this table provide additional information about each field.
Field | Required | Format | Length | Example | Title | Description | Edit FLD |
|---|---|---|---|---|---|---|---|
BACKUPRESPONSIBLEID | 352 | ||||||
CATEGORY | Recurring sales | ||||||
CONTACTID | 100152 | ||||||
CURRENCY | NOK | ||||||
CUSTOMERID | 100058 | CUSTOMERID or EXTERNALCUSTOMERID is mandatory for new contracts | |||||
DESCRIPTION | Terms of contract | ||||||
EFFECTIVEDATE | Mandatory | 2024.01.01 | |||||
EXPIRATIONDATE | Mandatory | 2024.12.01 | |||||
EXTERNALCUSTOMERID | CUSTOMERID or EXTERNALCUSTOMERID is mandatory for new contracts | ||||||
ISTERMINABLE | 1 | ||||||
MAINRESPONSIBLEID | Mandatory | 358 | |||||
PERIODSPECIFCATION | MONTH | ||||||
RENEWALDUDAYS | 15 | ||||||
SALESCONTRACTID | Mandatory for update of contract | ||||||
STATUS | 4 | Values: 4 or 9 (Activate or Deactivate) | |||||
TERMINATIONNOTICEPERIOD | 30 | ||||||
TITLE | Mandatory | 358 ContractLoad2 | |||||
UDF | CustomField TYPE | ||||||
VALUEPERPERIOD | 168.50 |
Possible fields to be loaded into RamBase are listed in the Field-column in the following table. The other columns in this table provide additional information about each field.
Field | Required | Length | Example | Description |
ACCOUNT | Y* | 123456 | Customer Id. Unique number created by RamBase. * To identify the customer to be updated ACCOUNT or EXTID must be provided in the file. | |
EXTID | Y * | External system customer Id. * To identify the customer to be updated ACCOUNT or EXTID must be provided in the file. | ||
ISDEFAULT | 1, Y, Yes | Set to 1, Y or YES if this should be the default Shipping Address for the customer. | ||
SDELTERM | Y* | *If shipping address is provided. | ||
SDELTERMPLACE | Y* | *If shipping address is provided. | ||
SFIRSTNAME | John | A person's first name in the shipping address. | ||
SNAME | Doe | Company name, or a person's surname in the shipping address. | ||
SATTN | Jane Doe | Attention in the shipping address. | ||
SADDR1 | Mystery Lane 123 | First address line in the shipping address. | ||
SADDR2 | Post Box 9077 | Second address line in the shipping address. | ||
SPOCODE | 5578 | Postal code in the shipping address. Will be validated against the POC archive in RamBase. Illigal values will be discarded. | ||
SCITY | NEDRE VATS | City/town/village in the shipping address. | ||
SSTATE | TN | A US state. | ||
SHIPCC | 2 | NO | Country code is a two-character code identifying a country. The code follows the ISO 3166 standard. Will be validated against the CON archive in RamBase. | |
SITM | 1 | Unique shipping address identifier. | ||
SSHCODE | SHC/100007 | Refers to a special shipping and handling code for orders to this shipping address. Valid options have to be set up in the SHC archive prior to the load. | ||
SPHONE | +4752763390 | Phone number for this shipping address. | ||
SFAX | +34915300164 | Fax number for this shipping address. | ||
SEMAIL |
Data Conversion: Import Finance Projects (PRJ) from file.
Field | Required | Format | Length | Example | Title | Description |
|---|---|---|---|---|---|---|
FROMPERIOD | Mandatory | 202402 | Effective period of the finance project | |||
NAME | Mandatory | Services | Name of finance project | |||
NO | Optional | 1050 | Finance project identifier | |||
RESP | Optional | 13215 | Responsible (PID) of the Finance project | |||
TEXT | Optional | TXT | Description of finance project |
Possible fields to be loaded into RamBase are listed in the Field-column in the following table. The other columns in this table provide additional information about each field.
Field | Required | Length | Example | Description |
NAME | Y | New Car Volvo AB12345 | Name of Fixed Asset | |
INVESTMENT | Y | Invoice 123000 | Reference to investment / invoice | |
INVESTMENTPERIOD | Y | 6 | YYYYMM | Period the investment was done |
ACTIVATEDPERIOD | Y | 6 | YYYYMM | Period the investment was activated |
FIRSTDEPRECIATIONPERIOD | Y | 6 | YYYYMM | First depreciation period |
LASTDEPRECIATIONPERIOD | Y | 6 | YYYYMM | Last period the depreciation was done |
AMOUNT | Y | 300000 | Investment amount | |
INVESTMENTACCOUNT | Y | 9010 | GL Account the investment / invoice was posted to | |
DEPNO | 1000 | Department number for the investment | ||
PRJNO | 2000 | Project number for the investment | ||
ASTNO | 3000 | Asset number for the investment | ||
CURRENTBALANCE | If this amount differs from the amount which is calculated by RamBase based on Activation period, Last depreciation period, amount and values in the depreciation rule, an adjustment record will be created on the FAR document. |
Possible fields to be loaded into RamBase are listed in the Field-column in the following table. The other columns in this table provide additional information about each field.
Field | Required | Length | Example | Description |
EXTID | Document ID from legacy (old) system. | |||
TRANS | Y | 6 | PERWAG | Transaction Type. For example: CUSCIN for sales invoices, SUPSIN for supplier invoices. When period amounts are to be loaded, the value in this field must be set to ATRMAN (manual postings to the general ledger). CUSMAN (Manual postings to account receivables). PERWAG (Import of wages). PACMAN (Manual period adjustment). SUPMAN (Manual postings to account payables). VATMAN (Manual VAT postings). |
TYPE | Y | IMPORTED | This field says how the transactions have been created. When period amounts are to be loaded, the value in this field must be set to IMPORTED. Valid options: AUTO = Automatic postings from Invoices, Credits or payments. MANUAL = Manual postings. AGIO = Agio postings. IMPORTED = Postings imported from file | |
PERIOD | Y | 201509 | Fiscal period. | |
TRDATE | Y | 2015.09.30 | Transaction Date. When period amounts are to be loaded, set this value to the last day of the month. | |
TRQTY | 369 | Transaction Quantity. Number of documents like invoices, credits of payments etc. connected to one ATR document that forms the basis of the GL entry. When period amounts are to be loaded, set this value to 0. | ||
DATE | Y | 2015.09.03 | Date of posting. When period amounts are to be loaded, set this value to the last day of the month. | |
REM | Imported wages from… | Remark (Free text). | ||
MSG | Message (Free text). | |||
ACCCODE | Y | 1210 | Account number in the General ledger. | |
DEPNO | 2040 | Department number. | ||
PRJNO | 3879 | Project number. | ||
ASTNO | 1001 | Asset number. | ||
DIM4 | 2966 | Reference to Dimension register 4. Used in addition to the dimensions Department (DEP), Project (PRJ) and Assets (AST). | ||
DIM5 | Reference to Dimension register 5 | |||
DIM6 | Reference to Dimension register 6 | |||
DIM7 | Reference to Dimension register 7 | |||
DIM8 | Reference to Dimension register 8 | |||
DIM9 | Reference to Dimension register 9 | |||
DIM10 | Reference to Dimension register 10 | |||
TEXT | Free text | |||
CUR | Y | NOK | Currency | |
RATE | Y | 1.00 | Currency exchange rate. | |
VATCODE | Y | 2 | 00 | VAT Code. |
ICTDB | Inter Company Database. Refers to a company in a corporation where there are corporate transactions. | |||
LOC | OSL | Location. | ||
AMOUNT | -4500.00 | Amount in Transaction Currency. |
Field | Required | Length | Example | Description |
ACCOUNT | Y* | The Supplier ID assigned by Rambase. *ACCOUNT or ACCOUNTEXTID must have a value | ||
EXTID | The external ID of the supplier shipping advice. | |||
DATE | Y | 2015.05.05 | Date | |
PERIOD | 201705 | Period | ||
LOC | Y | 3 | VAT | Location |
CUR | Y | NOK | Currency | |
QTY | Y | Quantity | ||
NETQTY | Y | Net quantity. Must be equal 0 or equal quantity | ||
STOCKQTY | Y | Stock quantity | ||
PARTIT | Y** | #100000 | Internal typenumber is a unique ID that identifies the article. This will be assigned by the system when a new article is created. Format: #123456 **PARTIT, PART or PARTEXTID must have a value | |
PARTEXTID | Y** | The external ID of the product. **PART or PARTEXTID must have a value | ||
PART | Y** | 190-489-A1 | The name of the product. **PART or PARTEXTID must have a value | |
MFR | ACME | Manufacturer. Used in combination with part if there are parts with the same name but different manufacturers. | ||
PRICE | Y | 20.98 | ||
LOT | ||||
QUALITY | ||||
STOCKLOCATION1 | The placement of the goods in stock | |||
QTYSTOCKLOCATION1 | Quantity of goods in stock | |||
STOCKLOCATION2 | ||||
QTYSTOCKLOCATION2 | ||||
STOCKLOCATION3 | ||||
QTYSTOCKLOCATION3 | ||||
STOCKLOCATION4 | ||||
QTYSTOCKLOCATION4 | ||||
STOCKLOCATION5 | ||||
QTYSTOCKLOCATION5 | ||||
NOTE | ||||
ACCOUNTEXTID | Y* | The supplier external ID. *ACCOUNT or ACCOUNTEXTID must have a value | ||
DEPNO | Department Number | |||
PRJNO | Project Number |
Possible fields to be loaded into RamBase are listed in the Field-column in the following table. The other columns in this table provide additional information about each field.
Field | Required | Length | Example | Description |
ACCOUNT | Y* | Supplier account number. The number should match the RamBase supplier number. *Either ACCOUNT or ACCOUNTEXTID must be present in the file. | ||
EXTID | BO-Fantomet | ID for the stockreference in old system. | ||
DATE | Y | YYYY.MM.DD | ||
LOC | Y | 3 | VAT | Location: A three character Warehouse Code, identifying a warehouse. |
CUR | Y | NOK | ||
QTY | Y | |||
PARTIT | Y* | Part IT. * PARTIT, PARTEXTID or PART must have a value. | ||
PARTEXTID | Y* | Product/Part ID in old system (Unique). * PARTIT, PARTEXTID or PART must have a value. | ||
PART | Y* | Servicetime | Part name. * PARTIT, PARTEXTID or PART must have a value. | |
MFR | 16 | MISC | Manufacturer. | |
PRICE | Y | |||
LOT | ||||
QUALITY | Field for Quality information on article, will be copied to Quality field on respective documents. | |||
NOTE | ||||
ACCOUNTEXTID | Y* | The supplier's unique ID from the legacy (old) system. To identify the supplier the transaction is to be connected to. *Either ACCOUNT or ACCOUNTEXTID must be present in the file. | ||
DEPNP | Department Number. | |||
PRJNO | Project Number. | |||
BESTIFUSEDBYDATE | 2020.03.30 | This is the date this product is best before, but it may also be good enough after this date. | ||
ORIGIN | 2 | NO | Two-character code (ISO 3166) identifying the default country where the product is produced. | |
PERIOD | ||||
PRODUCTIONDATE | ||||
CREATEPO | Y | If a corresponding Purchase order (SPO) should be created | ||
POEXTID | Purchase order ID in old system |
Possible fields to be loaded into RamBase are listed in the Field-column in the following table. The other columns in this table provide additional information about each field.
Field | Required | Length | Example | Description |
ACCOUNT | Y* | Supplier account number. The number should match the RamBase supplier number. *Either ACCOUNT or ACCOUNTEXTID must be present in the file. | ||
CUSTOMER | Y* | Customer account number for use if DOCTYPE=CUSOWNED (format: TEM-NO:CUS/100000). * Either CUSTOMER or CUSTOMEREXTID must be present in the file if DOCTYPE=CUSOWNED is used. | ||
CUSTOMEREXTID | Y* | Value in EXTID field on Customer can be used to find the right Customer, if DOCTYPE=CUSOWNED. This information will not be used if CUSTOMER is given in the file. *Either CUSTOMEREXTID or CUSTOMER must be present in the file if DOCTYPE=CUSOWNED is used. | ||
EXTID | BO-Fantomet | ID for the stockreference in old system. | ||
DATE | Y | YYYY.MM.DD | ||
DOCTYPE | For example CUSOWNED. Different DOCTYPE can be set. If DOCTYPE=CUSOWNED is set, the file must contain CUSTOMER or CUSTOMEREXTID. | |||
LOC | Y | 3 | VAT | Location: A three character Warehouse Code, identifying a warehouse. |
CUR | Y | NOK | ||
QTY | Y | |||
PARTIT | Y* | Part IT. * PARTIT, PARTEXTID or PART must have a value. | ||
PARTEXTID | Y* | Product/Part ID in old system (Unique). * PARTIT, PARTEXTID or PART must have a value. | ||
PART | Y* | Servicetime | Part name. * PARTIT, PARTEXTID or PART must have a value. | |
MFR | 16 | MISC | Manufacturer. | |
PRICE | Y | |||
LOT | ||||
QUALITY | Field for Quality information on article, will be copied to Quality field on respective documents. | |||
STOCKLOCATION1 | The placement of the goods in stock. | |||
QTYSTOCKLOCATION1 | Quantity of goods in stock. | |||
STOCKLOCATION2 | ||||
QTYSTOCKLOCATION2 | ||||
STOCKLOCATION3 | ||||
QTYSTOCKLOCATION3 | ||||
STOCKLOCATION4 | ||||
QTYSTOCKLOCATION4 | ||||
STOCKLOCATION5 | ||||
QTYSTOCKLOCATION5 | ||||
NOTE | ||||
ACCOUNTEXTID | Y* | The supplier's unique ID from the legacy (old) system. To identify the supplier the transaction is to be connected to. *Either ACCOUNT or ACCOUNTEXTID must be present in the file. | ||
DEPNO | Department Number | |||
PRJNO | Project Number | |||
BESTIFUSEDBYDATE | 2020.03.30 | This is the date this product is best before, but it may also be good enough after this date. | ||
ORIGIN | 2 | NO | Two-character code (ISO 3166) identifying the default country where the product is produced. | |
HEATNO | A heat number is an identification coupon number that is stamped on a material plate after it is removed from the ladle and rolled at a steel mill |
Update existing Goods receptions (SSA) items
Field | Required | Length | Example | Description |
|---|---|---|---|---|
CountryOfOriginCode | NO | |||
GoodsReceptionId | Mandatory | 100000 | Optional Goods reception id (SSA) that the serial number should be linked to. | |
GoodsReceptionItemId | Mandatory | 1 | Optional Goods reception item id (SSA-item) that the serial number should be linked to. | |
SerialNumber | Mandatory | ABC123 | Serial number to be loaded. | |
ShippingAdviceId | Mandatory | 100000 | Id of shipping advice (CSA) that the serial number should be loaded to. | |
ShippingAdviceItemId | 1 | Id of shipping advice item (CSA-item) that the serial number should be loaded for. | ||
ValidationOnly | 1, Y or YES | Y | The optional field ValidationOnly can be used to run the load in validation-only mode.
Usage RequirementsThe flag must be set on all lines in the load file. LimitationsValidation-only runs may not detect all potential issues. A successful validation does not guarantee a successful load. Always review the file thoroughly before performing an actual load. |
PDMIMPORTTOPRODUCT can contain products, operations, materials/parts, phantom Kits and added costs. There is no fixed order for these records, but each type must point to the PRODUCT it belongs to.
Only .csv and .txt file extensions are accepted.
To access the company settings from the RamBase menu click on Admin and click on Overview. Select Settings and then click on Company settings. The settings listed below are available from module list. Select Production, and then Production.
PDMImportCreateNewProduct = ‘ON' - New product is created if not found in RamBase.
PDMImportDefaultManufacturerID = ‘MFR/nnnn’ - Manufacturer for the product if this is not specified in the file.
PDMImportCreateNewPart = ‘ON’: - New part/material is created if not found in RamBase.
PDMImportOperationNo = ‘nnnnnn’ - The operation that is added to a new product structure if the file does not include operations.
PDMImportActivateNewStructure = 'ON’ - The updated/loaded product structures are activated to Status 4, new valid product version.
Default Material for PDM Import = ‘ART/#nnnnnn’: The ‘to be replaced’ part that is used instead of new part / material in the file if new part/material shall not be created by the PDM input.
The records with type = PRODUCT, used to create or update products and sub products for Class = K* articles. Some of these fields are also required at material, operation and added cost lines to identify the product they belong to.
Column (field) | Mandatory | Legal value/example | Description |
|---|---|---|---|
ISBATCHPRODUCTION | 0 or 1 | ||
KITSTATUS | 2 or 1 | Status of imported KIT. Default value is 2. Can also be 1. | |
MAANAME | YES | PRODUCTION | Logical manufacturing area |
OPERATIONSINCLUDED | YES | 0 or 1 | 1' states that operations are included in the file so the load of the structure will depend on that. ‘Blank’ or ‘0’: the load will select the default operation specified in setting: 'PDMImportOperationNo’. |
PRODLINE | Yes | PRODUCTION | Manufacturing area (logical). |
PRODUCT | YES (If PRODUCTIT is not given) | Main product A-1 | The product name (Part field in ART archive). |
PRODUCTCLASS | YES | K, KA, KS | The class of the product |
PRODUCTGR1 | E.g. ‘valves’ | Product grouping fields, value is copied to transactions for the product. | |
PRODUCTGR2 | E.g. ‘ball valves’ | Product grouping fields, value is copied to transactions for the product. | |
PRODUCTIT | YES (If PRODUCT is not given) | #123456 | Unique RamBase Id for existing product. |
PRODUCTMSG | Only for export | Message that is set at the product, visible to sales and procurement. | |
PRODUCTNOTCHANGED | 0 | Set to 0, or leave empty if product should be changed. Set to 1 if product should not be changed. | |
PRODUCTREVISION | Product revision number | ||
PRODUCTTEXT | High class valve | The product description | |
PRODUCTUNIT | YES | Pcs, kg | The measurement unit for the product |
PRODUCTWEIGHT | 1.023 | Product net weight in kg | |
TYPE | YES | PRODUCT | Record type identifier. Product means that the record is a product record. |
VERSIONFILENAME | E.g. ‘DRAWING.PDF’ | The file name for the drawing to be mapped to the new version. The drawing can be loaded to the file archive in RamBase before or after the PDM load. The file must have module = PDM. | |
VERSIONNAME | YES | Added quality control | Short description for the new product structure version. The structure will not be updated correctly if there are no valid (ST 4) product structures for each of class K* items in the product. |
VERSIONNOTE | Long text | Text area field containing a more detailed description of the new version that will be added. | |
VERSIONOPERATORINFO | Free text | Text that will show to operator at all operations in the routing. |
The records with type = OPERATION are optional and will be ignored if the product record fields OPERATIONSINCLUDED has value ‘0’ or ‘blank’. In that case, the operation specified in the setting 'PDMImportOperationNo’ will be included instead.
Column (field) | Mandatory | Legal value/example | Description |
|---|---|---|---|
OPERATIONINFO | Remember to… | Text that will show to operator at this specific operation in the routing. | |
OPERATIONNO | YES | 100134 | Operation number (OPR) in RamBase. |
OPNO | YES | 10 | Operation sequence number. |
PONOTE | Note to supplier | Only applies to external operations. The text in PONOTE will then be copied to the Note field at the SPO item for external work. | |
POSTTIME | *1 | 0.5 | The work time per produced unit. Value in decimals, 1.5 h 1h 30m. |
PRETIME | *1 | 1 | The work time per produced unit. Value in decimals, 1.5 h 1h 30m. |
PRODUCT | YES (If PRODUCTIT is not given) | Main product A-1 | The product name (Part field in ART archive) |
PRODUCTIT | YES (If PRODUCT is not given) | #123456 | Unique RamBase Id for existing product. |
QUEUETIME | 48 | The queue time per produced unit, before next operation can be started. Value in decimals, 1.5 h 1h 30m. | |
TIME | *1 | 1.5 | The work time per produced unit. Value in decimals, 1.5 h 1h 30m. |
TYPE | YES | OPERATION | Record type identifier. OPERATION means that the record is an operation record. |
*If operations are defined in the file, then at least one of the fields TIME/PRETIME/POSTTIME must have a value.
The record with type = MATERIAL for materials, parts and sub products that are to be included in the bill of materials for the new product revision/version. If no operations were defined, then parts will be added to the default operation.
Column (field) | Mandatory | Legal value/example | Description |
|---|---|---|---|
ACCOUNT | 100234 | Supplier account for the UNITCOST. Can be an ‘internal’ supplier if the supplier is not known, must be a supplier that is specified with the company currency as one of the currencies. | |
CLASS | YES | P, M, C, Z, K, KA, KS | The material/part class. |
CUSTOMERREF | Customer 123456 | Customer reference number that can later be modified by editing a material (part, material, kit) line in the Product structure that is in edit mode. | |
FILENAME | Material1-1_1 | The file name for the drawing to be mapped to the new material/part revision. The drawing can be loaded to the file archive in RamBase before or after the PDM load. The file must have module = PDM. | |
GR1 | Mechanical | Material/part grouping field, value is copied to transactions for the product. | |
GR2 | Nuts | Material/part grouping field, value is copied to transactions for the product. | |
INCLUDEINLCMPARTLIST | ‘0’ or ‘1’ or blank | ‘1’ = this material/part will be automatically added to the product units trace list. | |
IT | YES (If PART is not given) | The unique RamBase Id (IT) for existing material/part. | |
MFR | Siemens | If MFR is given in the file and IT is not given: ART search for match on material/part will use input fields PART and MFR to find IT from existing ART in RamBase. The job will search for match on PART if neither IT or MFR is given in the file. | |
MSG | This part is… | Message that is set at the part, visible to sales and procurement. | |
OPNO | (YES) | 10 | Operation sequence number that the part shall be added to. Mandatory if the product in the file is specified to contain operations. |
PART | YES (If IT is not given) | Material 1 | The material/part name (Part field at ART). |
POS | A1 | The assembly position of the part. | |
PRODUCT | YES (If PRODUCTIT is not given) | Main product A-1 | The product name (Part field in ART archive). |
PRODUCTIT | YES (If PRODUCT is not given) | #123456 | Unique RamBase Id for existing product. |
QTY | YES | 2 | Material/part quantity to be used per product. |
REVISION | 1.1 | The material/part revision number, alphanumeric. | |
TEXT | Material 1 description | The material/part description. | |
TYPE | YES | MATERIAL | Record type identifier. MATERIAL means that the record is a product/material record. |
UNIT | YES | Pcs, mm … | The measurement unit for the material/part. ‘pcs’ is used if no value is given. |
UNITCOST | 23.50 | Purchase price per part unit that can be added for new material/parts. In company currency. May be useful to get a cost indication for the part and the products it is included in. Will be added to new part as purchase price. | |
WASTAGEPCT | 2 | Adder used when allocating material/part to work orders. Value in percentage. | |
WASTAGEQTY | 1.11 | Standard quantity of wastage for product when used in a production work order in this location. | |
WEIGHT | 0.125 | The material/part weight per UNIT, in kg. |
Important
Information regarding POS and NOTE must be included in the PDM file for new KITs in order for the POS and NOTE fields to be loaded to the material records.
The records with type = COST used if added cost records are included in the file.
Column (field) | Mandatory | Legal value/example | Description |
|---|---|---|---|
COSTNO | YES | 100103 | The added cost (ADC) number in RamBase. |
ISMATERIALCOST | ‘0’ or ‘1’ or blank | ‘1’: The added cost is included as material cost in the calculated main level costs in the structure. | |
OPNO | 10 | Operation sequence number that the added cost applies to. Will be added to the structure (the KIT) if OPNO = ‘blank’. | |
PRODUCT | YES (If PRODUCTIT is not given) | Main product A-1 | The product name (Part field in ART archive) |
PRODUCTIT | YES (If PRODUCT is not given) | #123456 | Unique RamBase Id for existing product. |
TYPE | YES | MATERIAL | Record type identifier. MATERIAL means that the record is a product / material record. |
Note
The functionality requires that "DB" is added to scv/73720, or that the Product Interfaces submodule is activated.
Possible fields to be loaded into RamBase are listed in the Field-column in the following table. The other columns in this table provide additional information about each field.
Import new and update existing LCMs in RamBase based on LCMNO or SerialNo and PART.
The default behavior of the load operation requires a valid SERIALNO to be found on a Goods reception (SSA). Once located, the system automatically links the Life cycle management (LCM) to the Goods reception (SSA).
Field | Required | Format | Length | Example | Title | Description |
|---|---|---|---|---|---|---|
DATE | Date in format YYYY.MM.DD. Defaults to current date if not provided | |||||
EXTIDPART | ExtId to product. Product name of ExtIdPart must be provided. | |||||
MFR | TXT | 16 | AUDI | Mfr | If product name is used to identify product then MFR must be provided if there are multiple products with the same name but with different manufactuers. | |
NEXTSERVICE | The date of the next service in format YYYY.MM.DD | |||||
PART | TXT | Servicetime 232333 | Part | Product name. Product name of ExtIdPart must be provided. | ||
SERIALNO | Mandatory | Serial number | ||||
UDF | UDF_NameOfCustomField | Custom Fields | ||||
LCMNO | Identifier/number of LCM that you want to be updated. | |||||
SSANOTREQUIRED | Setting this to 'Y' enables the creation of an Life cycle management (LCM) without requiring a SerialNumber match on the Goods reception (SSA). |
Add Manufacturers product name (MPN) to Products (ART).
Possible fields to be loaded into RamBase are listed in the Field column in the following table. The other columns in this table provide additional information about each field.
Field | Required | Format | Length | Example | Title | Description |
|---|---|---|---|---|---|---|
BUNDLEWRAPPING | Optional | Tube ( PACKAGETYPE and BUNDLEWRAPPING is the same field in RamBase) | How the pieces are packed | |||
GTIN | Optional | 7894892017139 | Global Trade Item Number | |||
ISDEFAULT | Optional | Set to 1 if MPN is default for product | ||||
ISPREFERRED | Optional | 1 | Preferred MPN to use | |||
LTBDATE | Optional | 2020.10.01 | Last time buy date | |||
MANUFACTURER | Mandatory | Manufacturer, Manufacturer short name | ||||
MANUFACTURPART | Mandatory | H2G2-42 | Manufacturer product number | |||
NOTE | Optional | Comment | ||||
ORIGIN | Optional | TXT | 2 | DE | Origin | Country of Origin |
PACKAGETYPE | Optional | Tube ( PACKAGETYPE and BUNDLEWRAPPING is the same field in RamBase) | How the pieces are packed | |||
PACKQTY | Optional | 12 | PackSize | Number of pieces in a box/package | ||
PRODUCTNAME | Mandatory | Google Chromecast | ||||
STATUS | Optional | 1 | Status | |||
UDF | Optional | Custom defined fields |
Possible fields to be loaded into RamBase are listed in the Field-column in the following table. The other columns in this table provide additional information about each field.
Field | Required | Length | Example | Description |
|---|---|---|---|---|
MFR | Y | JHC | Manufacturer's Short name | |
ST | Y | 4 | Status | |
NAME | Jakob Hatteland Computer | Manufacturer's Full name | ||
SEGMENT | Computers | What kind of segment this MFR produces goods for. | ||
URL | http://www.hatteland.com/ | Reference to the manufacturer's web-page. |
Possible fields to be loaded into RamBase are listed in the Field-column in the following table. The other columns in this table provide additional information about each field.
METGROUP will be read from corresponding Product (ART).
Field | Required | Length | Example | Description |
PARTEXTID | Y* | External identifier to the product. * IT, PART or PARTEXTID must be present in the file. | ||
IT | Y* | #100000 | Internal typenumber is a unique ID that identifies the article. This will be assigned by the system when a new article is created. Format: #123456 * IT, PART or PARTEXTID must be present in the file. | |
PART | Y* | Product name * IT, PART or PARTEXTID must be present in the file. | ||
SERIALNO | Y | Serial number of the product | ||
NEXTSERVICE | Date of the next service in the format YYYY.MM.DD | |||
NO | 6 | 100000 | Number of the measuring tool document | |
LASTSERVICE | Date of the next service in the format YYYY.MM.DD | |||
STATUS | Status | |||
STOCKLOC | Stock location | |||
EXTID | 10017812346 | The external identifier to the measuring tool | ||
INSTRUMENTNAME | The name of the instrument |
Possible fields to be loaded into RamBase are listed in the Field column in the following table. The other columns in this table provide additional information about each field.
Field | Required | Length | Example | Description |
|---|---|---|---|---|
OWNER | Y | 1000 | PID reference to the owner of the opportunity | |
TITLE | Y | The title of the opportunity | ||
ASSIGNEE | 1010 | PID reference to the person this opportunity is assigned to. | ||
CNTEXTID | Contact id in the external system. | |||
CNTNO | 100000 | Contact id in RamBase. | ||
CONTRACTLENGTH | Number of months with recurring value | |||
CUSEXTID | Customer id in the external system. | |||
CUSNO | 100000 | Customer id in RamBase. | ||
EXPECTEDCLOSEDATE | 20210531 | The date when you expect the deal to be closed (YYYYMMDD). | ||
ONETIMEREVENUE | The value of startup/creation of the opportunity. | |||
OPSNAME | Case sensitive - The stage this opportunity is currently in. Reference to OPS archive Name. | |||
OPSNO | The stage this opportunity is currently in. Reference to OPS archive NO. | |||
PROBABILITY | 10 | The probability of winning this opportunity in percentage. | ||
RECURRINGREVENUE | 12000 | Monthly recurring value of the opportunity. | ||
SOURCE | The source of this Opportunity/lead. Must be given as the numerical value for option (not as text). | |||
VALUE | 120000 | The value of this opportunity. |
Possible fields to be loaded into RamBase are listed in the Field column in the following table. The other columns in this table provide additional information about each field.
Possible fields to be loaded into RamBase are listed in the Field column in the following table. The other columns in this table provide additional information about each field.
At least one of the fields PRODUCTID, PRODUCTNAME and EXTERNALPRODUCTID must be provided to identify the product.
Field | Required | Length | Example | Description |
PRODUCTID | Y* | #100000 | The Product ID assigned by Rambase. *If PRODUCTNAME is not a unique value you must use PRODUCTID or EXTERNALPRODUCTID. | |
PRODUCTNAME | Y* | Mobile phone | The name of the product (Part). *If PRODUCTNAME is not a unique value you must use PRODUCTID or EXTERNALPRODUCTID. | |
EXTERNALPRODUCTID | Y* | 123456 | The product external ID. *If PRODUCTNAME is not a unique value you must use PRODUCTID or EXTERNALPRODUCTID. | |
ACCKEY | Y | HOMESALE | Account key. Valid options: HOMESALE, VATSALE, EUSALE, EXPSALE, XMSALE, HOMEPURC, VATPURCH, EUPURC, EXPPURC, XMPURC and INVENTORY. Possible to specify multiple values using a commalist, e.g. "HOMESALE,VATSALE". Unique key for account record. | |
ACCCODE | Y** | 1030 | General Ledger (GL) account number. **ACCCODE, DEPNO, PRJNO or ASTNO must have a value. | |
DEPNO | Y** | 1000 | Department number. **ACCCODE, DEPNO, PRJNO or ASTNO must have a value. | |
PRJNO | Y** | 1001 | Project number. **ACCCODE, DEPNO, PRJNO or ASTNO must have a value. | |
ASTNO | Y** | 1003 | Asset number. **ACCCODE, DEPNO, PRJNO or ASTNO must have a value. | |
VATCODE | 00 | Value added tax code. | ||
DIM4 | Dimension 4 | |||
DIM5 | Dimension 5 | |||
DIM6 | Dimension 6 | |||
DIM7 | Dimension 7 | |||
DIM8 | Dimension 8 | |||
DIM9 | Dimension 9 | |||
DIM10 | Dimension 10 |
Possible fields to be loaded into RamBase are listed in the Field-column in the following table. The other columns in this table provide additional information about each field.
Field | Required | Length | Example | Description |
|---|---|---|---|---|
EXTID | Y* | 100 | External system reference/identifier. * Either EXTID or IT or PART + MFR is required. | |
GROUPID | Y | AGR/100000 | Product groups (AGR) ID. | |
IT | Y* | 7 | #100000 | Internal typenumber is a unique ID that identifies the product. This will be assigned by the system when a new product is created. Format: #123456 * Either EXTID or IT or PART + MFR is required. |
MFR | Y* | 16 | AUDI | Manufacturer. The manufacturers must be registered in the Manufacturer (MFR) application in RamBase. * Either EXTID or IT or PART + MFR is required. |
PART | Y* | 190-489-A1 | Product name. * Either EXTID or IT or PART + MFR is required. |
This load will not update existing Production operations (OPR).
Possible fields to be loaded into RamBase are listed in the Field column in the following table. The other columns in this table provide additional information about each field.
Important
The fields are case sensitive.
Field | Required | Length | Example | Description |
OPERATION | Y | Name of the Production operation (OPR). | ||
OPCLASS | Y | PRODUCTION | Production operation class. | |
OPTIME | Y* | 1.5 | Planned run time in hours for the Production operation (OPR). 1h 30min is given as 1.5. * Either OPTIME or OPPRETIME must be specified. | |
OPPRETIME | Y* | 1.5 | Planned setup time in hours for the Production operation (OPR). 1h 30min is given as 1.5. * Either OPTIME or OPPRETIME must be specified. | |
OPPOSTTIME | 1.5 | Planned cleanup time in hours for the Production operation (OPR). 1h 30min is given as 1.5. | ||
RESEXTID | Y** | Resource (RES) id in the external system. ** Either RESOURCENO (100000) or RESEXTID must be included. | ||
RESOURCENO | Y** | 100000 | Resource (RES) id in RamBase. ** Either RESOURCENO (100000) or RESEXTID must be included. | |
EXTID | The Production operation (OPR) external system id. | |||
DESCRIPTION | Description of the Production operation (OPR). | |||
PICKINGMUSTBECOMPLETED | 1 | Set value 1, if picking must be completed. Then all parts for this and previous operations must be picked before current operation can be completed. | ||
HASCHECKPOINT | 1 | Set value 1, if the Production operation (OPR) has a checkpoint set. | ||
CHECKPOINTDESCRIPTION | Checkpoint description. | |||
CHECKSERIALNOONPARTS | 1 | Set value 1, if it require serial number before completion. Then all items in the tracelist for all product units needs to have serial number assigned. |
This load will not update existing Production resources (RESCONFIG).
Possible fields to be loaded into RamBase are listed in the Field column in the following table. The other columns in this table provide additional information about each field.
Field | Required | Length | Example | Description |
NAME | Y | Name of Production resource (RESCONFIG). | ||
ST | Y | 4 | Status. Must be 1 or 4. | |
CLASS | Y | MACHINE | Production resource (RESCONFIG) class. | |
CATEGORY | Y | SINGLE | Production resource (RESCONFIG) category. Legal values are SINGLE, MEMBER or GROUP. | |
SHORTNAME | Short name of Production resource (RESCONFIG). | |||
EXTID | Production resource (RESCONFIG) external system id. | |||
NOTE | Description of the Production resource (RESCONFIG). | |||
GROUPID | Production resource (RESCONFIG) group id. | |||
ASSIGNTORESTRICTEDSTOCKLOCATIONS | 1 | Set value 1, if the Production resource (RESCONFIG) should be assigned to restricted stock locations. | ||
ALLOWGROUPING | 1 | Set value 1, to allow resource to use work order operation grouping. | ||
ALLOWMANHOURS | 1 | Set value 1, if man hours can be added to the the work log of work order operations. | ||
ALLOWMULTIOPERATOR | 1 | Set value 1, if multiple operators can work with one work order operation. | ||
HOURRATEPRE | 100 | Rate per hour for operations setup step, given in system currency. | ||
HOURRATE | 100 | Rate per hour for operations step, given in system currency. | ||
HOURRATEPOST | 100 | Rate per hour for operations post step, given in system currency. | ||
CALCULATECOSTBYPLANNEDHOURS | 1 | Set value 1 = Operation cost is calculated based on planned operation hours. Blank (Default) Operation cost is calculated by logged hours. |
Possible fields to be loaded into RamBase are listed in the Field-column in the following table. The other columns in this table provide additional information about each field.
The order of the loaded structure is given by the value in the field KITOPNO, and the order in the file. It is recommended to put operations first, and then articles (PART). The articles are loaded into the structure, for the corresponding KITOPNO, in the order they are given in the file (top to bottom). It is the value in the field KITOPNO that determines which operation the article belongs to. Operations and articles should be loaded in individual lines, which means that each occurrence in the structure should have a separate line in the file. Nb! The KIT structure will be in Status 1 and must be activated.
Field | Required | Example | Description |
PRODUCTID | Y * | ART/#100752 | IT-number and archive prefix of the article you are building a structure on. *PRODUCTID, PRODUCT or PRODUCTEXTID must be present in the file. |
PRODUCT | Y * | 17,17x1,78 Stang | PART-number of the article your are building a structure on. *PRODUCTID, PRODUCT or PRODUCTEXTID must be present in the file. |
PRODUCTEXTID | Y * | 17,17x1,78 Stang | EXTID of the article you building a structure on. *PRODUCTID, PRODUCT or PRODUCTEXTID must be present in the file. |
KITOPNO | Y | 100 | KIT operation number |
OPERATIONID | Y ** | OPR/100155 | RamBase operation number of operation in KIT with archive prefix. **OPERATIONID, OPERATION or OPERATIONEXTID must be present in the file if an operation is to be added to the structure. |
OPERATION | Y ** | 2037_Ekstern tilvirkning | Operation in the structure. **OPERATIONID, OPERATION or OPERATIONEXTID must be present in the file if an operation is to be added to the structure. |
OPERATIONEXTID | Y ** | 2037_Ekstern tilvirkning | EXTID of the operation. **OPERATIONID, OPERATION or OPERATIONEXTID must be present in the file if an operation is to be added to the structure. |
PARTID | Y *** | #100647 | IT-number for the PART in the structure. ***PARTID, PART or PARTEXTID must be present in the file if an article is to be loaded in the structure. |
PART | Y *** | 12.4962B 316 | PART-number of the PART in the structure. ***PARTID, PART or PARTEXTID must be present in the file if an article is to be loaded in the structure. |
PARTEXTID | Y *** | 12.4962B 316 | EXTID of the PART in the structure. ***PARTID, PART or PARTEXTID must be present in the file if an article is to be loaded in the structure. |
RESOURCEID | Y **** | 100043 | Resource number of the resource in the structure. ****RESOURCEID, RESOURCE or RESOURCEEXTID must be present in the file if a resource is to be added to the structure. |
RESOURCE | Y **** | Resource in the structure. ****RESOURCEID, RESOURCE or RESOURCEEXTID must be present in the file if a resource is to be added to the structure. | |
RESOURCEEXTID | Y **** | EXTID of the resource in the structure. ****RESOURCEID, RESOURCE or RESOURCEEXTID must be present in the file if a resource is to be added to the structure. | |
KITQTY | 2 | Quantity of a PART. If the field is empty in the file, the value will automatically be set to "1" | |
KITTIME | 1 | Time spent during operation/resource | |
KITPRETIME | 0.5 | Time spent prior to operation/resource | |
KITPOSTTIME | 0.1 | Time spent after the operation/resource | |
REVISION | Revision of the product | ||
VERSIONNAME | Baseline | Name of this version of the product | |
VERSIONNOTE | Note to this version of the product. It is possible to insert line breaks by using <br> in this field. | ||
KITPOS | Item specification, e.g., customer's part placement. Optional | ||
WASTAGEPCT | Quantity wastage percentage, adder to the kit quantity for a part. | ||
WASTEAGEQTY | Quantity wasted | ||
OPERATIONINFO | It is possible to insert line breaks by using <br> in this field. | ||
KITEXTCUR | |||
KITEXTPRICE | |||
QUEUETIME | |||
KITSALESPRICE | Sales price set in KIT table in ART given in SYS.CUR, in SAR/STR given in SALESCUR (main level). | ||
KITPONOTE | It is possible to insert line breaks by using <br> in this field. | ||
VERSIONOPERATORINFO | It is possible to insert line breaks by using <br> in this field. | ||
KITLEADTIME |
You find it by typing the RamBase command: "INP/72500". By using this you may upload purchase orders (SPO) to the system.
Field | Required | Length | Example | Description |
|---|---|---|---|---|
SUPPLIERID | Y* | Supplier account. * Either SUPPLIERID or SUPPLIERSECTERNALREFERENCE must be specified. If both are included in the file, SUPPLIERID will be used. | ||
SUPPLIERSEXTERNALREFERENCE | Y* | Suppliers external reference * Either SUPPLIERID or SUPPLIERSECTERNALREFERENCE must be specified. If both are included in the file, SUPPLIERID will be used | ||
CURRENCY | Y | Currency of the purchase order | ||
SUPPLIERSREFERENCENUMBER | Suppliers reference number e.g. quote number | |||
PRODUCTID | Product Id (IT) | |||
PRODUCTNAME | Product name. Either product id or product name must exist on a line | |||
SUPPLIERSPRODUCTNAME | Suppliers product name | |||
QUANTITY | Y | Quantity to purchase | ||
REQUESTEDDATE | Y | Requested date. | ||
NETPRICE | Purchase price. | |||
MPN | MPN, if MPN is provided also Manufacturer is required. | |||
MANUFACTURER | Manufacturer. | |||
NOTE | Note on the SPO item | |||
ACCNO | Account Id (Will override ACCCODE if both are given) | |||
ACCCODE | Account number | |||
TYPE | Type of Purchase Order. Must be blank or “REQUISITION” | |||
DEPNO | Department number | |||
PRJNO | Project number | |||
ASTNO | Asset number | |||
PRODUCTSEXTERNALREFERENCE | Products external reference | |||
VATCODE | Value added tax code | |||
DIM4 | Dimension 4 | |||
DIM5 | Dimension 5 | |||
DIM6 | Dimension 6 | |||
DIM7 | Dimension 7 | |||
DIM8 | Dimension 8 | |||
DIM9 | Dimension 9 | |||
DIM10 | Dimension 10 |
Load purchase orders (SPO). Purchase orders will be registered and forward automatically to a purchase order response (SOA) if a confirmation date is given. This load should be used for startup a new company.
Possible fields to be loaded into RamBase are listed in the Field-column in the following table. The other columns in this table provide additional information about each field.
Field | Required | Format | Length | Example | Title | Description |
|---|---|---|---|---|---|---|
Account | Mandatory | 100648 | Supplier Id *Either ACCOUNT or SUPEXTID is mandatory | |||
ASSIGNEE | ||||||
ASSIGNEEEXTERNALREFERENCE | ||||||
CONF | Confirmed delivery date | |||||
CUR | EUR | Currency | ||||
CUSTOMER | ||||||
CUSTOMEREXTID | ||||||
DOCTYPE | ||||||
IT | TXT | 7 | #1000000 | IT | Product Id | |
ITMEXTID | External reference/Id to item/line | |||||
LOC | TXT | 3 | VAT | Loc | Location | |
MFR | TXT | 16 | AUDI | Mfr | Manufacturer | |
MPN | Manufacturers product name | |||||
NOTE | Will be concatenated with ORDEREXTID in NOTE in SPOITEM | |||||
ORDEREXTID | Mandatory | Purchase order Id in old system (will be added to NOTE on SPOITEM) | ||||
PART | Mandatory | TXT | Servicetime 232333 | Part | Product name | |
PRICE | Mandatory | Price | ||||
PRODUCTSEXTERNALREFERENCE | Products external reference (EXTID) | |||||
QTY | Mandatory | Quantity | ||||
REQ | Request delivery date | |||||
SUP | TXT | 5 | TEM-NO:SUP/100004 | SUP | Suppliers product name for a specific supplier Id | |
SUPEXTID | Mandatory | Supplier Id in old system *Either SUPEXTID or ACCOUNT is mandatory | ||||
SUPPART | JHC 1500 | SUPPART | Suppliers product name | |||
SUPPLIERSORDERREFERENCENUMBER | Suppliers order reference number | |||||
SUPPLIERSREFERENCENUMBER | Suppliers order item reference number | |||||
UDF | ||||||
UDF1 |
Possible fields to be loaded into RamBase are listed in the Field-column in the following table. The other columns in this table provide additional information about each field.
Field | Required | Format | Length | Example | Description |
|---|---|---|---|---|---|
ST | Y | Status | 1 | 4 | Status of the Quality issue (QIS). It may be one of these values: 1 - Registering 2 - Analyzing 4 - Waiting for actions 8 - Reviewing 9 - Closed |
TITLE | Y | Text | Title of the Quality issue (QIS). | ||
DESCRIPTION | Y* | Text | *May be required by Company settings (CSV). Description of the Quality issue (QIS). | ||
TYPE | Y* | Number | 123456 | *May be required by Company settings (CSV). Type of quality issue (DOV). Identifier can be found in QHSES setup (QISADMIN) application next to specific type (columns might be hidden). | |
CATEGORY | Y* | Number | 123456 | *May be required by Company settings (CSV). Quality issue category (DOV). Identifier can be found in QHSES setup (QISADMIN) application next to specific type (columns might be hidden). | |
OCCUREDAT | Y* | Date time - YYYY.MM.DD HH:MM:SS | 2023.08.24 15:48:23 | *May be required by Company settings (CSV). Date and time when this issue occurred. | |
REGISTEREDAT | Recommended when ST >= 2. | Date time - YYYY.MM.DD HH:MM:SS | 2023.08.24 15:48:23 | Date and time when issue was registered. | |
DUEDATE | Date - YYYY.MM.DD | 2023.08.24 | Date for when issue has to be resolved. | ||
CLOSEDAT | Date time - YYYY.MM.DD HH:MM:SS | 2023.08.24 15:48:23 | Date and time issue was closed. | ||
CLOSECOMMENT | Text | Additional comment added when quality issue was closed. | |||
RESPONSIBLE | Y* | Number | 123 | *May be required by Company settings (CSV). PID of person who is responsible for the Quality issue (QIS). | |
ASSIGNEE | Number | 123 | PID of person the issue is assigned to. | ||
CREATEDBY | Number | 123 | PID of creator. | ||
TOTALCOST | Decimal number | 4999.95 | Total cost of the issue. Calculated based on data in sub-table, but editable. (Default 0 if no value is added) | ||
RISKSCORE | Number | 9 | Likelihood multiplied by severity of a quality issue. Used in risk assessment analysis. Calculated based on data in sub-table, but editable. | ||
DEPNO | Y* | Number | 123 | *May be required by Company settings (CSV). Department identifier. | |
LOCNO | Number | 123456 | Location identifier. | ||
REPORTARCHIVE | REPORTARCHIVE and REPORTNO are both required if load is to include reporter. | Text | 3 | CUS | Type of reporter. Possible values limited to CUS (Customer), SUP (Supplier) and PER (Personnel). |
REPORTNO | REPORTARCHIVE and REPORTNO are both required if load is to include reporter. | Number | 123456 | Reporter identifier. | |
EXTERNALREFERENCE | Text | External reference of the client’s or customer’s issue. | |||
EXTERNALTITLE | Text | Title of the Quality issue (QIS) used as title in external correspondence. | |||
REQUIREREVIEW | Recommended | True (=1) or false (=0) | 1 | 0 | True if this issue requires a review. False if not. (Default 0 if no value is added.) |
NOTIFYWHENCLOSED | Recommended | True (=1) or false (=0) | 1 | 0 | If this is set to true, an IMS will be sent to the creator of the issue. (Default 0 if no value is added.) |
ISMARKEDASNCR | Recommended | True (=1) or false (=0) | 1 | 0 | Whether this issue is marked as non conformance report (NCR) or not. (Default 0 if no value is added.) |
SOURCEARCH | SOURCEARCH and SOURCENO are both required if load is to include source. | Text | PWO | Type of source for Quality issue (QIS). | |
SOURCENO | SOURCEARCH and SOURCENO are both required if load is to include source. | Number | 123456 | Identifier of source for Quality issue (QIS). If using ART as source for this field, leave out "#", as this is a pure numerical field (no special characters). | |
SOURCEITM | Number | 1 | Item number of the source object. | ||
SOURCEIT | Text | #123456 | Identifier of the source product, preceded by # character. | ||
SOURCECUSACCOUNT | Number | 123456 | Identifier of the source customer account. Source related fields can be provided from file and will not be overwritten. Main source related fields will be automatically filled with corresponding data. | ||
SOURCESUPACCOUNT | Number | 123456 | Source supplier account identifier. | ||
SOURCEAFFECTEDQTY | Number | Number of affected product units. (Default 0 if no value is added.) Automatically calculated, but editable. | |||
SOURCETOTALQTY | Number | Total amount of units in the source of the issue. (Default 0 if no value is added.) Automatically calculated. | |||
SOURCECOANO | Number | 123456 | Source sales order identifier. | ||
SOURCECOAITM | Number | 1 | Source sales order item identifier. | ||
SOURCERESNO | Number | 123456 | Source production resource identifier. | ||
SOURCEMFRNO | Number | 1234 | Source manufacturer identifier. | ||
SOURCEOPRNODETECTED | Number | 123456 | Production operation identifier of the operation the issue was detected. | ||
SOURCEOPRNOOCCURRED | Number | 123456 | Production operation number of source where the issue occurred. | ||
SOURCEMATERIALIT | Text | #123456 | Source material identifier, preceded by # character. | ||
SOURCEMATERIALCODE | Text | Code of the source material. | |||
SOURCEPRJNO | Number | 234 | Finance project reference from source. | ||
SOURCEPWONO | Number | 123456 | Source production work order identifier. | ||
SOURCESPONO | Number | 123456 | Source purchase order identifier. | ||
SOURCESPOITM | Number | 1 | Source purchase order item identifier. | ||
EXTID | Text | ID-1234 | Identifier of the Quality issue (QIS) in source system which it was exported from. | ||
NOTE1 | Text | Note containing additional information added to the Quality issue (QIS). | |||
REPORTEDBYCUSEXTID | N | Text | ID-1234 | Identifier of customer from external system. If found in loaded customers it is set as a REPORTNO. | |
REPORTEDBYSUPEXTID | N | Text | ID-1234 | Identifier of supplier from external system. If found in loaded suppliers it is set as a REPORTNO. | |
REPORTEDBYPEREXTID | N | Text | ID-1234 | Identifier of employee from external system. If found in loaded employees it is set as a REPORTNO. | |
ARTEXTID | N | Text | ID-1234 | Identifier of the article/product loaded from external system. Articles loaded from external system have their own identifier and when found - this articles is set as a main source in loaded quality issue - will overwrite SOURCEARCH and SOURCENO, SOURCEITM will be empty. | |
CUSTOMTAG | Text | My custom tag text,second custom tag | Text added as custom tags to the imported quality issue. Might be more tags, they should be separated by comma. | ||
UDF | 123.123 - decimals with "." as a decimal separator 0/1 - zero or one as a boolean value yyyy.mm.dd - as date yyyy.mm.dd hh:MM:ss as datetime | UDF_NameOfCustomField | Custom field at main level of the quality issue. There might be many custom fields and each one of them should have separate column in .csv file with "UDF_" prefix. Specific formats are given in format column. |
Possible fields to be loaded into RamBase are listed in the Field-column in the following table. The other columns in this table provide additional information about each field.
Field | Required | Format | Length | Example | Title | Description | Edit FLD |
|---|---|---|---|---|---|---|---|
ACCOUNT | 100648 | ||||||
ACCOUNTEXTID | |||||||
CUR | EUR | ||||||
CUSPART | TXT | 24 | 1234 | CusPart | Customers Internal Part Number | ||
DELTERM | |||||||
DELTERMPLACE | |||||||
DUEDATE | |||||||
FREIGHT | |||||||
INTERN | |||||||
LOC | TXT | 3 | VAT | Loc | Location: A three character Warehouse Code, identyfing a warehouse. | ||
MFR | TXT | 16 | Audi | Mfr | Brand/Manufacturer | ||
NOTE | |||||||
PART | TXT | Servicetime 232333 | Part | Part number | |||
PARTEXTID | |||||||
PAYTERM | |||||||
PRICE | |||||||
QTY | |||||||
REQ | |||||||
SCODE | |||||||
SERIALNUMBER | |||||||
SHIPBYNO | |||||||
SHIPPINGADDRESSID | |||||||
UDF | |||||||
UDF1 | |||||||
YOURITM | |||||||
YOURNO | |||||||
YOURREF |
Possible fields to be loaded into RamBase are listed in the Field column in the following table. The other columns in this table provide additional information about each field.
Field | Required | Length | Example | Description |
|---|---|---|---|---|
DOCID | Y | |||
PRICE | Y | |||
PRICECAT | Y* | * Required if DOCID is given without an item reference. | ||
PRICECLASS | Y* | * Required if DOCID is given without an item reference. | ||
UNITID | Y* | * Required if DOCID is given without an item reference. | ||
FROM | ||||
FROMDATE | ||||
REMARK |
Add users to existing Roles.
Possible fields to be loaded into RamBase are listed in the Field-column in the following table. The other columns in this table provide additional information about each field.
Field | Required | Length | Example | Description |
|---|---|---|---|---|
USERID | Y | 11594 | Identification number of User (PID) | |
ROLEID | Y | 100001 | Identification number of Role | |
VALIDFROM | 2023.01.01 | Date the user should have the role from. Will be set to todays date if blank or earlier than today’s date. The user’s access will be in status 3 if this date is in the future, and it will go to status 4 when the date is reached. | ||
VALIDTO | 2023.12.31 | Date the user should have the role to. ValidTo will be blank if not given in load. |
Note
Only roles containing the AddRoleUsers permission (PRM/101467) are allowed to run this import.
Create a file in csv format
The file should have the following fields included, with the fields as header.
Field name | Description |
|---|---|
ACCOUNT | Customer Id. Unique number created by RamBase. This is not required. |
PRODUCTID | The identification of the product, e.g.: #123456 If a productid is provided it will be checked against the database to see if it exists. The job will log an error if no products are found. This field is required. |
PRODUCTNAME | The name of a product, You do not have to give a product id, a product name is enough. RamBase searches the product archive with the provided name. If the product can not be found the job logs an error. This field is required. |
CUSTOMERSPRODUCTNAME | The customer's name of the product, If neither product id nor product name is provided, the customer can upload the customers product name. This requires an account to be also provided. RamBase searches the product archive based on the customer's product name and the customer account. An error is logged if no match is found. This field is required. |
QUANTITY | The number of products, e.g.: 10. This field is required. |
REQUESTEDDATE | The requested delivery date for the product. This date is used for further planning in Sales and operation planning (SOP). Use the formats DD.MM.YYYY, DD-MM-YYYY, YYYY.MM.DD, YYYY-MM-DD. This field is required. |
LOC | Location of the forecast, e.g.: VAT. If LOC is not provided it will be set to LOC from the COM archive. The location will be validated against the database and an error is logged if no location is found.There is also a limitations that there can not be a mix of locations in the file – only one. |
PROBABILITY | The probability, in percentage, of receiving a firm order, e.g.: 65. |
CUSTOMERSREFERENCE | The customers reference, e.g.: SPO/12345 (any string). |
CUSTOMERSREFERENCENO | The customers reference number, e.g.: SFC/112233 (any string). |
SHIPPINGADDRESSID | Refers to a specific shipping address for the customer, e.g.: If the field is given, it is validated along with the provided account. If no shipping address with this identifier is located in the provided customer account, then an error is logged. |
Example of a CSV file
ACCOUNT;PRODUCTID;PRODUCTNAME;CUSTOMERSPRODUCTNAME;QUANTITY;REQUESTEDDATE;LOC;PROBABILITY;CUSTOMERSREFERENCE;CUSTOMERSREFERENCENO;SHIPPINGADDRESSID101147;101904;7309 VW Frontlykter;;7;06.01.2021;1;VAT;;FCS/1301;PO/2346;1
Possible fields to be loaded into RamBase are listed in the Field column in the following table. The other columns in this table provide additional information about each field.
Field | Required | Length | Example | Description |
|---|---|---|---|---|
ACCCODE | 1000 | General ledger account id. | ||
ACCOUNT | Y | 100033 | Customer id. | |
CUR | SEK | Currency. If currency is not specified, the first currency selected on the Customer (CUS) in the CUS application will be set. | ||
DEPNO | 1001 | Department id. | ||
DUEDATE | 10 | 2024.01.01 | Date when invoice is due. | |
EXTID | 99 | Unique ID for the transaction from the legacy (old) system. It is recommended to use the same value as in the YOURNO field. | ||
IT | Y | 7 | #100486 | Product id. |
NOTE | Note. | |||
OURNO | Sellers reference number. | |||
PRICE | Net price. | |||
PRJNO | 1000 | Project id. | ||
QTY | Y | Quantity. | ||
SELLER | 149 | Seller. | ||
TEXT | Default Article for Service | Product description. | ||
YOURITM | Customers item reference number. | |||
YOURNO | Customers reference number. | |||
YOURREF | Customers reference, typically a person. |
Possible fields to be loaded into RamBase are listed in the Field-column in the following table. The other columns in this table provide additional information about each field.
Field | Required | Length | Example | Description |
ACCOUNT | Y* | Customer identifier. Has to match a customer in ST>=2 and ST<9. *ACCOUNT or ACCOUNTEXTID must have a value. (If ACCOUNTEXTID is given in the file, and ACCOUNT is not given, the program will search for customer via the EXTID field in the Customer (CUS) application). | ||
ACCOUNTEXTID | Y* | The customer external ID. *ACCOUNT or ACCOUNTEXTID must have a value. (If ACCOUNTEXTID is given in the file, and ACCOUNT is not given, the program will search for customer via the EXTID field in the Customer (CUS) application). | ||
YOURNO | Y | Sales Order Request number. | ||
QTY | Y | 10 | Ordered quantity. | |
CUR | Y | 3 | EUR | Currency. |
YOURREF | John Doe | Sales Order Request reference, typically a person. | ||
DELTERM | Delivery terms. | |||
DELTERMPLACE | A place related to DELTERM. | |||
UDF | CustomerPartnerOrderId | User defined field, main level. | ||
SHIPBY | Preferred shipping method. | |||
CARRIER | BRING | Name of transporter. | ||
SADDRID | Shipping address. | |||
SNAME | Doe | Company name, or a person's surname in the shipping address. | ||
SADDR1 | Mystery Lane 123 | First address line in the shipping address. | ||
SADDR2 | Post Box 9077 | Second address line in the shipping address. | ||
SCITY | NEDRE VATS | City/town/village in the shipping address. | ||
SPOCODE | 5578 | Postal code in the shipping address. Will be validated against the POC archive in RamBase. Illigal values will be discarded. | ||
SSTATE | TN | A US state. | ||
SHIPCC | Country code is a two-character code identifying a country. The code follows the ISO 3166 standard. Will be validated against the CON archive in RamBase. | |||
SATTN | Attention in the shipping address | |||
SPHONE | +4752763390 | Phone number for this shipping address. | ||
SEMAIL | Email address for this shipping address. | |||
PART | The product in the order. (If PARTEXTID is given in the file, the program will first try to find the product (ART) based on PARTEXTID. If ART is not found, the program will search via CUSPART from file, and by PART from file as third priority. If no product is found, the program will set product based on the Company setting (CSV) Unknown product for sales order). | |||
PARTEXTID | The external ID of the product. (If PARTEXTID is given in the file, the program will first try to find the product (ART) based on PARTEXTID. If ART is not found, the program will search via CUSPART from file, and by PART from file as third priority. If no product is found, the program will set product based on the Company setting (CSV) Unknown product for sales order). | |||
MFR | The manufacturer for the product. | |||
CUSPART | The customers part number. (If PARTEXTID is given in the file, the program will first try to find the product (ART) based on PARTEXTID. If ART is not found, the program will search via CUSPART from file, and by PART from file as third priority. If no product is found, the program will set product based on the Company setting (CSV) Unknown product for sales order). | |||
PRICE | The price of the product. | |||
REQ | 2019.10.25 | Must have the format YYYY.MM.DD or YYWW. | ||
YOURITM | The customers reference number. | |||
NOTE | Note from the customer. | |||
INTERN | Info to be set in an DMS/I00 MSG. | |||
REVISION | Requested product revision. | |||
ISBLOCKEDFORPRODUCTION | If set to 1, the order will be blocked for production. | |||
UDF1 | Prefix | User defined field, item level. |
To open the Input menu (INP) for Sales orders (COA), type INP in the program field and find COAUPLOAD in the list. Press ENTER to access the Input menu (INP) for Sales orders (COA). The users may upload Sales orders (COA) to the system by using the Input menu (INP).
Field | Required | Format | Length | Example | Title | Description |
|---|---|---|---|---|---|---|
ACCOUNT | Y* | 100648 | Customer identifier. *Customer identifier (ACCOUNT) or Customer identifier from external system (ACCOUNTEXTID) is required. | |||
ACCOUNTEXTID | Y* | Customer identifier from external system. *Customer identifier (ACCOUNT) or Customer identifier from external system (ACCOUNTEXTID) is required. | ||||
ASSIGNEE | 4689 | User identifier (PID). | ||||
ASSIGNEEEXTID | External user identifier. | |||||
CONF | 2023.10.10 | Confirmed delivery date. Format yyyy.mm.dd | ||||
CUR | Y | NOK |
| Currency (Three character code following the ISO 4217 standard). | ||
CUSPART | Y** | TXT | 24 | 401321 | Customer's product name (customer's internal name of the product). **CUSPART, PART or PARTEXTID is required. | |
DISCPCT | 5.50 | Discount percentage | ||||
EXTID | External ID for Sales order (COA). | |||||
FREIGHT | Freight amount in Sales orders (COA) currency. | |||||
INTERN | Information notification in Sales order item (COAITEM). | |||||
ITMEXTID | External ID for the Sales order item (COAITEM). | |||||
LOC | TXT | 3 | OSL | Location (3 letters abbreviation). | ||
MFR | TXT | 16 | ERP |
| Manufacturer (Short name/code of the manufacturer) | |
NOTE | Note to customer at Sales order item (COAITEM) level. | |||||
PART | Y** | TXT | Steel Pipe Ø 8" x 6000 mm | Part | Product name. **CUSPART, PART or PARTEXTID is required. | |
PARTEXTID | External product ID. **CUSPART, PART or PARTEXTID is required. | |||||
PAYTERM | Payment terms | |||||
PLANNEREXTID | External planner user identifier. | |||||
PLANNERPID | 4598 | Planner user identifier (PID). | ||||
PRICE | Y | Gross price in Sales order currency. (Represents price per unit before any discount is applied.) | ||||
PROJECTLEADEREXTID | External planner user identifier. | |||||
PROJECTLEADERPID | 4698 | Project leader user identifier (PID). | ||||
QYT | Y | Quantity (number of units which is ordered by customer). | ||||
REMARK | Note to customer. | |||||
REQ | YYYY.MM.DD | 2023.10.10 | Requested delivery date. | |||
SHIPBYNO | 1014 | Shipping service ID. | ||||
SHIPPINGADRESSID | 3 | Address identifier which refers to an address for this customer that should be used as shipping address in the Sales order (COA). | ||||
UDF | UDF_NameOfCustomField | Custom field at main level of the Sales order (COA) | ||||
UDF1 | UDF1_NameOfCustomField | Custom field for the Sales order item (COAITEM) level. | ||||
YOURITM | Customer reference number at Sales order item (COAITEM) level. | |||||
YOURNO | Y*** | Customer reference number at Sales order (COA) main level. ***Required except when loading rental documents (DOCTYPE=RENTALORDER). | ||||
YOURREF | Customers reference. (Typically a person.) |
Possible fields to be loaded into RamBase are listed in the Field-column in the following table. The other columns in this table provide additional information about each field.
Field | Required | Length | Example | Description |
EXTID | Y* | 12345 | External reference/identifier. Unique reference to a goods reception. Can be used in external systems. | |
PARTEXTID | Y* | EP1K50TC144-2 | Product name. Must exist in the article archive. PART and MFR are used to identify the correct product. | |
SSAITEMID | Y* | SSA/102716-1 | *You must provide either SSAITEMID or both EXTID and PARTEXTID to identify the Shipping Advice line the serial number should be created on. | |
SERIALNO | Y | Serial number |
Possible fields to be loaded into RamBase are listed in the Field-column in the following table. The other columns in this table provide additional information about each field.
When loading a file using the SOAFORWARD import job, the SOAFORWARD job will only register a new Purchase order response (SOA) item if there are changes to the item that require a new Purchase order response (SOA) item to be registered. This could be a change to the confirmed/requested date, quantity or change in price. If there are no changes to these fields, there will not be created a new Purchase order response (SOA) item.
Possible fields to be loaded into RamBase are listed in the Field-column in the following table. The other columns in this table provide additional information about each field.
Field | Required | Length | Example | Description |
|---|---|---|---|---|
PURCHASEORDERID | Y | SPO/100000-1 | Must contain either case or source of SOA/SPO item that should be forwarded. | |
PRODUCT | Y* | Product name. * Either PRODUCT or SUPPLIERPRODUCTNAME is mandatory. | ||
SUPPLIERSPRODUCTNAME | Y* | Suppliers product name. * Either PRODUCT or SUPPLIERPRODUCTNAME is mandatory. | ||
BUYERSREFERENCENUMBER | Buyers reference number. | |||
CONFIRMEDDELIVERYDATE | Confirmed delivery date. | |||
NETPRICE | Purchase price. | |||
NOTE | Note on the SOA item. | |||
QUANTITY | Quantity to be forwarded. | |||
REQUESTEDDELIVERYDATE | Used to find (prioritize, does not need to match) item to forward (not updated when forwarded). | |||
SUPPLIERSREFERENCENUMBER | Suppliers reference number. |
Possible fields to be loaded into RamBase are listed in the Field-column in the following table. The other columns in this table provide additional information about each field.
Warning
Remember that the location (LOC) and level separator needs to be defined before loading stock locations.
The stock locations can easily be controlled and activated by the context menu option Activate stock location branch in the Stock locations (STL) application, once the import is completed.
Field | Required | Recommended | Length | Example | Description |
|---|---|---|---|---|---|
BLOCKLINKING | 1 | Blank or 1 | |||
BLOCKPICKING | 1 | Blank or 1 | |||
DESCRIPTION | Y | Pallet | |||
ISBLOCKEDFORSTOCK | 1 | Determines whether or not the stock location is blocked for moving goods etc. | |||
LEVEL1 | Y | H1 | StockLocation Name, e.g H1 | ||
LEVEL2 | R3 | StockLocation Name, e.g R3 | |||
LEVEL3 | R8 | StockLocation Name, e.g R8 | |||
LEVEL4 | H4 | StockLocation Name, e.g H4 | |||
LEVEL5 | P2 | StockLocation Name, e.g P2 | |||
LEVEL6 | |||||
LEVEL7 | |||||
LEVEL8 | |||||
LOC | Y | 3 | OSL | Default stock location | |
PARTCHANGEDEF | Blank or 1, Change part in Production |
Import Stock taking data (STT) and register it to Status 2 - Pending counting.
Field | Required | Format | Length | Example | Title | Description |
|---|---|---|---|---|---|---|
COUNTBY | Optional | 2798 | PID assigned to perform the counting. | |||
COUNTSELECTEDAREAONLY | Optional | 1 | Only count area given by FROMSTOCKLOC and TOSTOCKLOC. Only allowed if type is "STOCK LOCATION". | |||
FROMSTOCKLOC | Optional | H1-S1-R2 | First stock location in range. Required and only allowed if type is "STOCK LOCATION". | |||
GOODSRECEPTIONID | Opitional | TEM-NO:SSA/100502-1 | Reference to goods reception XXX-XX:SSA/nnnnnn-n. Required and only allowed if type is "GOODS RECEPTION". | |||
LOC |
| TXT | 3 | VAT | Loc | Location. Required if type is "STOCK LOCATION" or "PRODUCT". |
MAXNETPRICE | Optional | 5000 | Maximum net price of Goods reception item (SSAITEM) to be included in Stock taking (STT) (local CUR). Only allowed if type is "STOCK LOCATION". | |||
MINNETPRICE | Optional | 10 | Minimum net price of Goods reception item (SSAITEM) to be included in Stock taking (STT) (local CUR). Only allowed if type is "STOCK LOCATION". | |||
NAME | Optional | Annual stock taking 2024 | Name of the Stock taking (STT) | |||
PRODUCTID | Optional | #100325 | Product id (IT) number. *Required, and only allowed, if type is "PRODUCT". | |||
STOCKCLASSIFICATION | Optional | A | Restrict stock taking to given stock classification. Only allowed if type is "STOCK LOCATION" | |||
TOSTOCKLOC | Optional | H1-S1-R4 | Last stock location in range. *Required and only allowed if type is "STOCK LOCATION". | |||
TYPE | Y | STOCK LOCATION | STOCK LOCATION, GOODS RECEPTION or PRODUCT
|
Note
If content in a row is not according to the rules described for the "TYPE" field, Stock taking (STT) will not be created and details about why will be logged in In/out log view (IOL/;NAME:STTLOAD).
If Stock taking (STT) is attempted to be created for type “STOCK LOCATION”, there will be performed a check to identify if there already exists a non-completed (status less than 9) Stock taking (STT), which overlaps FROMSTOCKLOC and TOSTOCKLOC.
If overlapping Stock taking (STT) of type "STOCK LOCATION" is found, Stock taking (STT) will not be created for this row, and details about why will be logged in In/out log view (IOL;NAME:STTLOAD).
This load is handling both creation and updating of CAT/SAT transactions. Possible fields to be loaded into RamBase are listed in the Field-column in the following table. The other columns in this table provide additional information about each field.
Note
When loading account payable posting (TRANSTYPE=S), amounts must be with “-“ (minus) if it is a supplier invoice. If it is a supplier credit note, it should be without the “-“ (minus).
Field | Required | Length | Example | Description |
EXTID | Unique ID for the transaction from the legacy (old) system. It is recommended to use the same value as in the YOURNO field. | |||
DOC | CIN/101456 | When loading open posts for conversions, please leave this field empty RamBase transaction Id. (Sales Invoice number, credit number, payment number etc.). The field is a reference to a RamBase transaction document. If the field is loaded as empty, a "dummy" document reference will be created by the load. | ||
TRANSTYPE | Y | C | "C" = Customer transaction "S" = Supplier Transaction Both CAT (receivables) and SAT (payables) can be created from the same file. Based on the value in the Type field, the conversion programme will create either a CAT or a SAT document. | |
ST | Y | 1 | 9 | RamBase status code. The main purpose of the field is to differ between open (st:4) and closed (st:9) ledger postings. In addition, SAT documents can have status code 6 (marked for manual handling). Both CAT and SAT can have status code 8 (paid, but not confirmed). It is not advisable to have unconfirmed payments at the time of conversion, so st:8 is not recommended used in load. |
ACCOUNT | Y** | 10000 | Customer/Supplier account number. The number should match the RamBase customer/supplier number. **Either ACCOUNT or ACCOUNTEXTID must be present in the file. | |
NAME | HATTELAND DATA A/S | Company name (Account name). Drawn from the customer/supplier register in RamBase from the value in the account field, and is therefore usually not loaded. | ||
ICTDB | JHA-NO | Inter Company Trading DataBase. Used to identify customers/suppliers which are companies within the same corporation. The value is a RamBase database reference and should not be used unless the database reference actually exists in the RamBase system. | ||
CUR | Y | 3 | NOK | Document currency. An abbreviation of three letters which corresponds to the CUR register in RamBase. |
KID | 10124001029384 | KID. Norwegian transaction code for recognition of incoming payments. | ||
RATE | Y | 42041 | 1.0000 | Exchange rate. If document is issued in local currency the exchange rate is 1. |
AMOUNT | Y | 12 | 77490.00 | Amount = Qty * Price in transaction currency. |
CAMOUNT | 12 | 77490.00 | Net amount converted to home (local) currency. | |
DATE | Y * | 12 | YYYY.MM.DD | Transaction date (the date the transaction was issued). *To ensure best possible operation of age distribution and payment statistics, DATE, DUEDATE and PAYDATE should be loaded as accurate as possible. Format: YYYY.MM.DD |
REGDATE | Y | 10 | YYYY.MM.DD | The registration date of the document. Format: YYYY.MM.DD |
PERIOD | Y | YYYYMM | Account/fiscal period. | |
SHIPCC | 2 | NO | Shipping Country Code. On customer postings this is the code of the country the goods are shipped TO. On supplier postings it is the country code the goods are shipped FROM. | |
INVCC | 2 | SE | Invoice Country Code. On customer postings this is the code of the country the invoice are issued TO. On supplier postings it is the country code the invoice are issued FROM. | |
VATAMT | 1415.04 | VAT Amount. | ||
YOURNO | Y ** | 20 | Customer's/supplier's order number. When it comes to conversion, the value in the YOURNO field should be set to a value that refers to a searchable ID in the legacy (old) system. YOURNO in combination with ACCOUNT must be unique. If YOURNO is not unique, the first CAT/SAT transaction with a specific YOURNO will be updated when an additional CAT/SAT transaction is loaded with the same YOURNO. ** YOURNO is mandatory if KID is not included. | |
RMRFLAG | 1 | Reminder Flag: "1" - If this is set to 1, it means that reminders should not be created for this post. | ||
INTFLAG | 9 | Interest Flag: "9" - If set to 9, it means that interests should not be created for this post. | ||
DUEDATE | Y* | 10 | 1996.10.13 | DueDate. Last date which invoice has to be paid. Format: YYYY.MM.DD *To ensure best possible operation of age distribution and payment statistics, DATE, DUEDATE and PAYDATE should be loaded as accurate as possible. |
PAYDOC | PAY/100119-1 | Transaction id from payment received for transaction. If status=9, and this field is empty, PAYDOC is set to PAY/xxx. PAYDOC is a reference to a rambase document and is not loaded if the converted system is a non-rambase installation | ||
PAYBY | CLEARING | The method of payment (MANUAL, CLEARING, EDI etc). It's also a internal rambase reference and is usually not loaded when the converted system is non-Rambase | ||
PAYDATE | Y* | 14 | 1997.02.14 | Transactiondate of payments. Format: YYYY.MM.DD If status=9, and this field is empty, PAYDATE will be set to (if present): 1. DUEDATE 2. DATE 3. Date the file is loaded *To ensure best possible operation of age distribution and payment statistics, DATE, DUEDATE and PAYDATE should be loaded as accurate as possible. |
PAYREGDATE | 2005.10.14 | Registration date of payment received for transaction. Format: YYYY.MM.DD If status=9, and this field is empty, PAYREGDATE will be set to (if present): 1. DUEDATE 2. DATE 3. Date the file is loaded | ||
PAYPERIOD | 199702 | Period of payments received for transaction. If status=9, and this field is empty, PAYPERIOD will be calculated from (if present): 1. DUEDATE 2. DATE 3. Date the file is loaded To show a correct age distribution of historical closed posts, PAYDATE should be loaded as the actual date of payment. | ||
TEXT | 50 | Bank-fee | Description of the transaction in free text. It's recommended to use a similar value as in the yourno field (for instance an invoice number), with additional text to make a reference to the converted system. | |
ACCOUNTEXTID | Y** | The customer's/supplier's unique ID from the legacy (old) system. To identify the customer/supplier the transaction is to be connected to. **Either ACCOUNT or ACCOUNTEXTID must be present in the file. | ||
NOUPDATE | Must be set to Y or YES to prevent update on an existing document. |
Possible fields to be loaded into RamBase are listed in the Field-column in the following table. The other columns in this table provide additional information about each field.
Field | Required | Length | Example | Description |
NAME | Y | Doe | Company name, or a person's surname. | |
POCODE | Y | 5578 | Postal Code. Will be validated against the POC archive in RamBase. Illegal values will be discarded. | |
CITY | Y | NEDRE VATS | City/town/village. | |
CCODE | Y | 2 | NO | Country code is a two-character code identifying a country. The code follows the ISO 3166 standard. Will be validated against CON archive in RamBase. |
CUR | 3 | NOK, EUR | Currencies this supplier sells in. May contain a comma list if several. Is validated against a subset of ISO 4217. | |
ST | Y | 1 | 4 | Status of the supplier. 1:New, 2:Pending internal approvement, 4:Active, 9:Obsolete. Defaults to 2 if not provided. |
ACCOUNT | 10000 | Supplier Id. Unique number created by RamBase. Provide this value if you want to update an existing supplier. | ||
FIRSTNAME | John | A person's first name. | ||
ATTN | Jane Doe | Attention. | ||
ADDR1 | Mystery Lane 123 | First address line. | ||
ADDR2 | Post box 9077 | Second address line. | ||
STATE | Y* | CA | * Required if country (CCODE) is Canada or USA. | |
PHONE | +4752763390 | Supplier's main phone number. Can not contain any letters or spaces, but + is OK as prefix. Must be four digits or more. | ||
john.doe@msn.com | Supplier's main email address. Will be validated. | |||
ENTERPRISE | 924054832 | Legal entity, a unique enterprise/organization number. The format is different from country to country. | ||
VATNO | DK669248438 | Value Added Tax (VAT) registration number. Unique number assigned by the relevant tax authority. The format is different from country to country. | ||
LANGUAGE | 3 | Eng | Preferred Language. Value is stored as a three character code, according to ISO 639-2 standard. Will be used to produce output to supplier in correct language. | |
SHIPBYNO | 100036 | Preferred shipping method for purchase orders. Will typically be a carrier's product. Numbers are references to SHP archive. | ||
OUTGOINGSHIPBYNO | 100012 | Preferred shipping method for sales orders. Will typically be a carrier's product. Valid options have to be set up by JHC personnel in advance. Numbers are references to SHP archive. | ||
DELTERM | FCA Oslo | Delivery terms for shipments from supplier. Valid options have to be set up by JHC personnel in advance. | ||
PAYTERM | NET,10 | Payment terms for this supplier. Valid options have to be set up by JHC personnel in advance. If duedate on invoice documents are not manually filled, this will be calculated based on PayTerm. Valid options: ADVANCE - Payment in advance NET, X - Day(s) net COD - Cash on delivery COP - Cash on pick up EOCM, X - Net x day(s) EOM | ||
PAYBY | SWIFT | Method of payment. Valid options have to be set up by JHC personnel in advance. | ||
ACCOUNTCL | C | Classification of suppliers. Valid options have to be set up by JHC personnel in advance. | ||
PAYBLOCKED | 1 | If set to 1, the system will block for generating payments to supplier. 0 is default value -> no blocking | ||
MSG | Duplicate registered, use SUP/12345 instead. | Internal note/notice about the supplier. | ||
ICTDB | JHR-NO | Inter Company Trading DataBase. Used to identify internal customer/suppliers | ||
EXTID | External supplier reference/identifier. |
Possible fields to be loaded into RamBase are listed in the Field-column in the following table. The other columns in this table provide additional information about each field.
Field | Required | Length | Example | Description |
ACCOUNT | Y* | 100000 | Supplier Id. Unique number created by RamBase. Provide this value if you want to update an existing supplier. *ACCOUNT or EXTID must be present in the file. | |
EXTID | Y* | 12345 | External supplier reference/identifier. Can be used in external systems. *ACCOUNT or EXTID must be present in the file. | |
BANKCCODE | Y | DK | The bank's country code | |
BANKACC | Y** | 3254.12.35675 | Bank account number. **BANKACC or IBAN must be present in the file. | |
BANKSWIFT | dabano22 | The bank's international identification number. 8 or 11 characters. | ||
BANKNAME | Danske bank | Bank name | ||
BANKCODE | 123002911 | Bank code | ||
BANKCUR | Y | DKK | Currency | |
IBAN | Y** | NO9386011117947 | International Bank Account Number. **BANKACC or IBAN must be present in the file. |
Possible fields to be loaded into RamBase are listed in the Field-column in the following table. The other columns in this table provide additional information about each field.
Field | Required | Format | Length | Example | Title | Description | Edit FLD |
|---|---|---|---|---|---|---|---|
BACKUPRESPONSIBLEID | 11209 | ||||||
CATEGORY | Mandatory | Utilities | |||||
CONTACTID | |||||||
CURRENCY | NOK | ||||||
DESCRIPTION | Desciption field | ||||||
EFFECTIVEDATE | Mandatory | 2022.02.01 | |||||
EXPIRATIONDATE | Mandatory | 2024.06.30 | |||||
EXTERNALSUPPLIERID | SUPPLIERID or EXTERNALSUPPLIERID is mandatory for new contracts | ||||||
ISTERMINABLE | 1 | ||||||
MAINRESPONSIBLEID | 13688 | ||||||
PERIODSPECIFICATION | Week | ||||||
PURCHASECONTRACTID | Mandatory for update of contract | ||||||
RENEWALDUEDAYS | 45 | ||||||
STATUS | 4 | Values: 4 or 9 (Activate or Deactivate) | |||||
SUPPLIERID | 100624 | SUPPLIERID or EXTERNALSUPPLIERID is mandatory for new contracts | |||||
TERMINATIONNOTICEPERIOD | |||||||
TITLE | Consumption parts | ||||||
UDF | |||||||
VALUEPERPERIOD | 4500 |
Possible fields to be loaded into RamBase are listed in the Field-column in the following table. The other columns in this table provide additional information about each field.
Field | Required | Length | Example | Description |
CUR | Y | NOK | Currency. The value must valid for the given supplier. | |
PART | Y | EP1K50TC144-2 | Product name. Must exist in the article archive. PART and MFR are used to identify the correct product. | |
MFR | Y | ACME | Manufacturer. | |
PRICE | Y | 168.00 | Quoted price in given currency. | |
ACCOUNT | 10278 | Supplier Identifier. | ||
YOURNO | Supplier quote number. | |||
YOURREF | John Doe | Supplier reference, typically a person. | ||
VALIDFROM | 2003.03.17 | Date that the quote is valid from. Can be overruled on each item by value in EXPIRE. | ||
VALIDTO | Y | 2004.03.05 | Date that the quote is valid to. | |
ISSHIPANDDEBIT | 1 | 1 | Valid options are "0" and "1", should be set to "1" if it is a Ship & Debit quote. It is automatically set to "0" which means that the system will understand it as an ordinary quote. | |
QTY | 5040 | Quoted quantity. | ||
EXPIRE | 2015.06.30 | Date that a specific item in the quote is valid to. | ||
CUSTOMER | TEM-NO:CUS/10246 | Customer to be supplied if the supplier quote is valid for one customer only. |
Possible fields to be loaded into RamBase are listed in the Field-column in the following table. The other columns in this table provide additional information about each field.
Field | Required | Length | Example | Description |
TARIC | Y | 8531.90.90.090 | Customs clarification code | |
CCODE | Y | PL | Country code is a two-character code identifying a country. The code follows the ISO 3166 standard. | |
DESCRIPTION | DISPLAY, PARTS | Description. | ||
DUTYPCT | 5.2 | Duty percent. Ordinary duty rate, but goods can be duty free if the goods have preferential origin status. | ||
UNITDUTY | 1.28 | Unit duty. | ||
WEIGHTDUTY | 32.29 | Weight duty. | ||
MEASURE | GRM | Measure. The unit that will be used for preparation of statistical data. Valid options: GRM = Gram MTK = m2 (square meters) MTQ = m3 (cubic meters) NMB = pieces NPR = pairs | ||
ENVIRONMENTTAX | 20.32 | Environment tax. Only some countries have this tax. | ||
THIRDCONLIMITPCT | 2.5 | Third country limit cost in percent. Used to calculate if goods produced in a certain country, with components from 3rd countries included, are obligated to preferential origin status. | ||
UNION | EU | Union. |
Imports tasks from CSV file.
Field | Required | Format | Example | Description |
|---|---|---|---|---|
ST | No, default is 1 | Status | 4 | Status of the task:
|
TITLE | Yes | Text | Title. | Title of the task. |
DESCRIPTION | Text | Description. | Description of the task. | |
CREATEDBY | Partially yes - may be skipped if it will be able to find employee by name or email | Number | 11111 | The PID of the person who created this task. |
CREATEDBYNAME | Text | John | Used to find CREATEDBY if empty, based on first and last name or email. | |
CREATEDBYFIRSTNAME | Text | Doe | Used to find CREATEDBY if empty, based on first and last name or email. | |
CREATEDBYEMAIL | Text | john.doe@mail.com | Used to find CREATEDBY if empty, based on first and last name or email. | |
ASSIGNEDTO | Number | 11111 | The PID of the person who this task is assigned to. | |
ASSIGNEDTONAME | Text | Doe | Used to find ASSIGNEDTO if empty, based on first and last name or email. | |
ASSIGNEDTOFIRSTNAME | Text | John | Used to find ASSIGNEDTO if empty, based on first and last name or email. | |
ASSIGNEDTOEMAIL | Text | john.doe@mail.com | Used to find ASSIGNEDTO if empty, based on first and last name or email. | |
PRIORITY | Number | 2 | Priority of the task:
When skipped default value is 3. | |
DEADLINE | Datetime - yyyy.mm.dd HH:MM:ss | The date and time the task needs to be done. | ||
ISPRIVATE | Integer | 0 | True if this task is only visible to the creator of the task. 0 - False, 1 - True. | |
CREATEDAT | Datetime - yyyy.mm.dd HH:MM:ss | 2020.02.26 12:09:45 | Date and time when the task was created. | |
COMPLETEDAT | Datetime - yyyy.mm.dd HH:MM:ss | 2020.02.26 12:09:45 | Date and time when the task was set to Status 8 - Done. | |
STARTEDAT | Datetime - yyyy.mm.dd HH:MM:ss | 2020.02.26 12:09:45 | Date and time when the task was started. | |
CREATEDINDB | Text | TEM-NO | The database the task was created in. Default will be database, where loading script was started. | |
COMPLETEDBY | Number | 11111 | Reference to the user (PID) who marked this task as done. | |
COMPLETEDBYFIRSTNAME | Text | John | Used to find COMPLETEDBY if empty, based on first and last name or email. | |
COMPLETEDBYNAME | Text | Doe | Used to find COMPLETEDBY if empty, based on first and last name or email. | |
COMPLETEDBYEMAIL | Text | john.doe@mail.com | Used to find COMPLETEDBY if empty, based on first and last name or email. | |
REGISTEREDTIME | Number | 2.5 | Accumulated hours registered on this task. Decimals separated with dot "." and not comma ",". Time will be automatically registered by person, if present, in following order: COMPLETEDBY, ASSIGNEDTO, CREATEDBY. | |
EXTID | Text | ext123 | Identifier of the task in external system. | |
FOLDERID | Text | 1DC95E30-1E74-15EB-B5CC-758A19ED256B | Folder identifier from external system used to map correct folder in Rambase system. | |
QISACTIONSEXTID | Text | extQis123,extQis456,extQis678 | Identifiers to know what QIS to add new created task to as an action. Actions will be created in quality issues which have this EXTID (also imported to Rambase from external system). Multiple references can be defined in one task, separated by comma - see example. |
You will get an overview of all company settings in the application Company Setting Values (CSV).
The settings are filtered by modules and sub-modules. It is also possible to search by name and key name regardless of the modules and sub-modules.
Each setting is defined by JHC personnel in accordance with your company's demands.
Click on a module in the list of modules.
Click on the relevant sub-module. The names and descriptions of the settings connected to this sub-module will then be displayed.
Required settings are marked with a star icon.
You need the permission ViewCompanySettings to be able to see this list.
There are three types of settings. Some of the settings may not be turned off, this is because the setting has a default value.
On/off setting - The only option for this setting is to turn it on or off by use of the On/off-button.
Custom input value from user - Open text field where you can set the value.
Select value from list - Select an option listed in a drop-down menu.
Note that some of the settings may have child settings. There will be a dependency between them.
You need the permission UpdateCompanySettings to be allowed to edit the company set-up.
Enter the Default supplier
Because PRODLINE is removed, you must enter the default production supplier in the Company settings.
To do so, enter CSV in the Program field and select the Enter key.
In the CSV search field, enter Default supplier for production work order and select the Enter key.
Move the slider to ON to enable the setting.
In the default supplier field, enter the supplier code.

The Transmission log (TRL) application displays a list of transmissions based on the user’s permissions. For instance, a user without permission to submit VAT reports will not see entries for those transmissions. In addition to standard filter options, users can filter the log to show only their own transmissions or to focus on specific transmission types. If accessed directly from a VAT application via the context menu, the list will automatically filter by the relevant transmission type.

Users can filter the log to display only their own entries by selecting the Show only my log entries checkbox in the header. Additionally, the Transmission type lookup dropdown menu allows users to search and select a specific transmission type.
The list in the Transmission log area will list all logs based on the selections made in the header. The user can also customize which columns are to be displayed by using the Column settings.
The user can also further filter the Transmission log (TRL) displayed by using the Filter builder where the user can select from standard filters or even create custom filters.
Search field - The Search field can be used to search for specific Transmission log (TRL). Click the Search field and press SPACEBAR to list all the available parameters to search on.
Standard columns and their descriptions are listed in the table below:
Columns/Checkboxes | Description |
|---|---|
Transmission type | Transmission log type id |
Description | Description translated to selected language. If no translation exists for the given language, English description will show |
Checked if Transmission is to RamBase | True if RamBase is the receiver of the transmission |
Checked if transmission is directly transmitted to receiving system | True if data is being directly transmitted to receiving system |
View permission | Permission identifier |
Columns | Description |
|---|---|
Id | Attachment identifier |
Created at | Date and time of creation |
Attached to | Indicates if the file is added to the request or if it is received as a part of the response. If a file is relevant to the transmission but not a part of the request or the response, then it is marked as an extra. |
File | File identifier |
This application gives quick overview and access to applications for configuring new and existing companies.

All actions can be started from this menu. Hover the mouse pointer over the different tiles to see a description of the options. Some are linked directly to applications while others are menus.
The Domain values (DOV) application can be used to make local configurations of value lists, for specific databases or systems. Some value lists allow adding custom values, while others are restricted to activating or deactivating predefined values.

Choose the item line containing the value list you want to edit and press ENTER.

Here you are able to activate and deactivate the different values for the given value lists using the confirmation icons to the left of the status number.
The Value column contains the value (key) saved on the document, and needs to be a unique value.
The Prio column shows the priority sorting of the values, where the lowest number indicates higher priority.
Notice that most of the value lists are set up per system. If a value needs to be restricted to specific databases, this is done in the Restrict to be available for selected DB's column to the right. If a value is deactivated (using Deactivate, Disable for system or Delete (only available in ST:1)), it will not be available for any databases in the system. A value needs to be in ST:4 to be active.
The Default create values (ADMDEFCREVAL) application is used to configure default values for the following elements, for the current company:
Products
Customers
Suppliers
Sales quotes
Sales orders
Purchase quote requests
Purchase quotes
Service orders
Auction lots
Specify a default value
To open the Default create values (ADDEFCREVAL) application from the RamBase menu, select Admin > Overview > Settings > Default create values.

Click the module containing the default values to be specified.
Note
The user will then be moved to the Company settings (CSV) application with the filter "DEFAULTCREATEVALUEARTFIELD". The filter allows the user to display settings which are used to define or specify values for the previously selected module.
Enable or disable the Company setting (CSV) by clicking the OFF/ON icon.
Specify the value in the related field located directly under the Company setting (CSV).
The default value will be the 'default' input the next time the related field is created in a RamBase document.
The QAR classification application is used to create a classification tree. The application is available from the Domain Values (DOV) menu.

This application is used to set up the value lists for the QAR classification - Category, Type and SubType in a tree structure. You can only add SubTypes for the Categories 10, 11, 20, 21 and 30.
Note that the setup is performed per company. The company you are working in while opening the application will be the company the QAR will apply for.
A new company, or a company without local customization, will start with the default setup. To change this, click the Make local changes for company button.
Specify value and description for Category. Value and description is the same field for Type and SubType. The field to the right of the columns specifies the priority/sorting of the values when shown the dropdowns (in the QAR screen).
Note: If you need to delete a category, you will first have to delete all the Tpes for the given category. This also applies for Type and SubType.
Name and address
Currency (CUR)
Language - Will be used on print, email and reports. If another language is registrated on a Customer (CUS) or a Supplier (SUP), this will overwrite the information from Company. If no language is set on Company, Customer og Supplier - english is used as default
Enterprise - The format is different from country to country. In Norway we create the Enterprise number without 'NO' in the front and 'MVA' at the end, - example: 111 222 333
Vatno - The format is different from country to country. In Norway we create the Vatno with MVA at the end since this is a claim that it shows on documents. In Sweden there is always 'SE' in the front of the Vatno, and '01' at the end. All EU contries have their Countrycode (CCODE) in front of the Vatno, - example: DK 222 333 444
Location (LOC) - This is the main location for the Company. This will be used as default Location on documents, - if not another location is set on Personell (PER), then this location will overwrite the location set in Company. This Location must be created in the Location (LOC) archive
Phone - example: +47 11 22 33 44
Email - example: post@company.no
Url - example: www.company.no
ConfirmSend - Will automatically be filled with Email
CommonDBG - Will automatically be filled with a shortening of the Group the Company belongs to - example: ABC
GroupDBG - Will automatically be filled with a shortening of the Company - example: BCD
ADMDBG and ADMAliasDB - should not be filled
OwnerDB - Should be filled with the same shortening as the Company has - example: BCD-NO (NO is the CountryCode)
FinanceSys - If the Company shall use the finance module in Rambase, this field has to be filled with 'RB'.
GmModel (Gross Margin model) - Stock and unrealized Stock are calculated based on historical value (exchange rate when the Goods Reception Item (SSA-ITM) was registered in stock) or at current value (current price) or at invoice rate value (rate on SIN is posted back on SSA meaning value on SSA item is changed according to the rate on the SIN item).
Gm (Gross Margin) - the Company will not sell below this percent of profit. If they will sell with lover profit, is has to be approved by dedicated Personell
Period - Must be filled with the earliest period the Company will load data into Rambase. If the Company wil not load data, the period can be set from January same year, or the same month the Company is set up
ClosedPeriod - Will be automatically updated with the latest period that is closed in the Period Account Register (PAR)
Interest % - Interest percent that is used when interest-invoices to customers are created from the Interest Menu (INT). If the percent is changed from CSV/Customer Interest invoice Percent, the Interest field in Company is updated (and vice versa)
Unit - Units that the Company will use have to be created in the UNI (Unit) archive before it can be added in Company. A unit for 'pcs' must always be created, and this unit must be added in this field in Company
Rate Source - Customers can modify their RateSource through the Rate Sources tab in the Company (COM) application. A popup window can be accessed by clicking the Add new ratesource icon located below the grid, on the left side of the page.
In the popup, select a date in the From Date field for when the new setup will take effect in the system. Only start dates of future Accounting Periods can be selected.
After choosing the From Date, select the desired Rate Source from the following available options.
Xignite
European Central Bank
Nardowy Bank Polski
Norges Bank
Sveriges Riksbank
For most companies, the primary rate source will adequately meet the need for exchange rates for all currencies used by the company. However, in some cases, a secondary rate source may be necessary when the data provided by the primary source is insufficient for all relevant currencies. To ensure full exchange rate functionality in RamBase, it is important to have a backup option in place. Exchange rate from the secondary rate source will only be used for currencies not supported by the primary source. The available sources for the secondary rate source are the same as those for the primary source.
When a new rate source is entered, transactions made after the from date will utilize the exchange rate from the new source. Transactions made prior to the from date will continue to use the exchange rate from the previous source.
To view available exchange rates for each rate source, access the Currency menu (CUR) application. From the drop-down menu on the upper right corner, select the desired rate source and click on a date to see which currency rates are supported by that source.
Use the Approval configuration (APC) application to configure approval rules defining when approval is required and the persons that are allowed to approve. Approval rules can be added, edited, copied or deactivated. Users and roles can be added or removed as approvers of the approval rules.
In the Approval Rules area, the menu has a treelist, showing one line for each approval type on main level. It is possible to expand and see the approval rules as children of the corresponding approval type. The detail view in the Approval rule area, shows details of the approval rule and the Approver assignments area shows a list of its approvers.

An approval type must have at least one approval rule to be active. Most approval types will only have one approval rule, but the Amount limit types will typically have more than one approval rule with intervals of amount ranges where different persons can approve. Amount limit approval types also support restrictions on GL accounts (ACC) and Departments (DEP).
The list of approvers for the approval rule will have possibility of adding and removing approvers. Approvers can be both employees and roles.
Some approval types support restrictions and limits. These will be configured in separate applications, via links in the APC application.
For each approval type it is possible to configure if approval requests should be assigned automatically to (all) default approvers of the matching approval rule(s) or if a (single) approver must be selected manually when requesting approval.

Enter the Approval configuration (APC) application.
Highlight an approval type.
Click the Add approval rule button.
Make sure the correct item is selected in the Item field.
Set the name of the approval rule in the Name field.
Click the OK button to create an approval rule in status 1.
Click the Manage restrictions button in the Approval rule area. The button is only available for approval rules of some approval types and will be disabled if not.
Select restriction type in the Select restriction type field.
Click the Plus icon and set a value if required.

Configure if approval request should be assigned automatically to (all) default approvers of the approval rule or if a (single) approver must be selected manually when requesting approval.
In the Approver assignments area, click the Add user or Add role button.
Find user or role and click the OK button to add the user or role as an approver, for the selected approval rule.
Users (only) can be specified as default approver. There can be several default approvers for an approval rule. Default approver is required for each approval rule of approval types configured to automatically send approval requests.

Click the Activate approval rule in the context menu to activate it and set in Status 4.
It is not possible to define rules to approve a negative value or amounts.
NOTE! For approval types using amount limits, when they are configured to automatically send approval request to default approvers; approval rules with no amount limits (typically Approve all) will cause the default approvers of these rules receiving all approval requests, since they cover everything.
Click the Manage restrictions button in the Approval rule area to edit restrictions. The application APRCOND will open. The button is only available for approval rules of some approval types and will be disabled if not.
The applications shows the restrictions that can be configured for the selected approval type. The restrictions define when the approvers assigned to this approval rule are allowed to approve this approval type. Restrictions can be set by different fields, and the different fields allow different restriction types. To add a restriction, select restriction type for the field, and press the plus icon. Assign a value if required.
Some approval rules might have restrictions that are not supported by this new approval configuration. If so, a link will show, and this will open a popup to show these restrictions.
For approval types that supports configuring limits, the menu option Configure limits will show in the context menu. This will open the APCLIMIT application. An amount limit can be assigned. Some of today's configurations have conditions. These will show in the condition column.
It is possible to add roles as approvers. It will still be a single personnel (PER) that is selected when requesting approval. You select the role you want to select users from, and the active user assignments from that role are listed for selection.
For each approval rule users can be specified as default approver. There can be several default approvers for an approval rule. It is not possible to select a role as default approver.
Approval types can be configured if approval request should be assigned automatically to all default approvers of the approval rule or if a single approver must be selected manually when requesting approval. At least one default approver is required for each approval rule of approval types configured to automatically assign approval requests.
For approval types configured for manually selecting approver when requesting approval the default approver(s) will show at the top of the list of approvers to be selected (when requesting approval).
Combining the option for automatically assigning approval request to default approvers and selecting more than one user as default approver will cause multiple approvers having to approve a request. When requesting approval, a request will be assigned to each user configured as default approver. All requests must be approved, and the approver can only approve the request assigned to him. Other approvers on the same approval rule can approve on their behalf, but only for one of them.
NOTE! If several approval rules match the item, meaning overlapping approval rules are configured, request will be assigned to the default approvers of all the rules. But only once per user, should a user be default approver of more than one of the rules.
For an approval type to be active, there needs to exist an approval rule for the approval type in Status 4. The approval type must also not be disabled by the company setting. The approval type status is displayed in the Status column in the Approval Rules area.
Approval rule not configured - Approval type is enabled, but no approval rule has been added.
Approval rule(s) pending registration - One or more approval rule exists, and one or more has Status 1.
Approval type disabled for company - Company setting for disabling the approval type has been activated.
Active - One or more approval rule exists in Status 4, none have Status 1. But some could have Status 9.
For an approval rule to be active, it must have status 4. The approval type must also not be disabled by the company setting.
Pending registration - The approval rule has Status 1.
Active - Approval rule has Status 4.
Discontinued - Approval rule has Status 9.
When an approval rule is selected, the following context menu options can be available depending on the status of the approval rule:
Configure limits - Only available for some approval types. Opens the APCLIMIT application for configuring limits.

Activate approval rule - Approval rule is set to Status 4. Only available in Status 1.
Delete approval rule - Removes the approval rule. The approval rule will no longer show in the application. Only available in Status 1.
Discontinue approval rule - Approval rule is set to Status 9. Only available in Status 4.
Copy approval rule - Copies the approval rule to a new approval rule. Restrictions are included, but the approvers are not copied by default. When selecting the menu option, a popup will show with possibility to enter name of the new approval rule. There is an option to copy the approvers.
Copy all rules for this type to other type - For the amount limit approval types you have an option to copy all rules for one type to other type, to avoid doing the same setup on approval rule and approver assignment several times.
This option will open the Copy all rules for this type to other type popup, where the user can choose which type it should be copied to. Remember to enable the Include Approvers checkbox, The rules will be created and set in Status 1 - Pending registration. The rule can be activated, set in Status 4 - Active, from the Context menu with the Activate approval rule option.
Edit setting for disabling approval type - Most approval types have the possibility for disabling/enabling for company by a company setting. Most are by default enabled. This menu option opens the company settings (CSV) application for configuring setting for current approval type.
Show approver assignment report - Report where you find approver assignments that are active today. The report can list the approver assignments a specific employee has by typing the PID in the filter field. Approver assignments can also be referencing roles, and when specifying a PID, roles will only be listed if employee has approver assignments via the roles.
By default, all users will receive approval notifications. It is possible to turn this off in the Personnel (PER) application:
No notification when requested for approval - Specifying that the user should not receive an notification, when the user is requested to do an approval.
No notification when request approved - Specifying that the user should not receive an notification, when a document the user owns have approval requests approved by other persons.

If the document or item need requires approval, a notification will be shown.

When clicking the approval request icon, the approver(s) will be notified based on the Receive notification by selection made in the Personnel (PER) application, in the Details tab. This will happen either manually by selecting an approver or a role from popup or automatically, depending on configuration of the approval type.

Additional option under the three dots on document level.
Request approval - If you are allowed to approve your own document, this can be used to send the request to someone else. This option is available if the Automatically assign approval request to Default approvers for this approval type setting is turned off in the Approval rules (APC) application. If the setting is turned on, the request will be sent automatically by clicking on the Request approval option or the blue Request approval icon.
The Add approver option mentioned below is available after the request is sent for approval.

Approval is done from the document or by using the APPROVAL application in RamBase. It is also possible to approve from RamBase mobile application.
Approvers can only approve the request assigned to them. But other approvers assigned to the same approval rule can approve on their behalf (if no requests are already assigned to them), but only for one of them.
Logged in as an approver John Johnsen you will be able to approve the request that is sent to you, but not the request sent to John Doe.

Additional options under the three dots.

Deny – If you are the approver the approval request is sent to or you are assigned to the same approval rule, you are able to deny the approval request on behalf of yourself or others. You have to add a comment why you do not approve it.

The comment will be visible on the document/item, and there will occur an icon for denied.

Add approver – If you are the approver, the approval request is sent to, you can add an additional approver, e.g. if you want a second opinion. Any employee in your company can be selected. The document assignee can also add approver.
Comment is mandatory.

Change approver – If you are the approver, the approval request is sent to, you can change approver to another employee assigned to the same approval rule. The document assignee can also change the approver.
Comment is optional.

Delete – If you are the approver the approval request in sent to or you are added as an approver in the approval rule, you can delete the approval request on behalf of yourself or others.
When an approval request is deleted, it is displayed with a red approved icon and a note telling who deleted the request.
Note
Approval request that have been manually added with the Add approver option will be deleted.
The Approvals (APPROVAL) application is used to inspect and approve (or reject) items. It has three tabs to choose from to get an overview of items in need of approval and to follow up on them:
Approval detailed view, where item attachments has a preview area
Approval list view, with the option to export the list to Excel
Sent by me, where items sent for approval is gathered in one place
This tab (view) is divided in three main areas:
A list of the items sent to the user for approval
This is where the user approves or rejects the items by clicking the Approve or Reject symbol on each item. In this area, the user also has the option to approve all items for one document at the time by clicking the Approve all button. (For example all items belonging to one Purchase order (SPO) or one Supplier invoice (SIN).) Finally, there is an option to Approve all selected items at the bottom of the area, and a button to Select all and one to Deselect all to the right.
A Preview area to preview any attachments
If there are more than one attachment, the user may use the arrows at the top of the area to switch between the different attachments. There are several tools available for the preview area, for example zoom, so the user may zoom to find the ideal preview of the attachment. If the zoom is changed from default, the application will remember the change. In other words, the zoom last used will be the new default for the user.
A Details area with further details for each item
In this area, the user will find information like Account, Department and Finance project, as well as a log of activity under the Approvers header at the bottom.
The Approval detailed view has several filtering options.
When entering the application, there is a default filter called Sent to me , which may be turned off by clicking on it.
In addition, the five tabs Procurement, Logistics, Sales, Finance, All are quick filters to give an overview and help make the approval process as efficient as possible. The number at the top of each tab indicates how many items are awaiting approval of the specific user.
Beneath the tabs, there is a Search field to filter further, and a Filter builder to choose a Standard filter or to Create custom filters.
This tab presents perhaps the more traditional view, with items presented as a simple list. The view has several filtering options via the Sent to me filter, the Search field at the top, the Filter builder and the checkbox option Include all employee approvals.
Each item may be approved or rejected by clicking the Approve or Reject symbol on each item. All items may be marked by clicking the checkbox at the top left of the list and approved by clicking the Approve all selected button below the list. This button may also be used for selected items only, if the user marks the relevant items by clicking on the Status code of each of the items.
One of the advantages of this view is the possibility to Export to Excel via the Column settings icon.
This tab is in reality a filter to see only a list of items sent by the user. It makes it easy to have an overview of sent items (all in one place) and keep track of their status.
To make it easy to keep track of approvals, there are three approval widgets that may be added to the users dashboard:
PendingMyApprovalWidget: Shows the number of approvals pending the user's approval
PendingApprovalWidget: Shows approvals Sent to me, Sent by me and I can approve
ItemsPendingMyApprovalWidget: Shows the user's approval items as a list, and lets the user approve items directly from the widget.
Note
The rules for approvals (who approves what etc) is set up in the Approval configuration (APC) application.
Note
A daily e-mail will be sent to each user with a summary of approvals pending the user's review. When an approval is marked as "urgent", an e-mail will be sent to the user immediately.
Note that this can be configured in the Output object definitions (OOD) application in the Daily notification for apprivols remaining (OOD/100751).
Note
If the user has access to more than one company, the available companies are located in a grey header at the top of the application. Click on a company to access the Approval application for that specific company.
Note
Tip: Hover the mouse over symbols, search fields and buttons to get a description of function.
Automated workflows allow you to respond for specific events in RamBase and build simple notification systems or automatically create tasks for your team. ...
Events are special types of some occurrences that can occur while working with RamBase modules. It can be updated status, person assigned as responsible, some item added or modified in a specific document. Only RamBase can add new events, contact support if you have any questions.
To access automated workflows, you must use the Duties (DUTY) Create and maintain company workflows and Create and maintain company template workflows. The duties are not added to any system defined Roles (ROLE). Users must add these duties to their own company defined roles.
Automated flows make it possible to perform automated flow actions (described in the Actions section below) each time the specific event occurs. It is possible to add conditions that are checked before action is executed. All conditions are connected with “and” logical operator, which means that all must be true to perform action.

Each flow must contain one event and one action, in case there is need to perform many actions, another automated flow should be created with the same event and conditions, but with a different action.
There are few ways to create a new automated flow:
Using the Create custom flow button in the bottom left corner and enter the mandatory name and optional description.

Using one of the automated flow templates (described in the Automated flow templates section below) listed in the Create flow tab.

Use the New flow button in the Create flow tab which allows you to create empty flow from scratch.

Automated flows have their own statuses:
Status 1 - Draft - The flow is created and can be edited.
Status 4 - Active - The flow is active and every time the event occurs, the conditions will be checked and possibly action executed.
Status 9 - Disabled - The flow can not be edited and events do not cause the conditions to be checked and the action will not be executed.
To create and activate a new automated flow, follow the steps below:
Create a new automated flow and enter the name and description.
Select the event that will trigger this flow.
Add conditions for the event if necessary. List of available fields depends on the event itself, for events related to customers, fields will be retrieved from a resource that represents the customer. For events related to products, fields will be retrieved from the product resource and so on.
Choose what kind of action you want to execute, when event occurs and all the conditions are met.
Enter all mandatory action parameters. Remember, some parameters support macros.
After saving, activate the flow by clicking the switch next to the name in the flow list.
Conditions can be created based on fields from the event detail object and their type. There are different operators available depending on the selected field type: text, numbers, values or date.

To add a condition, just click the Add condition button and you will be able to select one of the available fields. Based on the type, you will get different operator lists and Condition input fields that support specific type (date or datetime picker, values, etc.). To delete a specific condition, just click on the trash can icon next to it. To undo the current changes, click the X icon.
Actions with their parameters were described earlier, so you can select any of them using the dropdown menu and provide all the required data to mandatory parameters so that the action can be executed.
Next to the action dropdown menu and each parameter you can find a small info icon, when you hover the mouse over it, you will see tool tips with a short description.

Next to the parameter field you will also find the X button, by pressing it all data in this field will be removed.
You can select the View execution log option in the Context menu to open the execution log popup window.
All events occurrences related to the flow are listed, even if the criteria were not met. This means that this list shows how many times a specific event was triggered.
Description of statuses:
Status 1 - Draft - New job to check the conditions and probably execute the task has been created.
Status 2 - In queue - The job is saved and queued to be performed.
Status 3 - Processing - The job is being processed.
Status 4 - Paused - The job is paused.
Status 7 - Failed - The job failed and the action was not executed.
Status 9 - Finished - The job is finished and at least the conditions were checked, if all were true, action was successfully executed.
The Info column shows how many IMS/e-mails have been sent and how many failed (if any). If a batch has no information in this column, it means that there was no IMS/e-mail action for that batch.
Only flows in Active status are considered to be executed. Newly created flow is in Draft status. To activate the flow, simply press the ON/OFF button next to the flow name that is visible in the All flows tab.

Use the same switch to deactivate the flow, the status will be changed to Disabled. In case you want to modify the flow again (you can only modify the flows created by you), use the Open for edit option in the context menu.
It is also possible to save existing automated flow as a template (templates are described in more details in the next section). To do so, select the correct option from the context menu and a new dialog will be opened.

In this dialog box, users are allowed to change the name and description of the flow, and they also can choose which event conditions and action parameters that will be copied. To copy the condition or parameter, the checkbox next to it should be checked.
Available actions in automated workflows are executed when the selected event occurs, and the criteria are met.
Each action has its own parameters. Some might be required, and some are optional, to execute the action.

This is a list of all actions defined in RamBase with their parameters:
Send IMS - Sends message to one or more recipients using Internal Message Service. (Supports macros with .userId and .employeeId)
Create note - Creates note in the RamBase system.
Start task process - Starts a task process.
Send Teams message.
Create task - Creates a new task in RamBase.
Send e-mail - Sends e-mail to one or more recipients. (Supports macros with .userId and .employeeId)
Some parameters support macros - this means that some properties of the object, which are related to the event, can be used. For example, you can start typing {{ (two curly brackets) to open the dialog with available properties list. Having such text in the field, which supports it, will cause it to be replaced with data contained in the object, for example having an e-mail title defined as follows:
Status of the {{customer.name}} customer was changed
Will cause e-mails sent by this action to have customer name instead of {{customer.name}} , i.e.:
Status of the RamBase customer was changed
if the status was changed for customer, whose name is RamBase.

Note
When sending IMS to more than one recipient, the recipients should be separated with a semicolon. (Recipient 1; Recipient 2 etc)
Automated flow templates are very similar to regular automated flows, but they are only used to create new flows. No automated flow templates are considered to be verified and executed when the event is triggered.
Templates are created according to the same rules as automated flows (name, description, event, event conditions, action and action parameters) and can be used to prepare many workflows with the same event and conditions, but with different actions.

Templates have following statutes:
Status 1 - Draft - Template not yet completed, can not be used to create new workflows.
Status 4 - Active - The template appears in the Create flow tab as a tile with icons related to the event name area and selected action.
Status 9 - Disabled - The template is no longer used, and can not be used to create new workflows.
Some templates are provided by RamBase and can not be modified or disabled, but they can be used to create new automated flows like regular templates. Templates like this have this additional information above the name:

There are two ways to create an automated flow template:
Create it from automated flow, as described in the Automated flows section above
Create it from scratch using the Create new template button below the templates list.

Users must provide name and optionally description. Rules for creating a template are the same as creating a regular flow, the same fields support macros.
After saving and activating template (changing the status to 4 - Active) only from the context menu, it can be used to create automated flows.
System requirements:
Windows server 2012 or higher
Windows 10 or higher
If you are going to do a lot of printing then we recommend a dedicated print server to guarantee that it is working smoothly
Type PCR in the program field in RamBase and press ENTER to open the Print connector (PCR) application. There are two ways to install the print connector, either download or use the Create new function.
It is recommended that the print connector is downloaded on a print server, but it can be downloaded locally on a computer. The computer must be turned on at all time.
There is a requirement for it to be installed on a Windows-based server or computer.
Click the Download latest print connector in the context menu and download the latest version of the print connector. The download will start in the browser.

The print connector is installed using the executable file. The installation is guided with an installation wizard that will take you through the installation step by step.
Locate the installation file and double click the downloaded executable file to start the installation wizard.
Follow the steps the wizard goes through.
When prompted for username and password, enter your RamBase credentials.
When prompted to create a print connector name, choose a suitable name. Your company may have naming conventions for print connectors so the superusers can have a clear overview, so choose accordingly.
After the installation is finished, you will see an overview over all your installed printers.

To install the print connector from the PCR application, click the Create new button in the left hand corner.
Give the print connector a name.
Enter a valid email address. The download link and License key will be sent to this email.
Click the Download button in the email and follow the step-by-step instructions.
Unpack the downloaded zip-file and follow the steps stated in Install from download from step 2.
The Print Connector (PCR) is a management application for superusers to keep an overview and control all the different print connectors for the company.

The left box shows all the print connectors, sorted by the dropdown menu in the filter field.
Choosing a print connector in the left menu will display the details concerning this in the top right box:
Print Connector ID - The unique ID given to each print connector.
Name - The given name of the print connector (the user chooses this during installation).
Installed By - The person who installed the print connector.
Installed - Date and time of installation.
Version - Which version of the print connector which is installed.
IP Address - The IP address of the computer the print connector is installed on.
MAC Address - The MAC address of the computer the print connector is installed on.
Computer Name - The name of the computer the print connector is installed on.
Operating System - What operating system the computer runs.
This folder shows all the printers connected to the chosen print connector. This is the same overview as in the stand-alone print connector application, but without the detailed view.
The Print Configurations (PRC) application is basically a priority list over printers where a job goes through the list until it finds a suitable output configuration.

This can be used if you want to print a specific output to another printer. In example, if you want to send all customer invoices to the accounting printer.
Click the Create New button in the left corner.
In the popup, add a name in the Name field.
Select print group in the Print Group field.
Click the OK button.
In the Print Configuration area, click the Add Printer button to add a printer. This will open a popup where you can choose the different printers and paper size.
You can drag & drop the order of the available print locations to prioritize the print order.
From anywhere in RamBase, select the account in the top right corner. At the bottom you will see several drop-down menus. Choose the one called Print Group and scroll to your preferred print group. Next you can use the Print Configuration, to further narrow down the actual print location.
 |
As printers are often changed with a newer model, we don’t have a specific printer we recommend, but we have very good experience with the brand Zebra.
Please inform your hardware provider that the label printer will need to support following;
Print PDF-files
Supports network printing (IP address)
+USB
Support the size of labels you would like to use.
Default size of some RamBase labels:
90mm wide x 45mm high (Example: Stock label)
90mm wide x 29mm high or 70mm wide x 30mm high (Stock location label)
An opening for:
printcloud.rambase.net Port 443 for HTTPS
We recommend to setup the printer as a network printer as this makes it easier to maintain.
Also, we don’t support shared printers, as that is disadvantageous way of setting up a print environment. If the machine that the printer is added from is turned off, the printing stops.
The printer settings need to be changed under the “Advanced” tab in the printer properties. This is because the RamBase print software runs as the system user on the machine and uses the settings for this place.

The label in the printer must be larger than the size of the PDF-file, else the PDFlabel will be too big to fit on the printer’s label.
Create custom labels and resizing can be done by using the Telerik application.
The label size can be modified in the Advanced tab in the Print properties. This is the place where the size of the label is defined, not in RamBase.
This is due to the Print connector (PRC) services are running as the System user and not the logged in user.

The Scheduled Print Configuration (BPR) application is used for scheduled printing. Example is if you want to automatically print a large number of invoices during the night and have the prints finished by morning.

Choose your print configuration. This must be done for each company.
The OOS application is used to control the outputs from various applications in RamBase, and to specify the default outputs for a new customer or supplier.

The left pane contains two tabs. Select gives all the different outputs, categorized by modules, applications and functions. You can select the necessary outputs here.
Search contains a search field at the top. Use the search field to find the necessary outputs. The search results can be filtered by selecting  . To view the documents that are available for customer output control, select Available for customer output control. The left pane now displays documents that you can select, to be the documents included by default when you create a new customer.

The description of the output is given at the top right side, and settings for print and email are given below.
Select Print enabled if you require output through print.
Select a document in the left pane and enable the Default for new customer slider.
If you require output through email, select Email enabled.
Select the necessary document in the left pane and enable Default for new customer.
The selected documents are added by default to every new customer and output according to the selected output channels, print, email, or both.
You can enable the Print output functionality by using the slider. The various settings related to printing are given below.
Paper Size - Select the necessary paper size from the list.
Copies - Enter the necessary number of copies.
Collated Key - Select YES to collate the printed outputs or NO to not collate.
Additional text - Opens a popup where you can enter additional text to add to the output. You can add text in several languages.
Current design - This field shows which design is used. Select Preview to see a quick preview of the output design.
Design for tester - Select the necessary design from the list.
Testers - Select the necessary tester from the list.
You can enable the Email output functionality by using the slider and specify the following settings for email.
Address source from - This field indicates from where the address is retrieved from.
Subject file name and body - This button opens a popup where you can edit the subject file name and body for the output.
Additional text - Opens a popup where you can enter additional text to add to the output. You can add text in several languages.
Current design - This field shows which design is used. Select Preview to see a quick preview of the output design.
Design for tester - Select the necessary design from the list.
Testers - Select the necessary tester from the list.
To view the documents that are available for supplier output control, select and select Available for supplier output control.
Select Print enabled if you require output through print.
Select a document in the left pane and enable the Default for new supplier slider.
If you require output through email, select Email enabled.
Select the necessary document in the left pane and enable Default for new supplier.

Specify the settings for Content and Design in Print and Email as given above.
The Product (ART) upload is an automatic alternative to the manual Load article archive (ARTUPLOAD) - INP/14542, which is performed via the Input menu (INP) application.
Required sub-module - Must be activated by RamBase Support or your partner
To be able to use the alternative automatic upload, the following submodule must be activated for your company.
Interfaces (SUBMODULE/100080)
This sub-module is most commonly used as an integration towards the article registry for CAD/PDM software.
To activate the Load article archive (ARTUPLOAR) via FTP, open the Output settings (OOS) application.
Navigate to the Output settings (OOS) application
Option 1: RamBase menu→Admin→Print / Email administration→Output settings
Option 2: Click the Program field and type "OOS" and press ENTER.
Click here to read more about the user interface.
In the Output settings (OOS) application, click the Output tab, followed by the Search sub-tab and in the Search field type "Product upload using FTP (ART upload)".
Once the Output setting (OOS), Product upload using FTP (ART upload)" is selected, set the FTP enabled toggle to 'ON' as shown in the image below.
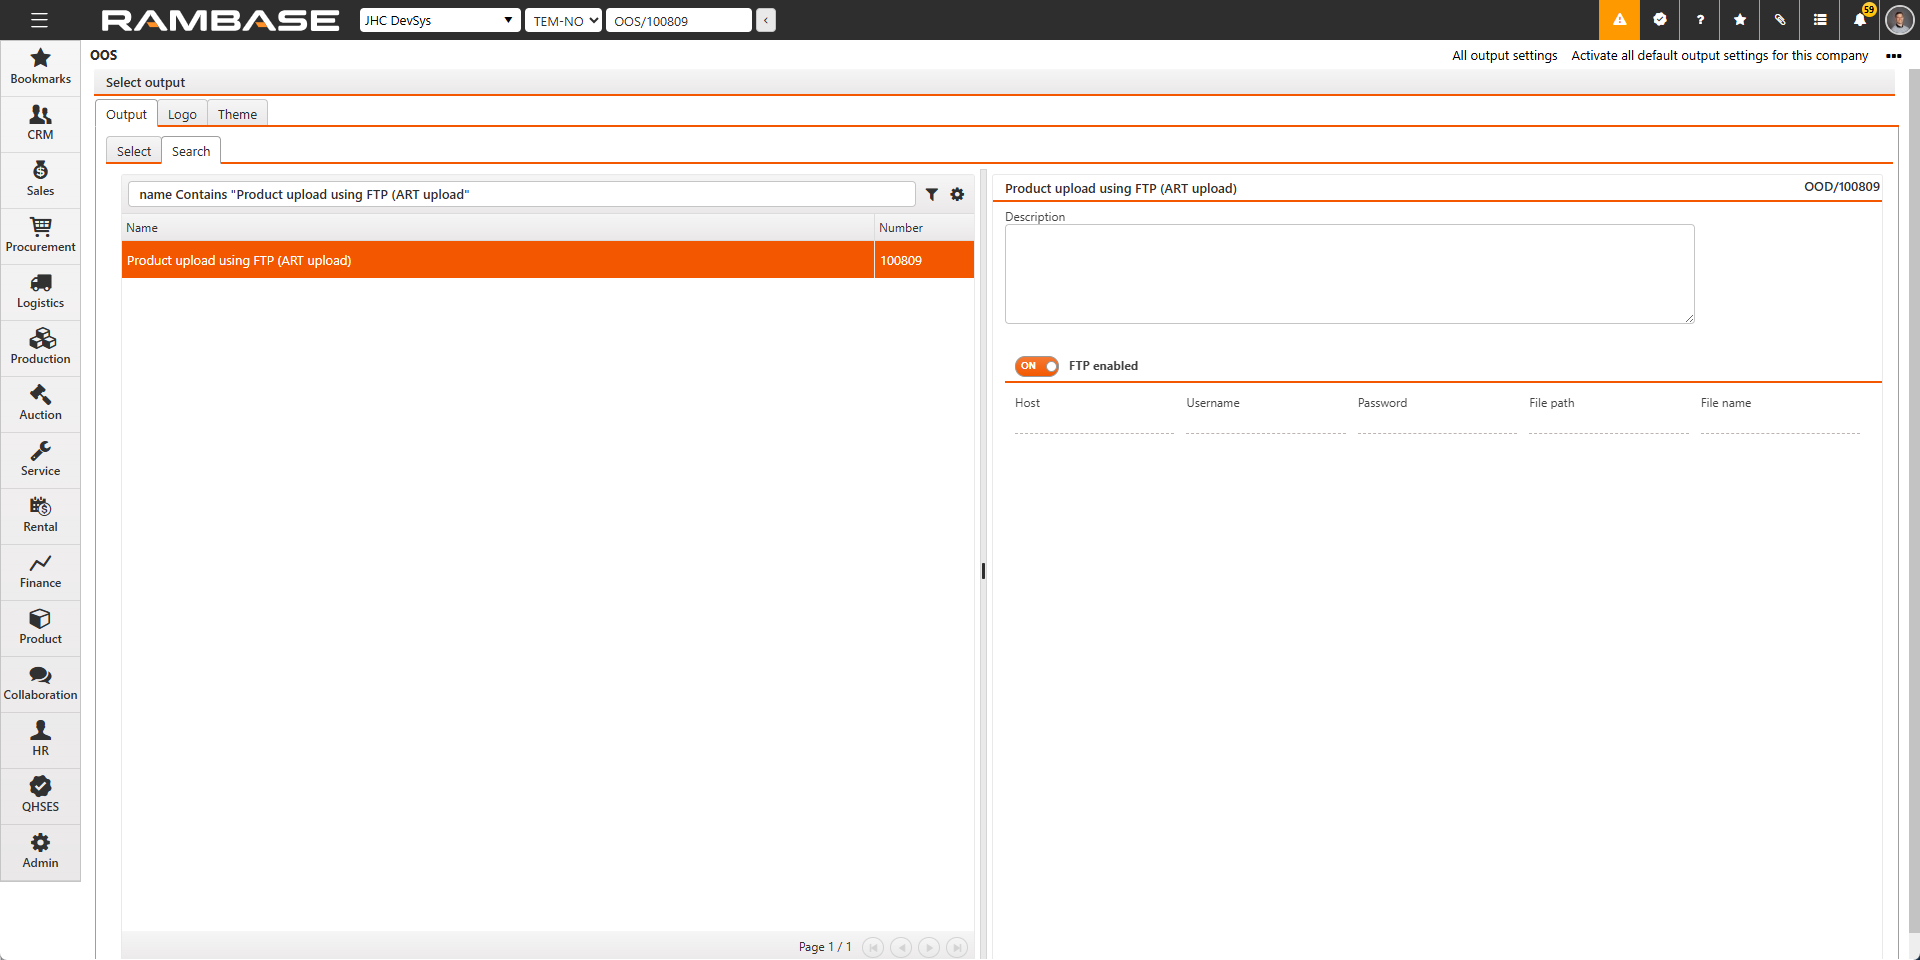
Then provide the FTP details in the following fields:
Host
Username
Password
File path
Important
File name must be blank.
Result
Automatic upload of Load article archive (ARTUPLOAD) can now be performed.
FTP (File Transfer Protocol) configuration is crucial for RamBase because it enables secure and automated data exchange between your local systems and the RamBase platform.
Important
The file name of the file to be imported (placed in the import folder), must NOT contain any spaces.
To ensure smooth file import operations, customers must configure their folder structure as follows:
Main_Folder/
├── Import/
└── Success/
Main Folder Requirements
Create a main folder dedicated to file imports.
Inside this folder, create two(2) sub-folders:
Import: Files are moved here when RamBase begins importing.
Success: Files are moved here after a successful import.
RamBase automatically handles file movement between these folders during the import process.
If your server uses a firewall:
Contact RamBase Support to obtain the IP address that must be whitelisted.
This ensure RamBase can communicate with your server without interruption.
If your server uses SFTP, you must configure the Host field with a fingerprint.
How to retrieve the Fingerprint
Use a tool like FileZilla to connect to your server.
FileZilla will display the encryption algorithm and the fingerprint during connection.
How to Format the Host Field
Add the fingerprint to the Host address using a # symbol.
sftp://test.ftp.com#SHA256:MxNRSaldsoos
"SHA256:MxNRSaldsoos" is the fingerprint
Note
RamBase supports both SHA256 and MD5 formats.
In the General output setting (GOS) application, users may change/customize:
logo for all designs
theme for all designs
footer for all designs
In the Company logo area, users may upload the company logo in .jpg or .bmp format. By doing this, the logo will be placed in the top right corner in the standard designs.
In the Output designer themes area users may select a standard theme or upload a new customized theme to fit their design need/preference.
Each theme consists of four color schemes:
Dark scheme: Fill color in the document header, item header and total sum
Light scheme: Fill color in the general information fields
Total scheme: Fill color in the summary field above the total sum
Last page headers: The letter coloring on the subtitles on the page (the same color as dark scheme in the default themes already available in RamBase.)

In order to customize, download one of the existing themes, and open in a word processing program, for example Notepad. The color codes should now be entered into the code in the file according to where the user prefers each color. To customize according to logo color, use an eyedrop tool (or similar) in a picture edit program to identify the color code of the color you want to use. The color model used in RamBase is the RGB code (Red, Green, Blue), so the color has to be given according to this code.

When the colour has been changed, save the file as an xml file.
Click Upload new theme, type a name for the output designer theme, and then click Upload. Now the theme may be added via drag and drop or the Choose files button. Finally, click Confirm to upload the file. In order to activate the theme, click the Use theme button on the line of the new theme.
The Jobs (JOBS) application is used to view and manage your output and report jobs. Users with the role Output administrator can also monitor all Output jobs and Recurring report jobs.
There are multiple ways to navigate to the Jobs (JOBS) application:
From the RamBase menu, click on Admin, then select Print/email administration and then Jobs.
From the RamBase menu, click on Admin, then select Reports and then Jobs.
The application is divided into four tabs; My output jobs, All output jobs, My report jobs and Recurring jobs. The functionality of the tabs is similar across all of them. The columns are explained in the My output jobs section, and distinct functionality is explained in each section describing the tabs.
This tab is available to all users and is for checking your output jobs. Notable functionality is located in the Download column where an attached document can be downloaded, and in the right most column, where an output job can be canceled or repeated.
Field | Icon | Description |
|---|---|---|
St |
| Displays information on the output job in RamBase.
|
Xst |
| Displays information on the external handling of the output job. Examples of this can be printing. An output job with Status 8 - Waiting for external handling and Xst in status 2 - On hold, will indicate that the output job was outputted correctly from RamBase, but failed in the external printing. Further information can be found in the Message column.
|
Job id | Displays the output job identifier. | |
Name | Displays the name of the output job. Examples of this can be "Extract menu data to excel", "Picking list #1234 by email" etc. | |
Document type | Displays information on the type of document being outputted. Examples can be "Reports", "GoodsReception", "ProductionWorkOrder" etc. | |
| Clicking the Download icon will locally download the file. The icon will indicate the file type. | |
| ||
| ||
Document |
| Will display information on the document being outputted: System:Application/Document Identifier Click the View icon to open the document in the application it is being outputted from. |
Destination |
| Displays where the output job is being outputted to. The Print icon indicates that the output job is being sent to a printer. Note the status in the Xst column. |
| Displays where the output job is being outputted to. The Email icon indicates that the output job is being sent to an email address. The icon will be followed by the recipient of the output job. | |
Message | Displays information on the output job. Examples of this can be issues with the external print job, issues with a report being outputted etc. | |
Created by |
| Displays information on what has started the output job. This can be Personnel (PER), in which case the name of employee will be displayed, or an output job triggered by an output interval set in an application. Click the View icon to open the application where the output was triggered from. |
Created | Displays when the output job was created in date and time. | |
Start | Displays when the output job was started in date and time. | |
End | Displays when the output job was ended in date and time. | |
Print connector | Displays the name of the Print connector (PCR) handling the output job. Click the View icon to open the Print connector (PCR) application to view details. Note that the permissions required to view these details are usually assigned to system administrators. | |
Output design | Displays the name of Output design (OPD) selected for the output job. Click the View icon to open the Output design (OPD) application | |
Output setting |
| Click the Link icon to open the Select output (OOS) application where, depending on the users permissions, the outputs of the various RamBase applications are specified in terms of design and content. |
|
|


The All output jobs tab will list all output jobs for all users. The functionality is the same as the My output jobs. For column and icon descriptions refer to the My output jobs section.
Note
Users with the role Output administrator can monitor the All output jobs tab.
The My report jobs will list all report jobs sent as either a print or email output. The output jobs can quickly be filtered by selecting the predefined filters Exclude recurring jobs or Show only recurring jobs. Status for the report output job can be viewed in the St column. The functionality is similar to the My output jobs tab without the option of repeating or canceling a report job.
The Recurring report jobs tab lists all report jobs that are set on an interval.
The Recurring report jobs tab is used to quickly identify that only wanted report jobs are running. Verifying that only wanted report jobs are running, will allow the system to run as efficiently as possible. It is also useful to manage the company information being exported.
Select a report job and press ENTER or click the Arrow icon to open the Report queue (RPQ) application to view or edit details. A relevant option here is the Interval which can be found in the Schedule setup area in the Report queue (RPQ) application.
Note
Report jobs that are activated by users without the required permissions, or by users that have been deactivated, will automatically be set in Status 6 - Unscheduled by system.
Users with the role Output administrator can monitor the Recurring report jobs tab.
FTP (File Transfer Protocol) configuration is crucial for RamBase because it enables secure and automated data exchange between your local systems and the RamBase platform.
Important
The file name of the file to be imported (placed in the import folder), must NOT contain any spaces.
To ensure smooth file import operations, customers must configure their folder structure as follows:
Main_Folder/
├── Import/
└── Success/
Main Folder Requirements
Create a main folder dedicated to file imports.
Inside this folder, create two(2) sub-folders:
Import: Files are moved here when RamBase begins importing.
Success: Files are moved here after a successful import.
RamBase automatically handles file movement between these folders during the import process.
If your server uses a firewall:
Contact RamBase Support to obtain the IP address that must be whitelisted.
This ensure RamBase can communicate with your server without interruption.
If your server uses SFTP, you must configure the Host field with a fingerprint.
How to retrieve the Fingerprint
Use a tool like FileZilla to connect to your server.
FileZilla will display the encryption algorithm and the fingerprint during connection.
How to Format the Host Field
Add the fingerprint to the Host address using a # symbol.
sftp://test.ftp.com#SHA256:MxNRSaldsoos
"SHA256:MxNRSaldsoos" is the fingerprint
Note
RamBase supports both SHA256 and MD5 formats.
We send out emails from RamBase that look like they come from the end user. E.g. something@yourcompany.com, but in reality they come from an email address from RamBase.
This is called spoofing and this is the usual way to do it. However, in order for these emails not to be flagged as spam or junk, the owner of the domain we are spoofing, in this case yourcompany.com, must include a spf pointer in their email setup.
Add the following information in the SPF pointer: include:spf.hatteland.com.
If the customer don't know how to check if this is implemented. You can use this procedure:
Go to: https://toolbox.googleapps.com/apps/dig/ and put in the domain. E.g www.Company.no.
Select TXT in the menu to see what text entries that are listed.
In the first example you can see that spf.hatteland.com is missing and in the second it is there.


If this is not setup for your company then please contact your local email provider and get them to add spf.hatteland.com to the domain