The QHSES module in RamBase provides the necessary overview to define the right focus areas to support continuous improvement and risk management. The module comes with a separate dashboard with many useful widgets for easy tracking of key-figures indicating the health of the company, including a top ten risk list.
Quality incidents and deviations, HSE observations, and security weaknesses can easily be reported in RamBase, either via the mobile app or the desktop app. Issues will be processed following a flow that matches the way one would naturally handle a quality issue and indicates where in the process an issue is at any given point.
Available features include the following and much more: Review issues, assign issues to colleagues, conduct cause analysis using the why-why method, add consequences and actions, as well as conduct basic risk assessments for reporting and statistical purposes.
The module also comprises risk applications, which provides the opportunity to perform risk assessments in RamBase. Users may choose which areas or RamBase objects to assess, and how to assess them.
The QHSES module covers all requirements needed to work within ISO requirements.
The QHSES setup (QISADMIN) application provides tabbed interfaces for administrative functions in QHSES. In order to use this application, the QHSES Administrator role must be enabled for the specific user.
To open the QHSES setup application, start in the RamBase menu and select Admin, then QHSES administration. The 6 tabs in which to administer the QHSES setup are QIS, Risk, Consequence areas, Consequence types, Cost categories and Requirement references.
The QIS setup has 5 tabs; Issue types, Issue categories, Direct cause, Root cause and Settings. In all the tabs excluding Settings, the query builder can be used to create search queries in the Search field. In all the tabs excluding Settings and Issue types, select the Predefined filters icon to apply predefined filters and view the filtered results.
Issue types
Create new issue types for incident reporting and view, edit or delete existing issue types. Select the Add new type button and enter a name for the issue type in English, then select Create. Select the Edit icon to edit the name. You can also provide translations of the name into other languages, for use when you change the default language.
There is by default one Issue type registered in your system, this is called Incident. You are not able to delete this issue type or edit it, this is because it is a global Issue type. When using this issue type in the QIS application you are required to add actual consequences. If you do not add this, you will get a message saying: Missing actual consequences! (Required for incidents).
Issue categories
Select Add new category to add a new issue category, enter a name for the issue category in English, then select Create. This will automatically go to Status 4.
Direct cause and Root cause
Select Add new direct cause category to add a new direct cause category, enter a name for the direct cause category in English, then select Create. Select the Edit icon to edit the name. You can also provide translations of the name into other languages, for use when you change the default language. This will automatically go to Status 4.
You can easily deactivate Direct Causes by using the Deactivate direct cause category icon or Restore direct cause category by using the Reactivate direct cause category icon.
There is by default one Cause categories in both Direct cause and Root cause registered in your system, this is called Not specified.
You are not able to delete this Cause category, or edit it, this is because it is a global Cause category. Not specified causes will be used on quality issues where there is nothing added by the user yet. This can be seen in the Widget for Direct Causes and Root Causes.
Settings
Enable various settings for QHSES and set the risk score thresholds.
Set mandatory field when creating issue : Title is required by default. It is also recommend to add Department or Responsible to make sure a responsible is notified by IMS when a new QIS issue is reported.
Risk score - Use the sliders to set the boundaries for where your company wants to have low (green), medium (yellow), and high (red) risk. Risk score varies from Min 1, Max 25, drag the sliders to set the thresholds for risk scores.

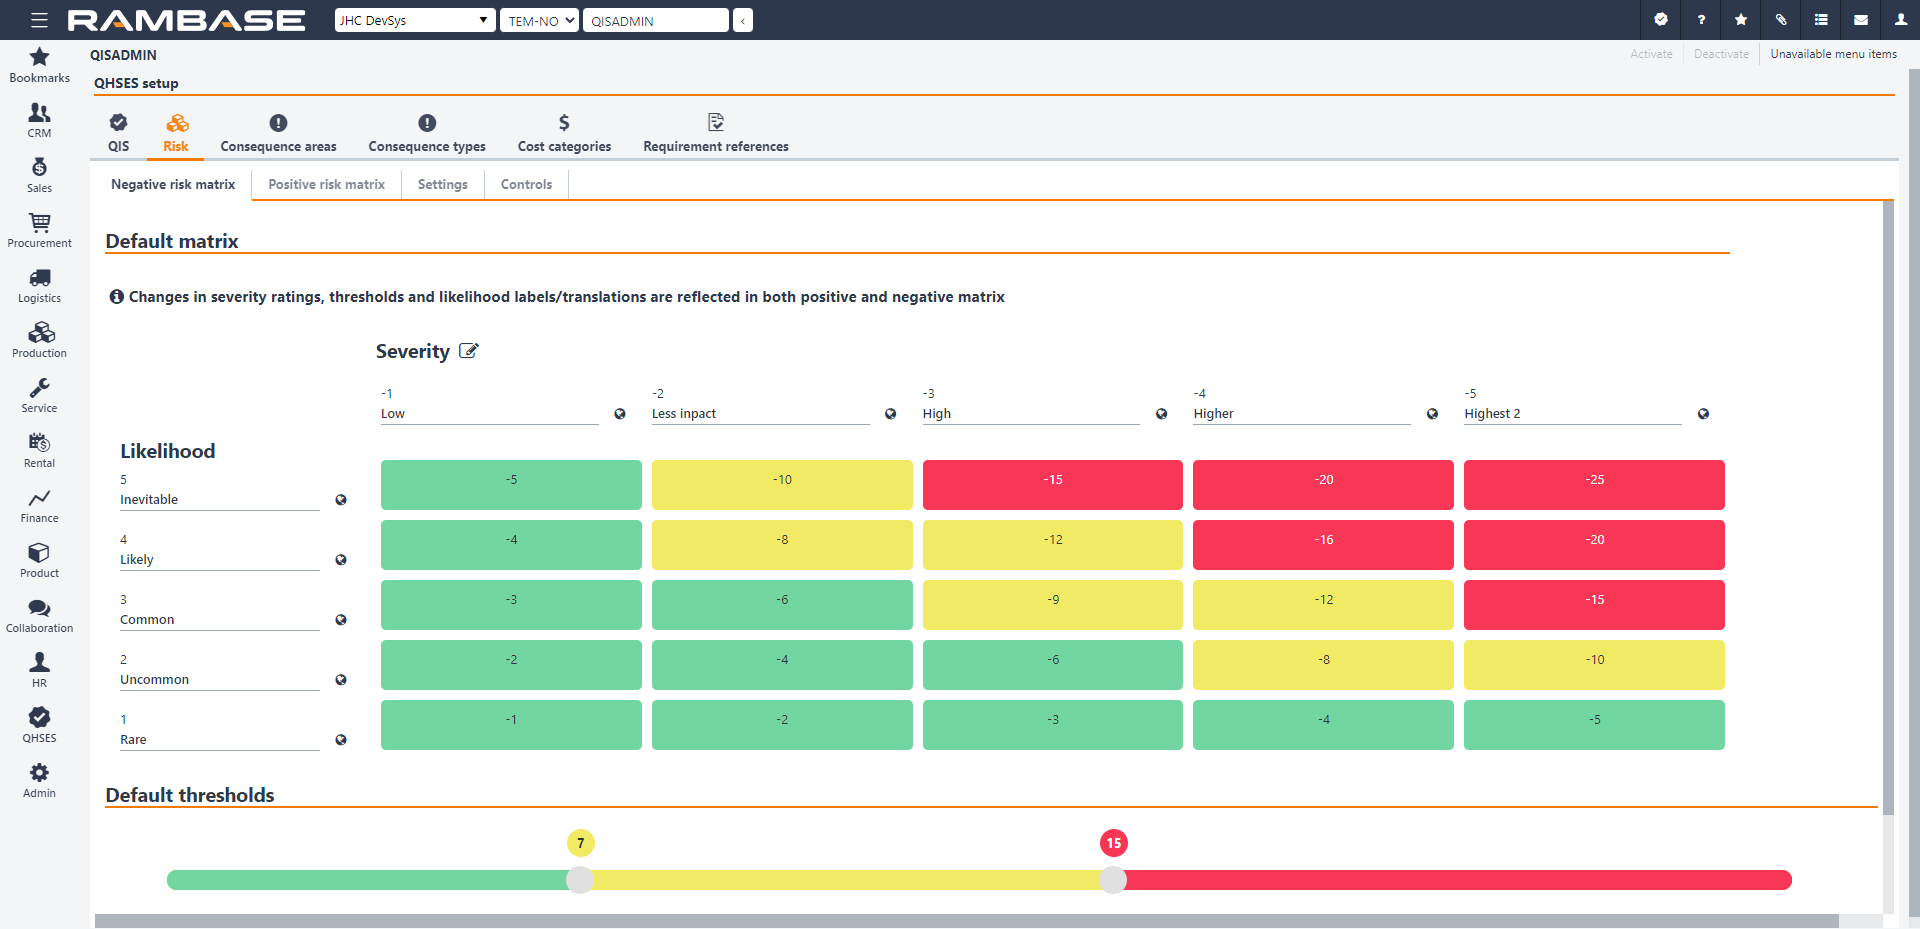
The Risk tab comprises 4 subtabs: Negative risk matrix, Positive risk matrix, Controls and Settings.
The Negative risk matrix and the Positive risk matrix tabs are mutually dependent. Changes in the severity ratings, thresholds, and likelihood labels/translations in one are thus reflected in the other (after a page refresh). Both tabs are divided into:
Default matrix, where the default risk matrix values chosen, and
Default thresholds, where the values of when a risk level is changed is chosen. (In other words when the risk level goes from green/light blue to yellow/medium blue and yellow/medium blue to red/dark blue.)
Note
When setting up the negative/positive risk matrix for the first time, Matrix scale will also be available in these tabs. Under Matrix scale it possible to change the matrix from its default 5x5 dimensions. However, this should only be done after careful consideration, as it is not possible to change the dimensions after a consequence area has been created. Matrix scale will disappear from the tabs at that point.
In the Controls tab, existing mitigating actions are added. These reusable controls may be added to a risk or risk assessment where applicable.
In the Settings tab, selecting Doing assessment reminder will cause the responsible for a risk assessment to get a reminder via IMS message.
The Consequence areas tab is shared by the Quality issue list (QIS) application and the Risk assessment applications. The content in this tab will be company specific, as it is based on activities and risks which varies from company to company.
To add a new consequence area, click Add new consequence area in the bottom left corner. Enter a name and click Create. Click the Edit icon to edit the name or provide translations of the name. The new consequence area has to be activated by clicking Activate in the top right corner. It may later be set to Status 9 by clicking Deactivate in the same place. The Inactive consequence area setting has the same function and can be found at the top of the area to the right. Beneath it, there is a setting called Use default, which should be selected in order to lock the matrix of the specific consequence area to the default matrix set in the Risk tab.
The consequence area has three tabs; Negative risk matrix, Positive risk matrix and Consequence types.
The default matrix in the Negative risk matrix and the Positive risk matrix tabs is the one that is set in the Risk tab. However, it is also possible to change the Severity values of the negative/positive risk matrix for the consequence area in question. This is done by clicking the Edit icon and changing the numerical values to the preferred ones, and confirming by clicking Ok.
In the Consequence types tab, consequence types may be connected to the consequence area in question. This may be done by clicking Add existing consequence or Add a new consequence in the bottom left corner of the tab area, entering the relevant name and clicking Create. Consequence types may be added both when the consequence area in question is in Status 1 - Registering and Status 4 - Active.
In order to add a new consequence type, click Add new consequence type in the bottom left corner, enter a name and click Create. Click the Edit icon to edit the name or provide translations of the name. The consequence type has been created and set in Status 4 - Active.
Select Add new cost category to add a new cost category, enter a name in English, then select Create. Select the Edit icon to edit the name. You can also provide translations of the name into other languages, for use when you change the default language. This will automatically go to Status 4.
You can easily deactivate cost categories by using the Deactivate cost category icon or Restore cost categories by using the Reactivate cost category icon.
The Cost registered on quality issues will not affect the Finance module, in any accounts.
Select Add new standard requirement to add a new standard requirement, enter a name for the requirement in English, then select Create. Select the Edit icon to edit the name. You can also provide translations of the name into other languages, for use when you change the default language. This will automatically go to Status 4.
You can easily deactivate standard requirements by using the Deactivate standard requirement icon or Restore it by using the Reactivate standard requirement icon.
The RamBase desktop features a QHSES tab with default widgets providing the user with information about various quality issues. It includes quality issues by Status and quality issues by category, as well as other useful information visualized in the form of key-figures, charts and lists.
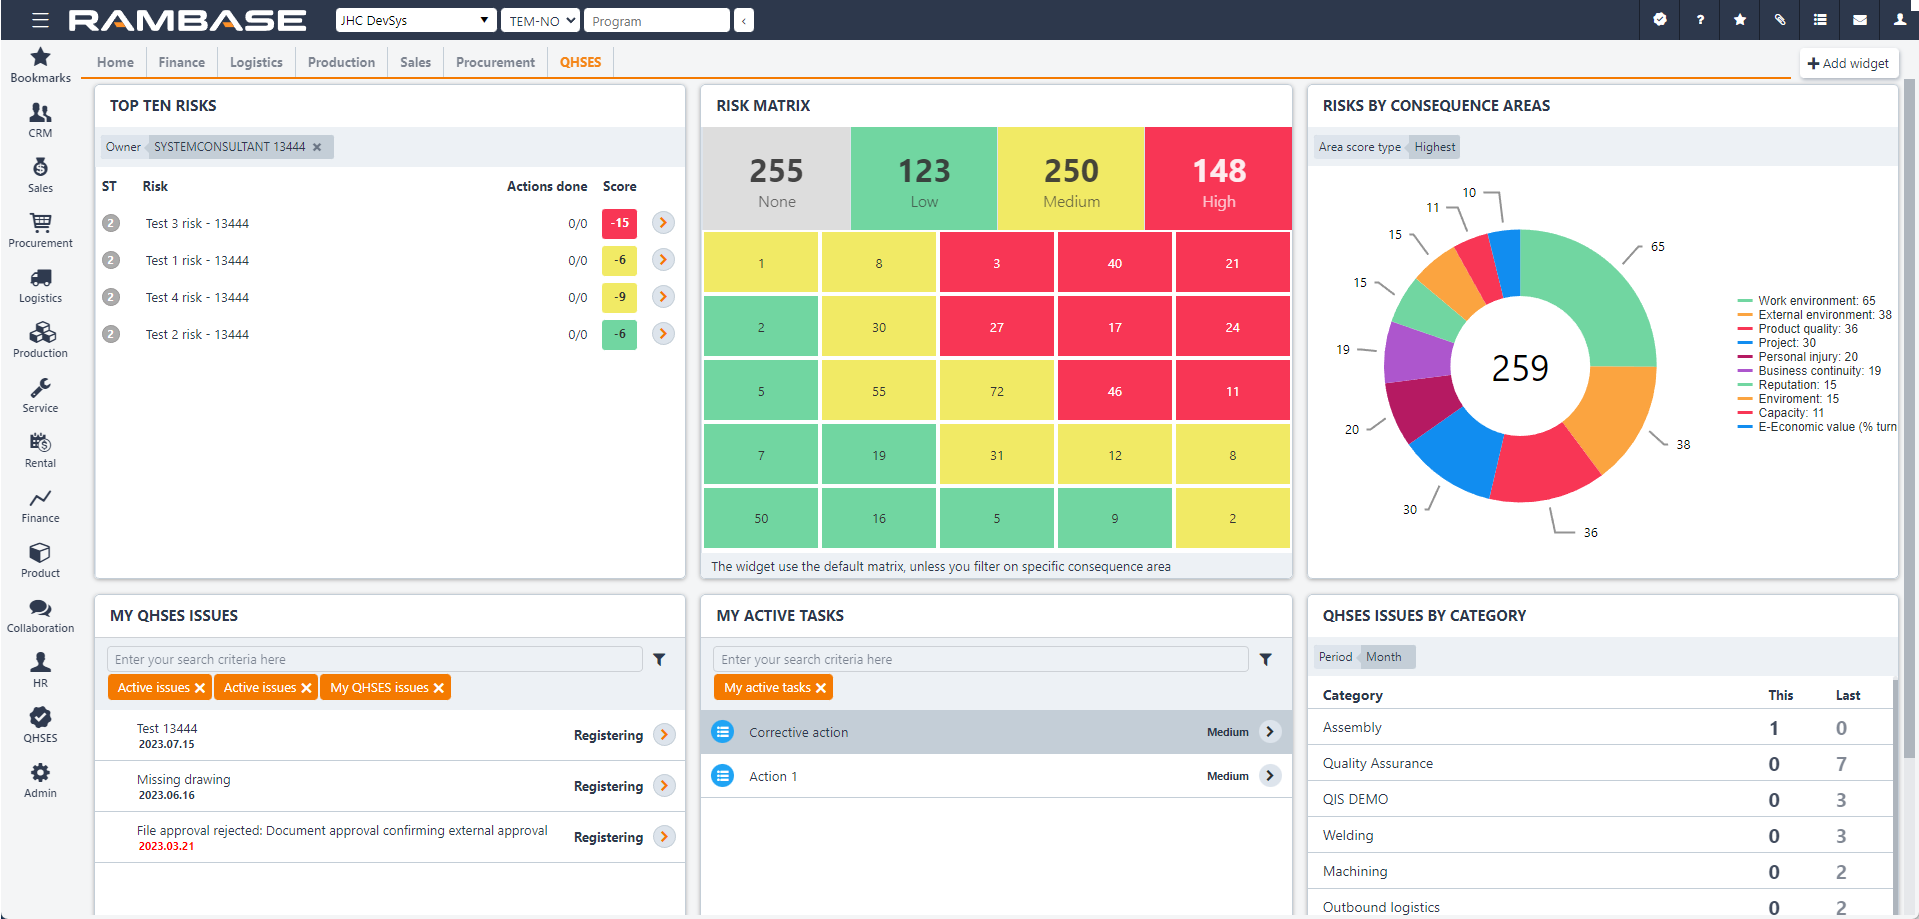
The Quality and risk widgets may be added, removed, moved around and adapted to the users preference in various ways. More information about this is available here: Desktops and Widgets
Note
Quality and risk widgets may also be added to the Home tab of the desktop, not only the QHSES tab.
To open QHSES reports, select QHSES in the RamBase menu, then Reports and finally QHSES Reports. Users need the duty Process and review quality issues to access these reports.
There are two available reports; one for actions and one for issues.
Filters may be added by clicking on the Filter builder icon, and selecting standard filters according to preference or creating custom filters.
The reports can also be set up as scheduled reports in RamBase, read more about this here:Scheduling reports
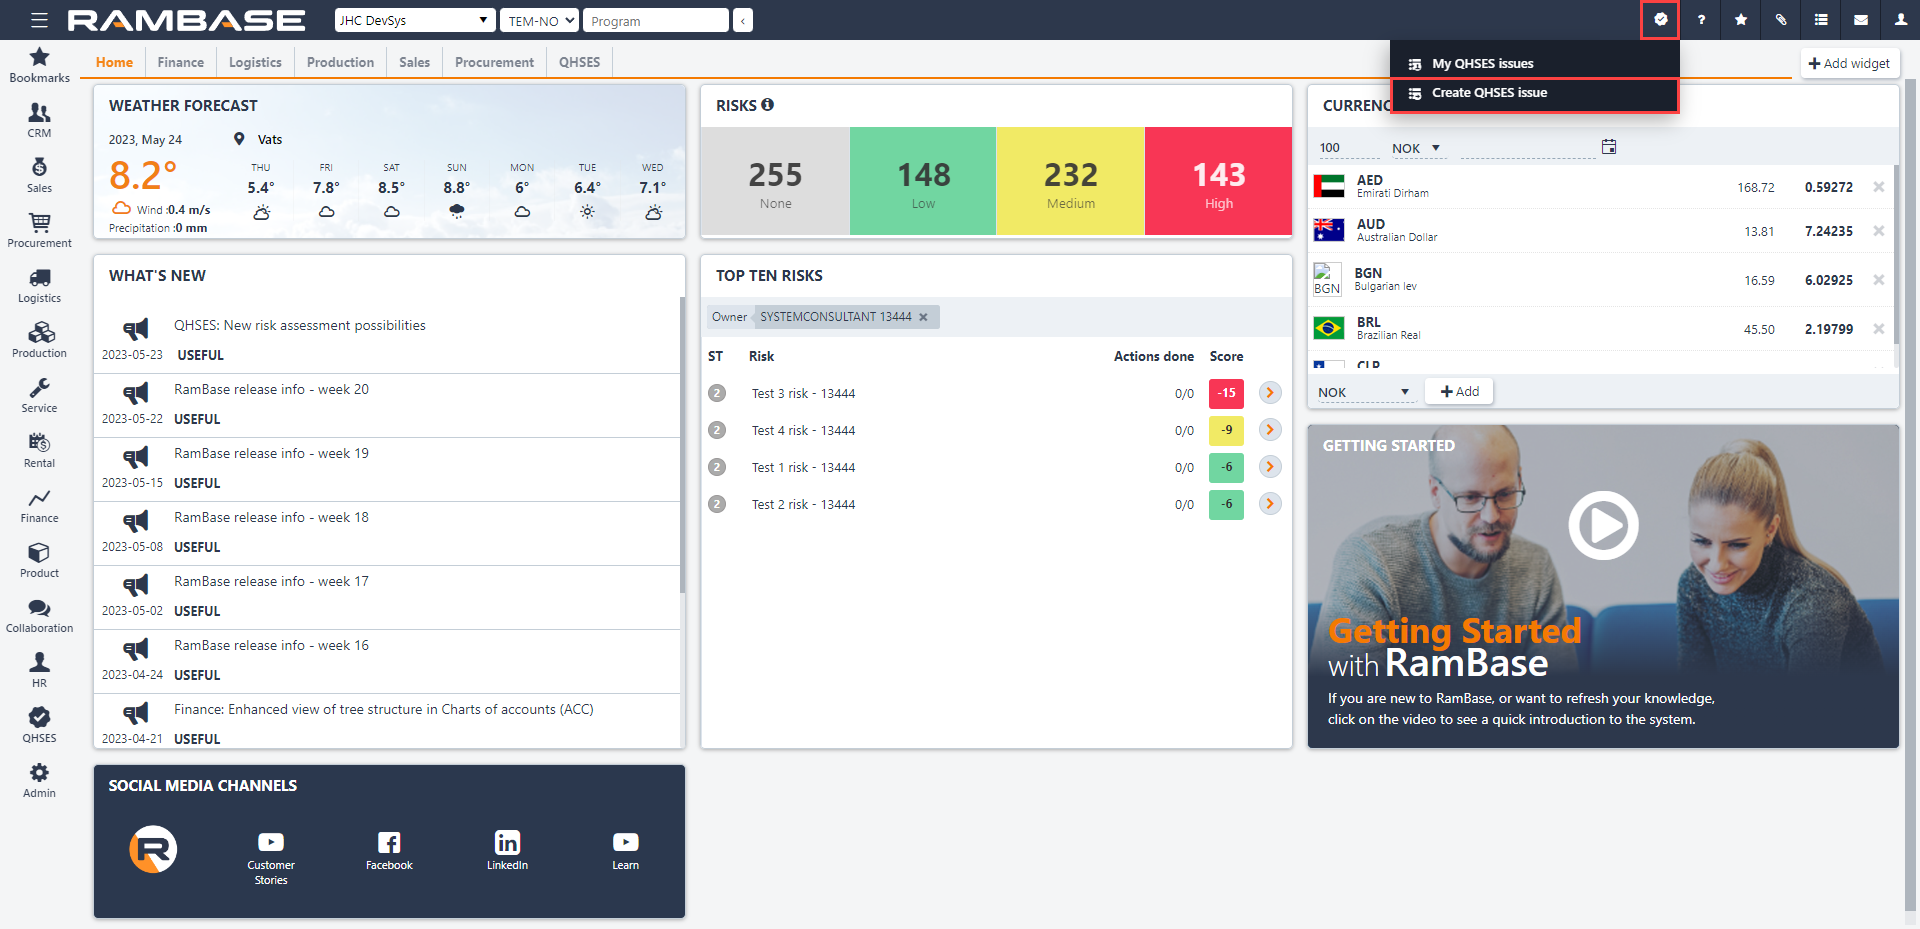
A new quality issue may be created from anywhere in RamBase. In the menu in the top right corner, click the Open QHSES icon and select Create quality issue.
If the quality issue is created from a place with a document ID, the user should select Create Quality Issue for xxx/xxxxxx from the Open QHSES drop-down menu. The will allow users to get an overview of the quality issues related to that specific document ID. It also gives the user the option to navigate directly to the quality issues related to the specific document ID via Quality issues related to xxx/xxxxxx.
When a quality issue is created, it brings the user to the Register a new quality issue (QISREGISTER) application. If the issue was created using the Create Quality Issue for xxx/xxxxxx option, there will be a Source field with the document ID as default to link the quality issue to the document it was created from. Title, Category and Responsible are mandatory fields.

The user has two options to register the quality issue:
Register, which will direct the user back to the application (s)he was working in before creating the quality issue.
Register and go to details, which will direct the user to the new issue in the Quality issue list (QIS) application.
Quality issues may also be created by using the RamBase mobile application.
Risk assessment is a submodule of QHSES and provides the opportunity to perform risk assessments in RamBase. Users may choose which areas or RamBase objects to assess, and how to assess them. Risk assessment aims to cover activities that a business must perform to comply with legislative, internal, and external requirements (such as Internal Control Regulations and ISO requirements).
Areas where risk is present may be assessed by adding potential consequences such as high-level stakeholder analysis, work environment, operational processes, supplier/customer performance, legislative compliance and more. By setting up a preferred risk matrix in the QHSES setup (QISADMIN) application, users may add and quantify existing mitigation controls. Users may also create actions based on findings and handle them to control and reduce risk impact. When actions are handled, they may later be converted to controls.
It is possible to perform regular re-assessments at chosen intervals or copy existing assessments/risks to use them as templates for further work in the same or similar areas.
The submodule comprises the following three applications:
Risk assessments (RAM)
Risk assessment (RAS)
Risks list (RISK)
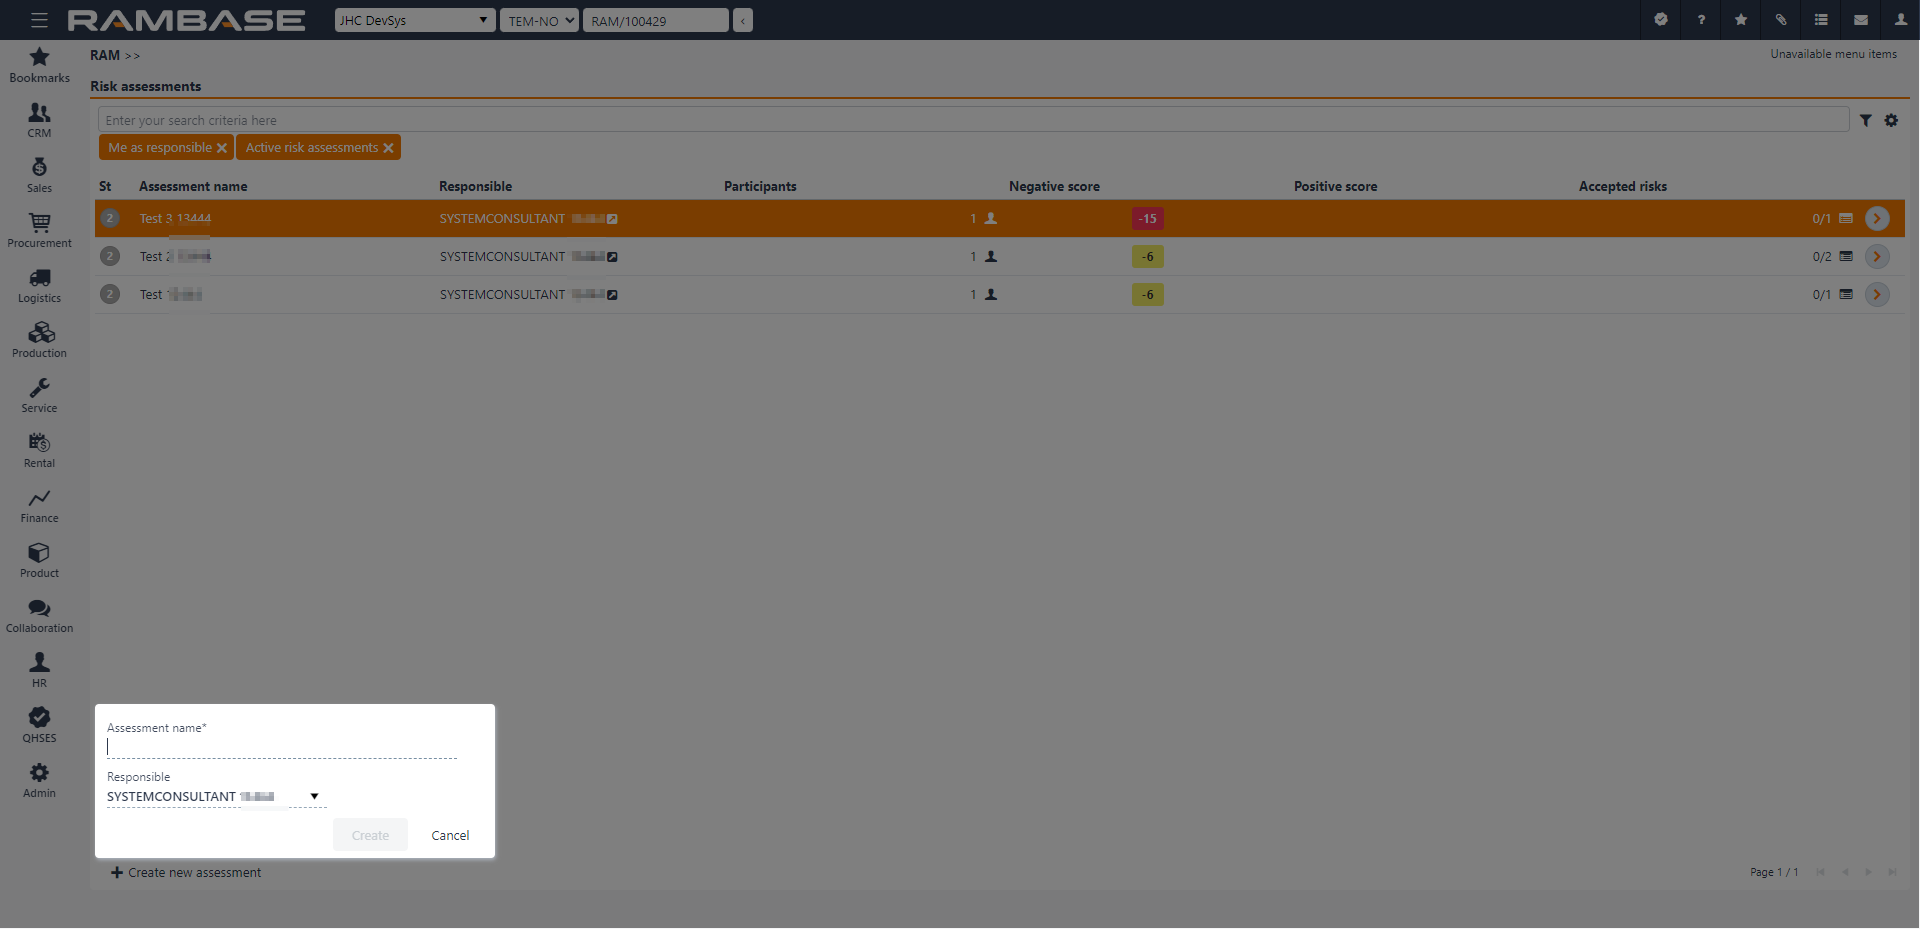
The Risk assessments (RAM) application gives an overview of the assessments in progress and the ones already completed. It also is a starting point for creating new risk assessments. Click Create new assessment in the bottom left corner and give the assessment a name and choose a responsible person. Clicking Create opens the risk assessment in Status 1 - Registration, in the Risk assessment (RAS) application.
To enable some context menu options, Risk assessment(s) (RAS) must be selected by clicking the Status icon. This is verified when the Status icon is replaced with a check-mark. Once one or more elements are selected, the context menu options are enabled.
Options | Descriptions |
|---|---|
Change responsible | Opens the Change responsible for selected popup where the user can use the Responsible dropdown menu to select another user as the one responsible for the risk assessment. |
Delete selected | Allows the user to delete the selected risk assessment. Verify the choice by selecting Yes or No in the popup. |
Clear selected items | To deselect quality issue(s), select the Clear selected items option. |
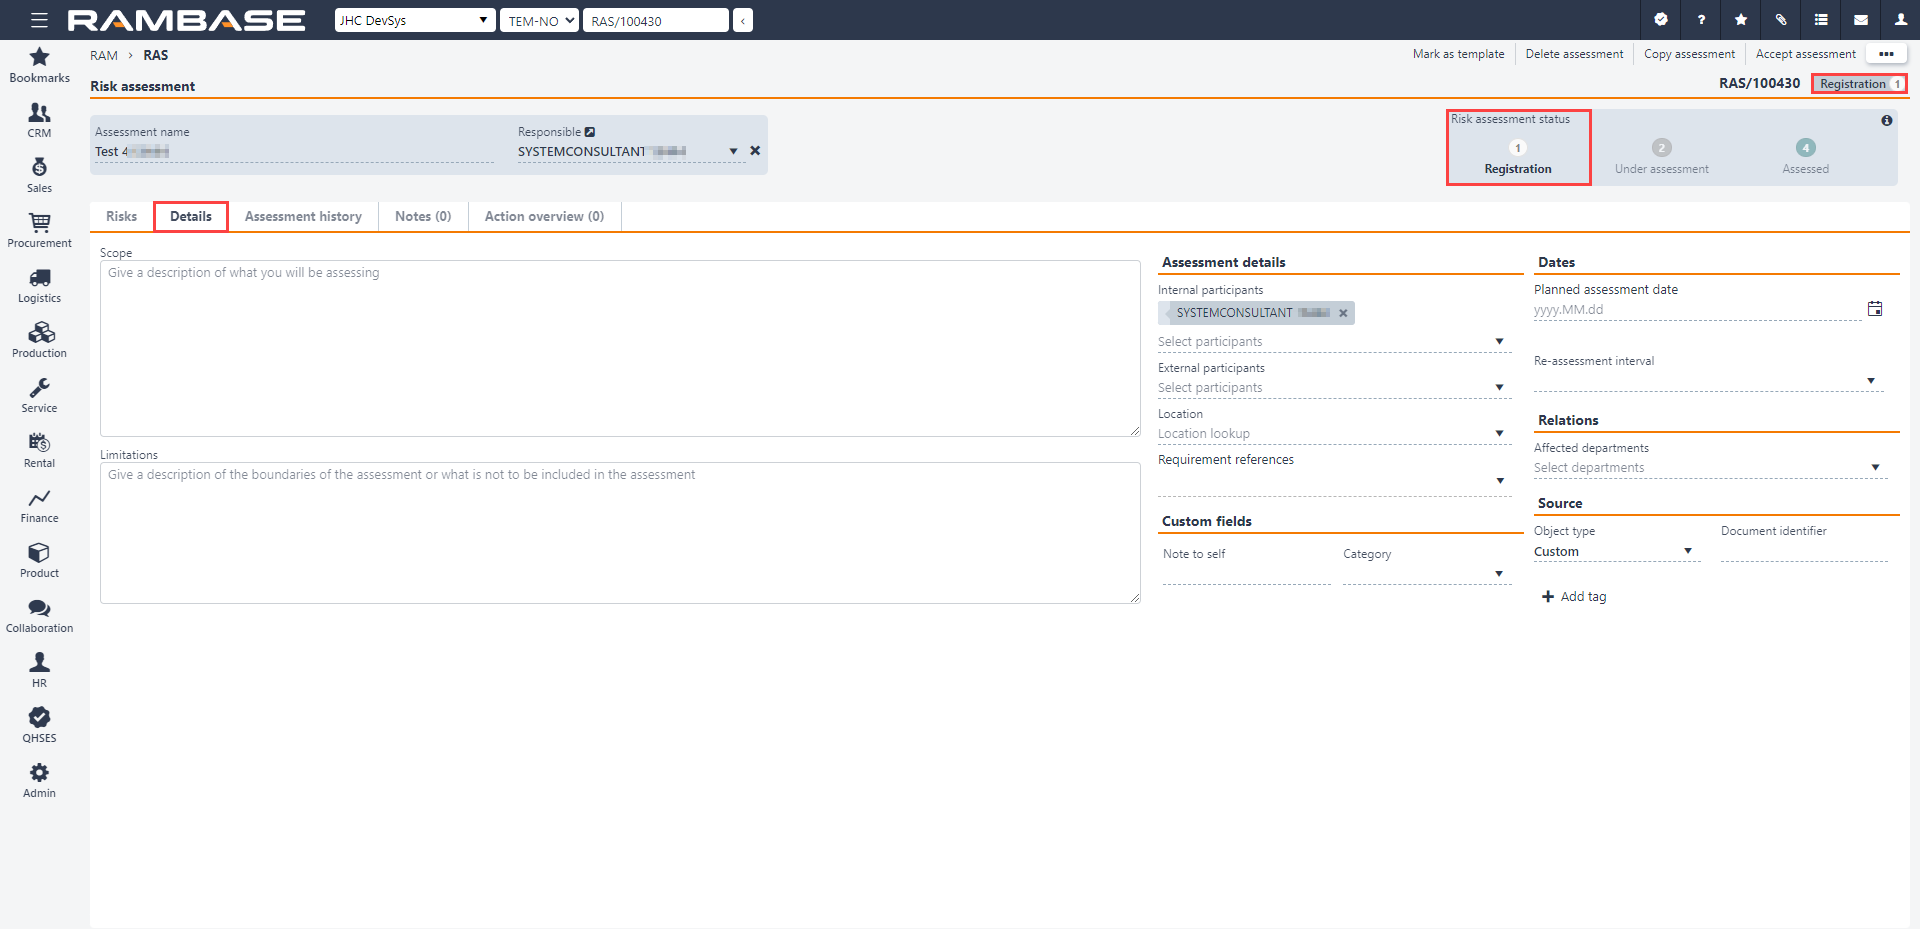
The Risk assessment (RAS) application is the starting point of the risk assessment. In this application, the user may start a new assessment, start a re-assessment, or copy an existing assessment. A copied risk assessment can be used as a template for the same or similar assessments at a later stage. The application allows the user to view and continue work with risk assessments according to the user’s permission level in RamBase. The tabs in the Risk assessment (RAS) application are Details, Risks, Notes, Action overview and Assessment history.
The boundaries for the assessment are set in the Details tab, in the field Scope and Limitations. The following fields are also located in the Details tab: Assessment details (participants, location etc.), Dates, Custom fields, Relations, and Source.
The Risk tab is where actual risks are added. Multiple risks may be added. (The actual assessment of each risk will be done in the Risks list (RISK) application.)
The Notes tab is used for unconnected notes of any kind.
The Action overview tab contains an overview of all actions added to the risks in the Risks list (RISK) application. Actions may be handled directly in this tab or processed further in the Task (TASK) application. It is also possible to add/convert a closed action to a control for the specific risk.
The Assessment history tab presents all previously performed assessment(s), from original to re-assessments.
The statuses in the Risk assessment (RAS) application are Status 1 - Registration, Status 2 - Under Assessment, Status 4 - Assessed. The status changes automatically from Status 1 - Registration to Status 2 - Under Assessment, when starting an assessment in the Risks list (RISK) application.
Add URL to Risk assessment (RAS)
The Risk assessment (RAS) application is accessed via the Risk assessments (RAM) application, where the user selects or creates assessments.
Open the Risk assessments (RAM) application from the RamBase menu, by clicking QHSES and then Risk assessments.
Either select or search for the required Risk assessment (RAS) in the list, then click the Right arrow to open the Risk assessment (RAS) application.
To add a URL to the Risk assessment (RAS), click the Add URL in the Tags & References area and provide a Custom short name and the Url.
To add the URL to the Tags & References area, click the +Add button.
The URL-element can now be clicked in the Tags & References area, and will open a new browser tab with the provided address.
The Risks list (RISK) application gives an overview of risk(s) already added in the Risk assessment (RAS) application. Note that new risks may be created directly in this application, not only via the Risk assessment (RAS) application.
The header includes informational and, depending on the status of the risk, editable fields. It is important to note that, depending on the Source object type selected, the selection of available fields will vary.
Risk title field - Title set when creating the risk. Can be edited in Status 1-3.
Risk assessment field - Name of the risk assessment. Can be edited in Status 1-4 and Status 9 with the right permissions. Click the View icon to open the Risk assessment (RAS) application.
Description field - Description of the risk assessment. Set when the the risk was created. Can be edited in Status 1-3.
Risk owner field - Name of the Risk assessment (RAS) owner. Click the dropdown menu to change the Risk owner . Click the View icon to open the Personnel (PER) application to view details on the user. Can be edited in Status 1-3.
Source object type dropdown menu - Allows the user to select which RamBase object the risk is linked to. The user selects an object type and provides an identifier, or selects it from the dropdown menu. Depending on the object type selected, the following dropdown menus will be available:
Selected object type
Identifier
Sales order
Source sales order
Source order item
Customer
Source customer
Supplier
Source supplier
Finance project
Source finance project
Product
Source product
Production work order
Production work order
Quality issue
Quality issue
Risk assessment
Risk assessment
Custom
Provide an identifier and RamBase will link it to the risk.
Source document identifier
The Risks list (RISK) application has three tabs:
Notes: This tab is used for unconnected notes of any kind.
Quality issues: Existing related issues from Quality issue (QIS) may be added in this tab.
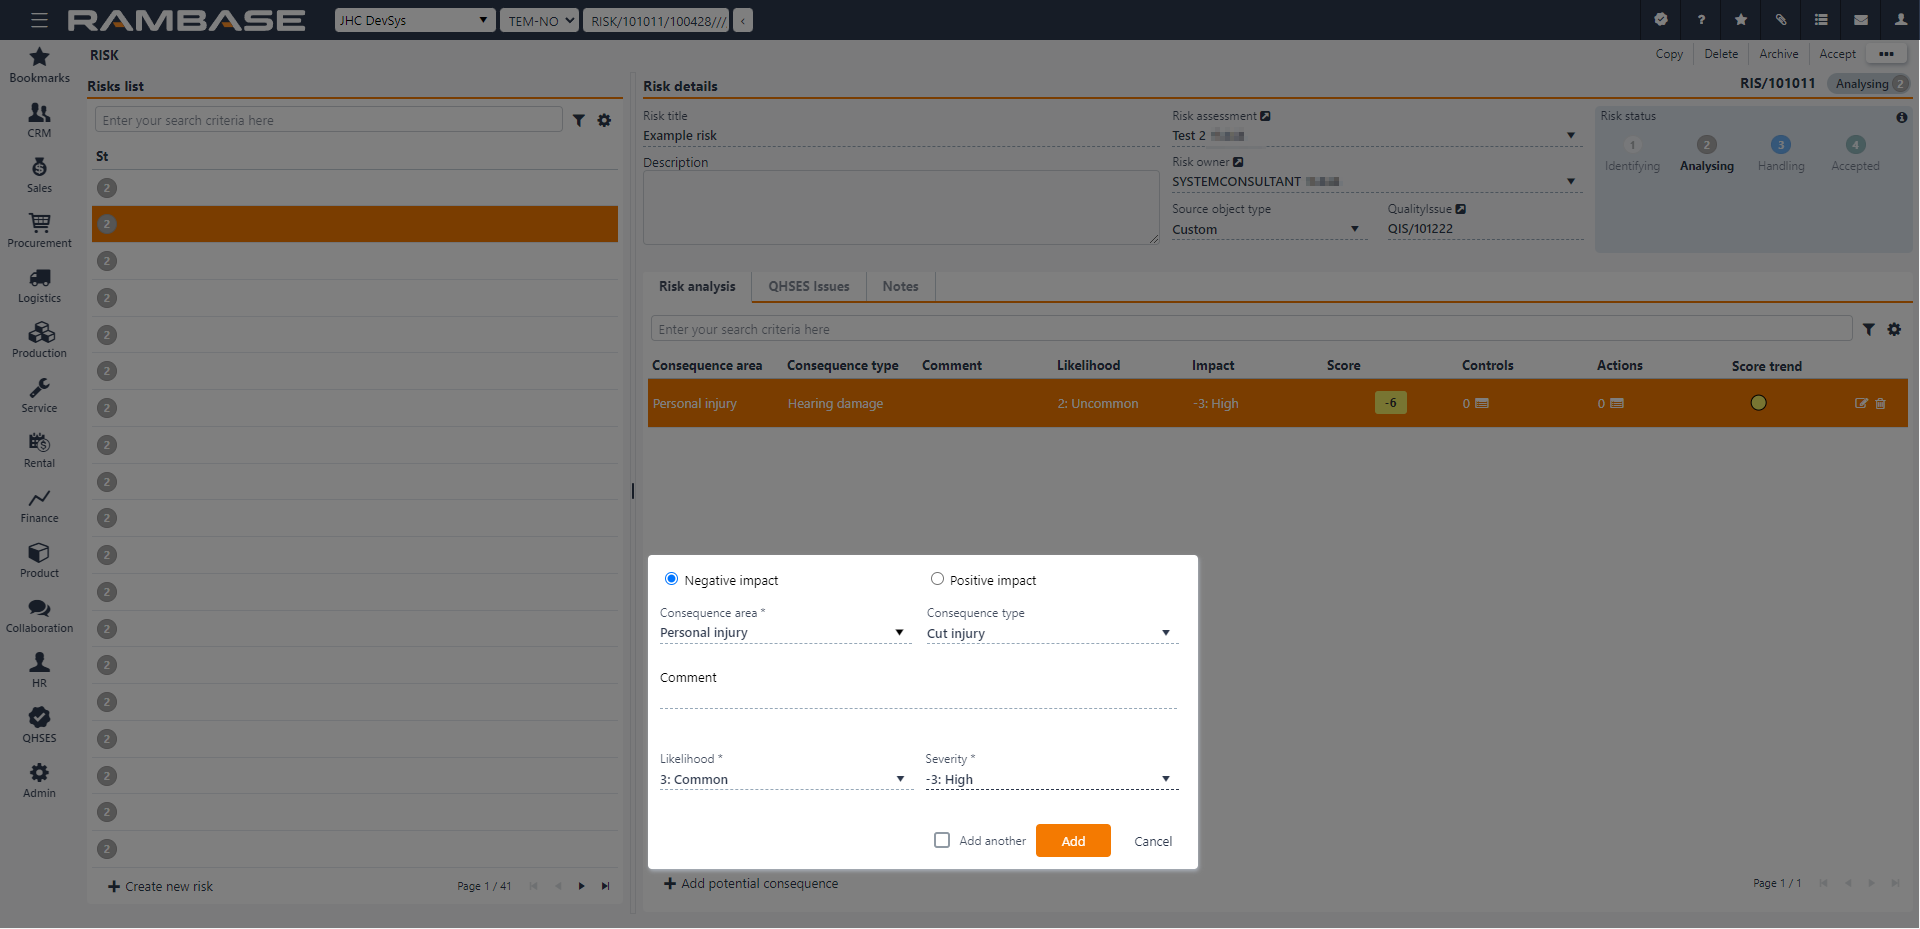
Risk analysis: In this tab, one or more potential consequences must be added for each risk.
Users select whether each potential risk has a Negative impact or a Positive impact (the latter is sometimes referred to as positive risk or a possibility).
Consequence area must then be chosen in the drop-down menu. It is then optional to choose a Consequence type from the next drop-down menu. For example, the Consequence area may be Personal injury, while the Consequence type could be Cut injury. The consequence areas and types are defined in the QHSES setup (QISADMIN) application.
There is also a Comment field, where the user may add any relevant information.
Likelihood and Severity are mandatory drop-down menus in which the user select the values corresponding to their assessment of each consequence. The risk matrix is defined in the QHSES setup (QISADMIN) application, with a 5x5 matrix as default.
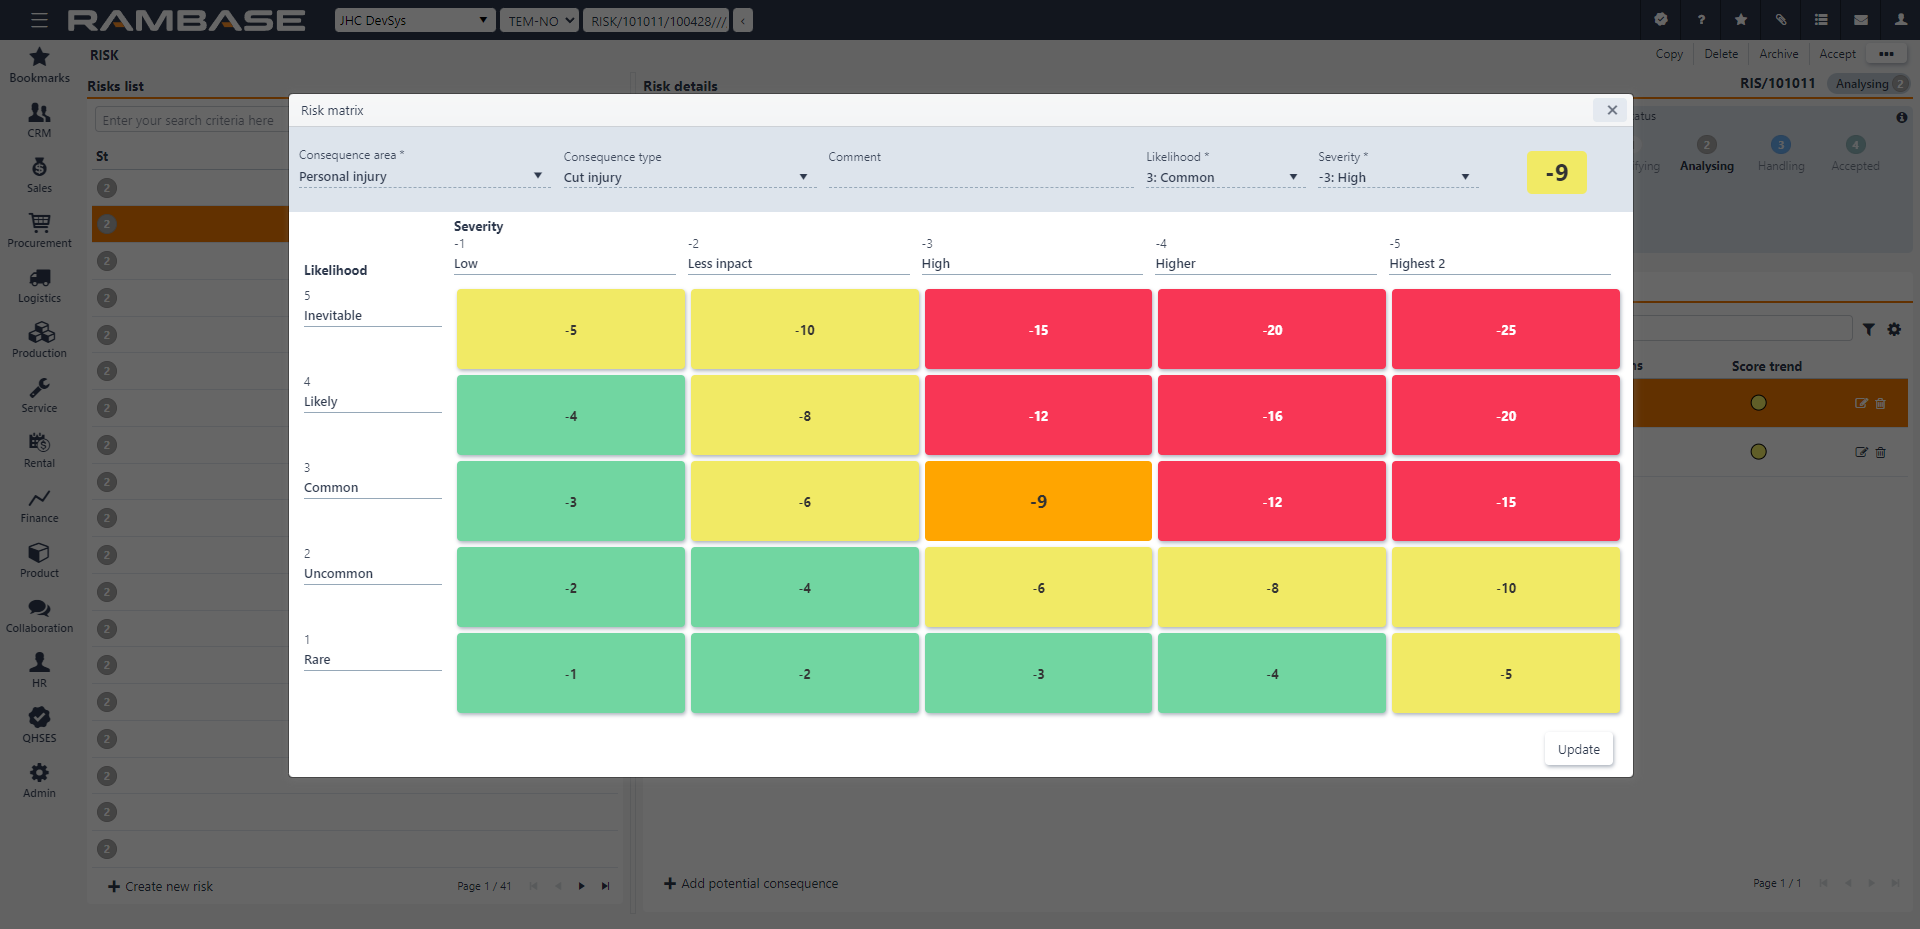
After quantifying the consequences of a risk, the potential consequence will appear in the Risk analysis tab. Controls may then be added. This is done by clicking the icon in the Control column for the consequence in question. A control could either be existing from other risk assessments, predefined reusable controls or new. The predefined and reusable controls are defined in the QHSES setup (QISADMIN) application.
After controls have been added, actions should be added to handle/control the remaining risk. Add actions by clicking the icon in the Action column for the consequence in question. Users may add new actions, or existing ones (if any exists). Actions are then handled further in the Risk assessment (RAS) application under the Action overview tab or in the Task (TASK) application. In the Action overview tab, users may add a closed action to a control for the specific risk.
The statuses of risks are Status 1 - Registration, Status 2 - Under Assessment, Status 3 - Handling, and Status 4 - Accepted. All individual risks must be in Status 4 - Accepted before a risk assessment can be closed in the Risk assessment (RAS) application (Status 4 - Assessed).
Note
If the user opens an older version of an assessment, a warning will appear and provide a link to the most up-to-date version.
The context menu options are available in by clicking the Context menu icon in the top-right corner.
To enable some context menu options, Risk(s) (RISK) must be selected by clicking the Status icon. This is verified when the Status icon is replaced with a check-mark. Once one or more elements are selected, the extended context menu options are enabled. The extended context menu options are listed in the second table below.
Options | Description |
|---|---|
Start analyzing | To forward the Risk to Status 2 - Analyzing, select the Start analyzing option. Available in Status 1 - Identifying
|
Start handling | To forward the Risk to Status 3 - Handling, select the Start handling option.
|
Accept | To forward the Risk to Status 4 - Accepted, select the Accept option.
|
Copy | Select the Copy option to open the Copy popup where the user can copy and customize the new risk copy. The new risk copy will be set in Status 1 - Identifying.
|
Archive | To forward the Risk to Status 9 - Archived, select the Archive option.
|
Delete | To delete a risk, select the Delete option. The user will be asked to verify the choice by either selecting Yes or No in the popup. A deleted risk will be removed from the Risk list.
|
Available options when multiple risks are selected | Descriptions |
|---|---|
Change risk assessment | Opens the Change risk assessment popup where the user can use the Risk assessment dropdown menu to select a different risk assessment. |
Delete selected | Allows the user to delete the selected risk. Verify the choice by selecting Yes or No in the popup. |
Archive selected | To forward the selected risk(s) to Status 9 - Archived, select the Archive option. |
Clear selected items | To deselect risk(s), select the Clear selected items option. |
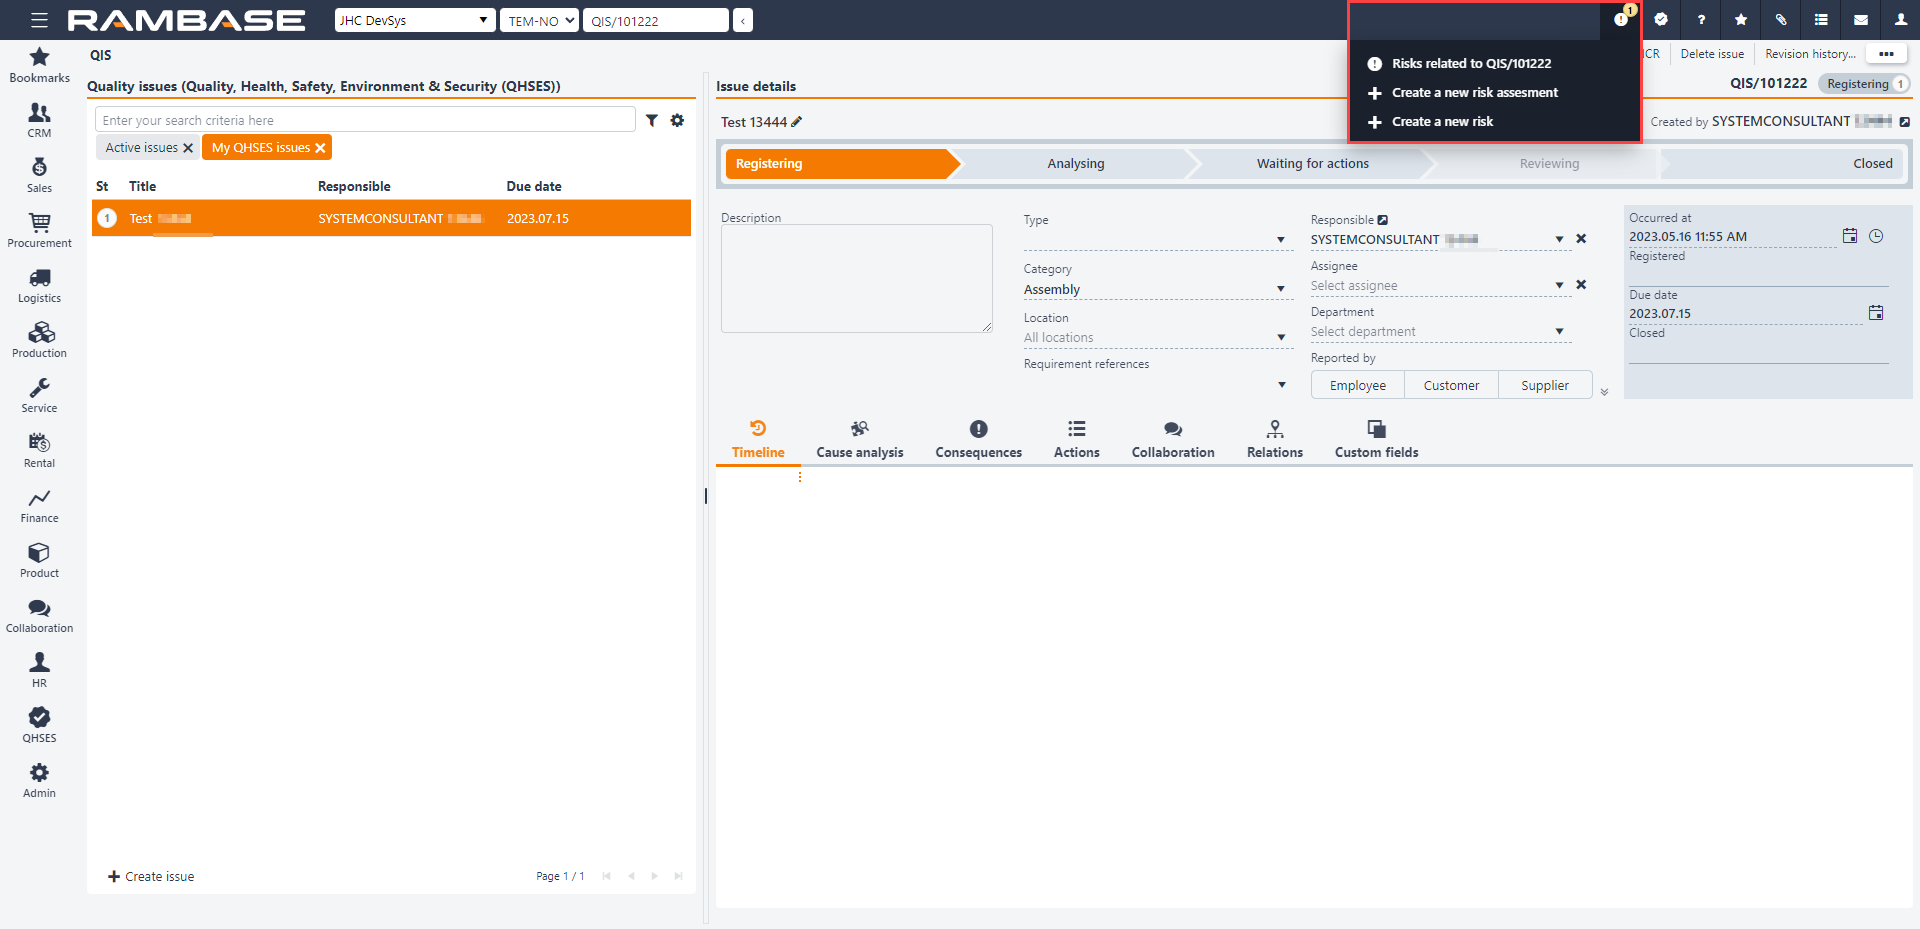
You may start a risk assessment or add a single risk from other applications in RamBase:
Sales Order (COA)
Production work order (PWO)
Customer (CUS)
Product (ART)
Supplier (SUP)
Quality issues (QIS)
To start a risk assessment or register a risk from any of these applications, click the Open RISK icon at the top right corner and select either Create a new risk assessment or Create a new risk. If there are any existing risks/risk assessments related to the object, there will be a number by the icon, indicating how many related risks there are. The color of the number (green-yellow-red) indicates the level of the highest related negative risk.
Quality management is the process where the quality of the product or service is questioned. This includes all the procedures involved to fix the situation, so all parties are satisfied.
Corrective and preventive actions are implemented.
Complaints are registered and handled.
Returns are performed for suppliers and customers.
Statistics regarding quality are exported.
Every company should prioritize resources to keep the quality of the product or service as high as possible. Mistakes and errors can happen, and it is important to have a set routine to handle these situations without losing customers. RamBase offers a module for these instances, where both corrective and preventive actions are performed, to fix the situation at hand in addition to avoiding such instances in the future. The function for returning goods or allowing a customer to return goods is integrated into every aspect of RamBase that deals with deliveries. To get an overview over the quality over a period, the Quality Management module in RamBase offers reports where the statistics are clearly presented.
Corrective and preventive actions - Actions need to be taken in situations where the quality is less than ideal. Corrective actions are taken to fix the situation and preventive actions are needed to avoid the situation to reappear.
Complaints and returns - Complaints from customers need to be resolved, and any defective/damaged goods need to be returned.
Statistics - All businesses live by their reputation, and statistics regarding the quality of deliveries are key to find how well the business avoids quality issues.
The Quality issue list (QIS) application may be used to:
Report incidents, observations, improvement suggestions or any deviations from standard operating procedure.
Get an overview of quality issues. By using the sorting and filtering functionality, the user can easily narrow down the amount of quality issues shown in the list, according to preference.
Open a specific quality issue in the Quality issue details (QISD) application, to work on the specific issue.
To open the Quality issue list (QIS) application, go to the RamBase menu and select QHSES, then Corrective & Preventive actions and finally Quality issues.
Quality issues can be registered via the RamBase mobile application or the Quality issue list (QIS) application by following these steps:
Click the Create a new quality issue button in the lower left corner.
Give relevant information and details in the following fields and checkboxes:
Anonymous: Check the I want to be anonymous when reporting this checkbox to report the issue anonymously.
Title: Type a descriptive title for the issue. (Mandatory.)
Description: If relevant, type a description of the issue in this free text field. The field is expandable: click in the lower right corner of the field and drag to set the preferred size.
Responsible: Select the employee who shall have the main responsibility for the issue. (Mandatory.) Click on the View icon to inspect the responsible in the Personnel (PER) application (after the responsible has been selected).
Occurred at: Type manually, or click the Calendar icon to select the date, and the Clock icon to select the time of the occurrence of the issue.
Issue type: Select the type of issue in the drop-down menu. (New issue types may be added in the QHSES setup (QISADMIN) application.)
Category: Select a category for the issue in the drop-down menu. (New categories may be added in the QHSES setup (QISADMIN) application.)
Department: Select the department in which the issue occurred. (Mandatory.) Click on the View icon to inspect the department in the Departments (DEP) application (after the department has been selected).
Click the Create button to create the quality issue and open it in the Quality issue details (QISD) application.
When the quality issue is created, notifications (IMS and/or email) are automatically sent to the employee who is set as responsible, assignee and the employee who is responsible for the selected department. A reminder notification will be sent one week in advance of the deadline of the quality issue, as well as another the day before the deadline. If the quality issue is still open after the deadline, a reminder will be sent once a week, every Monday.
It is easy to see which quality issues are overdue in the Quality issue list (QIS) application. The dates in the Due date column are presented with red color when the issue is overdue. It is also possible to keep track of overdue issues from your dashboard, via the Overdue Quality Issues and Actions widget.
Note
The due date on the created quality issue will be set based on the Quality issue default due date days setting in the QHSES setup (QISADMIN) application.
It is possible to use (some of the) columns to sort quality issues. Click once on the title of a column to sort in ascending order, click once more to sort in descending order, and click one final time to remove the sorting. It is possible to use several columns to sort at the same time.
In addition to the standard columns, users may add columns by clicking on the Column setting icon, selecting columns and then selecting (and deselecting) according to preference. The order of the columns in the quality issue list may be changed by drag-and-drop.
Filtering can be done via the Search field above the list of issues, and/or the Filter builder (which offers both an extensive range of Standard filters and the opportunity to Create custom filters). Read more about filtering in RamBase here, for detailed instructions.
Note
After sorting and filtering according to preference, it is possible to export the list to Excel. This is done by clicking the Column settings icon and selecting Export to Excel.
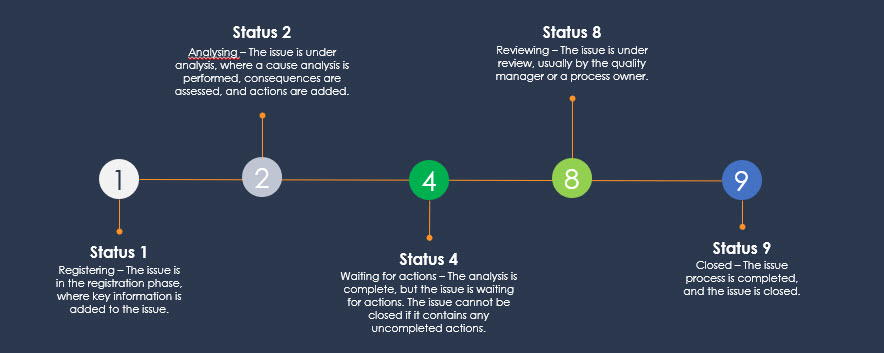
The following statuses are relevant in the Quality issue list (QIS) application:
Status 1 = Registering. (The issue is in the registration phase, where key information is added to the issue.)
Status 2 = Analyzing. (A cause analysis is being performed, consequences are being addressed, and actions are being added.)
Status 4 = Take action. (The analysis is complete, but the issue is awaiting actions. The issue cannot be closed if it contains any uncompleted actions.)
Status 8 = Reviewing. (The issue is under review, usually by the quality manager or a process owner.)
Status 9 = Closed. (The process is complete and the issue is closed.)
Quality issue(s) (QIS) must be selected by clicking the Status icon. This is verified when the Status icon is replaced with a check-mark. Once one or more elements are selected, the context menu options are enabled.
Options | Descriptions |
|---|---|
Change responsible for selected | Opens the Change responsible for selected popup where the user can use the Responsible dropdown menu to select another user as the one responsible for the quality issue. |
Delete selected | Allows the user to delete the selected quality issue(s). Verify the choice by selecting Yes or No in the popup. |
Clear selected items | To deselect quality issue(s), select the Clear selected items option. |
The Quality issue details (QISD) application is where quality issues are processed. In order to make it user friendly and efficient to use, the application is structured around the process of handling a quality issue:
Registration
Analyzing
Take action
Review and close
The application is accessed via the Quality issue list (QIS) application, which is found in the RamBase menu by selecting QHSES, then Corrective & Preventive actions, and finally Quality issues. Selecting an issue from the list, or creating a new quality issue, will take the user to the quality issue in the Quality issue details (QISD) application.
Upon creating a new quality issue in the Quality issue list (QIS) application, the quality issue will be opened in the Quality issue details (QISD) application, ready for registration.
This is the main area at the top of the quality issue, and will remain the same throughout the process of handling the issue.
At the top, it is possible to edit the quality issue name by clicking on the Pencil icon, making changes, and confirming them by clicking the Check mark icon.
Beside the quality issue name, the quality issue ID and the status of the issue are located, with the status changing according to the issue's position in the handling process.
Below the name of the quality issue, there is a free text field called Description, in which the issue should be described. The field is expandable: click in the lower right corner of the field and drag to set the preferred size.
Select the employee that should have the main responsibility for the issue in the Responsible look-up field. The responsible person should follow up and make sure the issue is processed by the correct people. In order to do this, the responsible person needs permission to forward the issue to review and/or close the issue.
Choose the individual to whom the issue should be assigned from the Assignee look-up field. This person will be tasked with handling the issue, such as conducting cause analysis or assessing consequences and/or risks. If the person set as responsible can perform these tasks, there is no need to assign it to an assignee.
The Process bar, situated below the quality issue area, tracks the user's progress in handling/viewing the quality issue (workflow). Serving as a navigation tool, it allows users to move back and forth to view or manage information. Advancing through the process changes the issue's status, but revisiting earlier phases to view or manage information does not alter the status.
The registration working area has several tabs, where further information can be registered on the quality issue:
Details
Related issues
Tags and references
Source
Tip
The order of the tabs may be rearranged according to user preference. Use drag-and-drop to move tabs.
In the details tab, further information on the quality issue may be registered.
Issue type: If this was not added upon creation of the issue, select the type of issue in the drop-down menu. (New issue types may be added in the setup (QISADMIN) application.)
Category: If this was not added upon creation of the issue, select a category for the issue in the drop-down menu. (New categories may be added in the setup (QISADMIN) application.)
Location: Select a location for the issue in the drop-down menu. After selecting a location, the location may be inspected in the Location (LOC) application by clicking the View icon.
Department: If relevant, the department chosen upon creation of the issue may be edited in the Department lookup field. The department may be inspected in the Departments (DEP) application by clicking the View icon.
Requirement references: Select one or more requirement reference(s) for the issue by checking the relevant checkbox(es) in the multi-select drop-down menu. Requirement references are used to identify which requirement(s) a quality issue deviated from or is related to. The reference could be an ISO quality standard, an internal procedure manual or other standard. (New requirement references may be added in the QHSES setup (QISADMIN) application.)
Origin of issue: If applicable, click on the Customer, Employee or Supplier button to add the origin of the issue. Then select customer/employee/supplier in the lookup field.
External reference: If applicable, type the external ID number that is reported from the customer’s or supplier’s system where they are processing deviations and actions.
Notify when the issue is closed: Select this checkbox to notify the creator when the issue is closed. If the creator of the issue checked the I want to be anonymous when reporting this checkbox upon creating the issue, it will not be possible to notify the creator.
Require review: If the setting Review step on issue level is turned on in the setup (QISADMIN) application, this checkbox will be checked by default.
Occurred at: Type manually, or click the Calendar icon to select the date, and the Clock icon to select the time of the occurrence of the issue.
Due date: This field gives the deadline for when the quality issue should be resolved. The default is calculated based on the value of the Quality issue default due date days setting in the setup (QISADMIN) application. The default date may be changed by clicking on the Calendar icon and selecting the preferred date.
Custom fields: Any added custom fields will be located in the Details tab. Custom fields are added via the Custom fields (CUSTOMFIELDS) application.
Suggested actions: This type of actions are typically added by the reporter.
Add a suggested action
Click Add new.
Provide a title and description for the suggested action.
Click Save.
Actions added in the Suggested actions sub-tab are not required actions. They must be converted to an immediate or a corrective action for them to be required actions for the quality issue to be closed. An action can be edited by clicking on it and making the necessary changes, then clicking Save (or the Trash can icon to delete it). If a suggested action is not relevant, the user handling the issue can check the Is rejected checkbox.
Immediate actions: In the registration phase, users may also add immediate actions already taken as corrective measures to handle the incident.
All immediate actions are created as tasks and may be view or edited in the Task (TASK) application. It is possible to add both existing actions (tasks) and new actions as immediate actions.
Add an existing action (task)
Click Add existing.
Use the filtering functionality to locate the existing action (task) and select it.
If the action should be given a deadline, an assignee or be marked as done, locate the recently added task in the Immediate actions tab and select it. Make the necessary changes and click Save.
Add a new action (task)
Click "Add new".
Provide a title and description for the immediate action (task).
If required, set a deadline by typing manually in the Deadline field or use the Calendar icon for the date and the Clock icon for the time selection.
If relevant, select an employee in the Assigned to lookup field.
To mark the action (task) as completed, check the Mark as done checkbox.
Click Save.
Tip
To edit an action (task) locate and select it, then make the relevant changes and click Save.
Related issues allow you to link any quality issue to the current issue.
Add related issue
Click the Add related issue button in the lower left corner of the tab.
Select the type of relation in the Relation type field (mandatory).
Select the relevant issue from the Quality issue look-up field.
If several issues are to be tagged, check the Add another checkbox to speed up the process.
Click the Add button to add the related quality issue to the current one.
Adding a tag means linking a RamBase object directly to the quality issue.
Add a tag
Click Add tag in the upper left corner of the tab.
Select the type of tag. (Available tags are Customer, Employee, Finance project, Product, Production work order, Sales order, Sales quote, Sales quote request, Supplier and Opportunity.)
Start typing the identifier of the object (name or number) to tag in the lookup field and select the relevant object.
Save the tag by clicking the Check mark icon.
Tip
Click on the tag to view the object in the parent application. For example, a Supplier object opens in the Supplier (SUP) application.
The Source tab holds information related to the source document of the quality issue.
The source information is based on the data of the source document at the time the issue was created and will not be updated if anything changes in the source document.
The user can update this information, but if updated, all source data will be removed and field information will be based on the newly selected source document.
If the quality issue is created via the Quality issue list (QIS) application, the information in the Source tab must be typed manually, if relevant.
Source | Customer |
|---|---|
Customer Cus/XXX | Name |
Source | Product | Manufacturer |
|---|---|---|
Product ART/XXX | Product Name | Manufacturer Name |
Source | Supplier | Manufacturer | Affected Quantity | Finance Project |
|---|---|---|---|---|
Goods Reception SSA-item SSA/XXX | Supplier Name | Manufacturer Name | Total quantity of the source – Use product unit picker | Finance project name |
Source | Customer | Manufacturer |
|---|---|---|
Shipping Advice CSA/XXX | Customer name | Manufacturer Name |
Source | Customer | Product | Affected Quantity | Product certification | Finance Project |
|---|---|---|---|---|---|
Customer Deviation CDV/XXX | Name | Product name | Total quantity of the source – Use product unit picker | Product certification name | Finance project name |
Source | Customer | Product | Manufacturer | Affected Quantity | Sales Order | Sales Order Item | Product Classification | Finance Project | Production Work Order |
|---|---|---|---|---|---|---|---|---|---|
Production Work Order PWO/XXX | Name | Product name | Manufacturer name | Total quantity of the source – Use product unit picker | Sales order ID number | Item number | Product classification name | Finance project name | PWO/XXX |
Sources | Manufacturer | Affected Quantity | Material Classification | Production Work Order |
|---|---|---|---|---|
Lifecycle Management LCM/XXX | Manufacturer name | Total quantity of the source- Use product unit picker | Material classification | PWO/XXX |
Source | Customer | Supplier | Product | Material | Manufacturer | Affected Quantity | Sales Order | Sales Order Item | Product Classification | Finance Project | Production Work Order |
|---|---|---|---|---|---|---|---|---|---|---|---|
LCM Part Change LCM/XXX | Name | Supplier name | Product name | Material name | Manufacturer name | Total quantity of the source- Use product unit picker | Sales order ID | Item number | Product classification name | Finance project name | PWO/XXX |
Source | Product | Manufacturer | Affected Quantity | Sales Order | Sales Order Item | Resource | Detected OPR | Product Classification | Finance Project | Production Work Order |
|---|---|---|---|---|---|---|---|---|---|---|
Work Order WOO/XXX | Product name | Manufacturer name | Total quantity of the source- Use product unit picker | Sales order ID number | Item number | Resource name | Product operation name | Product classification name | Finance project name | PWO/XXX |
Source | Resource |
|---|---|
RESCONFIG RES/XXX | Resource name |
Source | Product | Manufacturer | Product Classification |
|---|---|---|---|
Measuring Tool MET/XXX | Product name | Manufacturer name | Product classification name |
Source | Supplier | Purchase Order | Purchase Order Item | Manufacturer | Affected Quantity | Product revision |
|---|---|---|---|---|---|---|
Supplier Purchase Order SPO/XXX | Supplier name | Purchase order ID | Purchase order item number | Manufacturer name | Total quantity of the source- Use product unit picker | Latest product revision |
This is the gray area to the right in the application, and comprises four tabs:
The Summary tab is the default view displayed in the gray overview area. It presents a summary of the key information logged throughout the issue's handling process in the working area. Clicking on different items will open them in their respective parent applications. For example, clicking on an action will open it as a task in the Task (TASK) application. Depending on the users permissions; Due date, Occurred at, Type and Category can be edited.
The Log tab enables users to track the primary changes made to the quality issue. The latest change appears at the top. Clicking on a log entry grants users access to more detailed information about that specific log entry.
In the Notes tab, users may add notes to have them at hand and available when handling the quality issue. The tab also has filtering functionality. Notes added here, will also be available in the Notes (NOTE) application.
Users utilizing the RamBase Outlook add-in can directly link emails to a quality issue. When this is done, the emails will be available in this tab. The tab also has filtering functionality.
Tip
The order of the tabs may be changed according to user preference. Use drag-and-drop to rearrange the order of the tabs.
The Quality Issue Detail application provides a process-oriented workspace, where input fields and statuses are dynamically adjusted according to the current stage in the workflow/process.
When the registration phase is completed, there are three ways of moving forward to the next stage (Analyzing):
clicking on Analyzing in the Process bar
clicking the Start analyzing button at the lower right of the working area, or
clicking the Context menu and selecting Register
Any and all of these three options will take the quality issue from Status 1, Registration to Status 2, Analyzing.
After moving forward to the Analyzing stage, navigation back to the Registration stage to view or manage information can be done either by clicking the View registration details button at the lower right of the working area, or by clicking on Registration in the Progress bar. This will not impact the status of the issue. After the issue is set to Status 2, Analyzing, it is not possible to change the status back to Status 1, Registering.
During this phase of addressing the quality issue, the focus is on examining consequences, potential risks, and deciding on necessary actions based on a root cause analysis to prevent the issue from reoccurring in the future.
The analyzing working area comprises the following five tabs:
Consequences
Costs
Risks
Actions
Root cause analysis
Tip
The order of the tabs may be rearranged according to user preference. Use drag-and-drop to move tabs.
This tab is where consequences for the quality issue are registered.
Add a consequence
Click the Add consequence button in the lower left corner of the Consequences tab.
Select a consequence area from the mandatory Consequence area lookup field. The lookup field has filtering functionality, with Active consequence areas as a default filter. (Consequence areas are set up via the setup (QISADMIN) application.)
Select the appropriate severity in the mandatory Severity drop-down menu.
Select a consequence type in the mandatory Consequence type drop-down menu. (Consequence types are set up via the setup (QISADMIN) application.)
If relevant, provide a comment in the Comment field.
Check the Create risk assessment checkbox to create a corresponding risk assessment. This will automatically create an item for the consequence in the Risks tab, where the risk assessment has to be completed afterwards.
If another consequence should be added, check the Create another checkbox to speed up the process.
Click the Create button.
The total sum of all costs added in this tab will be displayed in the Cost field, located in the Summary tab within the grey Overview area to the right.
Add a cost
Click the Add cost button in the lower left corner of the tab.
Select a category for the cost in the mandatory Cost category drop-down menu.
Provide a price.
If another cost should be added, check the Create another checkbox to speed up the process.
Click the Create button.
Note
Costs in quality issues do not affect any accounts is RamBase.
In the Risks tab, users may work on risks created when adding consequences in the Consequences tab, or add new potential risks. The highest risk score among the risks added in this tab will be displayed in the Risk score field, situated in the Summary tab within the grey Overview area on the right.
The tab has sorting functionality for the Risk score column. Click on the column header to sort.
Add a new potential risk
Click the Add potential risk button in the lower left corner of the tab.
Select a consequence area in the mandatory Consequence area drop-down menu.
Select the appropriate severity in the mandatory Severity drop-down menu.
Select the appropriate likelihood in the mandatory Likelihood drop-down menu.
Provide a comment, if relevant.
If another risk should be added, check the Create another checkbox to speed up the process.
Click the Create button.
The Actions tab comprises four sub-tabs: All, Suggested, Immediate, and Corrective, which function as filters based on the type of action. Users have the option to view all actions, only suggested, only immediate, or only corrective actions. Actions added during the registration phase will appear under the respective sub-tabs. Additionally, users can add new suggested actions, new or existing immediate actions, and new or existing corrective actions. For instructions on adding new or existing actions (tasks), please refer to the section about actions in the registration documentation, where the process for adding suggested and immediate actions has been detailed. Corrective actions are added similarly to immediate actions.
In the Root cause analysis tab, users have the opportunity to perform a why-why analysis to pinpoint underlying causes.
When the analyzing phase is completed, there are three ways of moving forward to the next stage (Take action):
clicking on Take action in the Process bar
clicking the Take action button at the lower right of the working area, or
clicking the Context menu and selecting Take action.
Any and all of these three options will take the quality issue from Status 2, Analyzing to Status 4, Take action.
If there is a need to view or edit information given in the registration phase, navigation can be done either by clicking the View registration details button at the lower right of the working area, or by clicking on Registration in the Progress bar. This will not affect the status of the issue.
After moving to the Take action stage, navigation back to the Analyzing stage to view or edit information can be done either by clicking the View analyzing details button at the lower right of the working area, or by clicking on Analyzing in the Progress bar. This will not affect the status of the issue. However, if the whole process needs to be taken back a step, it is possible to change the status back to Status 2, Analyzing. This is done by clicking on the Context menu and selecting Send back to responsible, then adding a comment and finally clicking the Confirm button.
In this stage of handling the quality issue, the focus is on following up on the actions identified in the previous stage and completing them. It is still possible to add new actions, if relevant.
The analyzing working area comprises the following five tabs:
All
Suggested
Immediate
Corrective
External correspondence
Tip
The order of the tabs may be rearranged according to user preference. Use drag-and-drop to move tabs.
This tab gives an overview of the actions (tasks) tied to the quality issue. (In other words, immediate and corrective actions. Suggested actions need to be converted to an immediate or corrective action to show in the All tab.) The status of the progress of each action is conveniently located to the far right on each action line. As each action is also a task (except suggested actions), the status of an action originates from the Task (TASK) application: To do, In progress, or Done. An action can be marked as done by clicking on the action, checking the Mark as done checkbox and clicking the Save button.
The Suggested tab displays all suggested actions associated with the quality issue. To convert a suggested action into a task and make it actionable, click on the respective action and then click on the Immediate or Corrective button, then click the Save button. The action will then move to the correct tab. This process relocates the action to the appropriate tab.
This tab displays immediate actions associated with the quality issue. New or existing actions may be added and managed in the same way as in the analyzing stage of handling the issue.
The Corrective tab displays corrective actions associated with the quality issue. New or existing actions may be added and managed in the same way as in the analyzing stage of handling the issue.
Tip
In any of the action tabs, an action (task) may be deleted or unlinked from the issue by clicking on the action in question, clicking the Trash can icon and then clicking the Unlink or Delete button, respectively.
In this tab, external correspondence are logged. External correspondence may be added via the Create new.. button in the lower left corner of the tab or via the Context menu. There are four types of external correspondence:
Corrective action report (CAR)
NCR Deviation request
NCR Concesion request
Technical clarification
More information about external correspondence is found here.
The quality issue can be marked with NCR by selecting the Mark for NCR option in the Context menu. Subsequently, a small blue marker displaying an information symbol and NCR will appear on the title line of the quality issue, next to the quality issue identifier. To remove the mark, hover over the blue marker and click Remove NCR marking or select the Unmark for NCR option in the Context menu.
Marking an issue for NCR requires external NCR correspondence to be completed in order to close the issue.
If an issue is marked for NCR, users can filter and identify the issues that require external NCR correspondence in the Quality issue list (QIS) application. To do this, create a custom filter within the Quality issue list (QIS) application, with the following values: IsMarkedForNCR = True. Find instructions of how to create custom filters here.
When the actions (tasks) are completed, there are three ways of sending the issue for review, or alternatively closing it directly:
clicking on the check-mark icon in the Process bar
clicking the Send for review/Close issue button at the lower right of the working area, or
clicking the Context menu and selecting the Send for review/Close issue option.
Any and all of these three options will take the quality issue from Status 4, Take action to Status 8, Reviewing or Status 9, Closed.
After an issue has been sent for review, it is still possible to view and manage information registered in the issue. Navigation can be done either by clicking the View analyzing details button at the lower right of the working area, or by clicking on Registration/Analyzing in the Progress bar. This will not affect the status of the issue. However, if the whole process needs to be taken back, it is possible to change the status back to Status 2, Analyzing or Satus 4, Take action. This is done either by clicking on the Send back to responsible button in the lower right corner of the working area or clicking on the Context menu and selecting Send back to responsible. This action prompts a pop-up window where the preferred status must be selected, followed by clicking the Confirm button.
If an issue is sent for review, the reviewer will either send the issue back to responsible if improvements are needed, or close the issue if everything looks fine.
Note
All immediate and corrective actions have to be marked as done in order to close the quality issue.
When an issue is closed, it is no longer possible to manage information in the quality issue, but it is possible to view the information.
External correspondence is used to suggest an improvement or report a non-conformance, whether it has occurred or is anticipated to occur. It is sent to external parties as part of the quality issue handling process.
The correspondence will be listed in the External correspondence tab in the Take action stage of the Quality issue details (QISD) application. External correspondence may be created in the same tab, by clicking on the Create new... button in the lower left corner and selecting the relevant type of correspondence, making sure all the relevant information is included and correct, and then clicking the Save button. This will create the external correspondence in Status 1, Draft.
Tip
External correspondence may be created at any stage in the quality issue handling process, by clicking on the Context menu, selecting the relevant type of correspondence and following the same procedure as when creating correspondence directly in the External correspondence tab.
Note
When an external correspondence is created, the initial information is drawn from the quality issue in its current state, but the information can be edited, and additional information can be incorporated as needed.
In the External correspondence tab, the added correspondence will appear in a list view, each correspondence as a separate row. Each correspondence have four icons which allows the user to interact with it in different ways:
The Open and edit icon lets the user view and manage the correspondence
The Magnifying glass icon lets the user view signed files that are uploaded to the correspondence
The Trash can icon lets the user delete the correspondence
The Options icon lets the user Send to myself or Close external correspondence (if the correspondence is in the right status to do so).
Note
A correspondence cannot be edited after it has been set to Status 9, Closed. It can, however, be deleted.
Corrective action report (CAR) is used to send a response to the customer/supplier who has reported a deviation. For instance, it addresses issues like a product being damaged during shipment or suggestions for process enhancements. This report provides the customer/supplier with a response that justifies both short and long-term actions to prevent a recurrence.
When a corrective action report is created, there are two options to save it:
Clicking the Save button will create it in Status 1, Draft.
Clicking the Send to myself button will create it in Status 3, Waiting for verification.
Clicking the Send to myself button will send the corrective action report to the user via e-mail. If the quality issue has attached files in the File manager (FILEMANAGER) application, these may be included in the e-mail.
A corrective action report may be closed (set to Status 9, Closed) in the following ways:
When in the External correspondence tab, clicking the options icon on the correspondence and selecting the Close correspondence option, or
When in the open Corrective action report, clicking the Close correspondence button, or
When in the open Corrective action report, clicking the Send to myself button. (This alternative will send the corrective action report to the user via e-mail. If the quality issue has attached files in the File manager (FILEMANAGER) application, these may be included in the e-mail.)
NCR Concession request is used when a deviation is identified before its occurrence, requiring either prior approval or actions to address it, based on customer input. Once created and sent to the customer, the request will be visible in the External correspondence tab.
When a request is created, there are two options to save it:
Clicking the Save button will create it in Status 1, Draft.
Clicking the Send to myself button will create it in Status 2, Waiting for response.
Clicking the Send to myself button will send the NCR concession request to the user via e-mail. If the quality issue has attached files in the File manager (FILEMANAGER) application, these may be included in the e-mail.
When a response is received, this should be registered in the NCR concession request. Click the Open and edit icon on the NCR concession request in the External correspondence tab and then select the Response tab. Depending on the customer's decision, select the appropriate status for the correspondence:
Approved. (The correspondence will be set to Status 9, Closed.)
Conditionally approved. (The correspondence will be set to Status 8, Pending actions.)
Not approved. The correspondence will be set to Status 9, Closed.)
Based on the customer's decision, an Action should be selected, such as Scrap part/product, Credit Note, or another applicable choice. The file with the signed response could also be uploaded here, before saving the correspondence by clicking the Save button.
Note
When the NCR concession request is in Status 2, Waiting for response, a shortcut is available to register a response: Within the External relations tab, users will find an Upload button in the Response status column. Clicking this button directs users straight to the Response tab in the open NCR concession request. Here they can upload the signed document, register the response, and select an action.
NCR Deviation request is used when deviations are discovered after the work has started, and an approval from the customer needs to be applied for. Except for the purpose of the report, the information above about NCR Concession request also applies for NCR Deviation request.
Technical clarification is used when the possibility of an improvement is discovered early in the process, to request permission for alterations, (such as material changes and so on).
When a technical clarification is created, there are two options to save it:
Clicking the Save button will create it in Status 1, Draft.
Clicking the Send to myself button will create it in Status 2, Waiting for response.
Clicking the Send to myself button will send the technical clarification to the user via e-mail. If the quality issue has attached files in the File manager (FILEMANAGER) application, these may be included in the e-mail.
When a response is received, this should be registered in the technical clarification. Click the Open and edit icon on the technical clarification in the External correspondence tab and then select the Response tab. Depending on the customer's decision, select the appropriate status for the correspondence:
Approved. (The correspondence will be set to Status 9, Closed.)
Conditionally approved. (The correspondence will be set to Status 8, Pending actions.)
Not approved. (The correspondence will be set to Status 9, Closed.)
The file with the signed response could also be uploaded here, before saving the correspondence by clicking the Save button.
After the technical clarification has been created (either in Status 1 or in Status 2), it is also possible to set it directly to Status 9, Closed, without registering any response. This is done in the following ways:
When in the External correspondence tab, clicking the Options icon on the correspondence and selecting the Close correspondence option, or
When in the open technical clarification, clicking the Close correspondence button.
Tip
Customization of the output from these reports can be done using Telerik. This also allows for tailored output designs that can be allocated to specific customers or suppliers as needed.
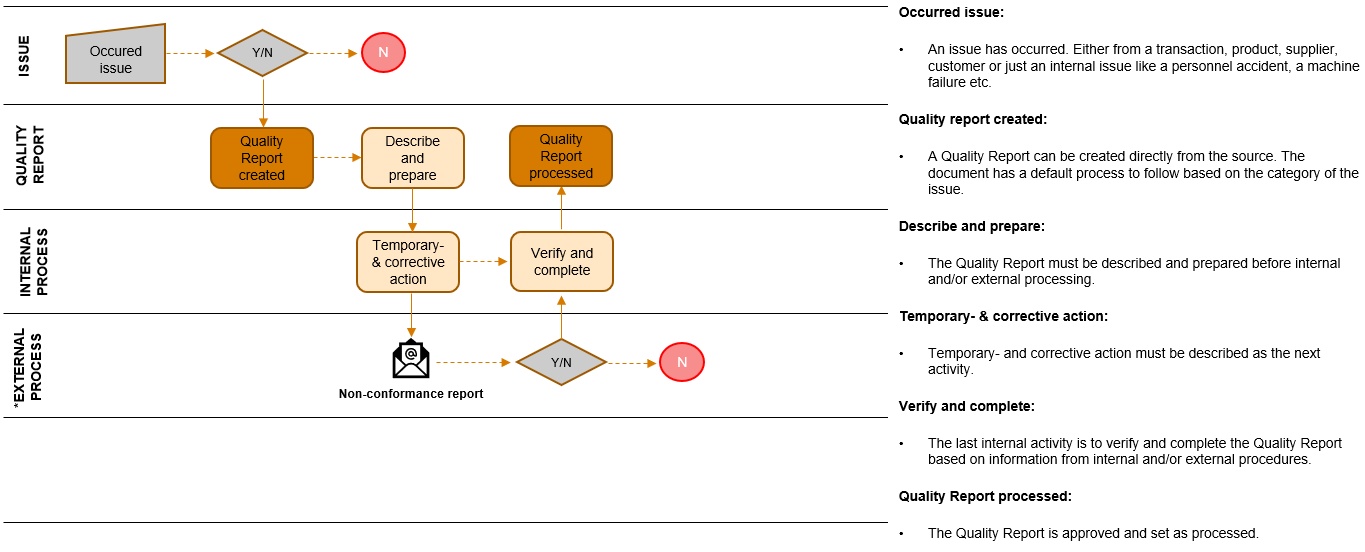
Corrective and preventive actions are registration of typical quality events directly from the place in the ERP system where the event occurred.
The quality issue is reported.
The quality issue is followed up.
The issue is resolved.
RamBase supports standard corrective and preventive action processes with no extra logins and no sub-system. Registration directly from different applications in the system makes the registration close to both the place and time for the issue, makes it easy to register accurate quality issues. The issue is then followed up and actions are taken to both fix the issue at hand and to avoid similar situations in the future.
Registration of a quality issue - The quality issue is reported by the customer and registered into the system.
Follow up on the quality issue - The quality issue is followed up and methods of fixing it are presented.
Close the quality issue - The quality issue is resolved, and the issue is closed.
The Quality Assurance Report archive (QAR) contains reports on quality deviations and actions taken to improve the overall productivity and service quality. The archive is managed by the QAR program.
To inspect the archive content, write QAR in the program field and press ENTER.
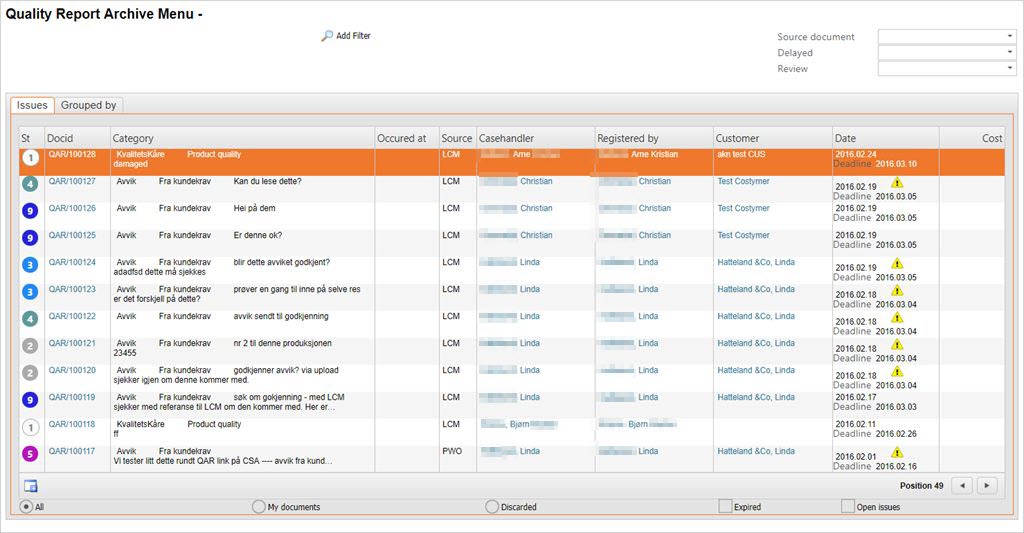
To inspect a single report, click the DocId link or highlight the report entry and press ENTER.
The list of quality reports may be restricted by filters and by their report status. It is also possible to list predefined sets by clicking the radio buttons below the menu listing.
Simple search strings - The QAR program searches the DocId field. If you add a number to the program name (for example QAR 101137) the program searches for reports with a similar document id.
Predefined subsets - Select the predefined subsets by clicking the radio buttons below the list. In addition to the All documents subset, and the My documents subset, you may list reports for which the deadline has expired, as well as reports that are still open.
The Source document drop down box - The Source document drop down box allows you to list reports that have been created from a certain document such as ART, LCM, and PWO.
The Delayed drop down box - The Delayed drop down box allows one to select and list reports for which the due date is exceeded.
The Group by folder - The Group by folder allows you to construct a filter to pick out specific subsets of reports.
To group reports by a certain property, open the Group by folder and select one of the options in the dropdown-box to the left. Select a message type, and press ENTER. The selected message type is added in the QAR Menu header along with a paint brush to remove the filter, and a Filter button to apply the filter.You may create a second, and a third filter before applying it.
Complex searches - To do more complex searches, click the Add Filter icon. A complex filter of up to 8 fields can be created by constructing conditions.
In order to analyze data, or present data graphically, data from the QAR archive can be extracted to a CSV file:
Create a filter using the Add Filter button, unless you want to extract data from all QAR reports in the archive.
Press F12 to open the action menu and choose the option Send CSV-file to myself. A spreadsheet file is created and sent to the user's email.
A Preventive Action is an action to prevent the occurrence of a potential nonconformance, such as harmful behaviors or processes.
Enter the Quality Report Archive (QAR).
Click the Create New icon to create a new QAR.
Choose which type of category the issue sort under using the drop-down menu called Category.
Choose the type of sub-category the issue will sort under using the Type drop-down menu.
The Subtype field is either drop-down menu, based on the previously chosen categories, or free text fields. The Case field is always a free text field.
The field Reported By can be entered with the PID of the person who reported the issue.
The Review dropdown menu has two option, Pending and Reviewed. Choose if you want the issue to go through a review process. This flags the issue and makes it visible when filtering.
Click the magnifying glass called Grouping to open the QAR Grouping popup window. Here you may choose which department (DepNo field), project (PrjNo) and the Assets menu (AstNo) the issue will be related to.
Add a description in the description free text box, together with any notes & attachments you want to connect to the issue.
The next step is to forward the report to the next attendant which this is accomplished by pressing the Register button. The status will then change from 1 to 2, and a new folder, Temporary actions, becomes active. The new folder will typically be handled by the next attendant.
Open the Temporary actions folder and enter a description of the temporary action.
The Deadline will be set default to todays date. Keep this, or edit it if you need.
If the issue is lacking details, it may be returned to the original creator for supplemental information using the Return button.
Choose the Next Casehandler using the person icon.
Register the temporary actions using the Register button.
When a report on preventive action in status 2 is registered, the status is updated to 3, and a new folder, Cause, is now active.
Open the Cause folder
Select a Cause type
Write a supplementary description of the cause
Choose the Next Casehandler using the person icon.
If the issue is lacking details, it may be returned to the original creator for supplemental information using the Return button.
Register the cause using the Register button.
When a report on preventive action in status 3 is registered, the status is updated to 4, and a new folder, Corrective actions, is now active.
Open the Corrective actions folder
Select an Action type
Write a supplementary description of the corrective action
Choose the Next Casehandler using the person icon.
Register the cause using the Register button.
The Risk Assessment folder is not mandatory, but is recommended.
Choose the most fitting option in the Recurrence Probability dropdown menu.
Choose the degree of severity in the Severity dropdown menu.
The date/signature is set automatically.
Open the Verification folder
Write a supplementary description of the verification if needed.
Choose the next casehandler.
Register the cause using the Register button.
If you need to connect the issue to an article, press F12 to open the action menu and choose the option Link to ART. If this is chosen, choose the desired article and press ENTER. There will now be a reference to the article in the QAR document. All articles with a QAR document related will have this document listed when you click the QAR Documents icon in the ART document.
QAR may also be created from a series of other documents such as CUS, SUP, PWO and LCM in addition to ART. Please look for the QAR Documents icon in the upper right corner on the document.
Complaints and returns covers both a quality issue process and a complex logistics overview. In addition to register a quality issue, this process gives to the possibility to follow up the operational handling of a complaint dependent of a set of complaint and return scenarios.
Complaint from customer is registered.
The customer complaint is followed up.
Handling of the financial aspects of returns or complaints.
The situation concerning complaints and returns can involve a complex logistical process with return of goods, repair or re-delivery, return to your suppliers and the financial impact this has. All these details need to be registered correctly and followed up through several steps. The reason for that is to ensure a clean and efficient complaint or return situation which result in the continued business relationship with the customer or supplier. Another aspect is the financial situation. A return situation will inevitably cause a financial disorder, which needs to be handled correctly so the ledger is true.
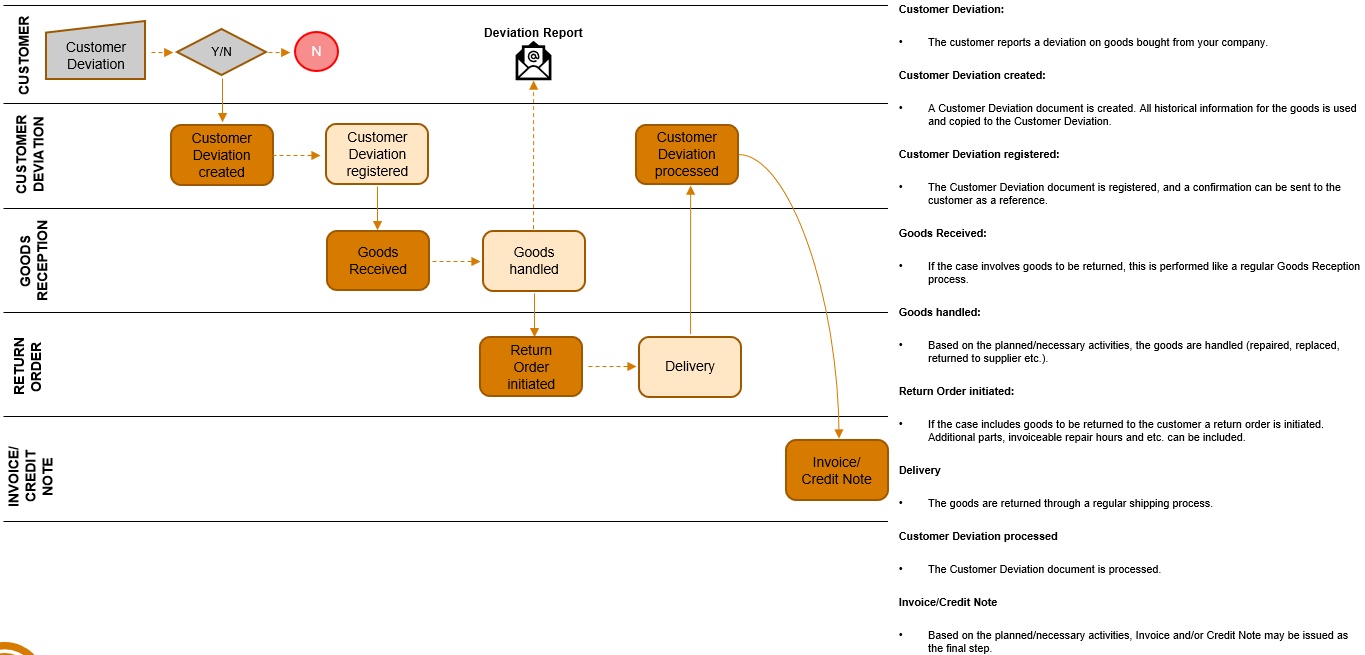
Create a customer deviation document - The customer deviation is registered in a specific document for further processing.
Follow up on the complaint workflow - The complains are set in a workflow where the issues are followed up.
Handle the accountancy impact - The solutions performed may have financial impacts which needs to be resolved for the accounts.
Create a supplier return document - If the quality deviation comes from the supplier side, the issue is registered as a supplier issue.
Setting name | Description |
Account for Repair Order from Deviation (CDV) | Value in this setting is the Account that should be used on Sales Order (COA) created from the Repair of loan process on a Deviation (CDV). Format to be used: NNNNNN (N for numbers) |
Autoforward Sales Invoice/Sales Credit Note (CIN/CCN) from Deviation (CDV) | If this setting is "ON" - the Sales Invoice/Sales Credit Note (CIN/CCN) will be autoforwardet to status 4 when using the option 'Account Action' on Deviation (CDV) |
Deviation (CDV) - Copy Freight to new Sales Invoice (CIN) | If this setting is 'ON' - On a Deviation (CDV) with 'ship replacement' or 'repaired product', the new Sales Invoice (CIN) that is created will get Freight copied from the original Shipping Advice (CSA) - the Source on Deviation. If there is a Sales Invoice in status=1 or 2, an item will be added to this one, and the freight will be copied into this document |
Product (ART) for ServiceTime | Value in this setting is a ProductId (e.g. ART/#100000) used for Service hours at 'Service Deviation' (CDV). An item will be created at the Sales Order Item (COA-ITM) for the used Service time. Format to be used: ART/#NNNNNN (N for numbers). NOTE: Setting is only used by the customer Hatteland Display |
Require Approval on Invoicing and Crediting from Deviation (CDV) | If this setting is 'ON' - Deviation (CDV) with AccountAction=Creditnote or Invoice will get status=7 when the goods are received from Customer. The option 'Released for Account Action' must be done before the Sales Credit Note (CCN) can be created. If the setting is 'OFF' - The Deviation will go direct to status=4 when goods are received from Customer |
Service Model | If this setting is "ON" - Customer is using the old Service Model in Rambase. Only used by Hatteland Display |
Set Linking Blocked in SAP for CusReturn Goods Reception (SSA) | If setting is 'ON' - Set Linking Blocked in default SAP that is created when CusReturn Goods Reception (SSA) is registered |
Status on Customer returned Supplier Shipping Advice (SSA) | Value in this setting is either Status '3' or '9'. When you registrate a Supplier Shipping Advice (SSA) marked as CusReturn (Customer Return), the Shipping Advice will get Status 3 or 9 depending of the value in this setting. |
There are several ways of creating a Customer Deviation (CDV) document. You can create it directly from a Shipping Advice (CSA) item, from the Life Cycle Management (LCM) part list, or create a new one from the CDV archive.
The easiest method of creating a CDV is from the Shipping Advice (CSA). When created from the CSA most relevant information is already filled in. Use the context menu option make Deviation Document and follow the same steps as when CDV is created from the CDV menu, from step 2.
Write CDV in the program field and press ENTER. Click the Create new CDV button.

Enter the necessary information in the popup. The fields to the right in the popup will be populated with the information as you enter it.
Customer: Choose the customer (mandatory)
Shipment: Choose the CSA. If this is chosen, you will be able to choose serial numbers from a list compiled of serial numbers from the CSA in question.
Serial No: Choose the serial number
Product: Choose the product (mandatory)
When you have entered sufficient information, the Next button will appear. Click this to proceed.
You will now need to enter the deviation type and what caused the deviation in the drop down menus. The choices taken in the first dropdown decides the third dropdown, where the result of the deviation is entered. Click the Create Document button to go to the CDV document you have created.
Press F12 and choose the option Forward to Register. This will set the CDV document to ST:2. Depending on the Correspondence settings, a notification will be sent out to the recipient(s).
Depending on the deviation type, the different actions to take next will be defined in the Actions and Calculations folder. Press F12 to open the action menu and choose the appropriate option for your desired next action.
Depending on the deviation type and deviation codes chosen, a new document will be created, either an SSA for the customer to return the goods, a credit note if the price needs adjustment or other document based on the previous chosen options. Click the document link and proceed with the document you have entered.
Based on the alternatives chosen earlier, you will need to complete the process with the documents which has been created during the CDV process.
The most important fields in a CDV document are the DevType, which states the type of deviation, and CausedBy, which states the cause of the deviation. These fields control the further handling of the document based on the scenarios defined in the Customer Deviation Codes (CDC) archive. RamBase will offer suggestions on how to handle the document based on these scenarios, but hey may also be ignored as the document is in editing mode.
The deviation document will often need to be sent by e-mail, either to one or several recipients from the customer side. It may also be sent to yourself first if you want to double check all information in the output. The recipients are controlled by the Customer Contacts (CNT) archive as the contacts are defined here.
The deviation document will normally be sent following the default settings in RamBase at the time of registration, but it may also be sent subsequently if desired. This may be done by pressing F12, or right click, to open the action menu and choosing the option Print Copy/Resend. Then you choose if you want to send the original or a copy, and the method of sending.
To register the deviation document, and subsequently send it to the desired recipients, you must press F12, or right click, and choose the option Forward to Customer. This action assumes you have selected cause and deviation type in the CausedBy and DevType fields.
If you want to edit the deviation document after registration, press F12, or right click, and choose the option Open for Edit.
The CDV is now registered, and depending on what action registered as expected you may proceed with the processing as desired.
The operator sets the deviation type and the corresponding deviation handling code. A deviation handling code decides which warehouse, financial and cost actions that should be carried out in the complaint case. Each deviation type can be set with a default deviation handling code. Therefore it's possible to only make the operator pick the correct deviation type if wanted.
Complaints are followed up from the action and calculation tab on the deviation document. Warehouse transactions regarding the complaint are handled at the warehouse, and the flow of goods are registered on the deviation document. Deviation handling and cost and financial transactions are carried out from the deviation document.
Based on the promised and actual delivery date, on both in- and outbound logistics, a detailed overview of delivery performance is automatically calculated by the system.
Overview of customer delivery performance.
Export the details to spreadsheet file.
Keeping an overview over the quality situation can be challenging without proper tools. In a company where quality issues are resolved ad-hoc, there will be no clear statistics regarding the company’s quality issue, and the issue may worsen before the proper steps are taken. RamBase can produce reports which details these issues clearly, which again enables the company to take the necessary steps to avoid these in the future. These reports can also be exported as Microsoft Excel files.
Inspect delivery performance statistics - The reports detailing the delivery performance statistics can be run and exported to several different file formats and can include several different statistics and details regarding the deliveries.
DPS is an application which can be used to view statistics about confirmed and requested delivery date calculations for customers and suppliers. The application shows if deliveries has been done early, on time or late.
To start the application, write DPS in the program field and press ENTER.
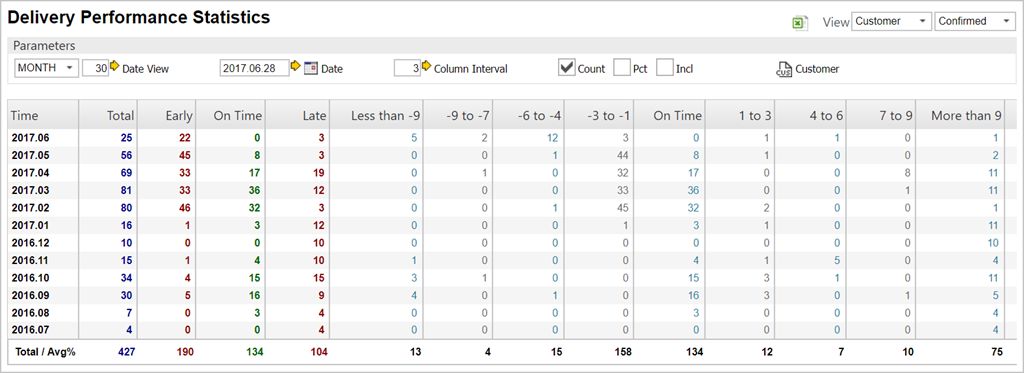
Time - This column shows the date intervals.
Total - The blue column shows the total amount of deliveries in the defined interval.
Early - The red column contains information regarding all early deliveries.
On time - The green column lists all deliveries that have been on time.
Late - The last static column, which is also red, shows all the deliveries that has exceeded their delivery date and is listed as late.
The rest of the columns are dynamic and shows detailed information on deliveries by the user-defined parameters set in the parameters-box.
Column Interval - The Column Interval field indicates the interval used by the detail columns below, with a default set to 3 days.
Count checkbox - This checkbox gives the user the opportunity to show, or hide, the totals.
Pct Checkbox - This checkbox enables the percentage of delivery differences to be shown.
Incl Checkbox - This option ebables the user to filter non-confirmed and non-requested shipping documents.
The algorithm for calculating the required and confirmed date is stored in a batch program which runs every night in RamBase. The calculated values are stored in the CSA and SSA document fields DPCONF and DPREQ. When the batch program is not able to perform the calculation, these fields gets the value 0.
The first column in the application is showing the date intervals.
The blue column is the total number of deliveries.
The green column is showing statistics about deliveries done on time.
The red columns contains information about early and late deliveries.
The remaining columns in the application are showing detailed information about deliveries, based on a given day interval.
First the user needs to select if the application shows statistics about customers or suppliers. This choice is found on the upper right corner drop-down list. Default view is set to customer.
The user can also choose which view should be started by simply writing DPS / CUS or DPS / SUP in the application command line field. To select between confirmed and requested, use the second drop-down list in the upper right corner of the application.
The application is by default showing statistics on monthly basis, starting on todays date. The default column interval is set to 3 days. All parameter choices are found on the parameters task bar.
In the first field select the date view you want the statistics to be presented in.
If you choose the DAY INT (day interval) default interval is set to 30 days. This can changed by the user.
StartDate is by default set to today's date, but can be changed by the user in the date field. Or simply click the calendar icon to choose the Startdate from the calendar. Date format is YYYY.MM.DD.
The column interval field is used by the detail columns. The detail columns contains information about deliveries done early, on time and late on a given day interval. Default is set to 3 days, but this can be changed based on the users' needs.
The Count checkbox is used for showing and hiding totals.
The Pct checkbox is used for showing and hiding percentages.
The Incl checkbox is used to include non-confirmed and non-requested shipping documents. By default the application is including early, on-time and late shipments.
An early shipment is a document with DPCONF or DPREC value less than 0. A late shipment is a document with DPCONF or DPREC greater than 0.
An on-time document is a document with DPCONF or DPREQ equal to 0. In addition, CONF or REQ date is required.
When checking Incl, non-confirmed and non-requested documents are included. A non-document has the value 0 in DPCONF or DPREQ and does not have a CONF or REQ date.
Checking Incl has impact on calculations in the total and percentages columns. The non-confirmed and non-requested totals and percentages are shown in own columns.
Blank, null and values starting with “N/A” are not included in the report.
When reconfirming an order where one chooses CausedBy=Supplier/Customer, RamBase will skip this order acknowledgement (SOA/COA), and look at the first registered order acknowledgement. This is done to ensure the correct statistics regarding too early/too late delivered. If one agrees with the new confirmed date one should enter CausedBy = US and RamBase will use the new confirmed date, since this was agreed on.
By default, the application is showing statistics for all customer or suppliers. To filter this information, press the Customer or Supplier icon on the parameter task bar.
This brings up the Customer or Supplier popup window where the user can filter the statistics shown in the application.
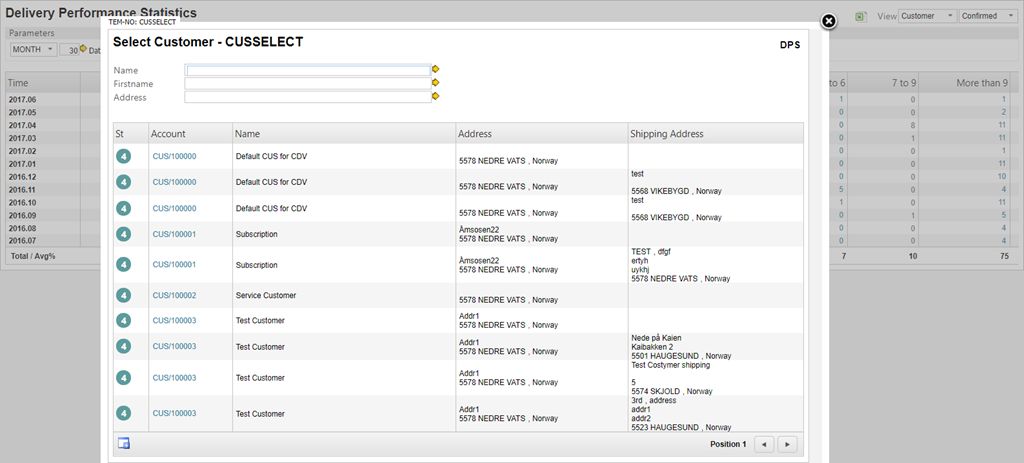
To remove the Customer and Supplier filters press the Remove Account Restriction icon.
You use the QAR widget to see the number of quality reports related to production, by month. The Y-axis gives the number of reports and the X-axis gives the months from January to December.
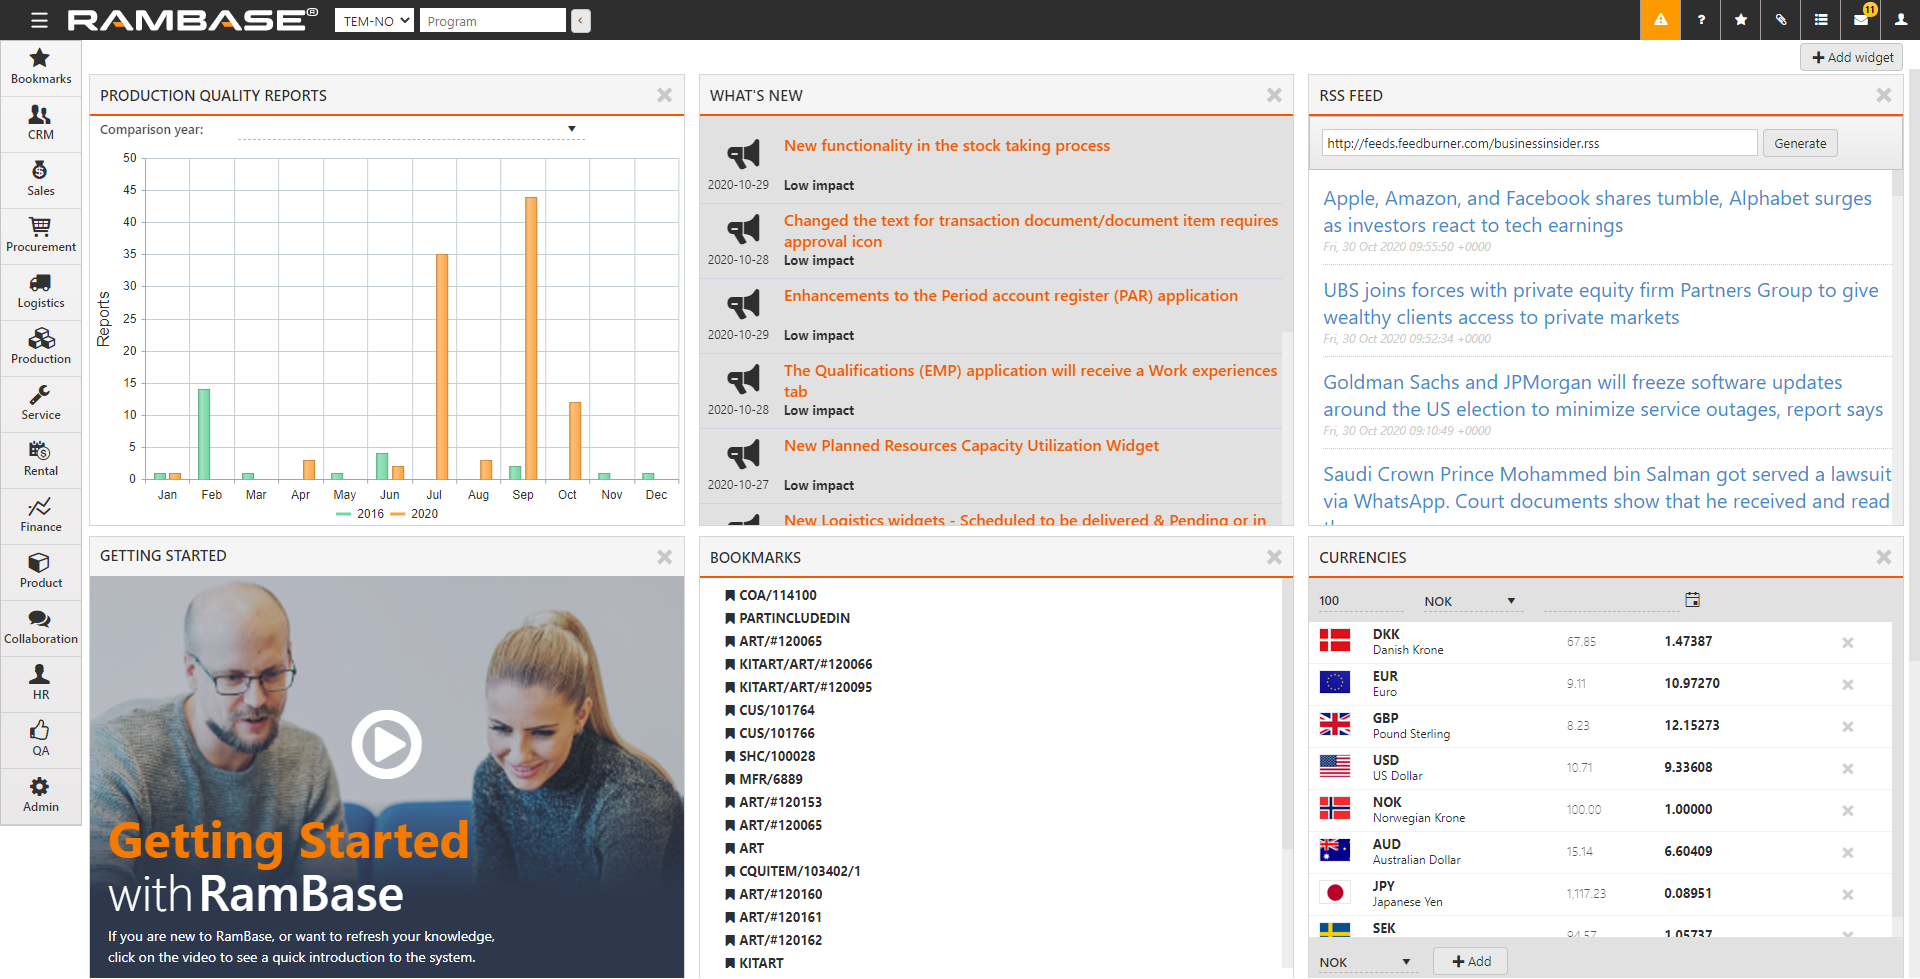
To add the QAR widget to your desktop, select
 in the desktop.
Select ProductionQualityReportWidget and select
 .
.To compare the number of reports in the current year with any year in the past 5 years, select the Comparison year from the list.

Hover over any bar, or the grid in the vicinity of a bar to see the month and number of reports in that month.

You can view the chart as one of four types by selecting the necessary Chart type in the list.
Bar. This is a typical bar chart that shows the data as color-coded bars.
Fluctuating Line. In this chart, the data is represented by color-coded lines.
Bar Stacked. In this chart, the bars for the comparison and current years are superimposed.
Accumulated line. In this chart the data is represented by color-coded, shaded areas.
